Windows & macOS
Introduction
This document serves as a general guide to the DASSET feature set. Please be advised that DASSET functionality is device-specific; hardware constraints may limit the availability of certain modules. Furthermore, PlanetX Labs maintains a policy of continuous integration. Consequently, documentation images and descriptions may differ from the production environment. Users should refer to the live DASSET interface for real-time feature verification and system status.
What is DASSET
The DASSET App provides the essential software framework for intelligent data management and collaborative AI workflows. Whether deployed for enterprise teams or personal use, the application provides a secure, local-first environment that bypasses traditional cloud restrictions. Through native integration with DASSET-supported devices, users maintain end-to-end control of their digital assets, ensuring that private data remains private while staying accessible from any platform, anywhere in the world.
DASSET Features
-
Cross-platform support: Available for Windows, macOS, iOS, and Android, ensuring a consistent user experience across different devices.
-
Access DASSET devices anytime, anywhere: Users can remotely access and manage their DASSET hardware devices from any location via the DASSET App.
-
Unified cross-platform experience: Provides a consistent interface and operational logic across operating systems and devices, reducing the learning curve.
-
Data synchronization and backup: Supports data synchronization and backup between DASSET hardware devices and end-user devices, ensuring data security and availability.
Application Scenarios
-
Personal data management: Synchronize and back up personal data across multiple devices to ensure data integrity and security.
-
Family data sharing: Share photos, videos, and other files among family members to enhance interaction and communication.
-
Team collaboration: Serve as an internal file sharing and collaboration platform for small teams or startups to improve efficiency.
Installation and Download
DASSET Download Links
Download from the DASSET official website: [Click to Download]
System Requirements
-
DASSET Windows version: Supports Windows 10 or later
-
DASSET macOS version: Supports macOS 11 or later
Multi-language Support
DASSET currently supports Simplified Chinese, Traditional Chinese, and English.
Installation and Execution
Windows Version
After the download is complete, run the DASSET_Windows_vX.X.X.exe file to begin installation.
To facilitate real-time synchronization and secure data transfer, DASSET must initialize several background network services. When prompted by the Windows Firewall, please click Allow to prevent service interruptions. Granting these permissions ensures that your sovereign data environment can communicate securely with all connected hardware and cloud endpoints.
macOS Version
After the download is complete, double-click the "DownloadedFile.dmg" file, then drag the DASSET application icon to the macOS Applications folder shortcut. macOS will begin copying the application.
Before installing DASSET, please allow apps from any source on your Mac.
-
Open System Preferences: Click the Apple icon in the top-left corner and select System Preferences, or press Command + Space to search and open.
-
Go to Security & Privacy: Click the Security & Privacy icon, then click the lock icon in the bottom left corner and enter the Administrator password to unlock.
-
Select Allow apps from Anywhere: Under the General tab, locate Allow apps downloaded from and choose Anywhere, then confirm.
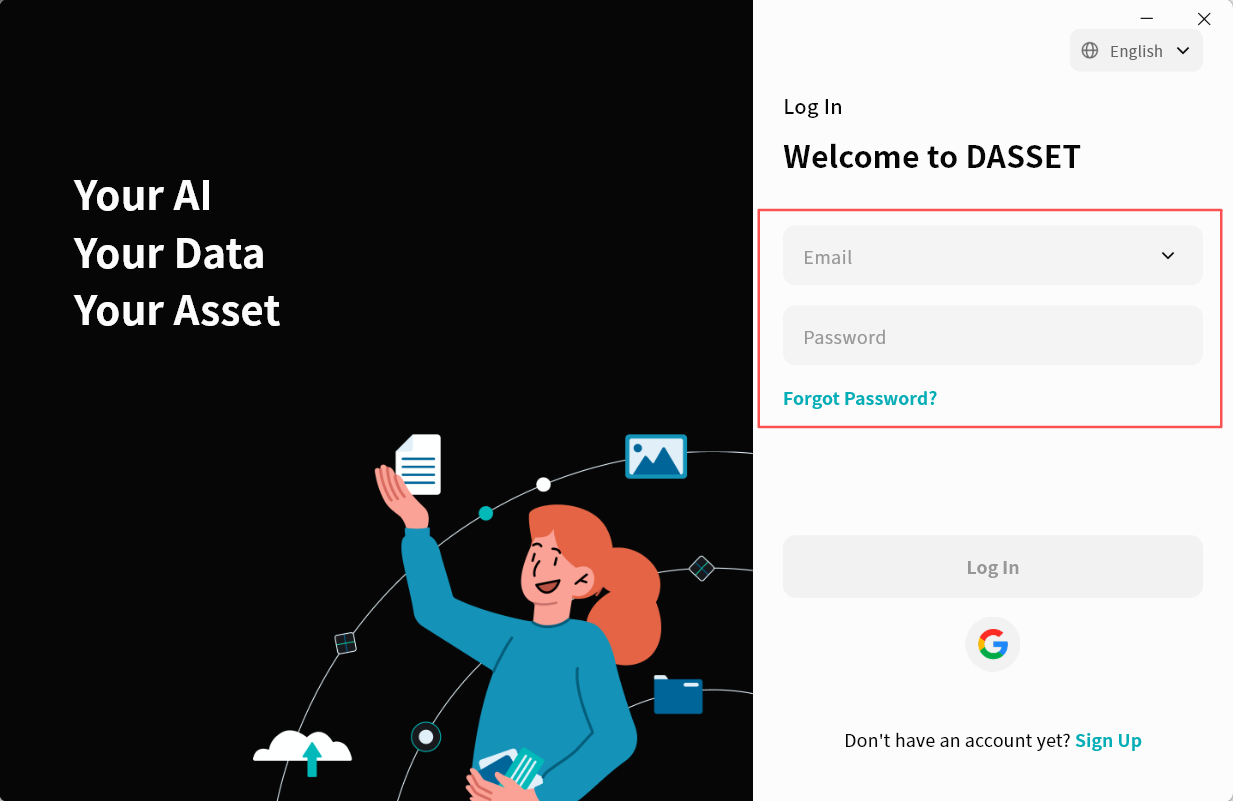
Registration and Login
When using DASSET for the first time, you will need to create an account.
DASSET supports both mobile phone numbers and email addresses as account credentials.
The current DASSET version for Windows and macOS does not allow mobile phone number registration.
DASSET empowers you to define your own security standards for Password Strength. For optimal protection of your sovereign assets, we recommend using a complex, high-security password to minimize potential privacy vulnerabilities.
If you forget your password, you can easily reset it on the DASSET login page by using the mobile phone number or email address registered with your account.
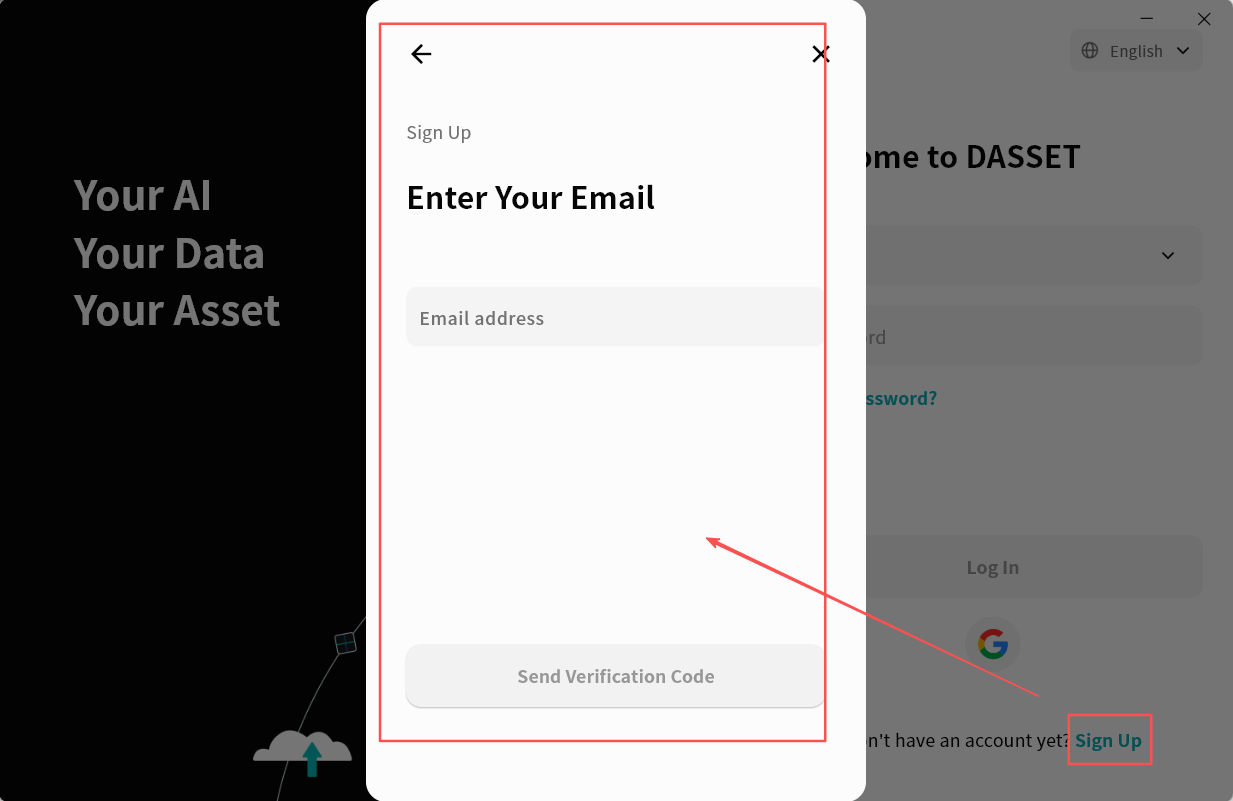
Registration
DASSET supports two registration methods: mobile phone number and email.
To register, click the Register button on the login page and follow the instructions to complete the account setup.
External security filters and aggressive ISP settings can occasionally intercept DASSET registration emails. If you have not received your Verification Code, please check your Spam folder.
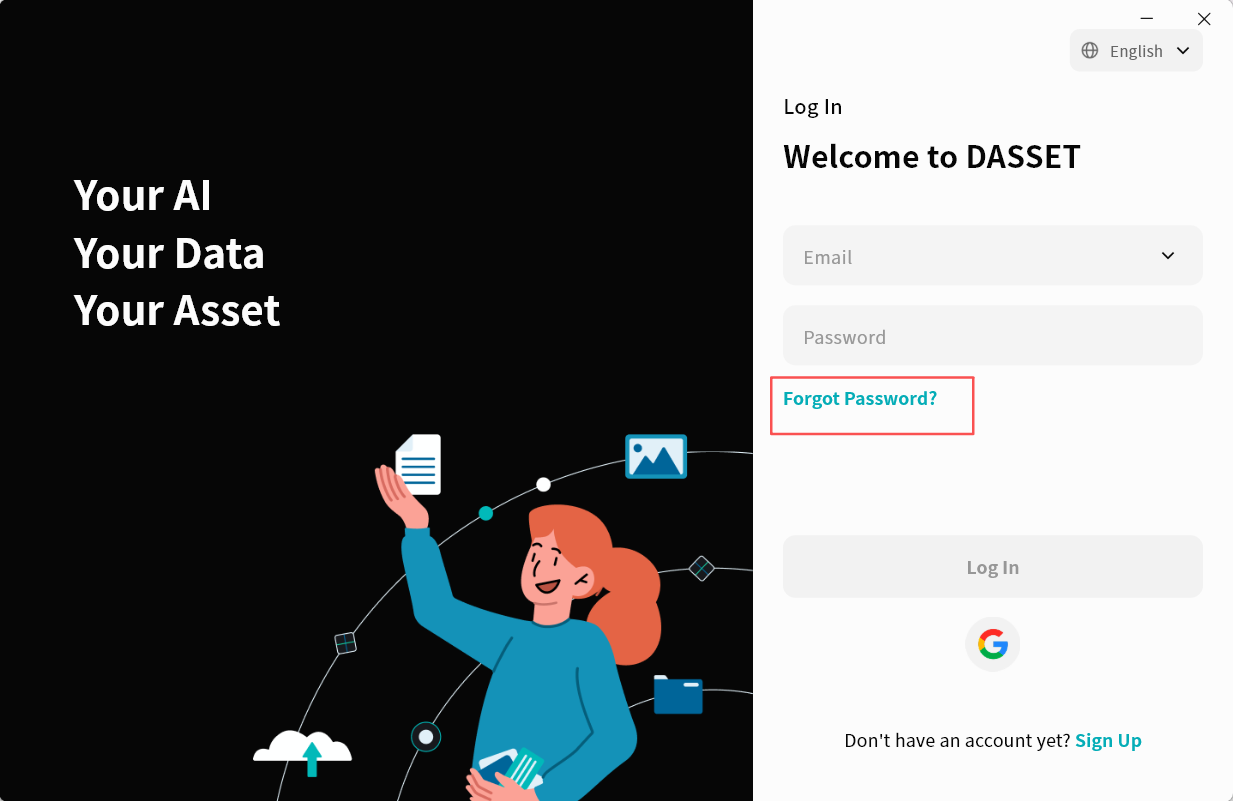
Password Reset
If you forget your DASSET login password, click Forgot Password on the login page and follow the on-screen instructions to reset your password.
Login
DASSET supports login via both email and mobile phone number.
Enter the email or phone number you registered with, along with your password, then click Login to proceed.
You may also click the dropdown arrow next to the account input field to select a previously used account (if saved) and log in directly.
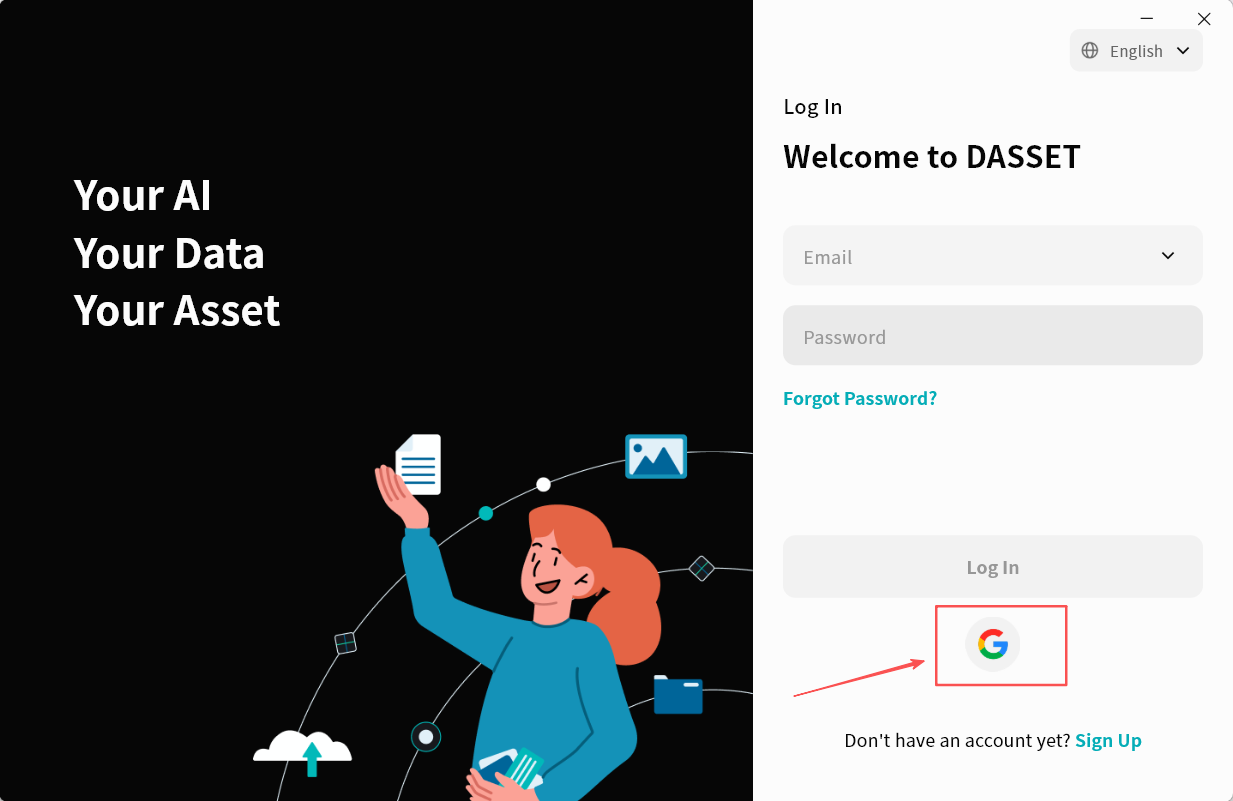
Quick Login with Google Account
You can log in to DASSET with one-click authorization using your Google account, without the need to register.
- On the DASSET login page, click the Google icon.
-
DASSET will open a browser and redirect to the Google verification page. Enter your Google account and click Next.
-
Enter your Google account password and click Next.
-
Wait for verification. When the page shown below appears, it indicates that Google verification has been successfully completed.
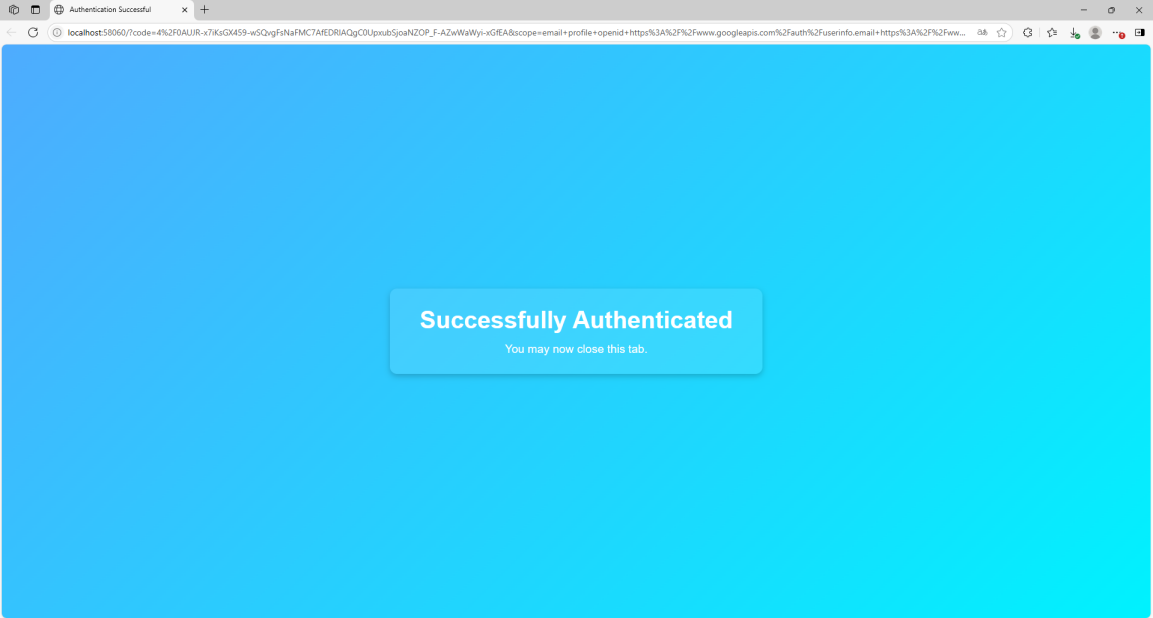
After verification, wait for DASSET to automatically complete the login process.
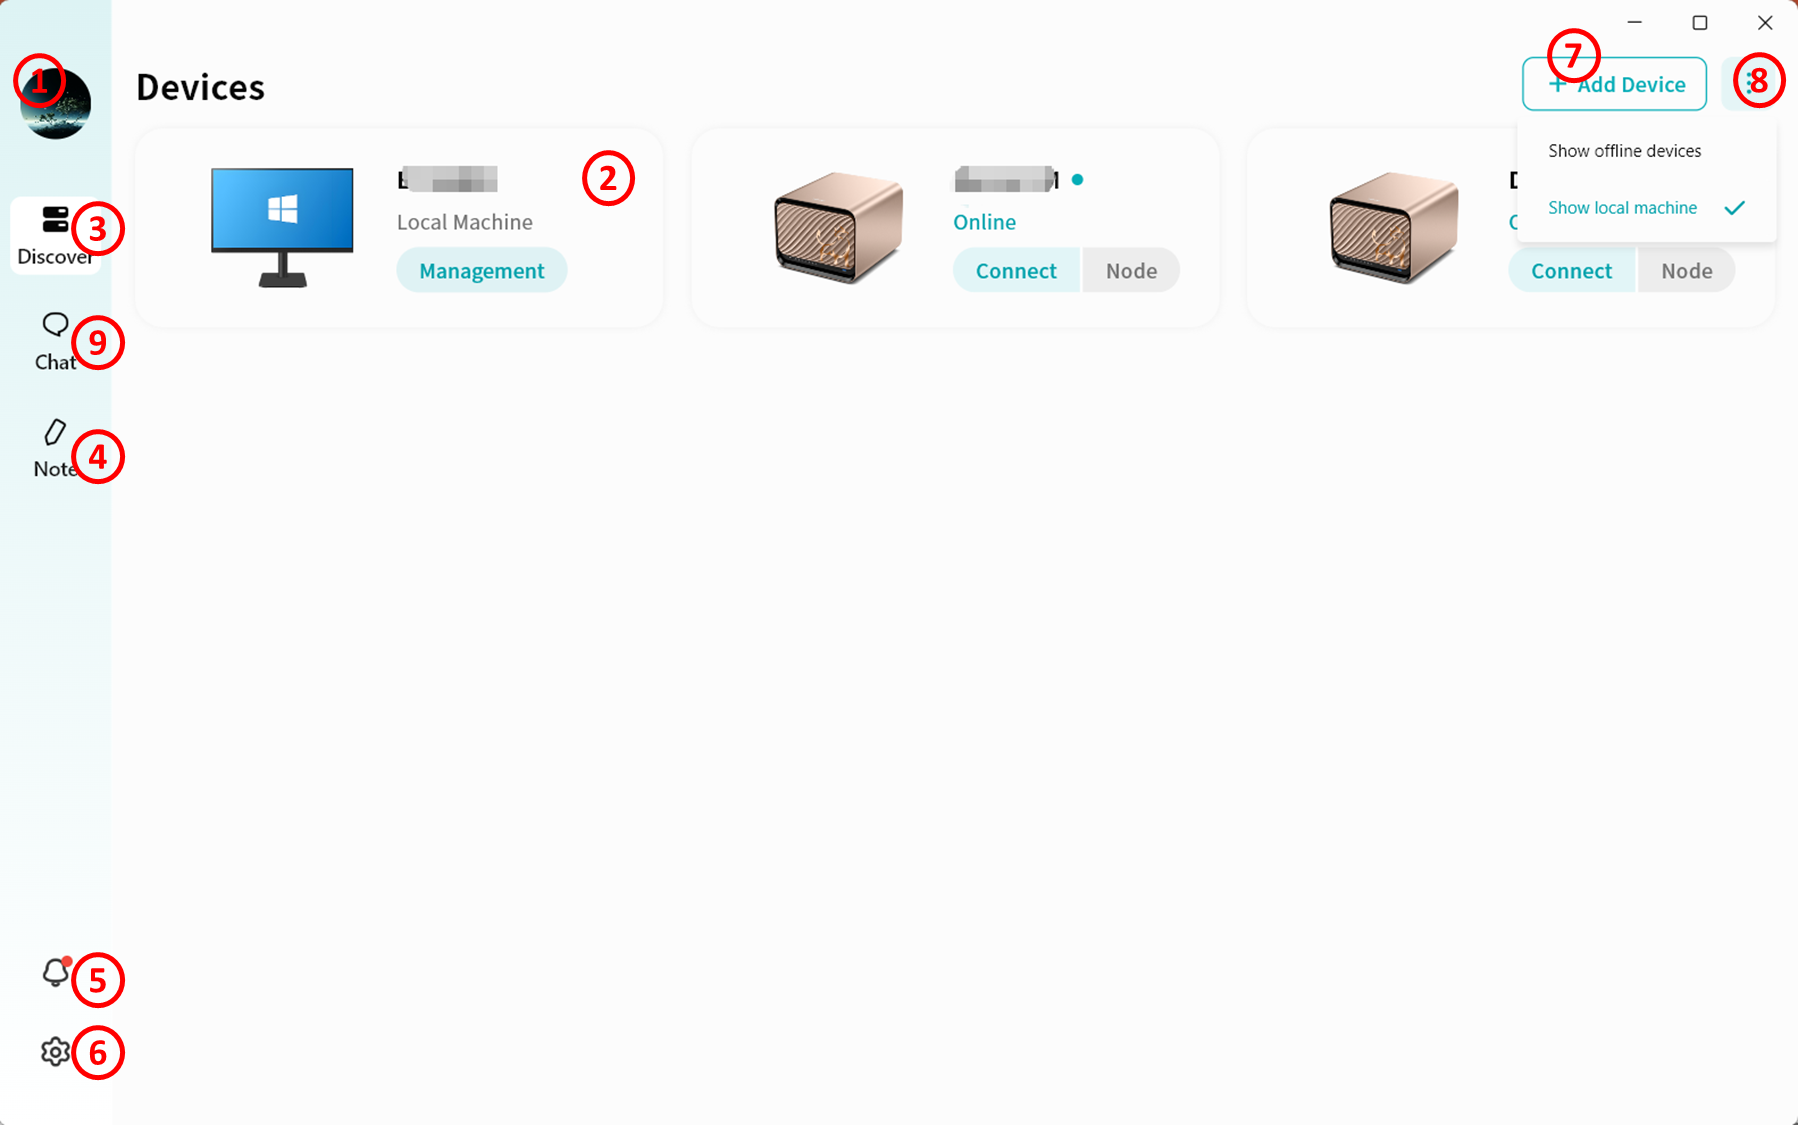
Device List Page
After completing the login process, you will enter the Device List Page. If you are accessing DASSET for the first time and have not yet added a new device, this page will blank.
On this page, a list of all available DASSET devices associated with your account will be displayed. From here, you can:
-
View connected devices and their status.
-
Select a device to access its functions and manage files.
-
Quickly switch between multiple devices for centralized control.
The Device List Page serves as the primary entry point for managing your DASSET hardware.
-
Account Avatar: Allows you to switch to another account or log out of the current account.
-
Device List: Displays all devices bound to your account, including both your own devices and those shared with you by others. The list clearly shows whether each device is online or offline.
-
Online/Offline status
-
Connect: Click to access the selected device.
-
Node: Click to use this DASSET device as a relay node for accessing the Internet. The node option only appears if the corresponding feature is enabled on the device. More details on the Node function can be found at here.
-
Device List Shortcut Button: Click this icon from anywhere in DASSET to return to the device list page.
-
Notes: Use DASSET's Notes feature to create, edit, and delete notes, while keeping them synchronized between your computer and DASSET devices.
-
Notifications: View device binding notifications here, including binding, unbinding, and binding requests.
-
Settings: Configure DASSET desktop client settings.
-
Add Device: Enter a share code to bind another user's DASSET device.
-
Show All/Online Devices:
-
Select Show All Devices to display all bound DASSET devices, whether online or offline.
-
Select Show Online Devices to display only devices currently online and accessible.
- Chat: Enter the chat function to communicate in real time with other users on the same DASSET device. All chat records are stored locally on that DASSET device.
DASSET Device Home Page
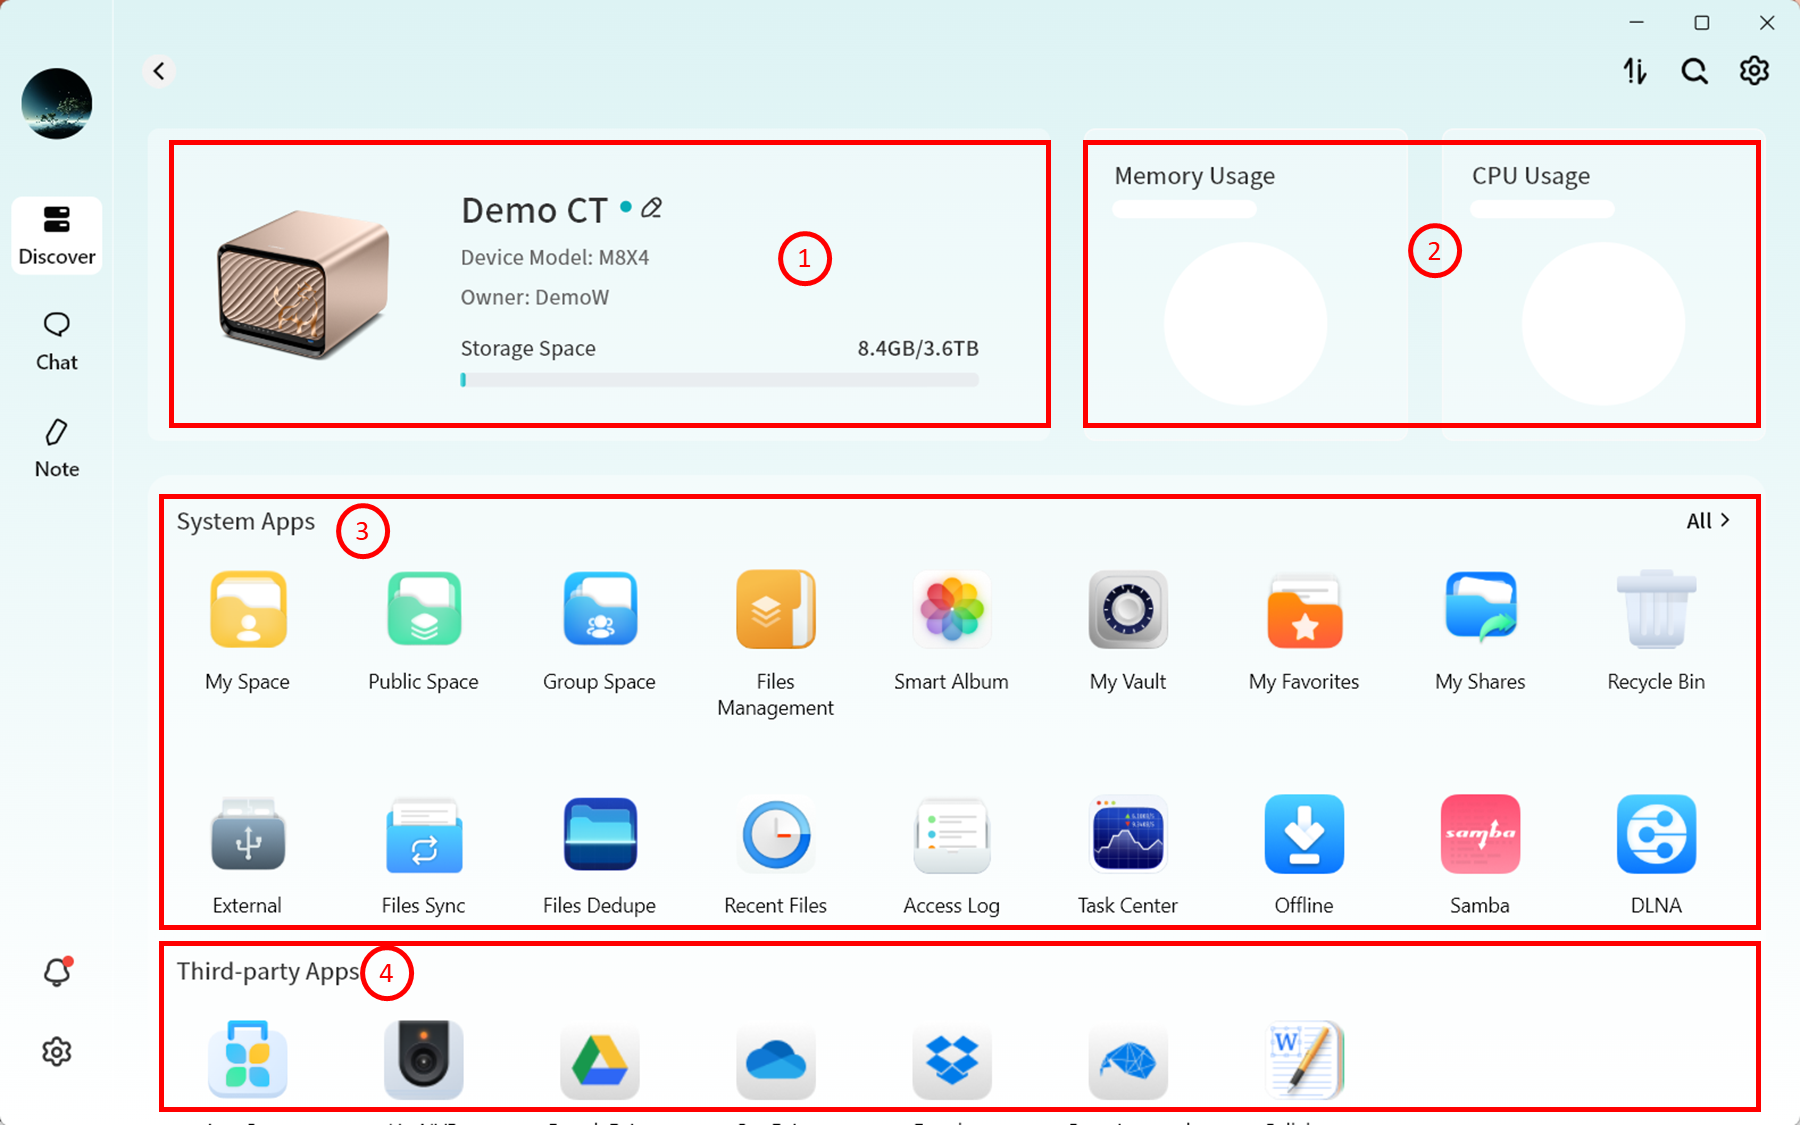
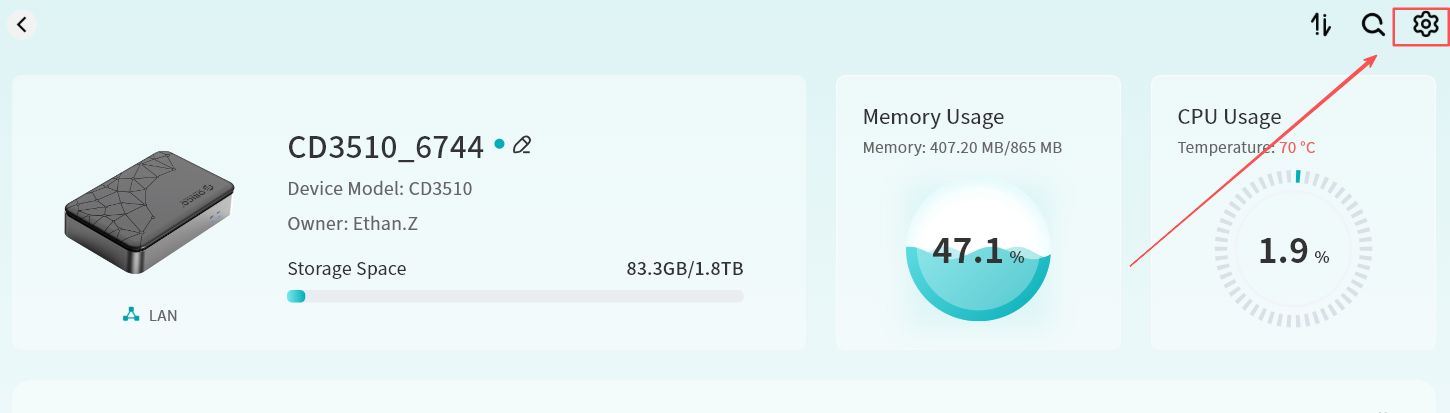
After clicking the Connect button for a device, you will enter the DASSET Device Home Page.
-
Device Status will display:
- Device name (click to edit remarks)
- Device model
- Device Owner account
- Storage usage
-
Hardware Performance Monitoring
- CPU usage
- Memory usage
-
System Applications
- Displays built-in DASSET system application icons. Click an icon to open the corresponding application page.
-
Third-party Applications
- Displays third-party applications available for installation on DASSET. Click an icon to install and use as needed.
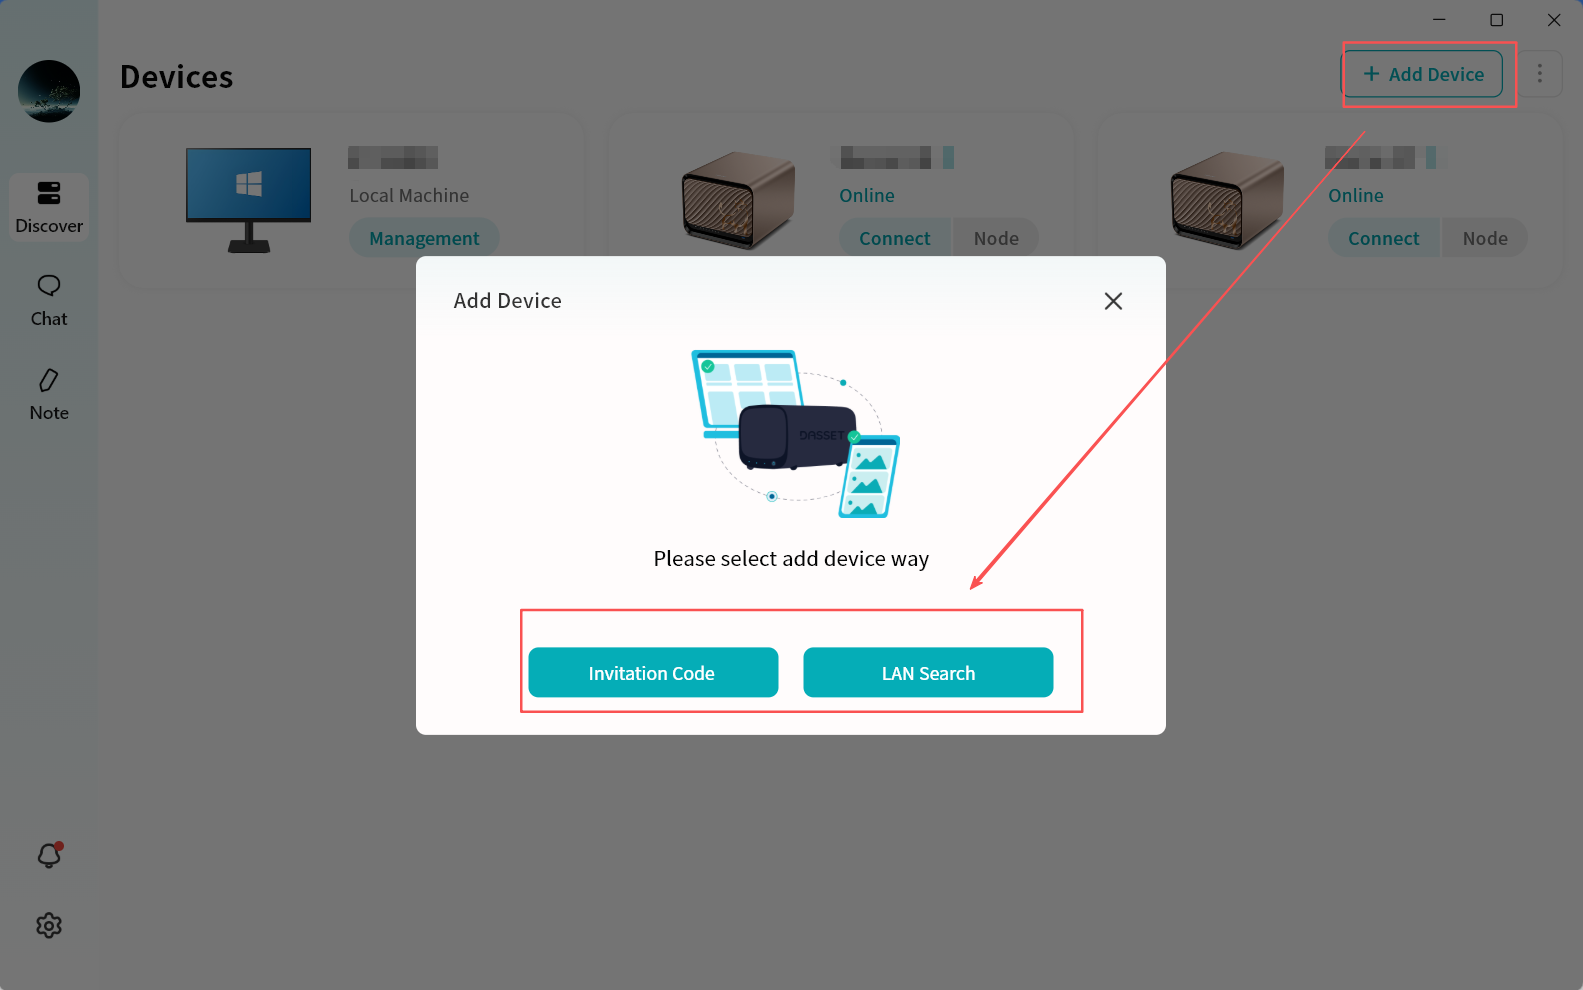
Adding Devices (Binding)
You can click the Add Device button on the DASSET home page and enter an invitation code to bind a DASSET device shared by others.
Methods of Adding Devices
"Add Device" supports two methods:
-
Invitation code: Enter the invitation code shared by another user to complete binding with their DASSET device.
-
LAN search: Search for all DASSET devices on the same local network as your terminal and bind them.
Add Device via Invitation Code
- Enter the Invitation Code provided by another user (usually an 8-character string).
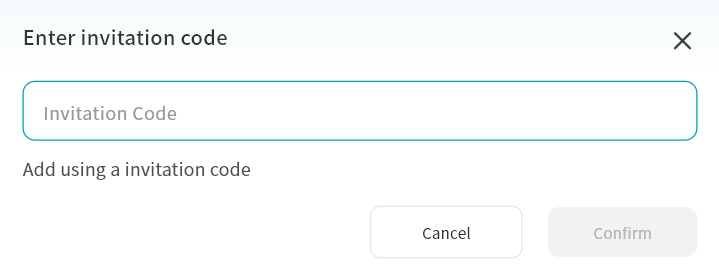
- Click Apply for Binding.
If the selected device requires Owner approval, the binding will only be completed after confirmation by the Owner.
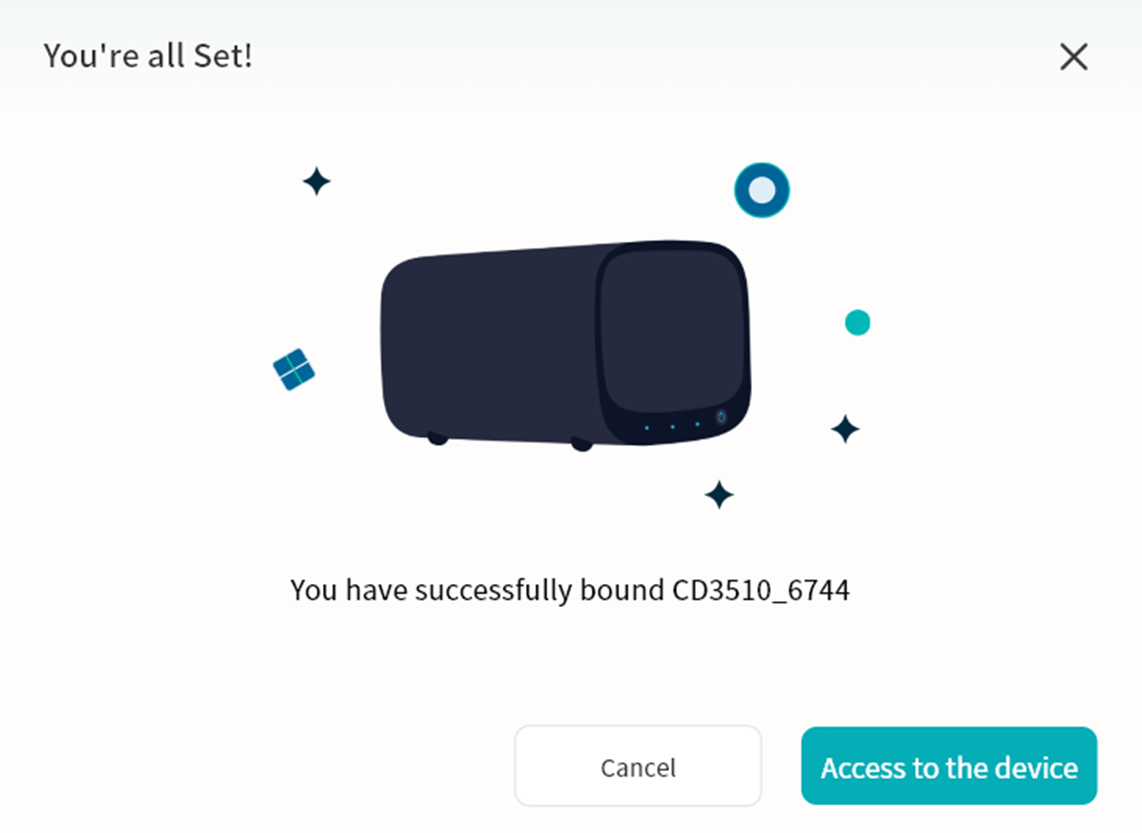
- Once binding is completed, the device will appear in your device list.
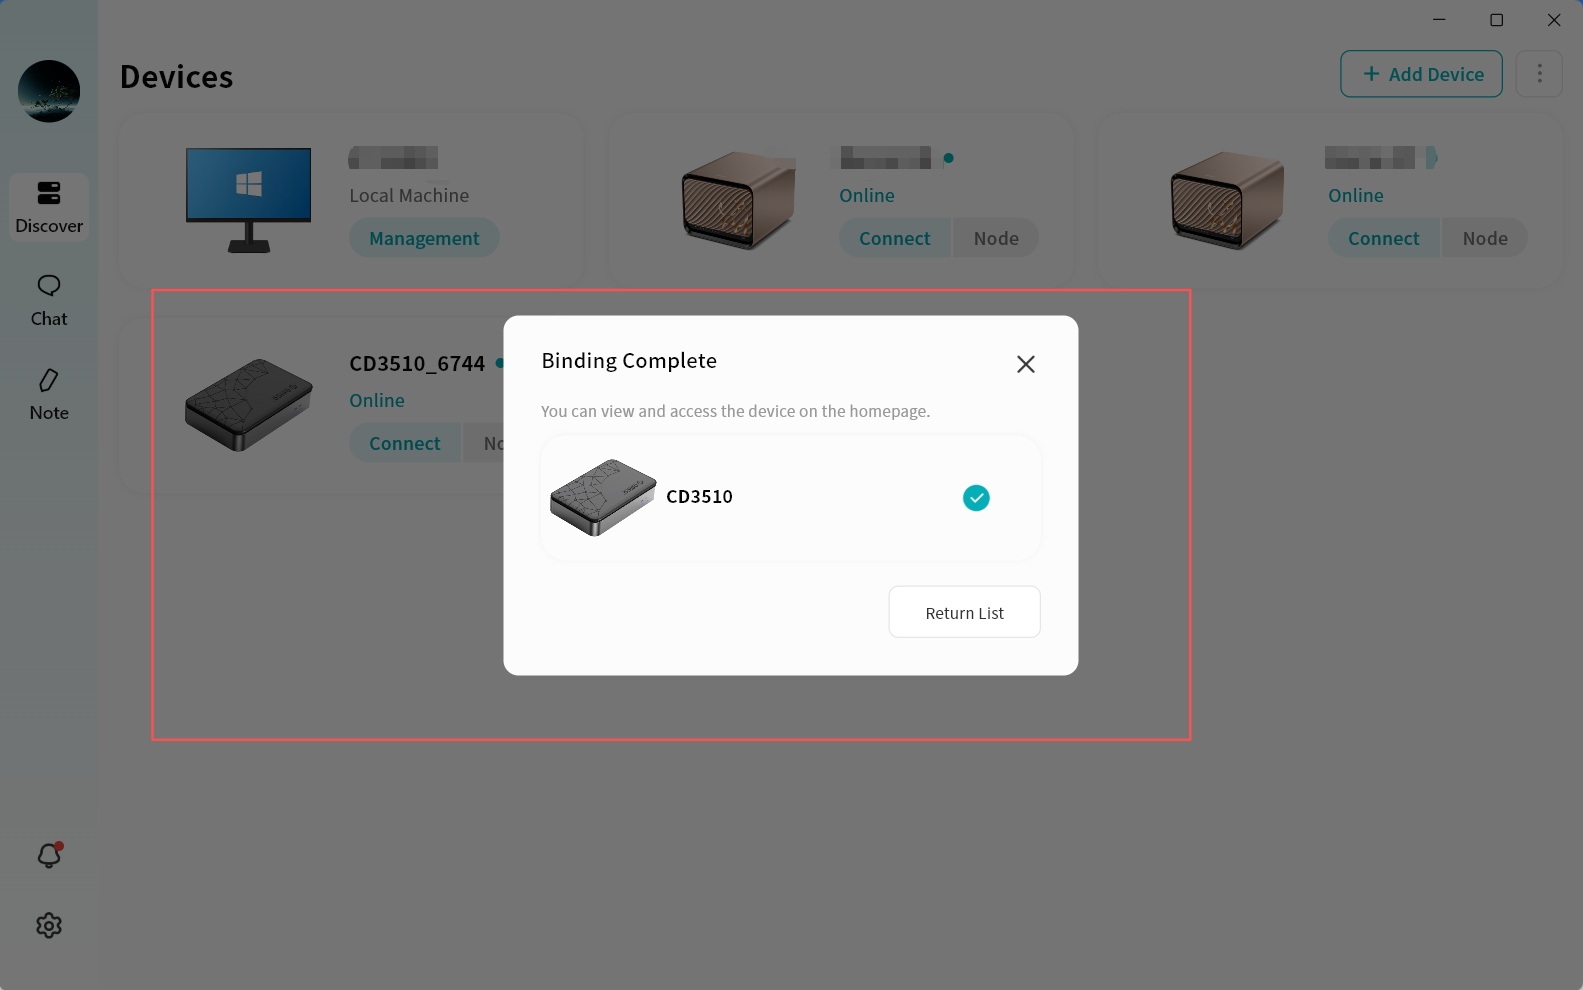
- Click the Connect button on the device icon to access the device.
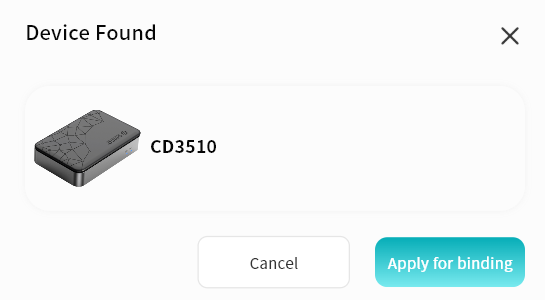
Add Device via LAN Search
-
Click Add Device LAN Search.
-
From the search results, select the desired device and click Bind This Device to complete binding.
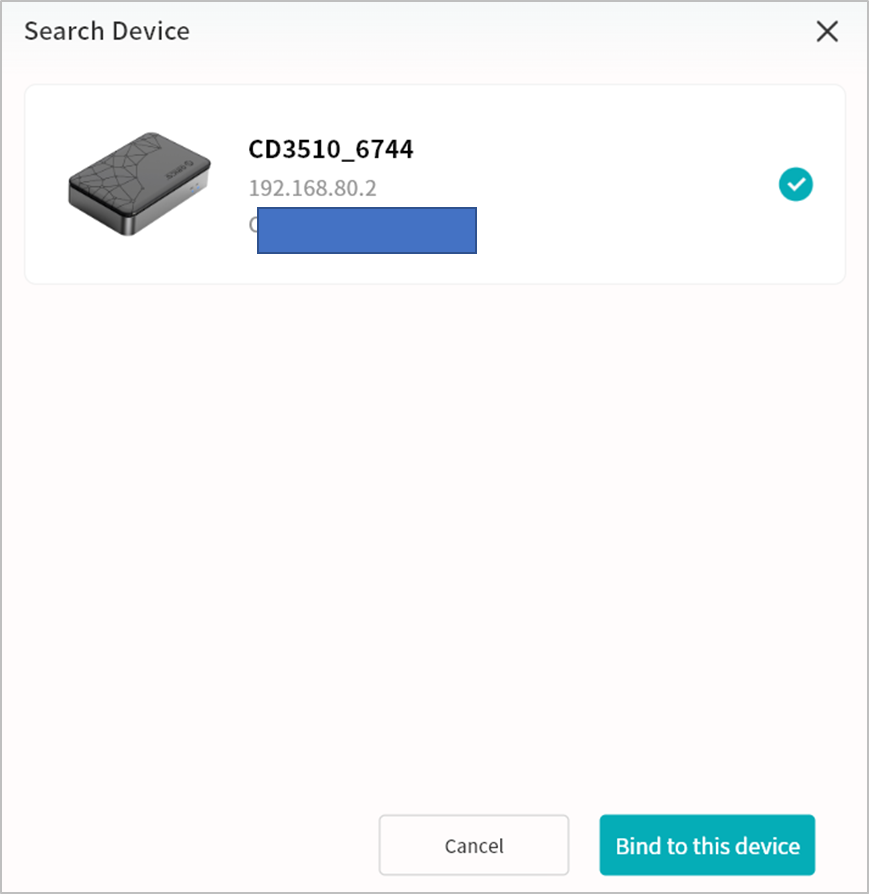
If the selected device is already bound to another user, LAN search binding will not be available.
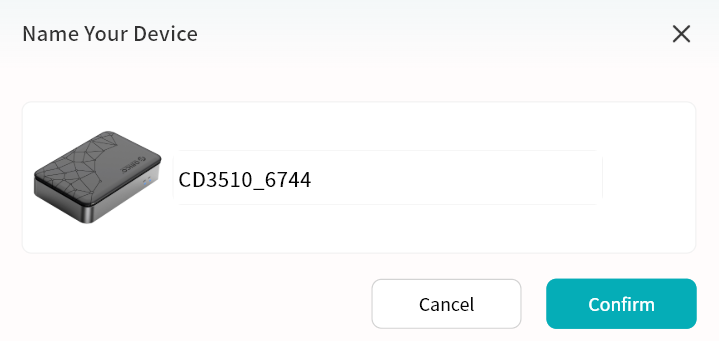
- Assign a custom name to the device for easier identification.
- After binding, click the device to enter its home page.
Device Unbinding
Owner Unbinding
The Owner can unbind their DASSET device. After unbinding, all users on this hardware device will be automatically unbound.
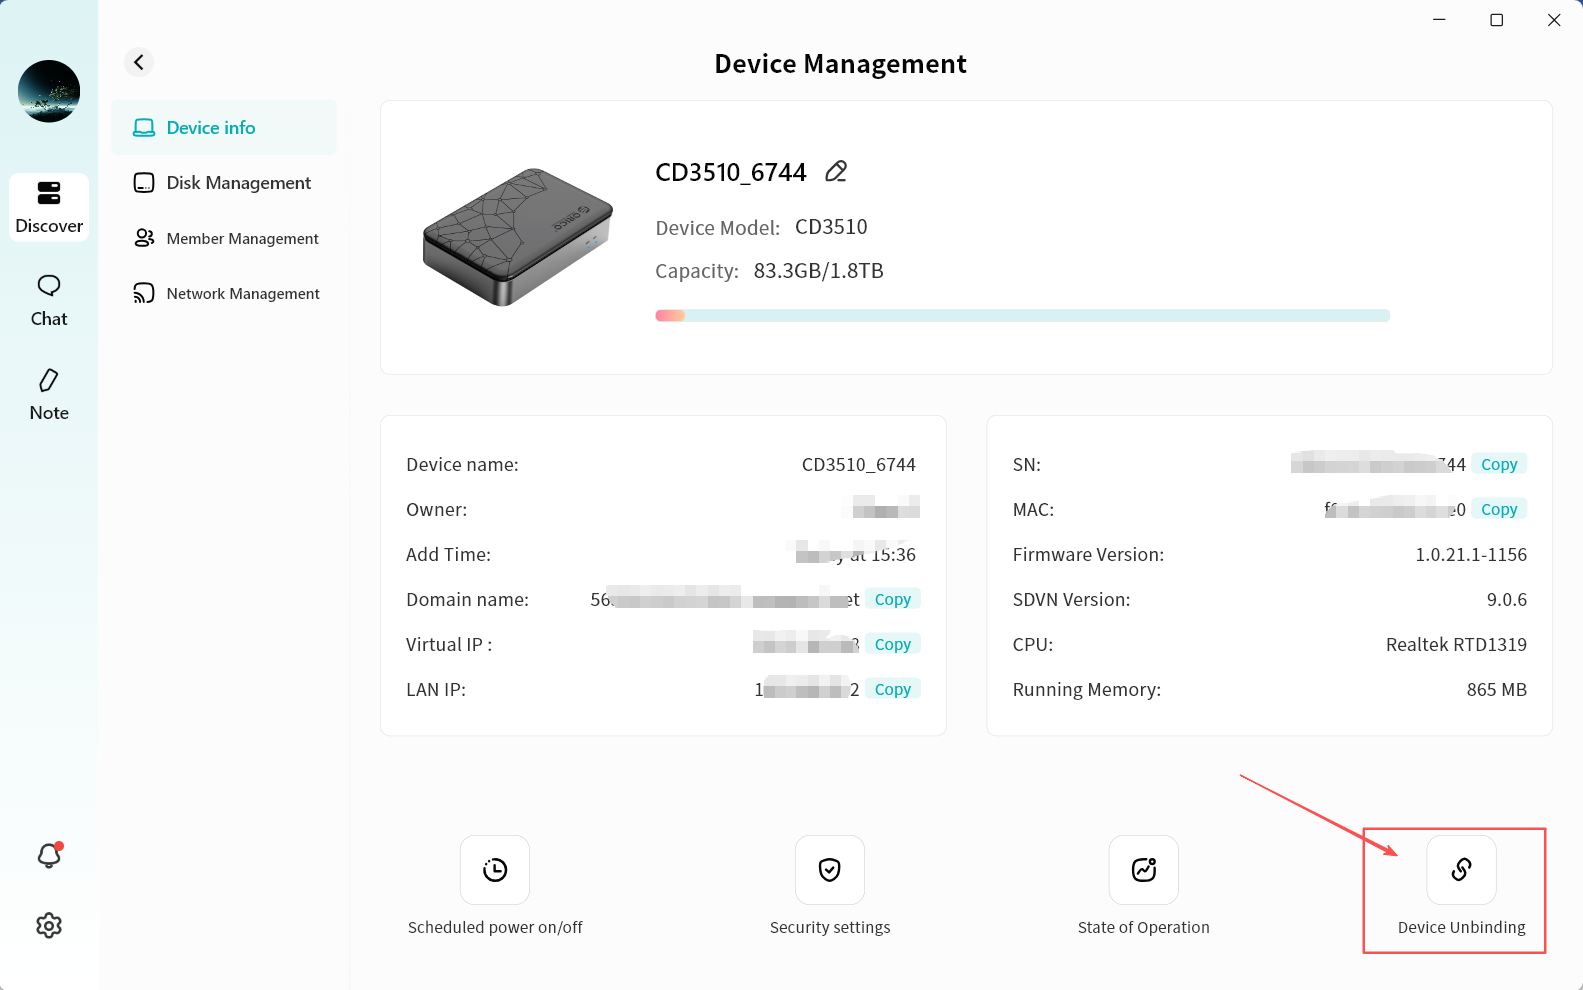
- Enter the device home page and click the upper-right corner.
- On the Device Management page, click Device Unbinding.
-
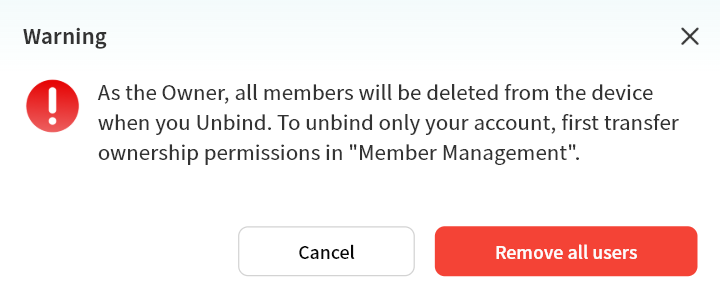
As the Owner, you will receive an unbinding warning.
-
If you do not wish to remove all members, you can transfer Ownership to another member before unbinding.
-
If you decide to proceed, click Remove All Members.
-
Ownership can be transferred to another member via Member Management.
-
-
In the pop-up window, enter your DASSET account and password.
-
If you no longer need the data stored on this device, it is strongly recommended to check Erase Personal Hard Disk Data at the Same Time.
-
Once selected, after your account is unbound from the DASSET device, all data in My Space will be automatically deleted to protect your privacy.
-

Member Unbinding
You can unbind from a device at any time. After unbinding, the device will no longer appear in your device list.
- Enter the device home page and click the upper-right corner.
- On the Device Management page, click Device Unbinding.
-
In the pop-up window, enter your DASSET account and password.
-
If you no longer need the data stored on this device, it is strongly recommended to check Erase Personal Hard Disk Data at the Same Time.
-
Once selected, after your account is unbound from the DASSET device, all data in My Space will be automatically deleted to protect your privacy.
-
Device Offline
When the device is offline, you can perform the following operations:
- Device Information
-
View basic device information, including device name, remarks (editable), device Owner, add time, and device SN.
-
Unbind from the device.
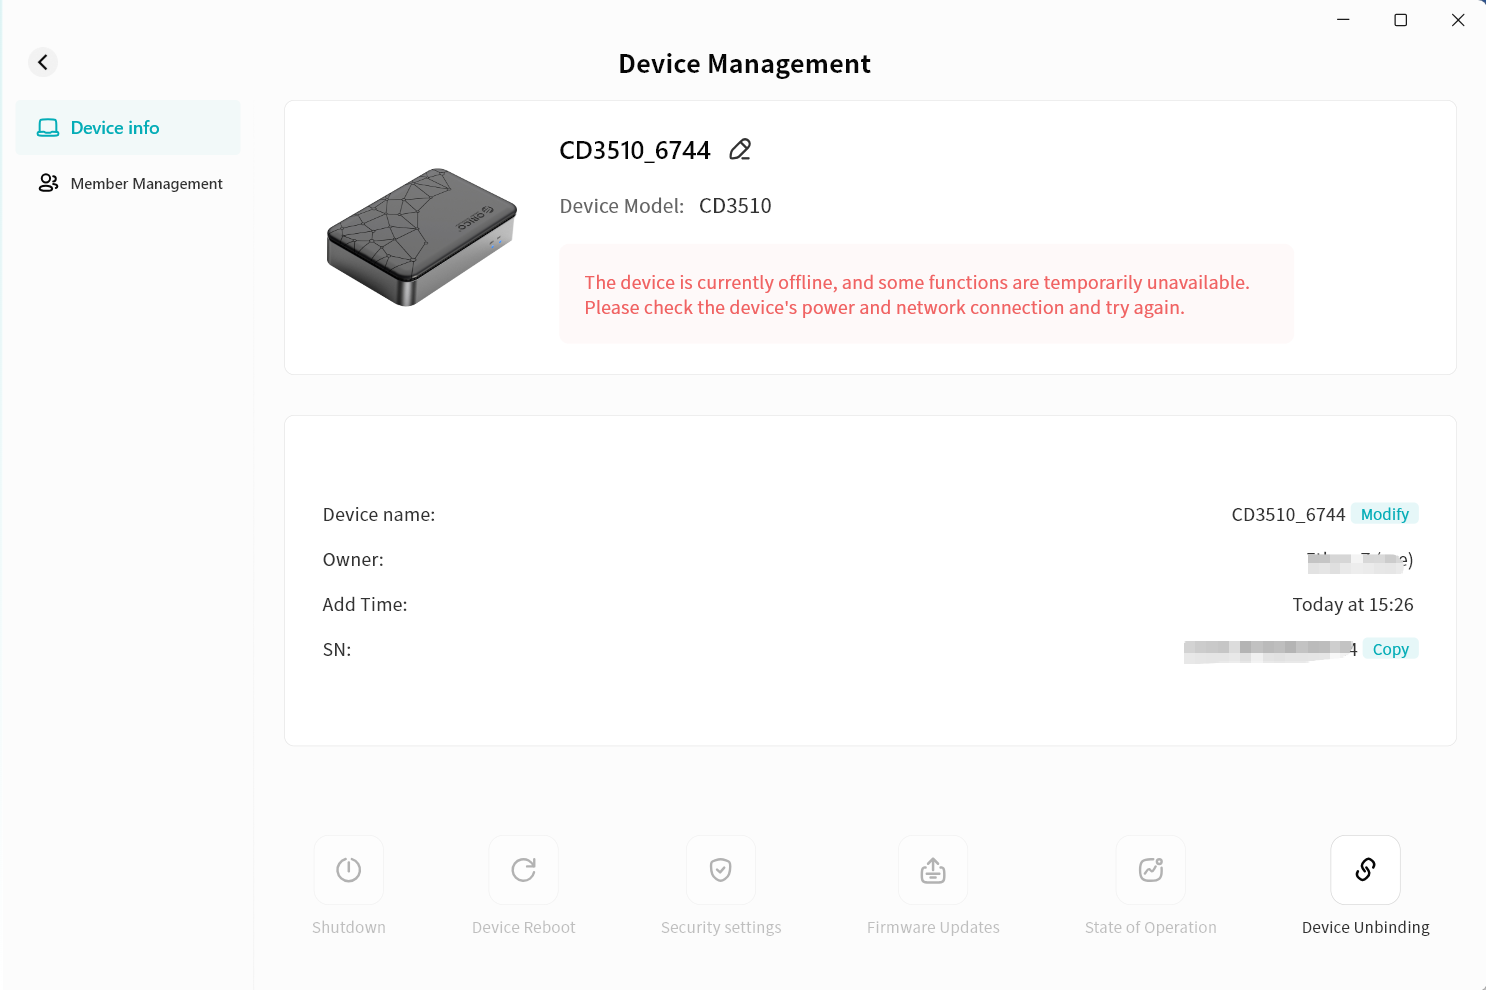
- Member Management
- View accounts currently bound to the device.
- Promote a regular member to Administrator.
- Demote an Administrator to regular member.
- Remove a member.
For detailed instructions, please refer to the Member Management section.
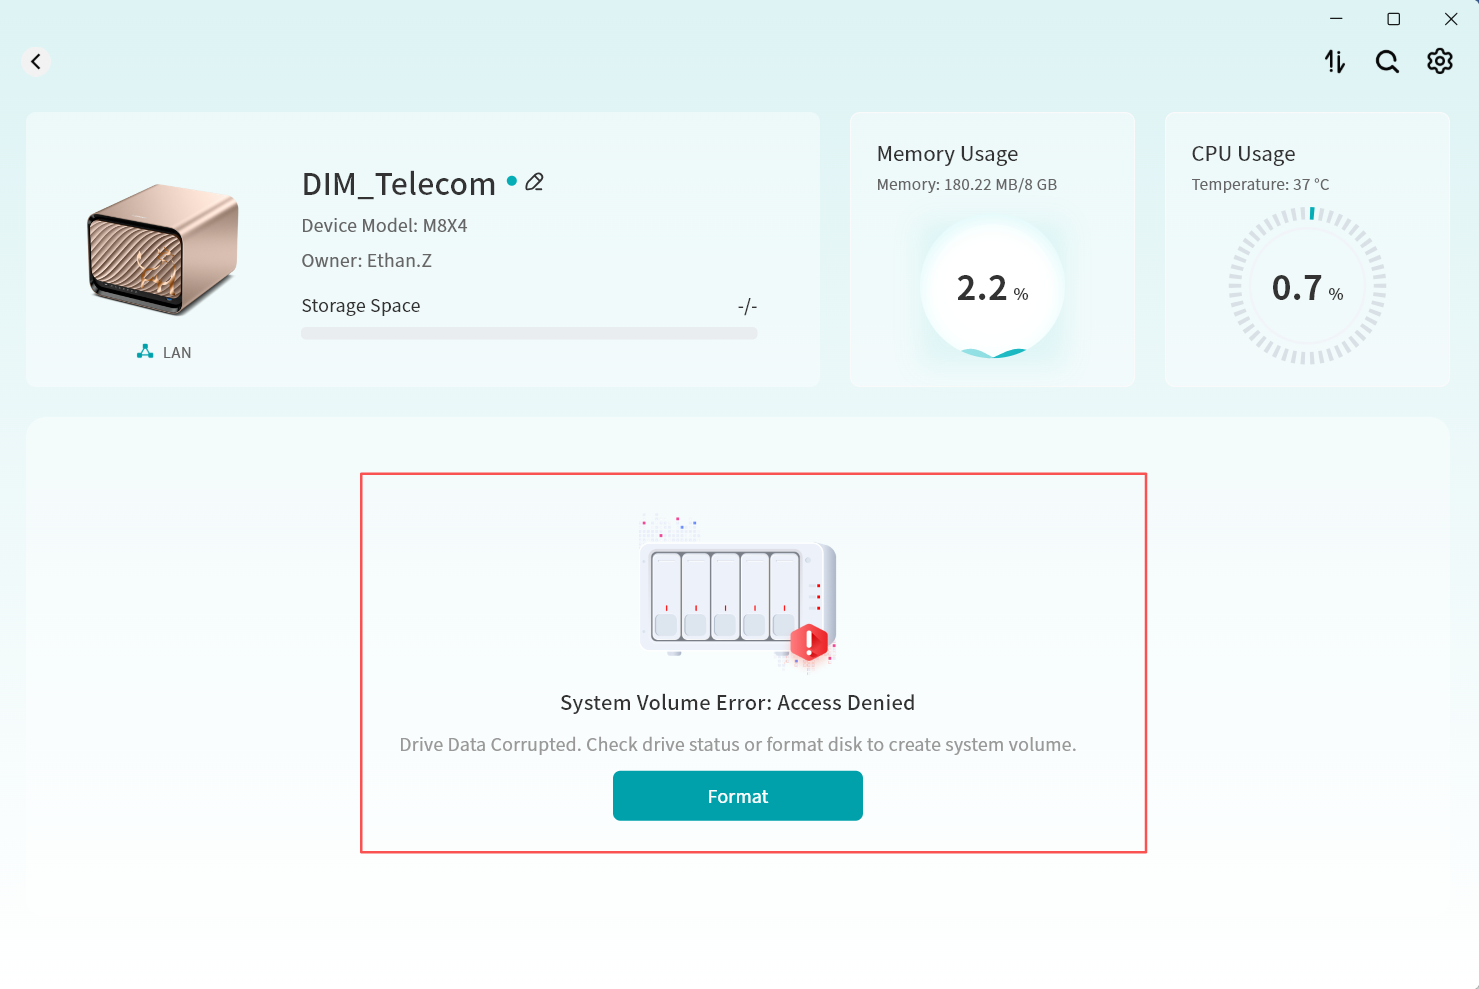
Device Initialization
If you are binding a DASSET device for the first time, you must use the DASSET mobile client to scan the QR code on the device to complete the binding.
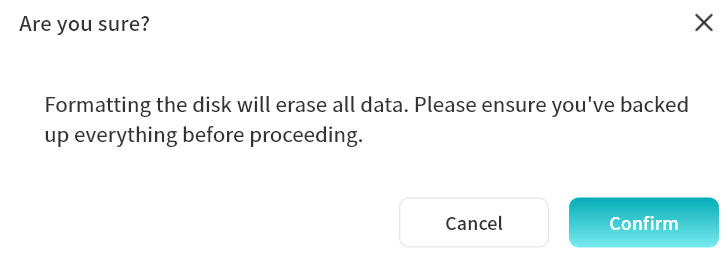
After binding, when you enter the device for the first time, you will be prompted to perform a hard disk format:
-
Insert the hard disk into your DASSET device.
-
From the Discover, click your device to enter.
-
You will see a format prompt. Click Confirm.
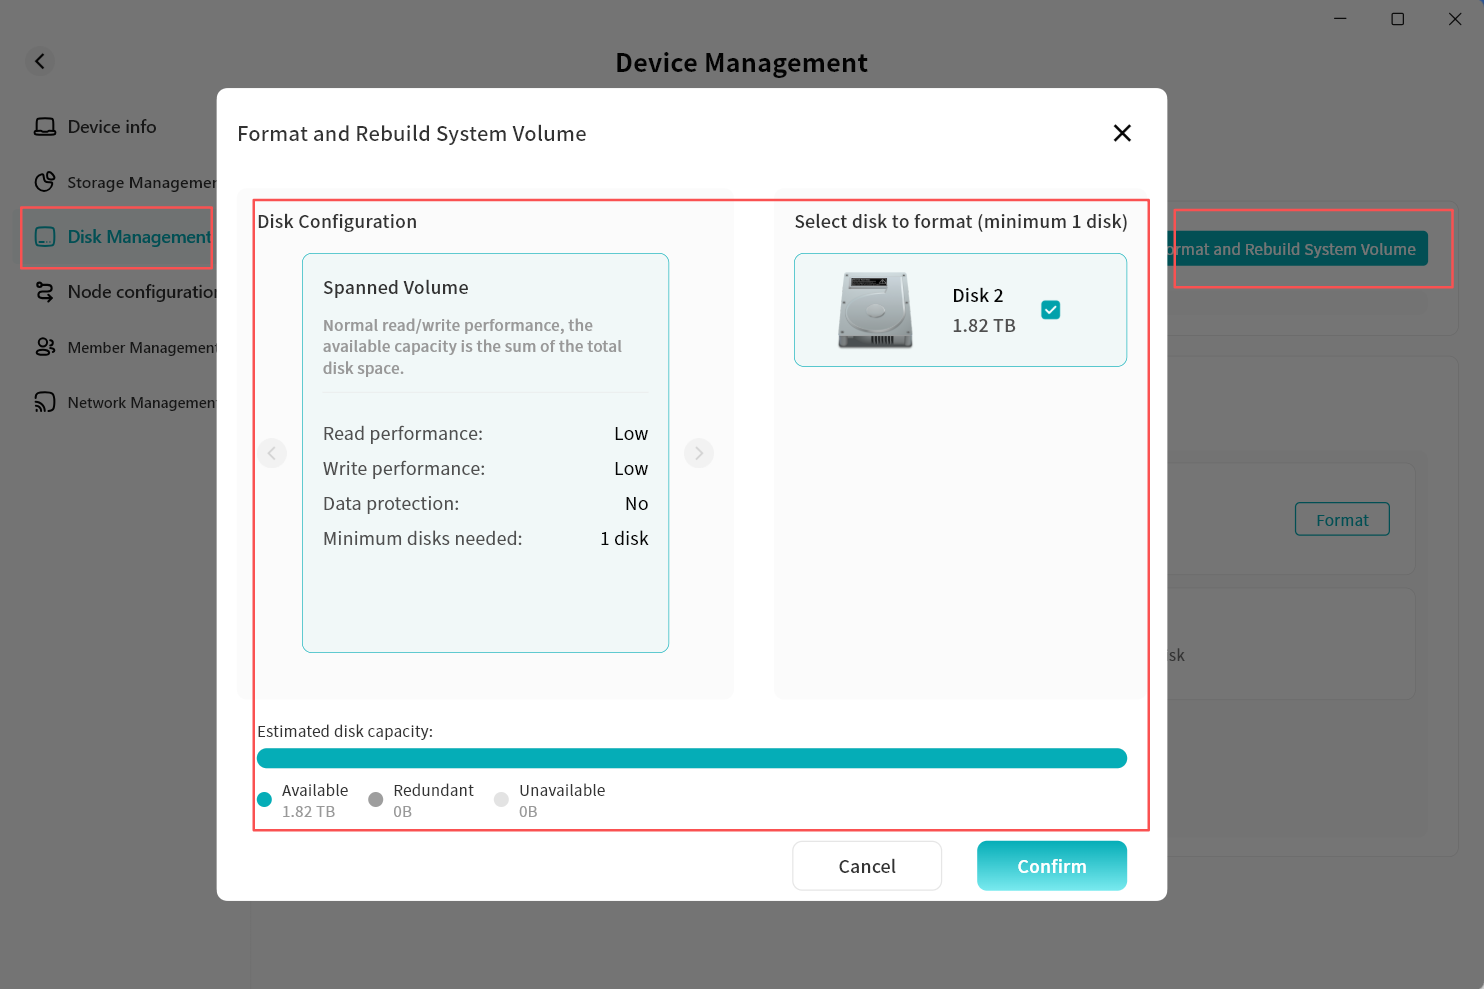
-
The DASSET client will redirect to Device Management Disk Management. Click Format and Rebuild System Volume.
-
Select the disks you wish to format and the desired disk format, then click OK.
-
Disk format options include:
-
Spanned Volume: Basic mode; available capacity equals the sum of all disks, with no redundancy.
-
RAID 0: Optimized read/write performance; available capacity equals the sum of all disks, with no redundancy.
-
RAID 1: Two disks required; available capacity equals the smaller of the two disks, with redundancy.
-
RAID 5 (Recommended): Minimum of three disks; available capacity equals the combined capacity of two data disks, with redundancy.
-
-
The disk format page will display the estimated capacity based on the chosen mode.
-
- The system will begin formatting. Depending on the number and size of disks, formatting may take a few minutes.

- Once formatting is complete, a confirmation message will appear. Click OK to start using your DASSET device.
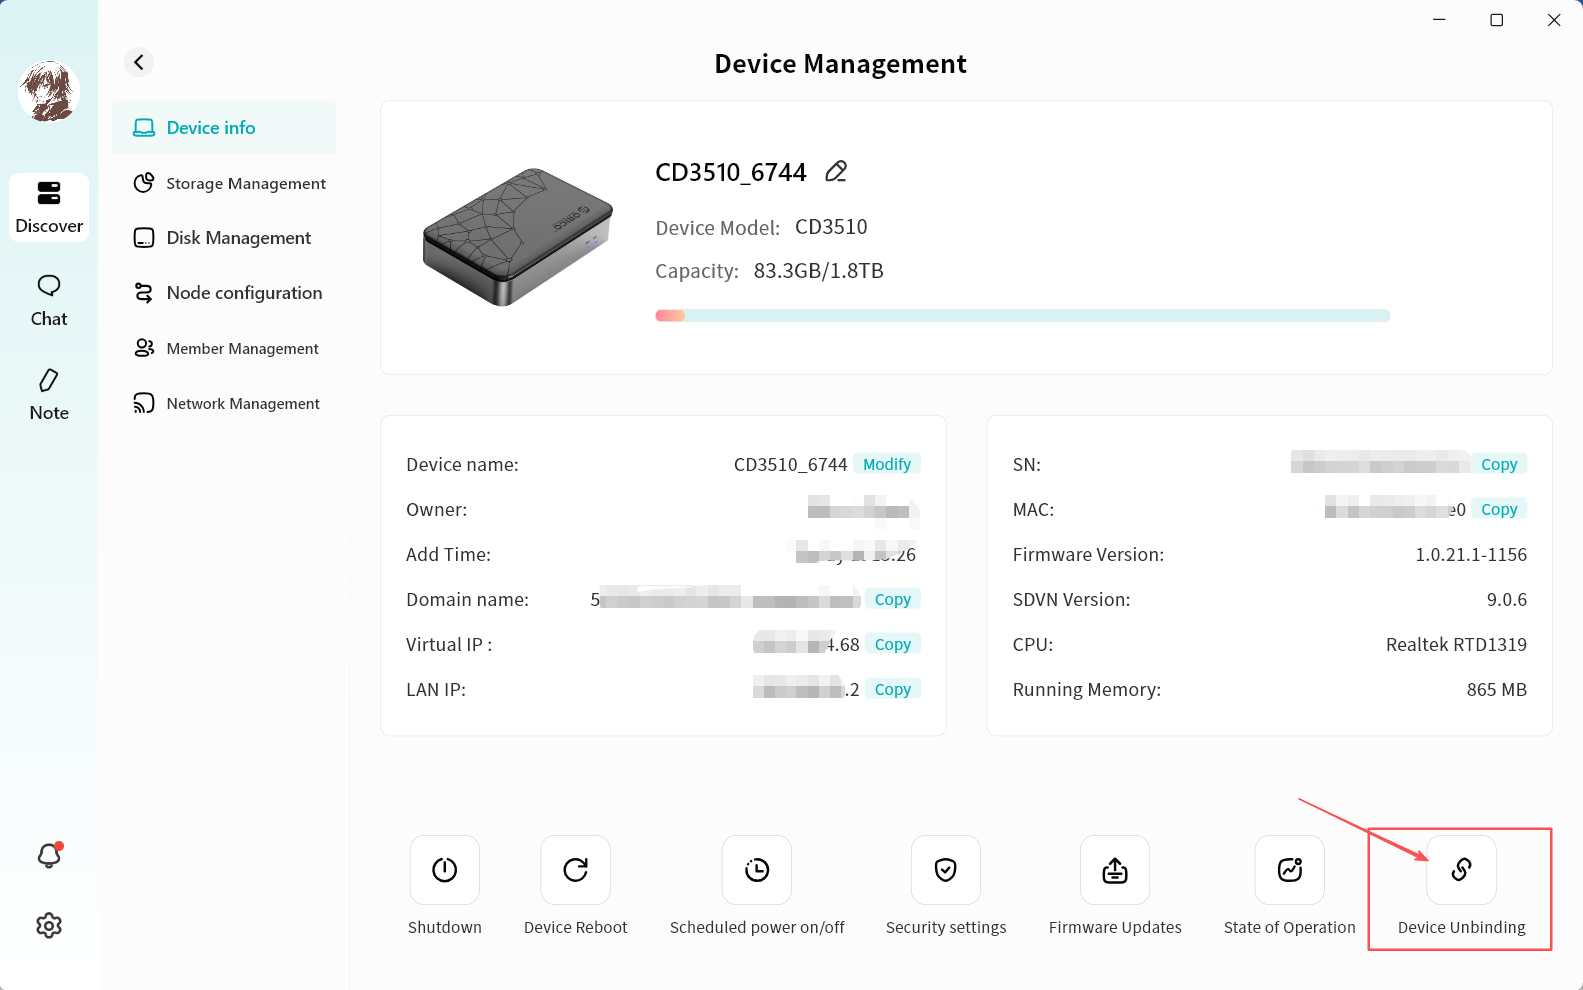
Device Management Overview
All management of DASSET devices is centralized on the Device Management page, which mainly includes the following functions:
-
Device Info: Displays device software and hardware information, with quick access to operations such as shutdown.
-
Storage Management: Shows storage usage details.
-
Disk Management: Manages inserted hard drives and supports operations such as formatting.
-
Node Configuration: Configures node information, allowing you to use this device as a relay node to access the Internet or resources within the device's local network.
-
Member Management: Manages all members on the device and invites others to join the device.
-
Network Management: Configures device network settings.
Device Info
The Device Info page primarily displays the device's basic details and provides quick access to functions such as shutdown:

-
Edit Device Remarks: After modification, the updated device name will appear on the device list and home page.
- Remarks help you distinguish between multiple devices more clearly.
- Remarks are visible only to you.
-
Device Model and Capacity Information: Displays the device model and an overview of storage usage.
-
Device Basic Information: Centralized display of all device-related details, including:
- Device Name: Editable only by the device Owner.
- Owner: Displays the account nickname of the current device Owner.
- Added Time: Shows the date the device was bound.
- Domain Name: Displays the device's virtual domain URL within the DASSET virtual network.
-
When logging in to DASSET, you can connect to the device using the domain name or virtual IP.
infoThe virtual domain is static and will not change once assigned.
-
Security: Only users bound to the device can connect via the virtual domain. Other DASSET accounts cannot.
-
Virtual Network IP: The IP address assigned to the device within the DASSET virtual network.
-
This IP is dynamic.
-
Security: Only users bound to the device can connect via the virtual IP. Other DASSET accounts cannot.
-
-
LAN IP: The device's IP address within the local network.
-
Device Model: Factory model defined by the manufacturer.
-
SN: The device's unique serial number.
-
MAC: The MAC address of the device's network interface card.
-
Firmware Version: Current firmware version number.
-
SDVN Version: Current SDVN version number.
-
CPU: Device CPU model.
-
RAM: Device memory size.
- Quick Functions: Includes shortcuts for shutdown, unbinding, and other operations.
Shutdown
This function is available only to Owner and Administrator accounts.
Click the Shutdown button at the bottom of the Device Information page to remotely power off the DASSET device.
Note: If your DASSET device does not support remote startup, there are two ways to restart it after shutdown:
-
Disconnect and reconnect the power supply (requires device support for power-on after power recovery).
-
Manually press the device's power button to restart.

Device Reboot
This function is available only to Owner and Administrator accounts.
Click the Device Reboot button at the bottom of the Device Information page to remotely restart the DASSET device.

Scheduled Power On/Off
This function is available only to Owner and Administrator accounts. Regular users can only view the scheduled rules.
Click the Scheduled Power On/Off button at the bottom of the Device Information page to set your DASSET device to enter sleep mode at specified times.
Steps to configure:

-
Go to Device Management Device Information Scheduled Power On/Off, then click Enable Scheduled Power On/Off.
-
Set the specific rules:
-
System Time
-
Time of power off/on: Set the scheduled shutdown and startup times. You can either input the exact time or adjust in hourly increments using the up/down arrows.
-
Repeat: Set the repeat schedule for the rule to take effect. Options include Everyday, Weekdays, Weekends, or Custom days of the week.
-
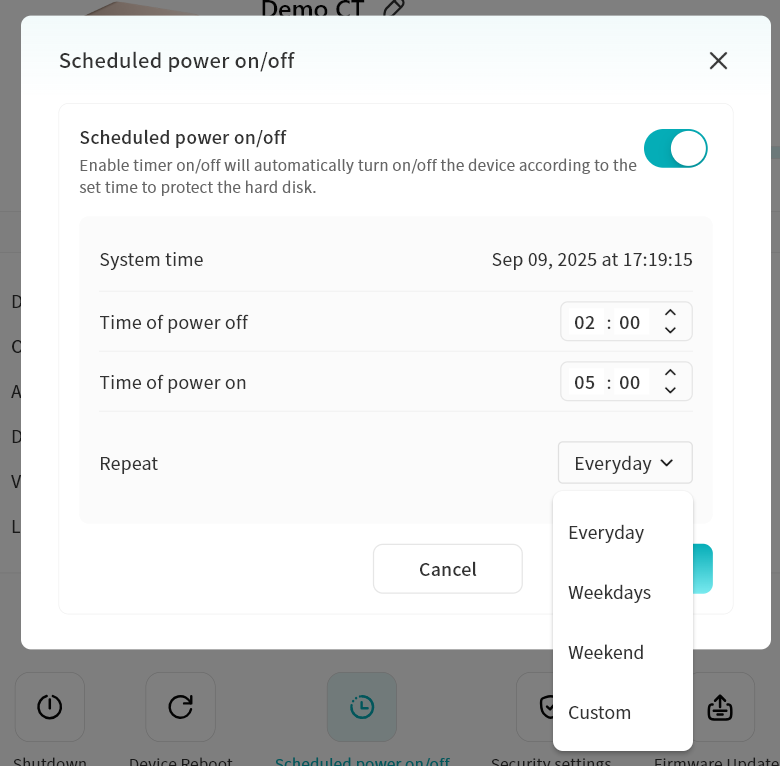
- If you no longer wish to use Scheduled Power On/Off, simply disable the option.
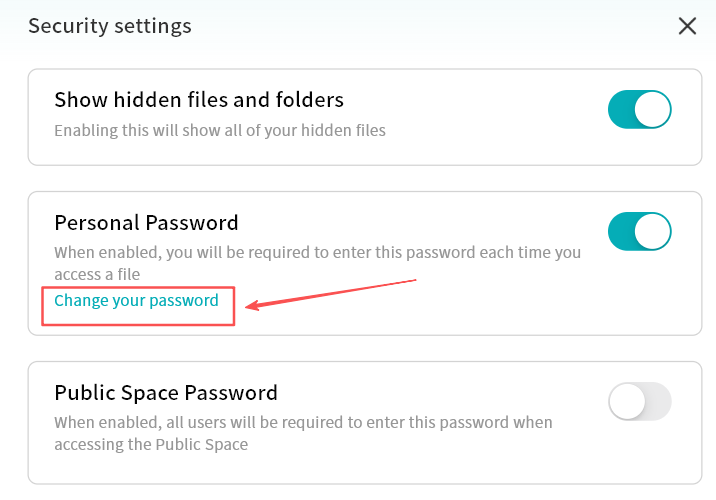
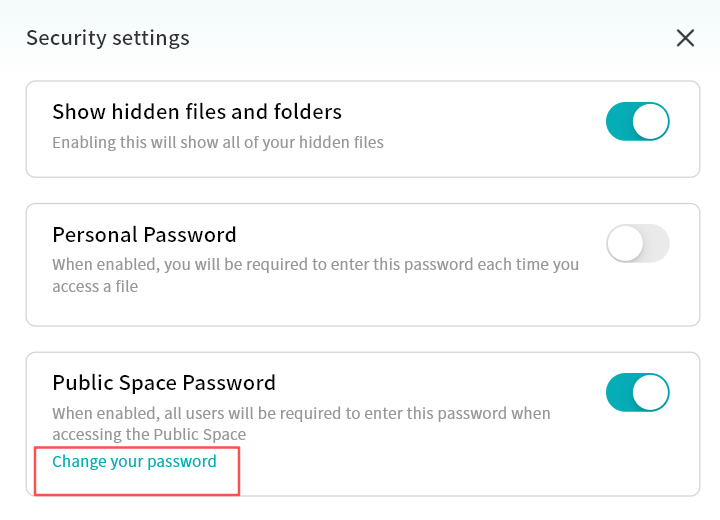
Security Settings
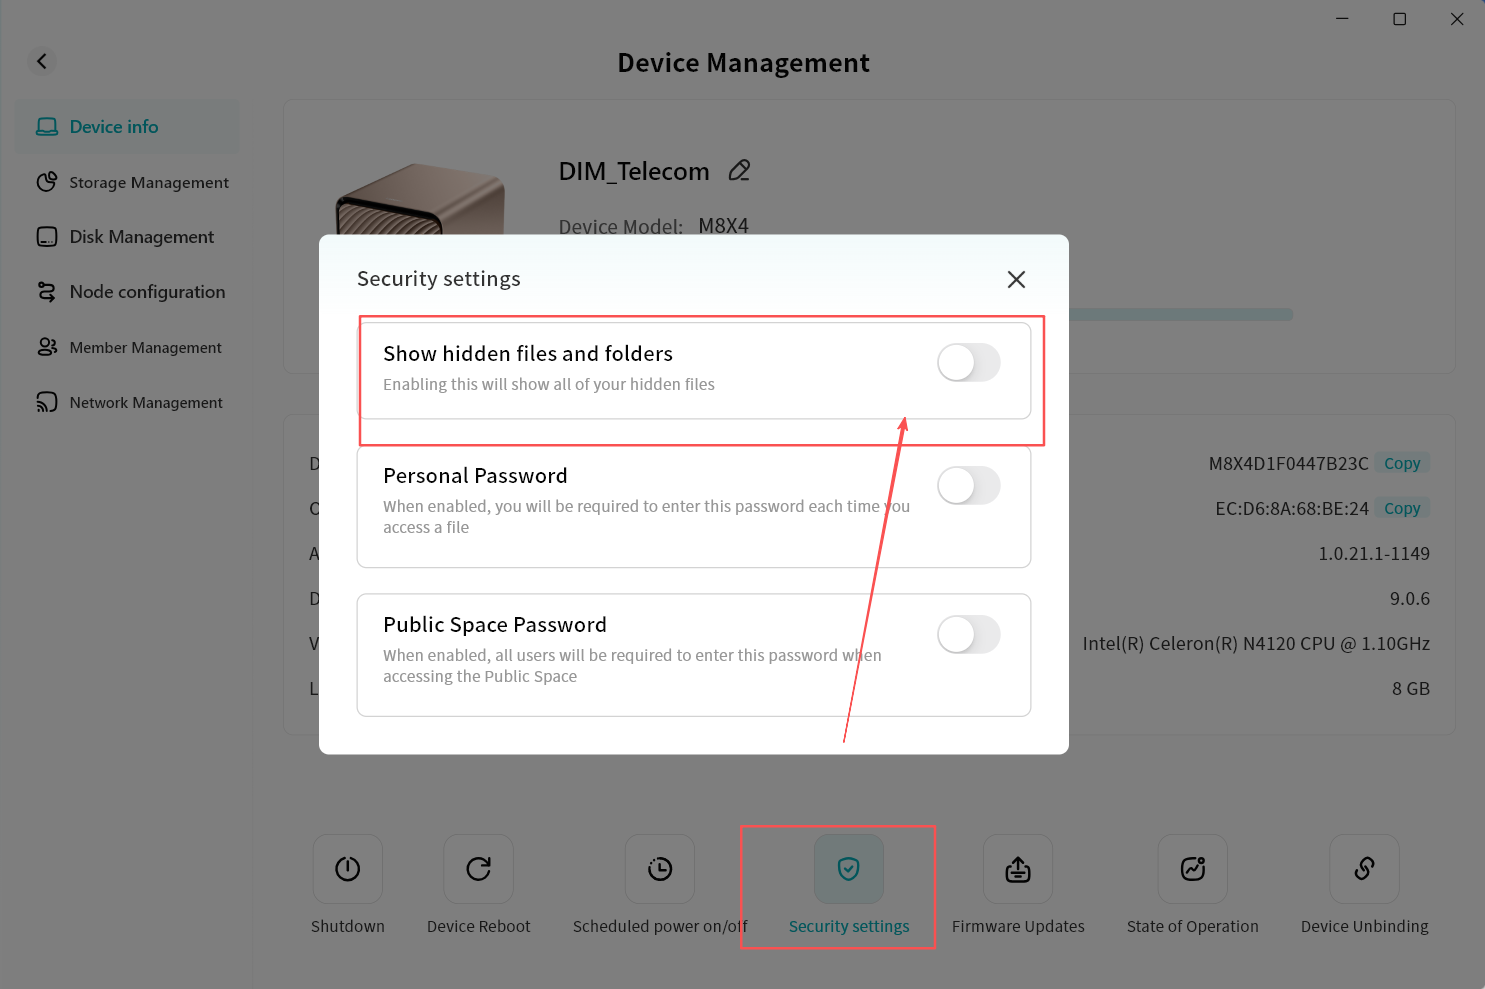
Click the Security Settings button at the bottom of the Device Information page to enter the Security Settings page.

-
Show Hidden Files and Folders: When enabled, all hidden files and folders will be visible in the File Management page.
-
Personal Password: When enabled, a password must be entered to access the device.
-
Public Space Password: When enabled, a password must be entered to access data in the Public Space.
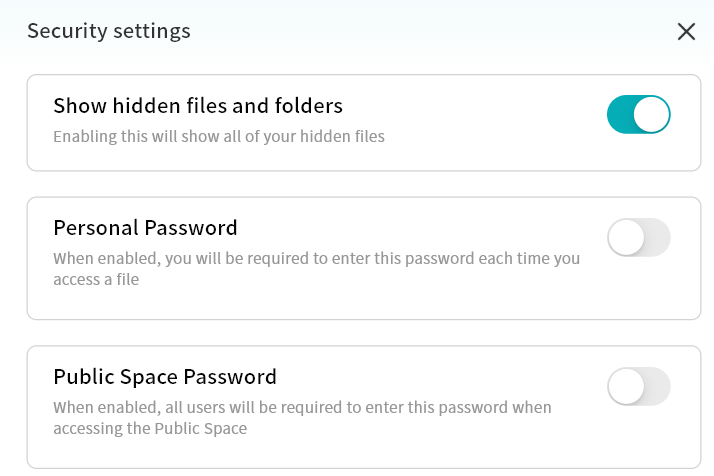
Show Hidden Files and Folders
If you have hidden certain files and wish to access them again, you can enable Show Hidden Files and Folders to display hidden files/folders in the File Management page.
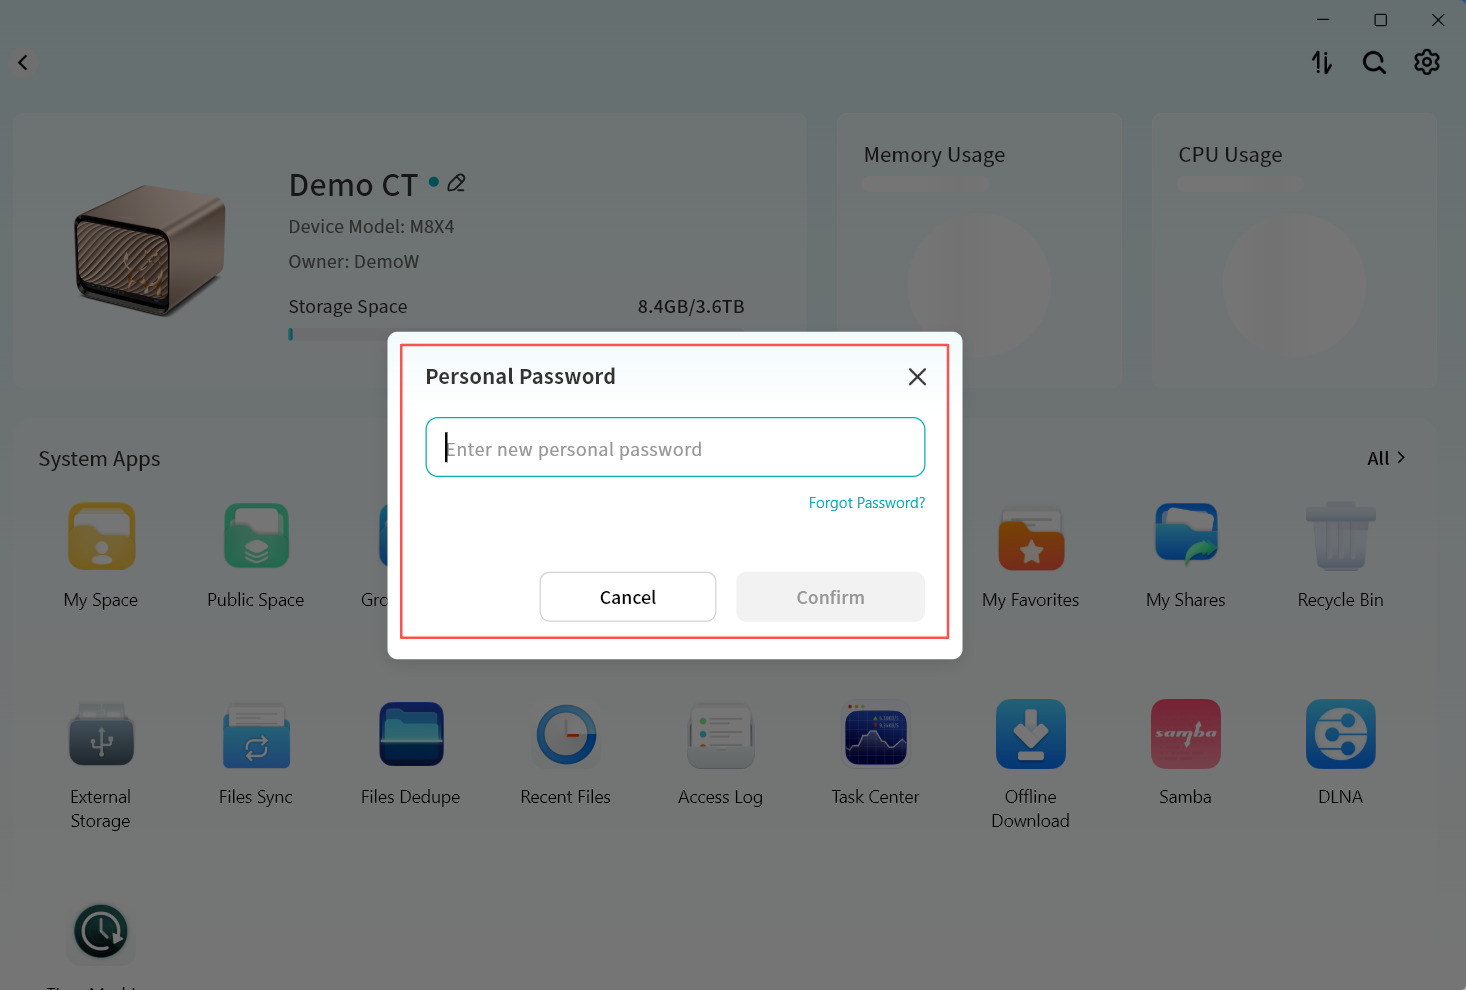
Personal Password
To set a Personal Password:
-
On the Device Information page, click Security Settings and enable Personal Password.
-
In the pop-up input box, enter a password to complete the setup.

After setting a personal password, you will be prompted to enter it when accessing the device home page.
Only after entering the correct password can you access the device.
To change your Personal Password:
- Go to Device Information Security Settings - Personal Password and click Change Password.
- In the pop-up window, enter the current personal password to verify your identity.
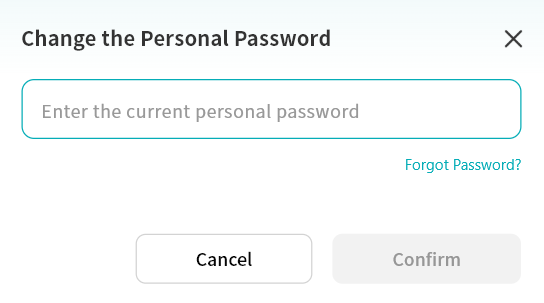
- Enter the new password to complete the change.
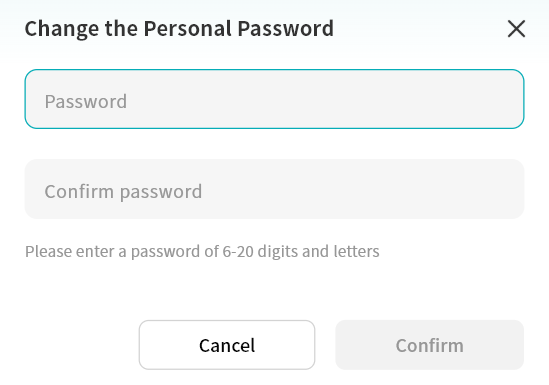
To recover a forgotten Personal Password:
- In the personal password input or change password window, click Forgot Password.

- Enter the email address or mobile phone number bound to your DASSET account.
-
Enter the correct verification code.
-
After verification, set a new personal password in the new password window.
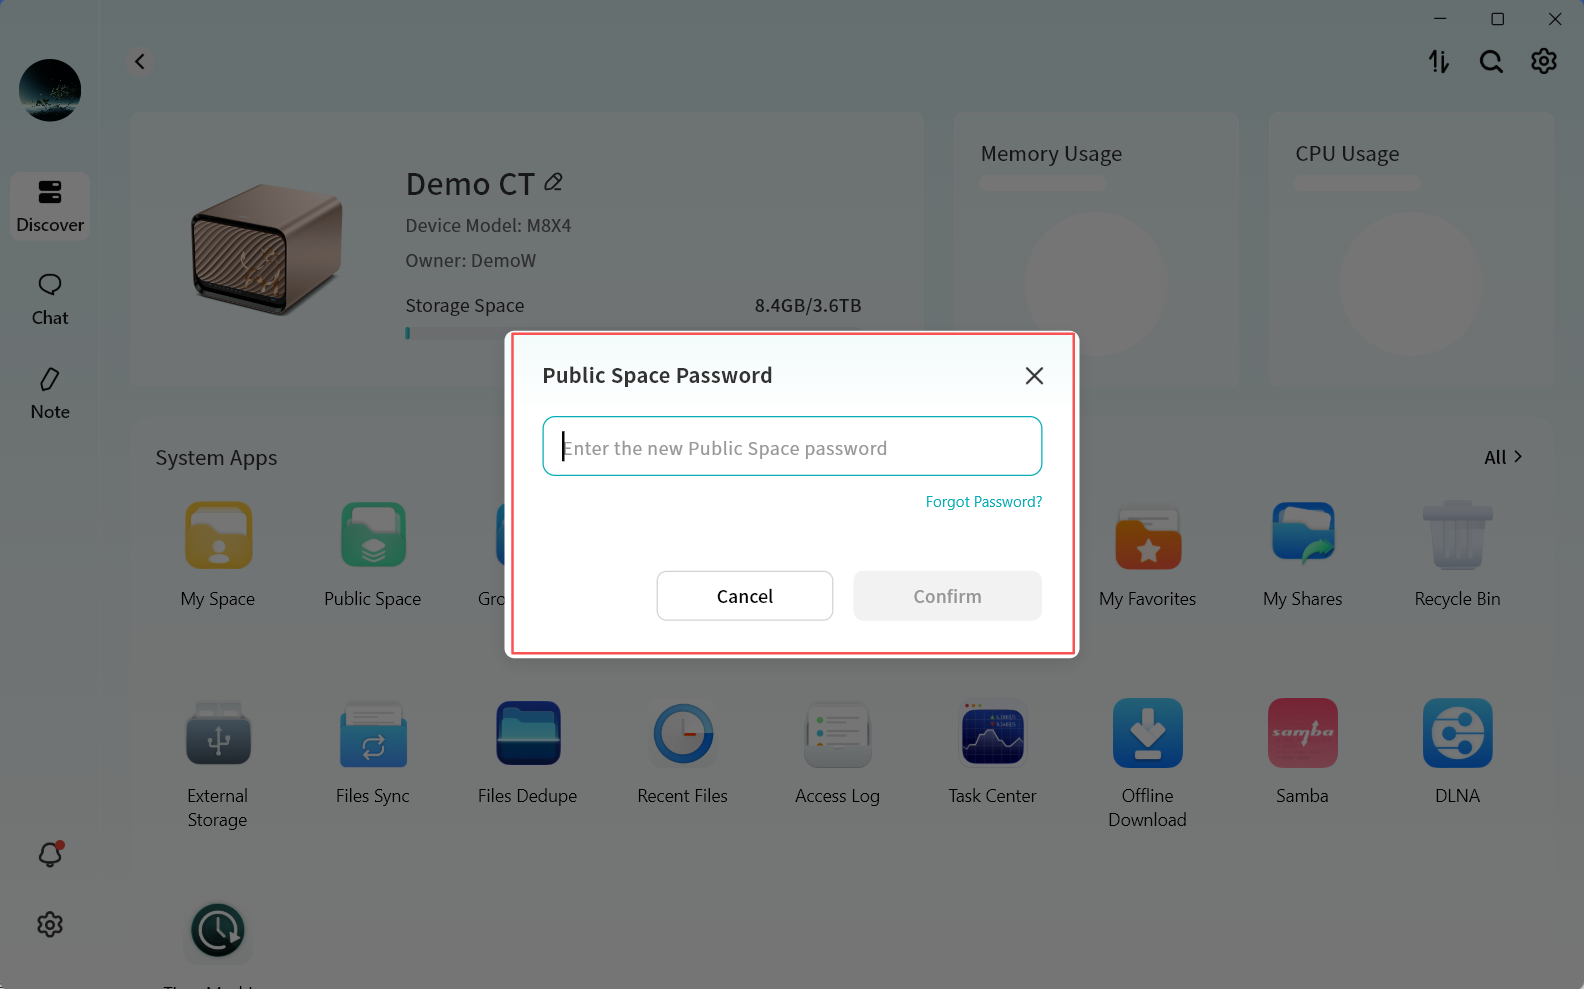
Public Space Password
Setting a Public Space Password is available only to Owner and Administrator accounts.
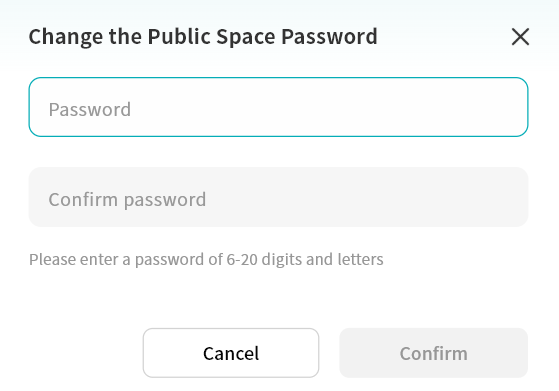
To set a Public Space Password:
-
On the Device Information page, click Security Settings and enable Public Space Password.
-
In the pop-up input box, enter a password to complete the setup.
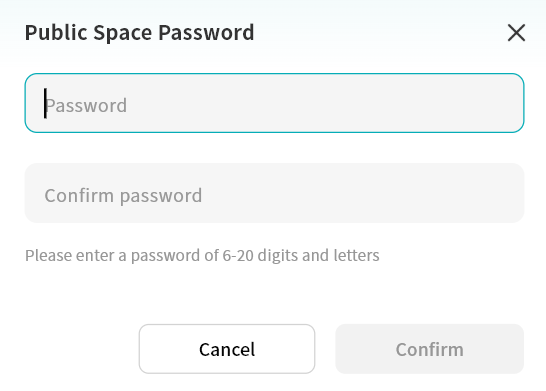
When attempting to enter a password-protected Public Space, you will be prompted to input the correct password before access is granted.
To change the Public Space Password:
- To change the Public Space password, go to Device Information Security Settings Public Space Password and click Change Password.
- In the pop-up window, enter the current Public Space password to verify your identity.
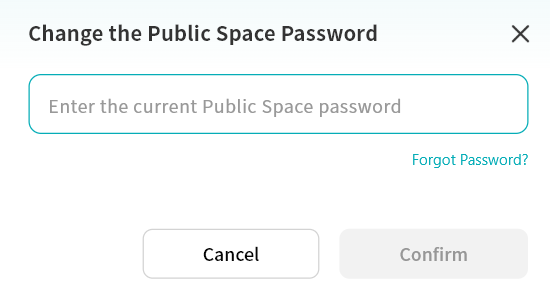
- Enter the new password to complete the change.
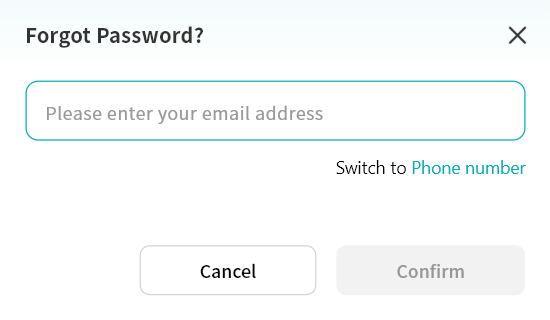
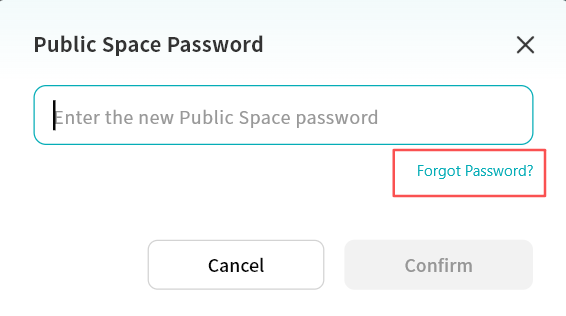
Forgot Public Space Password -- Recovery
This recovery function is available only to Owner and Administrator accounts.
- In the Public Space password input or change password window, click Forgot Password.
- Enter the email address or mobile phone number bound to your DASSET account.
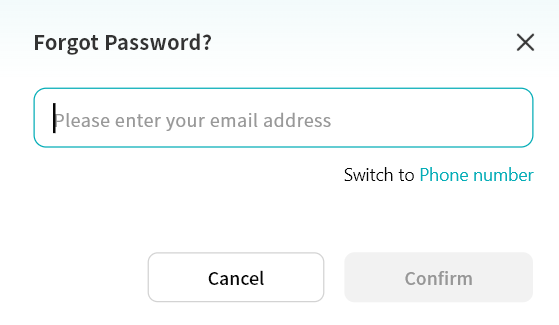
-
Enter the correct verification code.
-
After verification, set a new Public Space password in the new password window.
Firmware Update
Periodic firmware upgrades are pushed to DASSET devices to enable new features and functionality as well as providing bugfixes and security updates. This function is available only to Owner and Administrator accounts.
Firmware upgrades are provided in two ways:
-
Automatic check with client update notifications
-
Manual check for updates
Automatic Firmware Update Notification
When a new firmware version is detected for the DASSET device, the DASSET client will automatically display a Firmware Update prompt upon entering the device home page.

The system checks for updates every 8 hours. If a new version is found, you will be notified at login.
-
Click Update Now to begin the upgrade.
-
If you prefer not to upgrade immediately, click Next Time to postpone the update.
Manual Check for Firmware Updates
Click the Firmware Updates button at the bottom of the Device Information page to manually check for available firmware updates.

- If a firmware upgrade is detected, a small red dot will appear on the Firmware Update option, indicating a pending update compatible with your device.

Firmware upgrade steps:
-
Click Device Information Firmware Update.
-
Check for updates:
-
If an update is available, the upgrade page will display the firmware version, release date, and detailed update information.
-
If no update is available, a message will confirm that the device is up to date.
-
-
Click Update Now. The system will automatically download and install the firmware. Please wait patiently.
dangerDo not power off or restart the device during the upgrade process to avoid firmware failure or device malfunction.
-
After the upgrade is complete, the device will restart automatically. You will receive a device offline notification, and once the restart finishes, the device will appear online again in your device list.
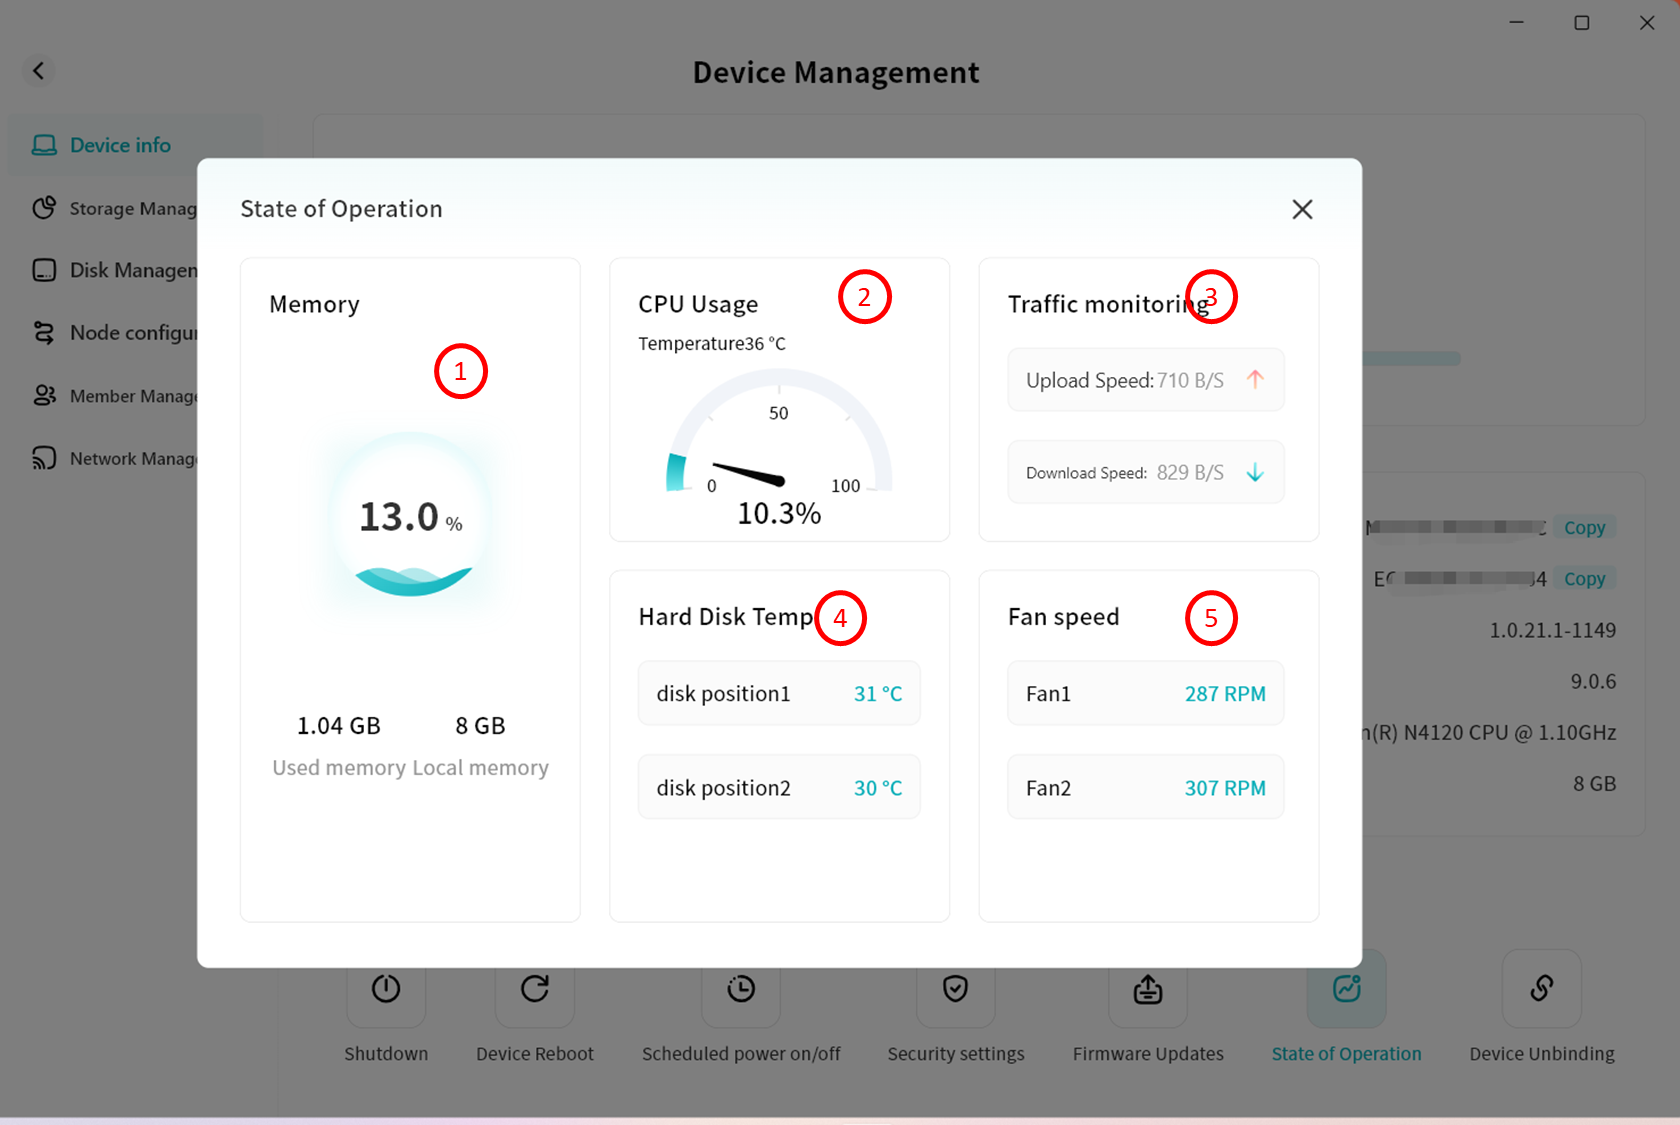
State of Operation
This function is available only to Owner and Administrator accounts.
Click the Running Status button at the bottom of the Device Information page to view the current operating status of the device.
On the Running Status page, you can monitor the following information:
-
Memory usage
-
CPU usage
-
Device traffic, including upload and download speed
-
Hard disk temperature, showing the operating temperature of inserted disks
-
Fan speed, showing the rotation speed of the device's built-in cooling fan
Device Unbinding
Click the Unbind Device button at the bottom of the Device Information page to remove the binding with this DASSET device.
For detailed steps, please refer to the Device Unbinding section.
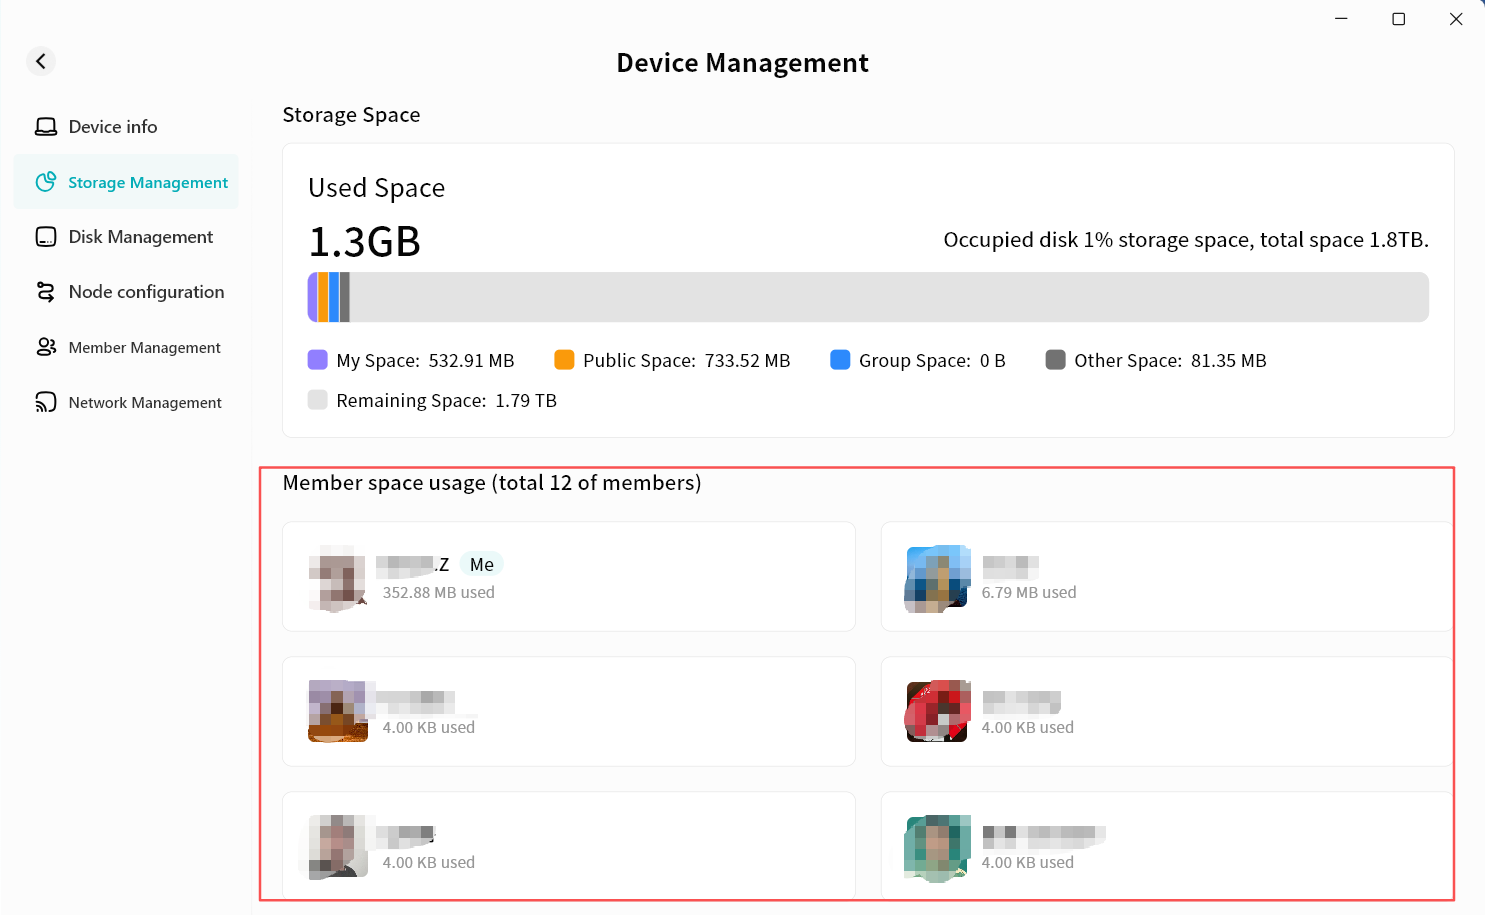
Storage Management
In Storage Management, you can view the overall storage usage of the current DASSET device:
-
Total Storage Usage
- Total hard disk capacity
- Current used disk space (all users combined)
- Total disk space used by My Space (all users combined)
- Total disk space used by Public Space (all users combined)
- Total disk space used by Group Space (all users combined)
- Total disk space used by Other Space (including My Vault, Recycle Bin, thumbnails, etc.)
- Total available space
-
Per-User Storage Usage
Displays the total storage space used by each user.
-
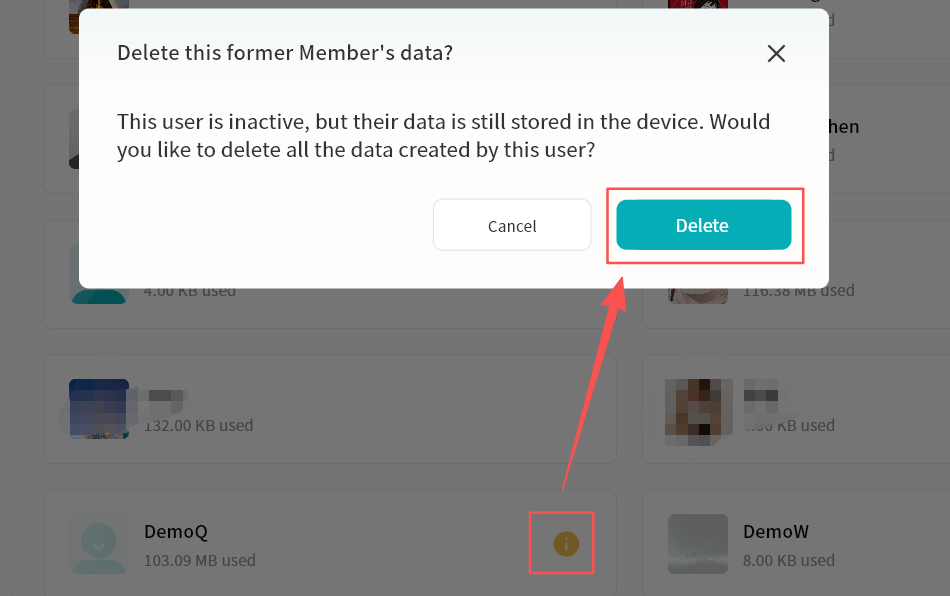
Abnormal Member Space (clean up and release storage used by unbound members)
In the member storage usage view, you may see a mark on certain member space cards. This indicates that the member has unbound from the device, but did not select Delete Data during unbinding.

You can click the marked option to clean up and release the storage space occupied by these unbound members.
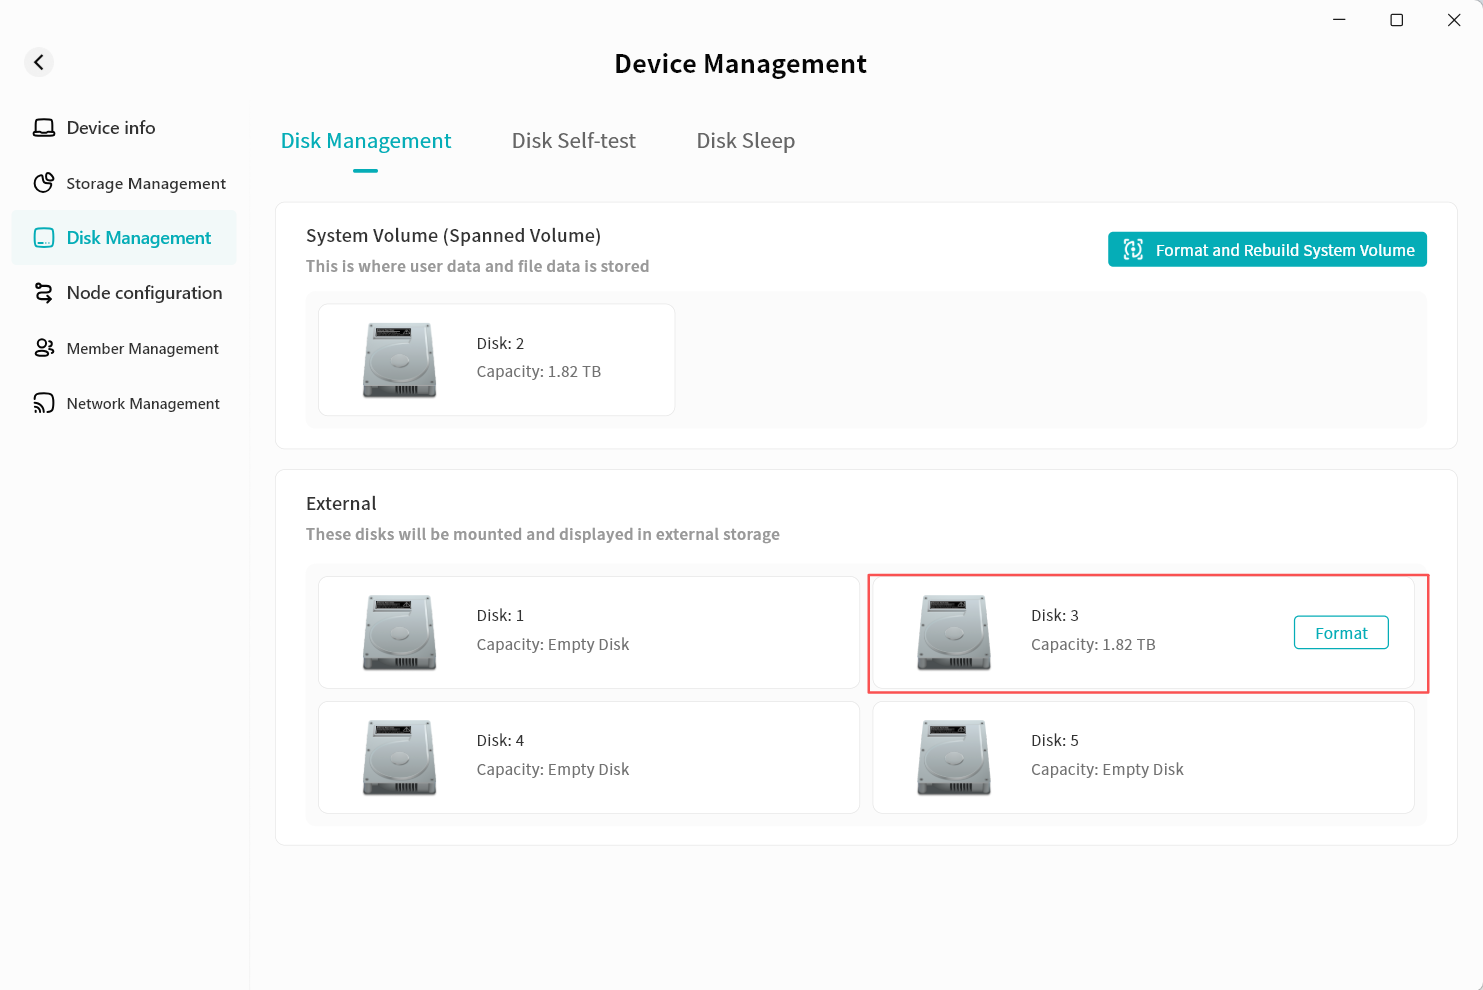
Disk Management
In Disk Management, you can view information about all hard drives currently inserted into the DASSET device and configure them accordingly.
-
Disk Management: Configure system volumes, format disks, and display disk capacity and status.
-
Disk Self-Check: Inspect the health status of the disks.
-
Disk Hibernation: Configure hard drive sleep mode.
-
Format and Rebuild System Volume: Reformat all or selected hard drives with a new disk format.
-
System Volume Status Display: Show the current status of the system volume, including the number of drives.
-
External Disks: Newly connected drives that are not part of a rebuilt system volume are displayed here. After formatting, these drives can be used as external storage under External Storage.
Format and Rebuild System Volume
When replacing or adding new hard drives, if you do not wish to use them as external storage, you can choose Format and Rebuild System Volume.
- Go to Device Management - Disk Management and click Format and Rebuild System Volume.
-
In the pop-up window, select a new disk format. DASSET devices support multiple disk formats:
- Spanned Volume: Basic mode; available space equals the sum of all disks, no redundancy.
- RAID 0: Optimized read/write performance; available space equals the sum of all disks, no redundancy.
- RAID 1: Two disks required; available space equals the smaller of the two, with redundancy.
- RAID 5 (Recommended): Minimum of three disks; available space equals the combined capacity of two data disks, with redundancy.
- RAID 10 (Recommended): Minimum of four disks; available space equals the combined capacity of the smaller group of two, with redundancy.
The disk format interface will display the estimated capacity based on the selected mode.
-
Click Confirm to start formatting. Please wait patiently.
In RAID modes, after formatting, the disk status may show Synchronizing. This indicates internal disk configuration. You can still perform normal operations such as file upload and download. The Synchronizing status does not affect your ability to use your DASSET device, although read/write operations may be slower until all disks are synchronized.
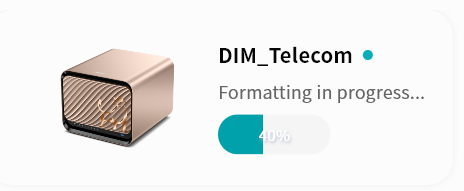
When the device is performing formatting operations, you will also see the device status on the Device List page.
Add External Disk
When inserting a new hard drive, if you do not wish to rebuild the system volume (which would erase existing disk data), you can configure the drive as an external disk.
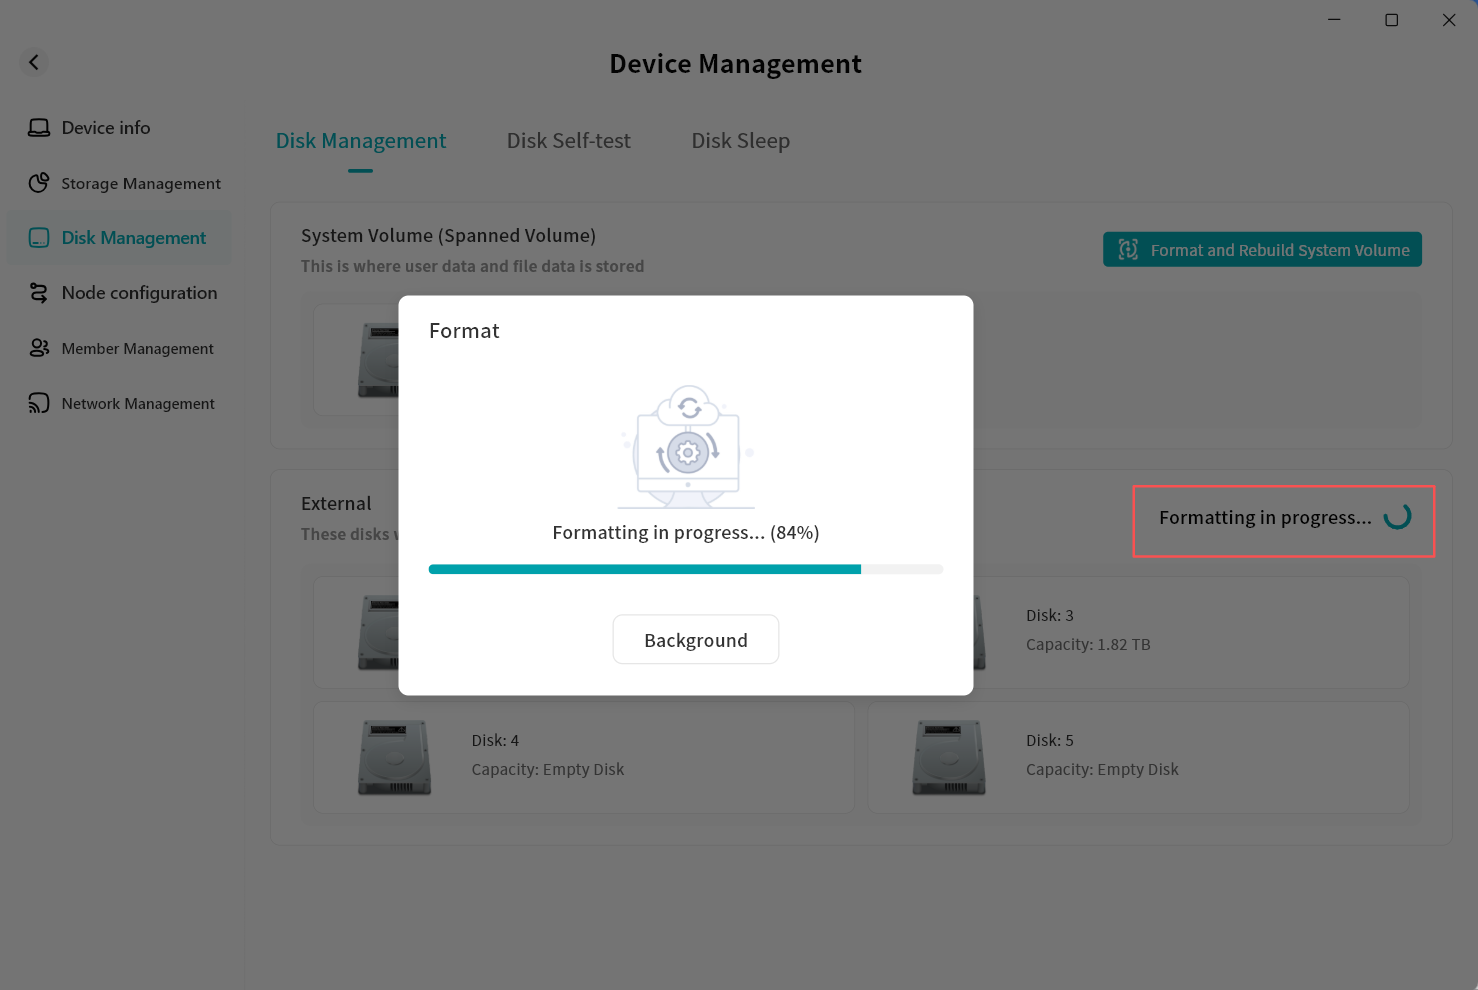
- Go to Device Management Disk Management, where the newly added disk will be shown as Pending Configuration.
-
For the disk you want to add to external storage, click Format.
-
In the pop-up prompt, click Confirm.
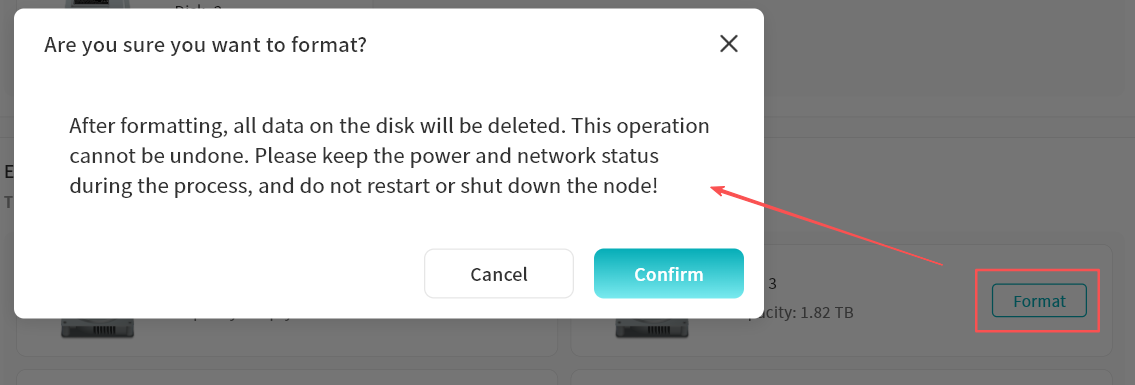
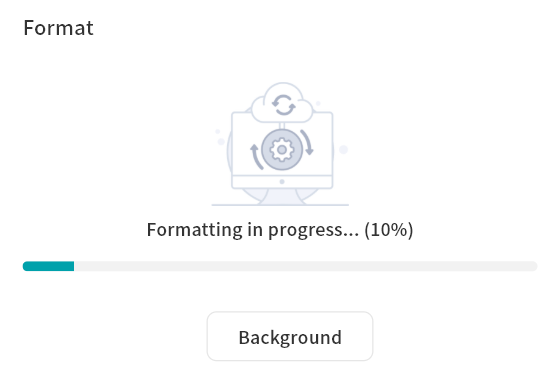
- The system will begin formatting. You can click Background to close the progress window while formatting continues in the background.
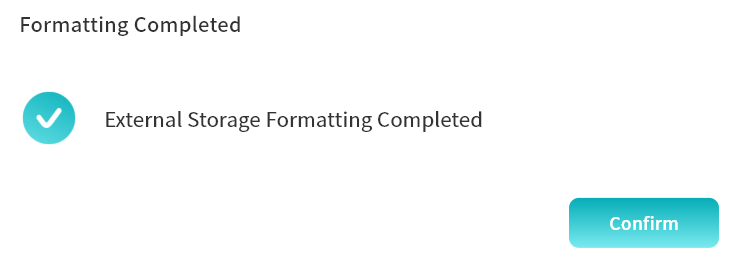
- After formatting is complete, the system will notify you that the task is finished, and the Pending Configuration status will be removed.
- Go to Applications - External Storage to see the disk added as external storage.
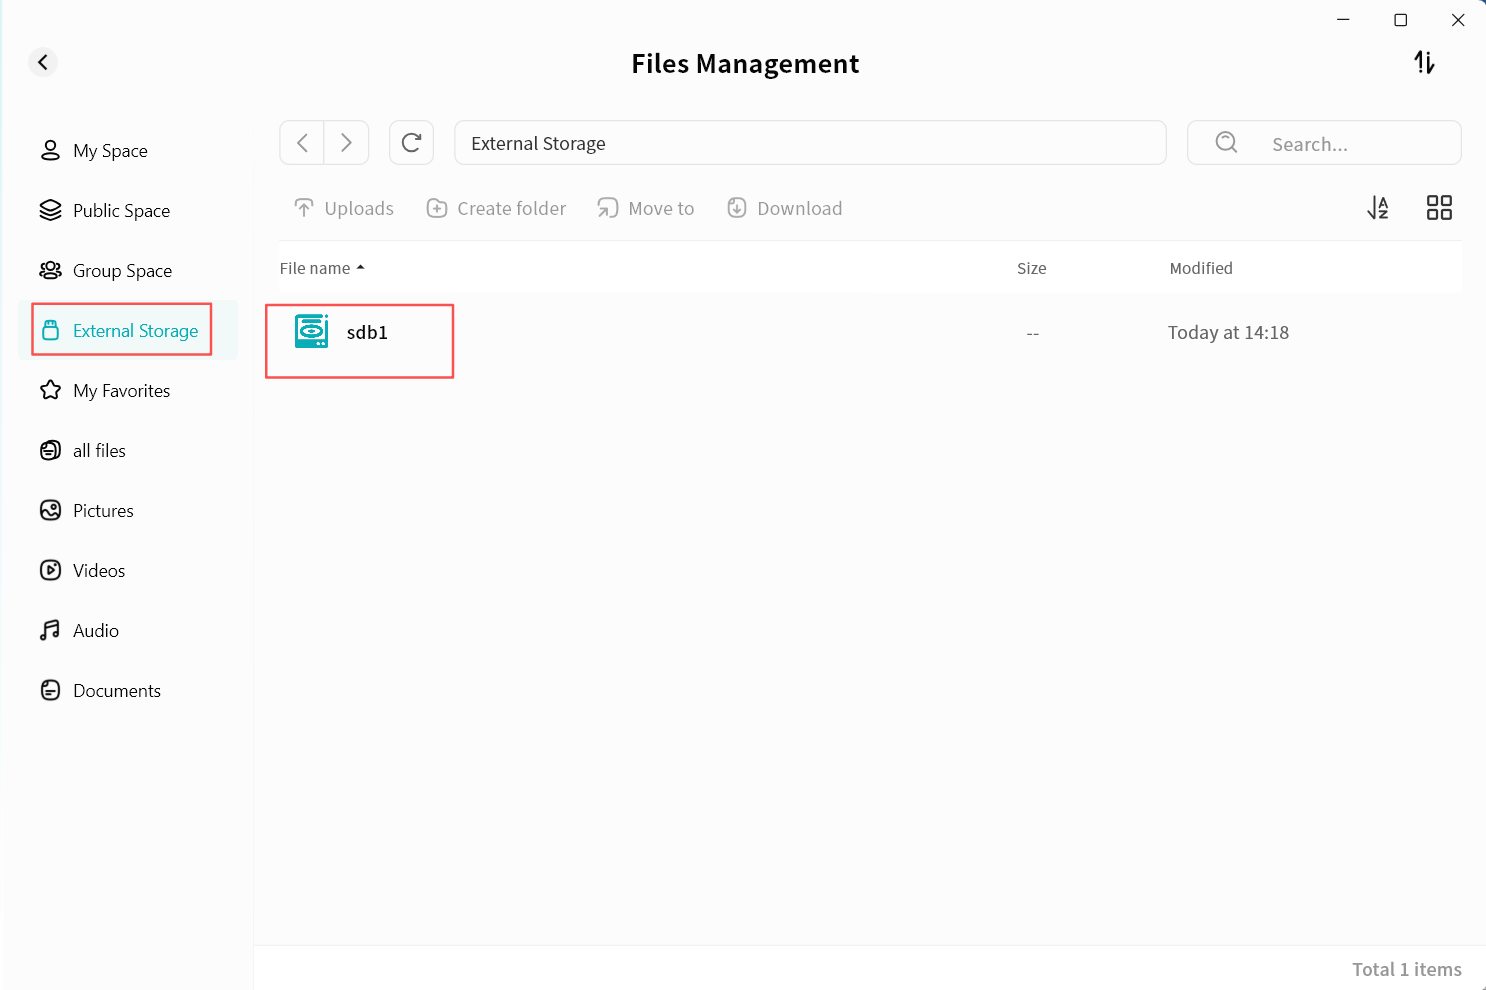
- Double-click the disk name to enter the external disk and perform file operations.
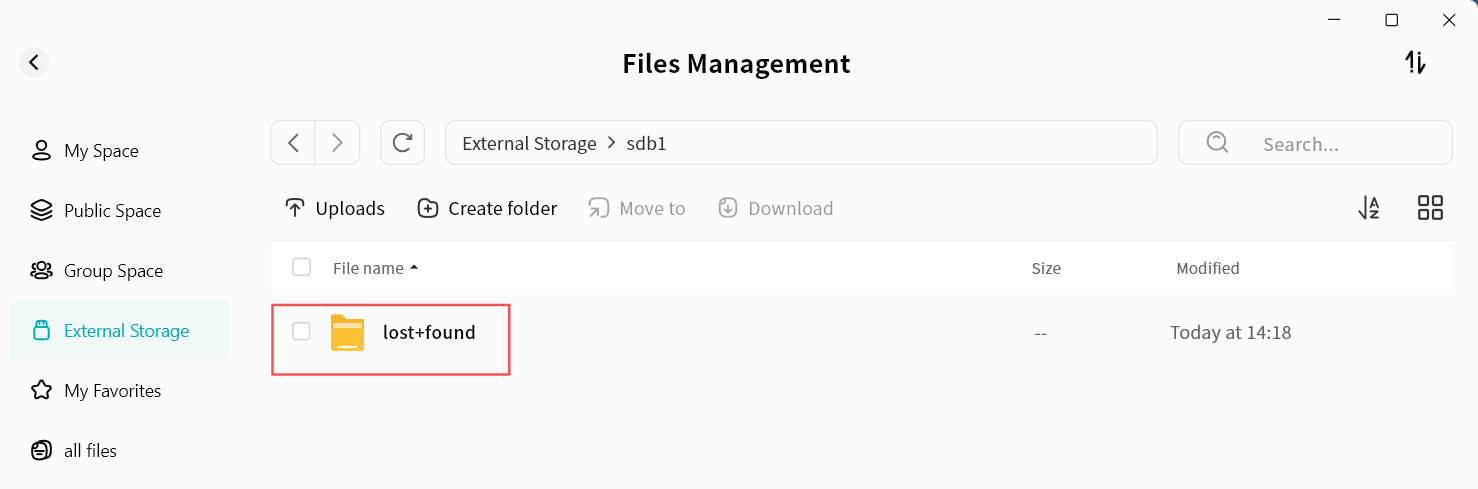
To avoid abnormal behavior, do not delete the lost+found folder.
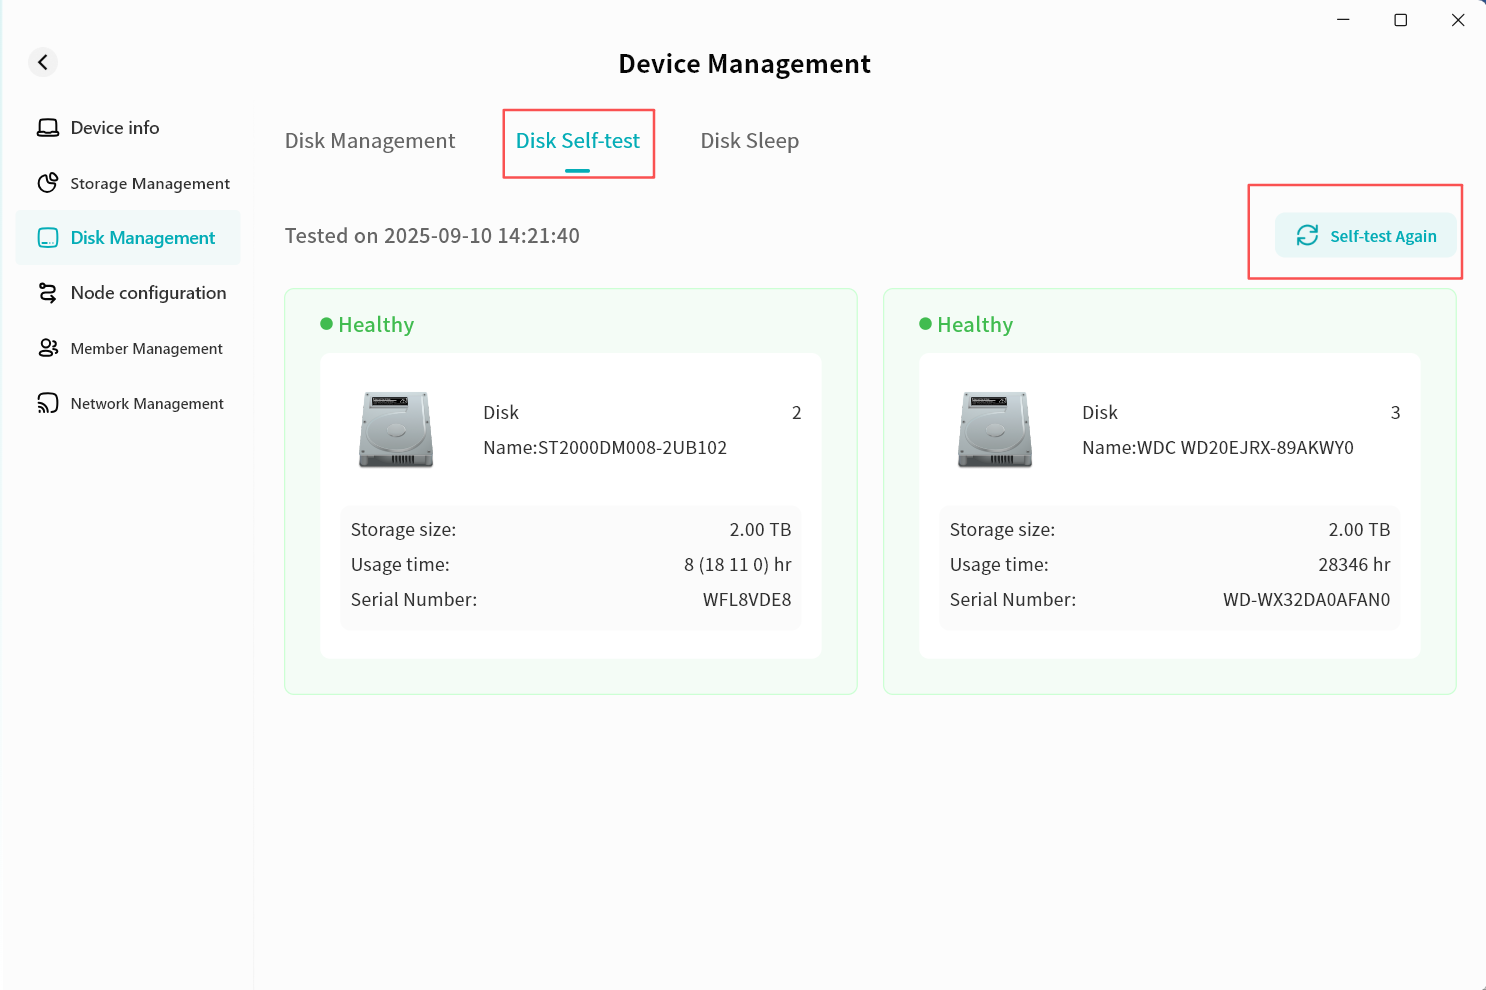
Disk Self-test
Performing a self-test on the hard drives helps you identify problematic disks in time and take appropriate action to prevent data loss.
We recommend running a disk self-test periodically to ensure data integrity.
To run a disk self-test:
-
Go to Device Information - Disk Management - Disk Self-test.
-
Click Self-test Again.
-
The system will begin scanning the hard drives. Please wait patiently for the process to complete (the time required may vary depending on disk size and type).
-
Once complete, you will see the current health status of the hard drive along with the self-check completion time.
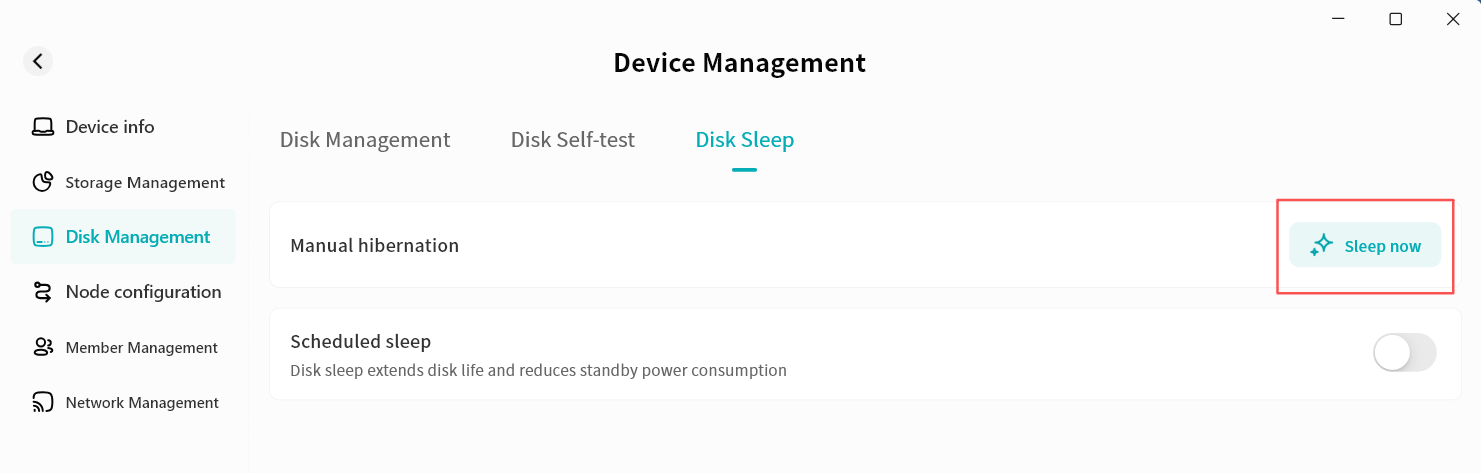
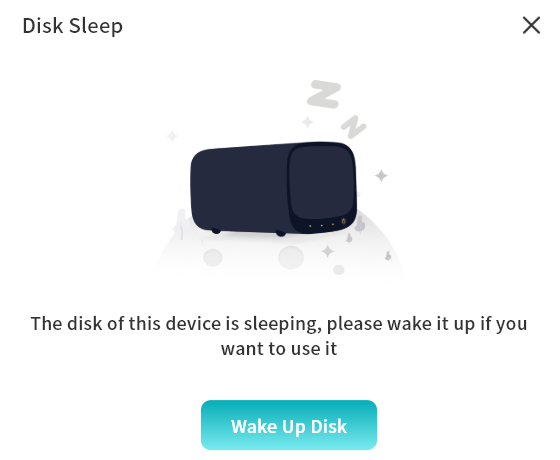
Disk Sleep
The purpose of disk sleep is to power-down hard drives when no read/write operations are occurring. This extends disk lifespan and reduces energy consumption while the device is idle.
Manual Hibernation
- Click Sleep Now.
- In the pop-up warning window, click Confirm. During disk hibernation, all applications and transfer tasks will be stopped.
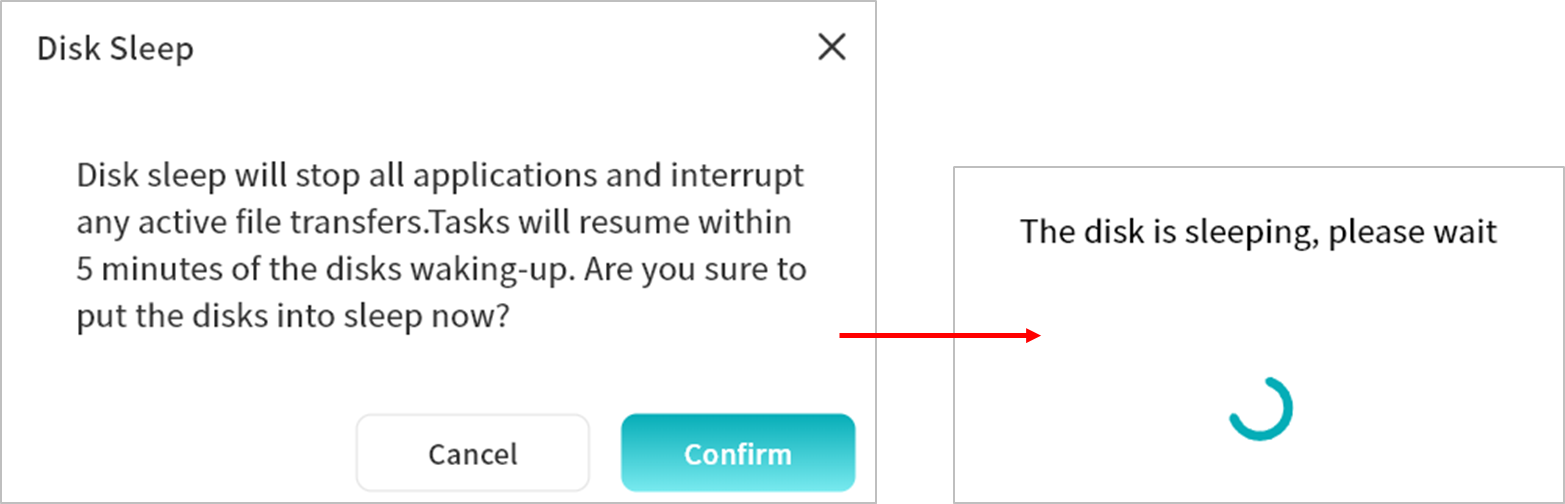
- Once the disk enters hibernation, a notification will appear.
Scheduled Sleep
-
Enable Scheduled Sleep to have the disks enter hibernation on a particular interval based on your usage of your DASSET Device.
-
After enabling, configure the specific hibernation rules:
-
System Time: The time zone of your client.
-
Wake Time / Sleep Time: Set the start and end times for disk System Time: The time zone of your client.
-
Repeat: Choose when the rule applies---Everyday, Weekdays, Weekends, or custom days of the week.
-
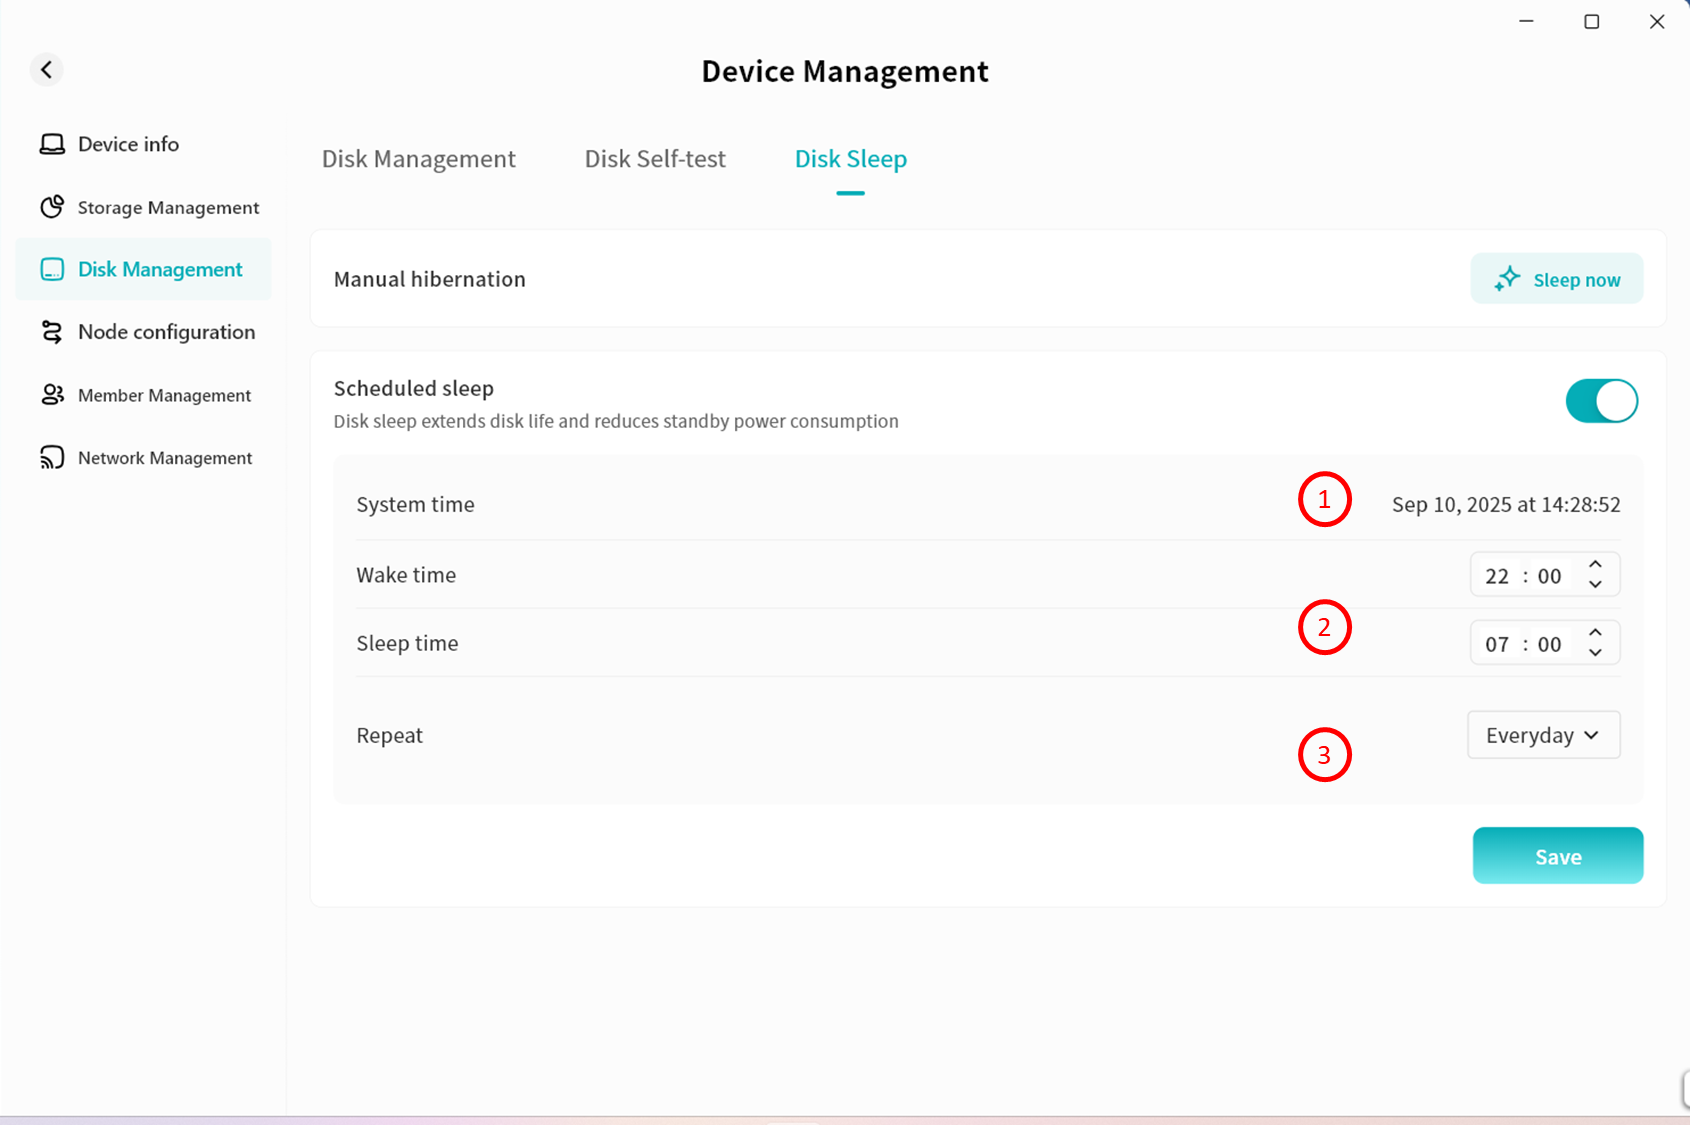
- If you no longer wish to use scheduled sleep, simply disable this option.
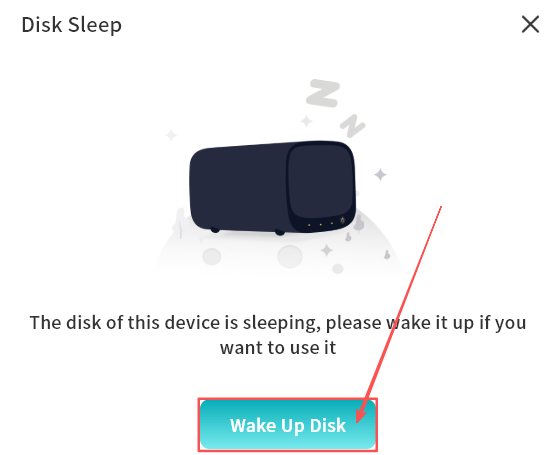
Wake Disk
After disks enter hibernation, the DASSET client will automatically prompt you upon accessing the device. You can click Wake Disk to re-enable the hard drives and resume normal operations on the DASSET device.

Node Configuration
Node configuration allows the DASSET device to expose its local network resources (e.g., at home) for remote access.
This enables users to access home network resources such as cameras, printers and other devices when they are not on the local network.
Only Owners and Administrators can configure this feature.
Example:
If you configure your home printer's IP address in Node Configuration, you can log in to the DASSET client from your office and use the DASSET device as a relay node to connect to your home printer for printing.
All communication during this process is encrypted.
Node Configuration provides three functions:
-
Allow access to the network through this node: When enabled, users can use this DASSET device as a relay node to access the Internet.
-
Use a dedicated DNS: Configure a dedicated DNS address so domain names can be resolved using your chosen DNS, avoiding domain pollution.
-
Allow access to the subnet of the device: Configure access to the local network resources where the DASSET device is located, enabling remote access via the DASSET hardware relay.
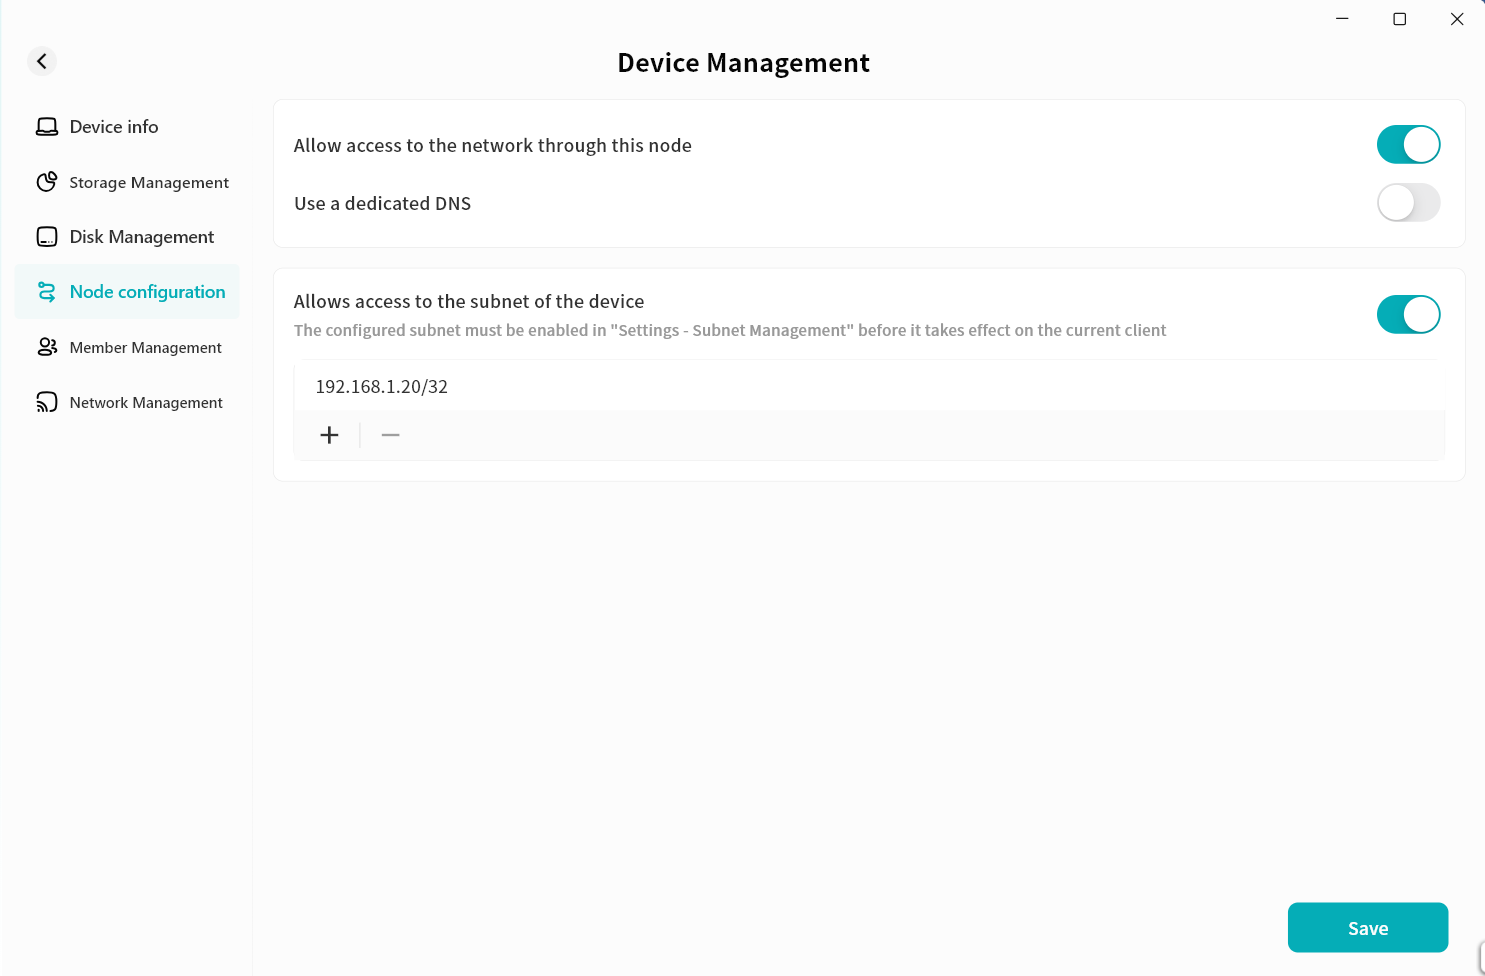
Allow access to the network through this node
When enabled, if you activate the Node function on the device home page, all your Internet traffic will first be sent to the DASSET device, and then forwarded to the target website.
Note: All communications are encrypted by the SDVN virtual network, so you do not need to worry about your data being decrypted or read by others.
Once enabled, all users bound to this device can use this function. Please enable it with caution.
Example:
If you are at a café in City A and need to use online banking but are concerned about Wi-Fi security, you can log in to the DASSET client and select the Node function on your home device in City B. Your online banking data will be encrypted and tunneled to the DASSET device in City B before being forwarded to the bank's server. Even if the café's Wi-Fi is being monitored, hackers cannot obtain your banking information because the traffic is encrypted.
Steps:
- Go to Device Management Node Configuration and enable Allow Internet Access Through This Node.
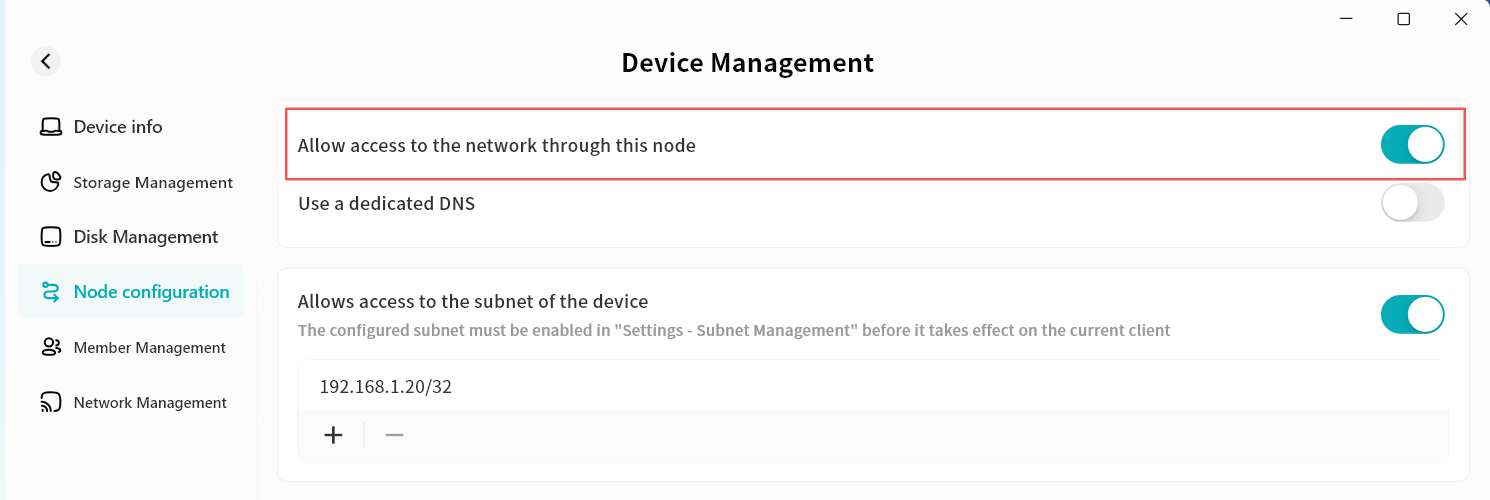
- After enabling, you will see a Node button appear on this device's card in the device home page.
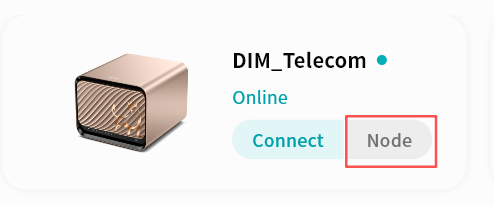
- Click Node, then confirm in the pop-up window.
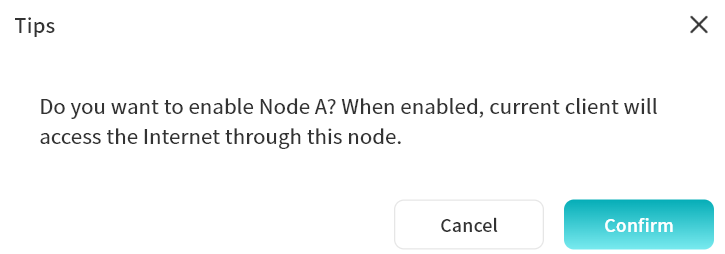
- The Node button will appear active, and all subsequent Internet access will be routed through this device.
Use Dedicated DNS
When enabled, you can configure a specific DNS server for domain name resolution. This is useful if Internet access through DASSET hardware seems slow, allowing you to choose a faster DNS server.
Ensure the DNS server you configure is valid. If it is unavailable, domain names may fail to resolve, making URLs inaccessible. If you are unsure, it is not recommended to enable this function.
Allow Access to Device Subnet
This function allows remote access to local network resources via the DASSET hardware relay.
Once configured, all users bound to this device can access the subnet IP addresses you specify. Configure carefully to avoid privacy risks. The device must be on the same LAN as the target subnet.
Example:
If you configure your home printer's IP address in Node Configuration, you can log in to the DASSET client from the office and use the device as a relay node to print documents remotely. All communication is encrypted.
Steps:
- Go to Device Management - Node Configuration and enable Allow Access to Device Subnet.
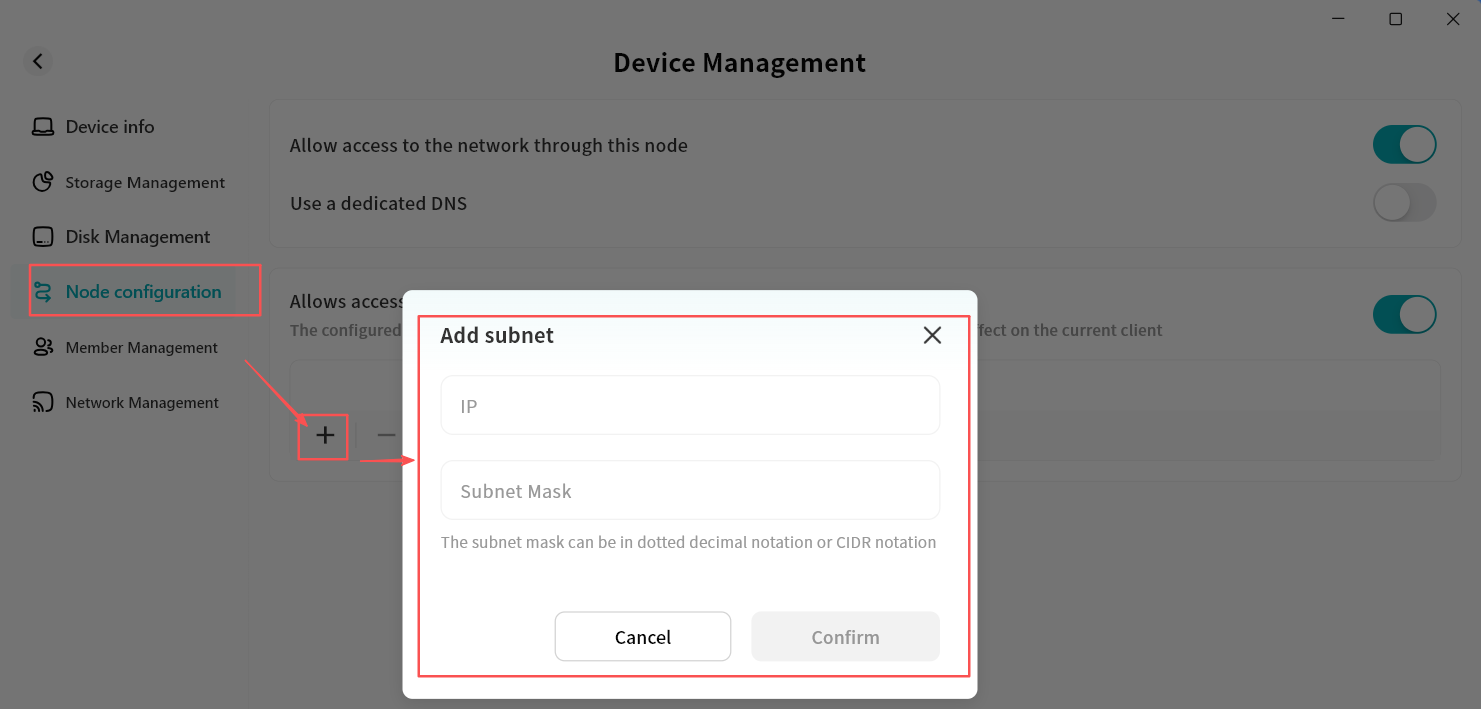
-
Click the "+" icon to add a new device or subnet for access.
- Sharing a single device: To access a single device, such as a printer, enter the IP address of the printer in the IP Address field. Enter /32 or 255.255.255.255 in the Subnet Mask field and click Confirm.
- Sharing an entire subnet: To access an entire subnet, which would provide access to all devices on the subnet, enter the subnet IP address with the last segment being "0" (eg; 192.168.5.0). Enter /24 in the Subnet Mask field and click Confirm
It is recommended to use subnet addresses to reduce the risk of IP conflicts.
Example Scenario: Remote Work
A user places a DASSET device in the office and enables sharing of the office computer's network resources.
While at home or on a business trip, the user can securely and easily control the office computer through the DASSET device, enabling efficient remote work.
Member Management
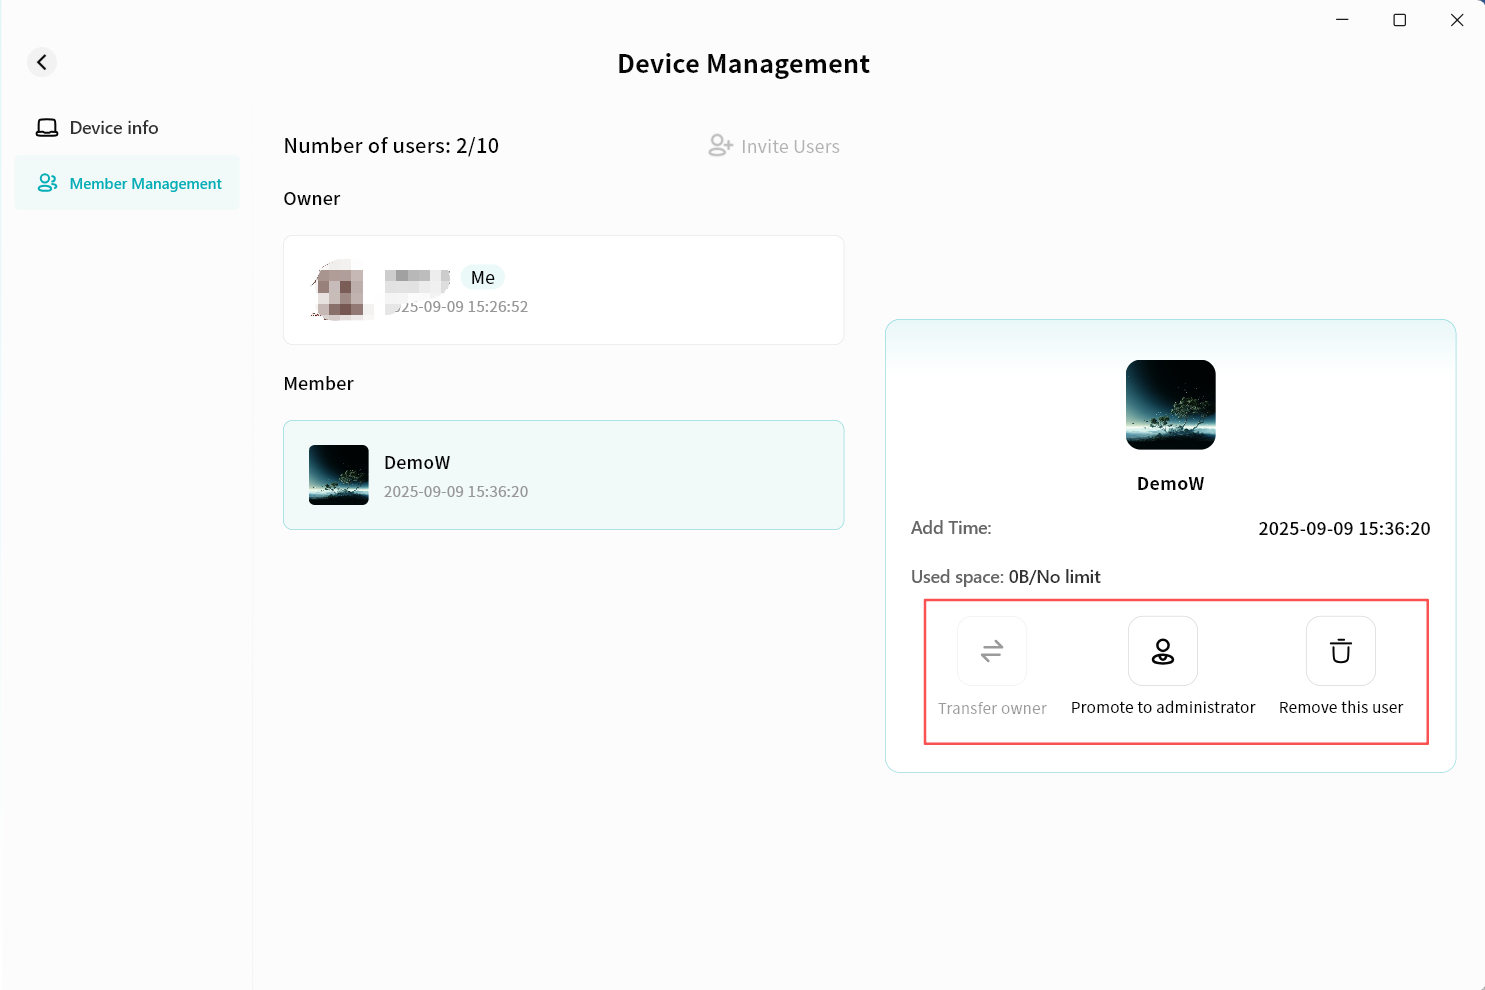
On the Member Management page, you can manage all members and their permissions, as well as invite others to join the device.
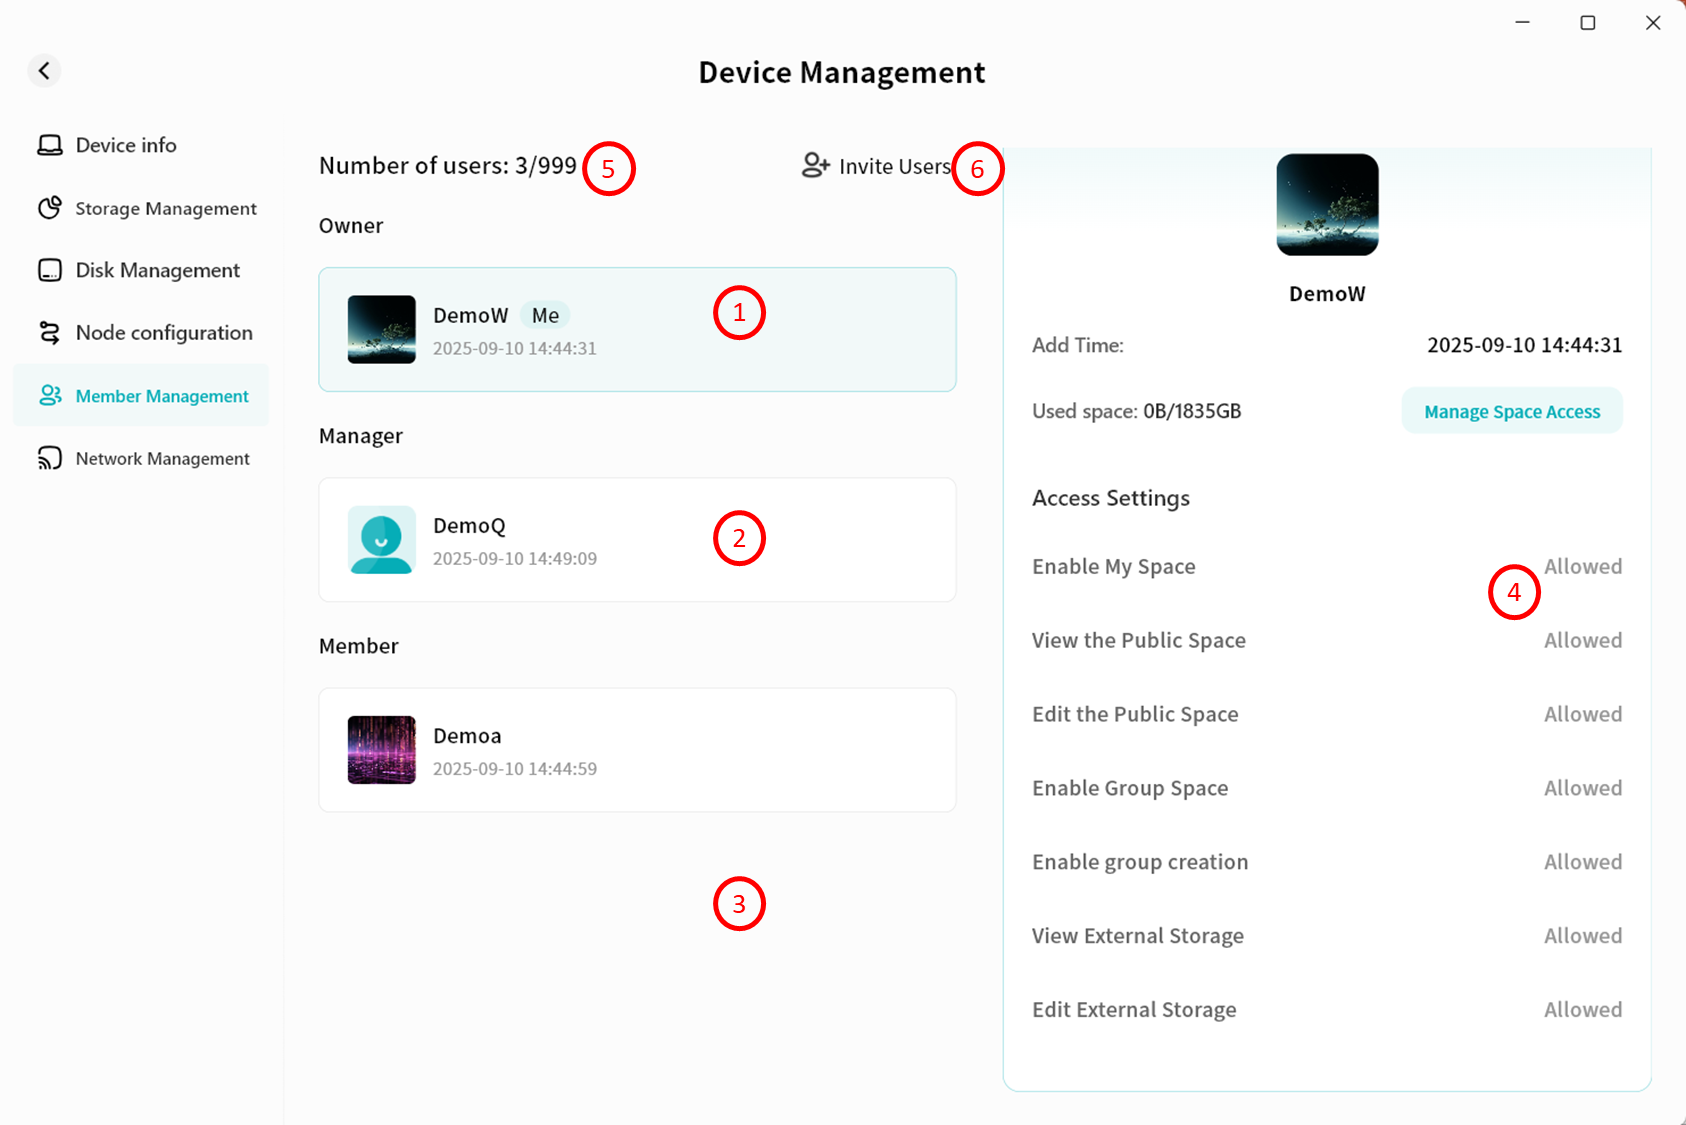
-
Owner: Displays the Owner's nickname and the time of device binding.
-
Manager/Administrator: Displays all Administrators' nicknames and their binding times.
-
Member: Displays all members' nicknames and their binding times.
-
Permission Details: Shows your specific permissions on this device.
-
User Count: Displays the number of users currently bound to the device and the maximum number of users allowed.
-
Invite Users: Generates an invitation code to invite others to join the device.
Only Owners and Administrators can view and configure member permissions. Members can only view their own permissions and cannot modify them.
User Roles in Device Binding
In DASSET, accounts are classified into different roles based on their permissions:
-
Owner: The first account to bind the device. Has full control over the device.
-
Administrator: A role assigned by the Owner to a member account. Has most device management permissions and can configure member permissions.
-
Member: Accounts invited to join the device default to member role, with only basic permissions.
Permission Description
The differences in permissions between user roles are shown in the table below:
| Permission Item | Owner | Administrator | Member |
|---|---|---|---|
| Manage account storage limit | √ | √ | |
| Read/Write My Space | √ | √ | √ |
| View Public Space | √ | √ | √ |
| Edit Public Space | √ | √ | |
| Use Group Space | √ | √ | √ |
| Create Groups | √ | √ | |
| View External Storage | √ | √ | |
| Edit External Storage | √ | ||
| Transfer Ownership | √ | ||
| Assign Administrator | √ | ||
| Remove Users | √ | √ |
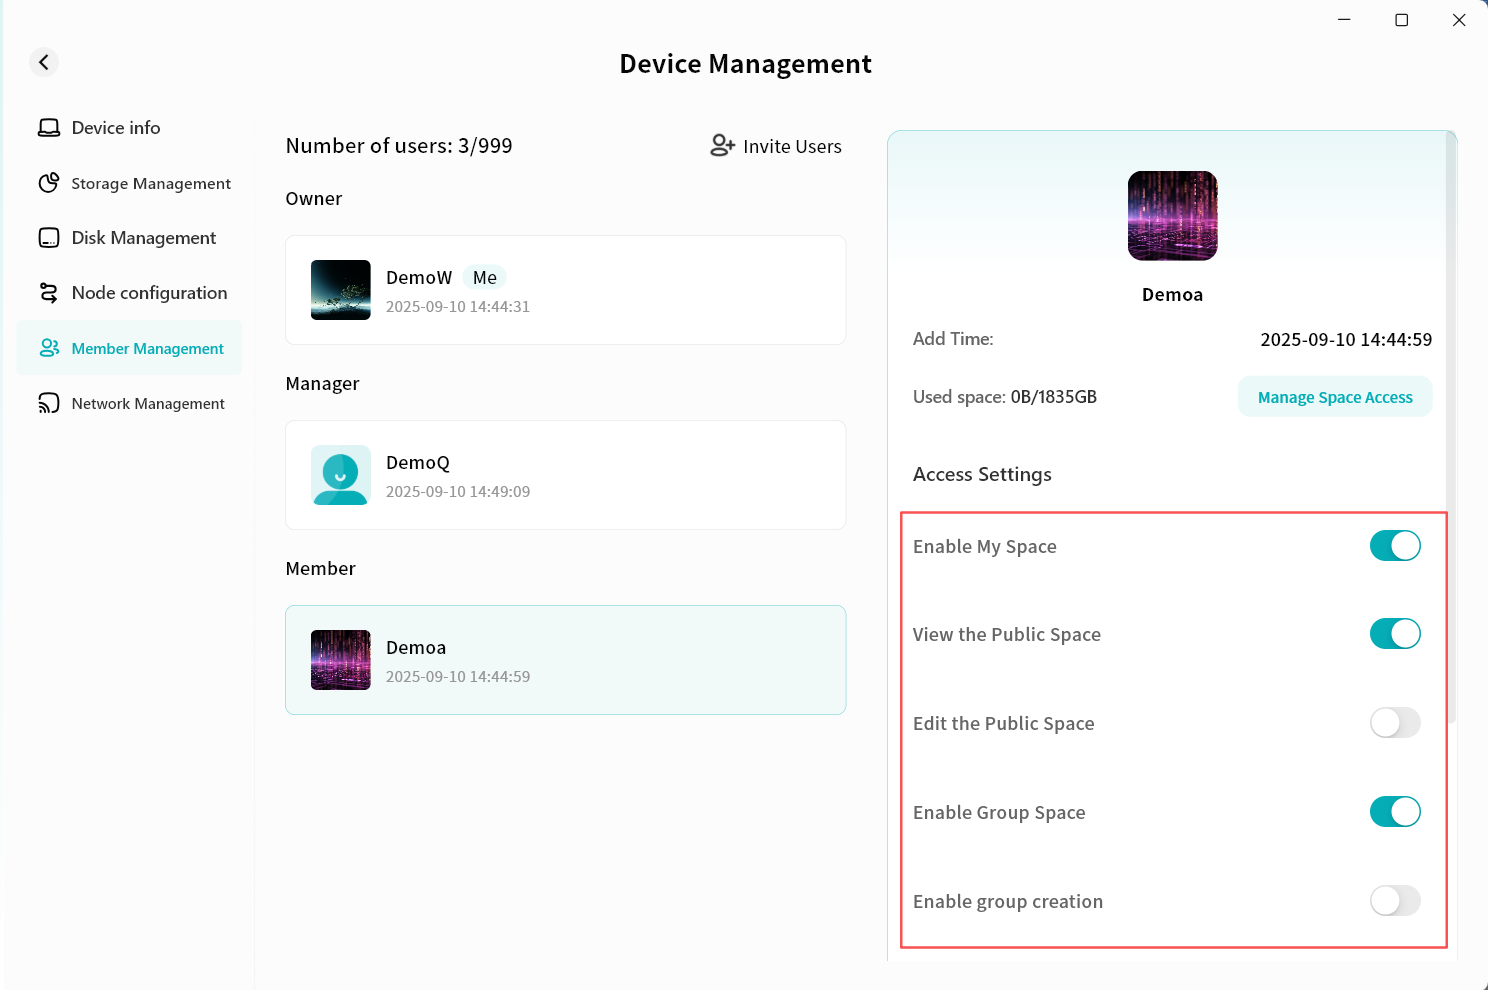
Adjust Member Permissions
You can configure detailed permissions for different members.
-
Select a member account, then in the Permission Details section on the right, enable or disable specific permissions for that member.
-
Owners can configure permissions for all users.
-
Administrators can configure permissions for member accounts.
Storage Quota Management
You can configure storage limits for different members:
-
Owners can set storage limits for all users.
-
Administrators can set storage limits for member accounts.
- Select a member account, then in the Permission Details section on the right, click Manage Space Access.
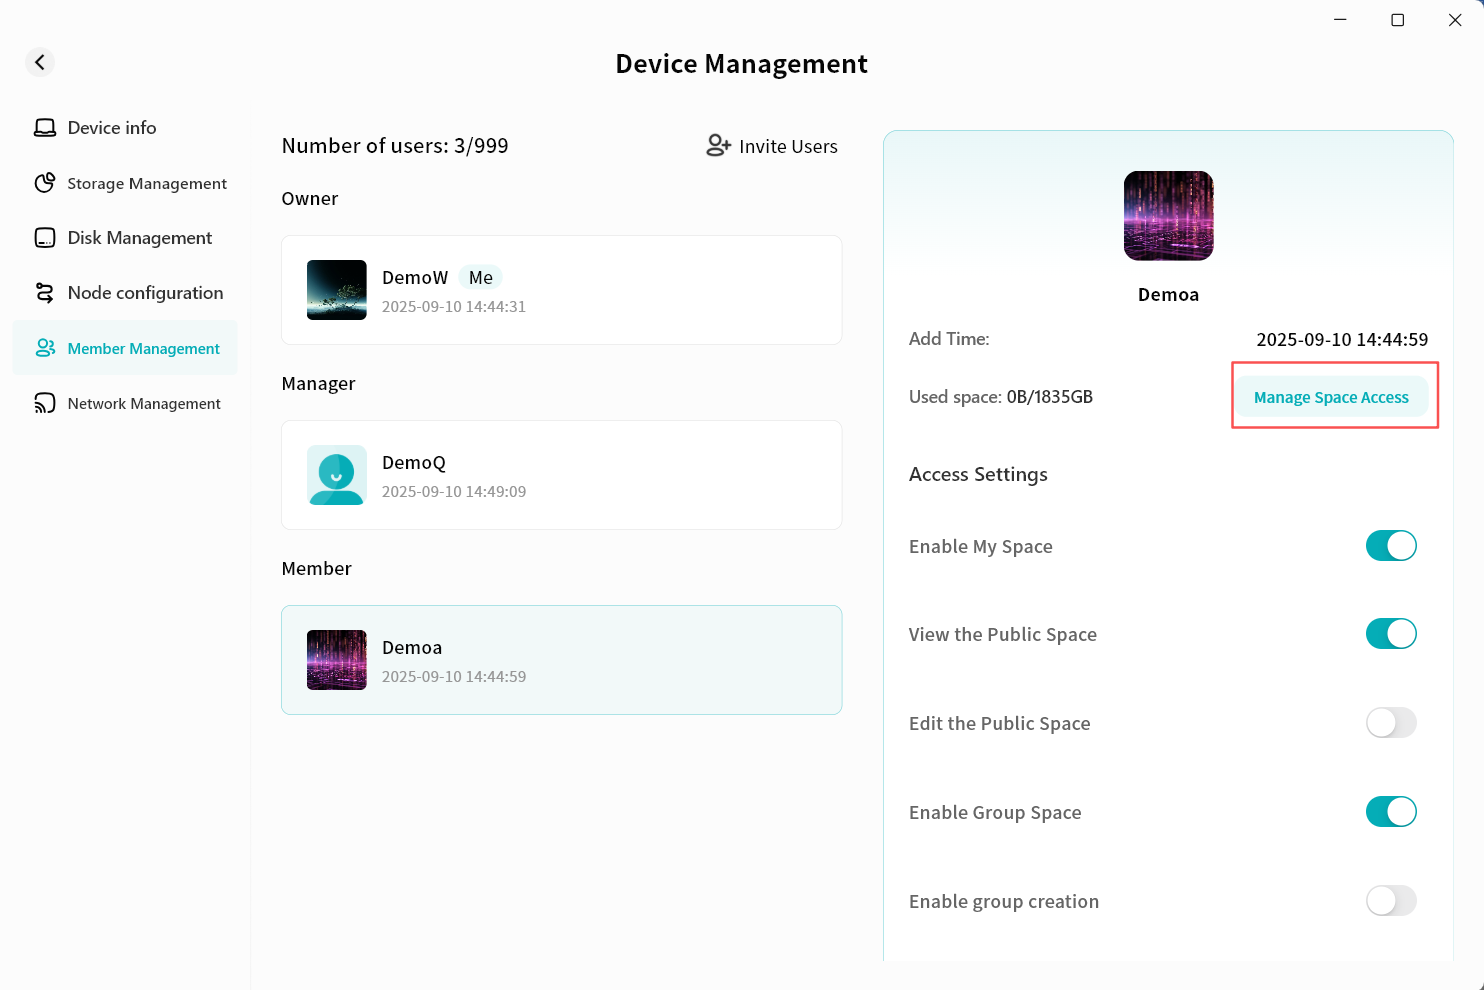
-
In the pop-up window, configure the available storage limit for the account:
-
No limit: No restriction on the member's storage usage.
-
Percentage: Allocate a percentage of the device's total capacity.
-
Customized Size: Set a fixed maximum capacity (in GB).
-
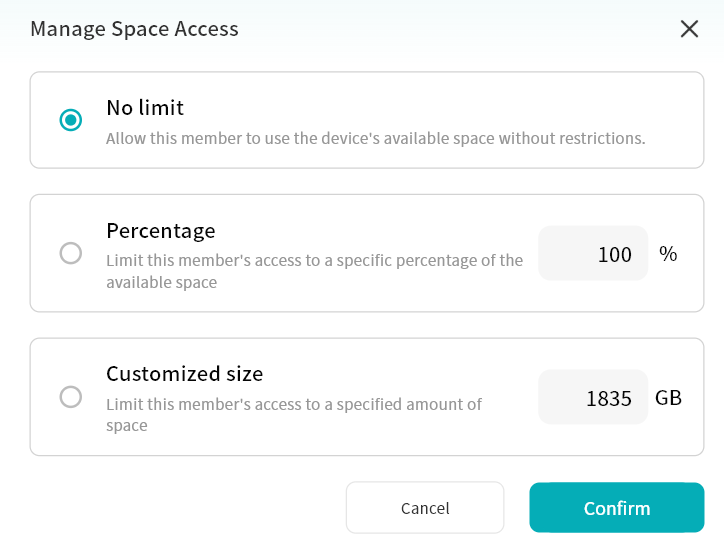
Once configured, the member will not be able to exceed the assigned quota.
Transfer Owner
The Owner can transfer device Ownership to another member account.
- Select a member account, then in the Permission Details section on the right, scroll down and click Transfer Owner.
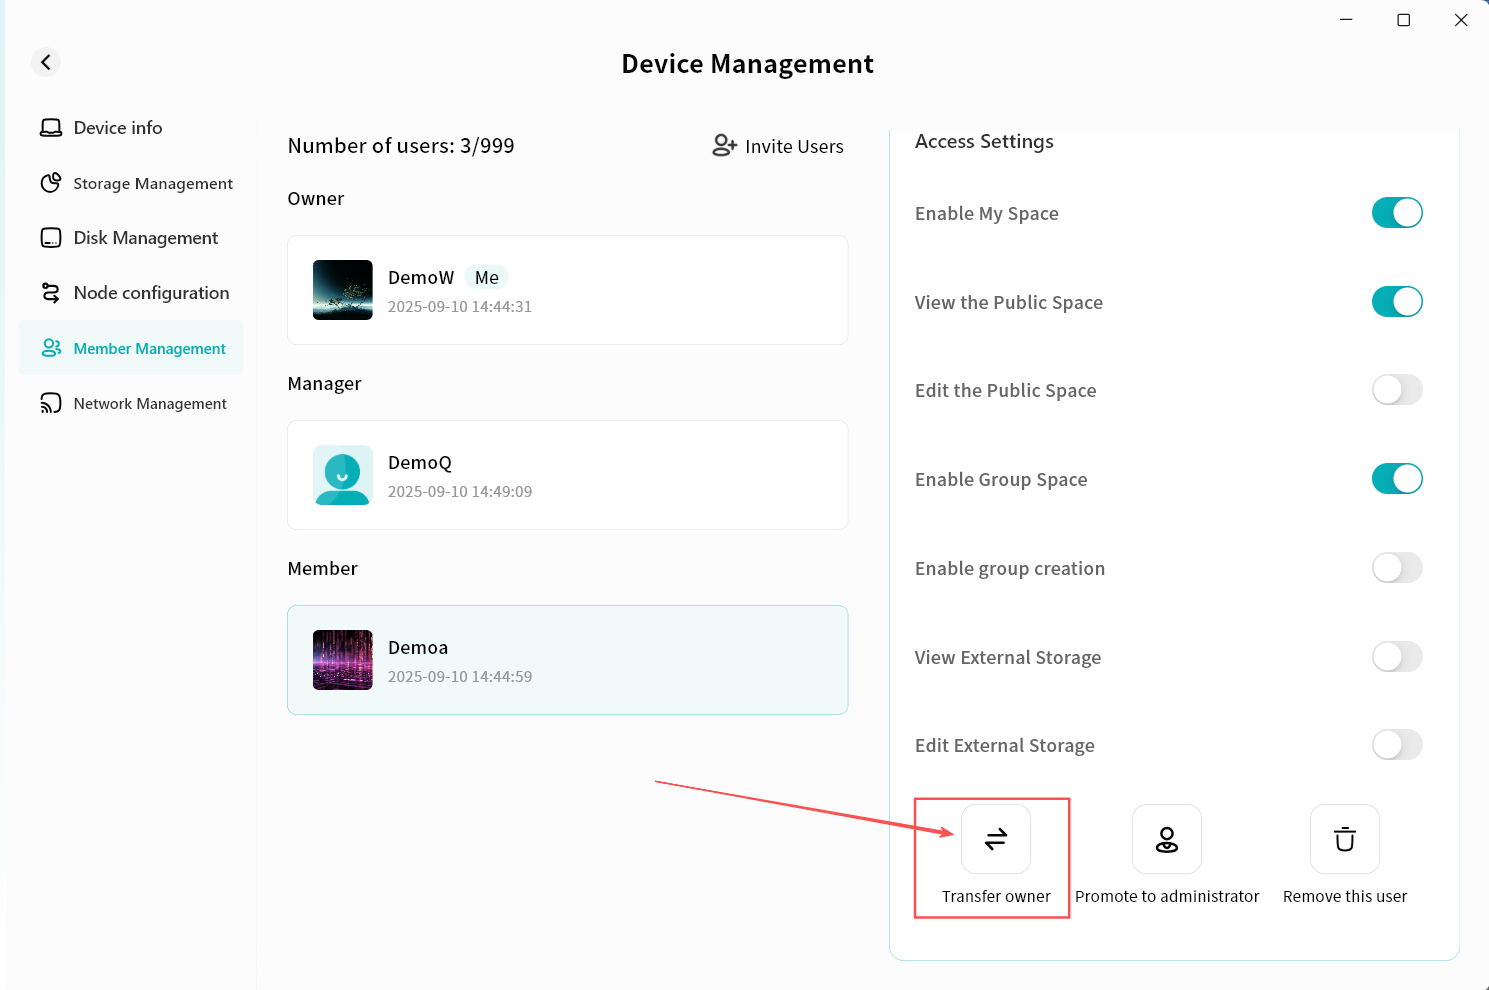
- In the pop-up window, click Transfer.

-
After transfer, the device will briefly go offline and then reconnect to update internal permission logic.
- Once back online, your account will become a member, and the selected account will become the device Owner.
Administrator Promotion and Demotion
Promote Member to Administrator
- Select a member account, then in the Permission Details section on the right, scroll down and click Promote to Administrator.
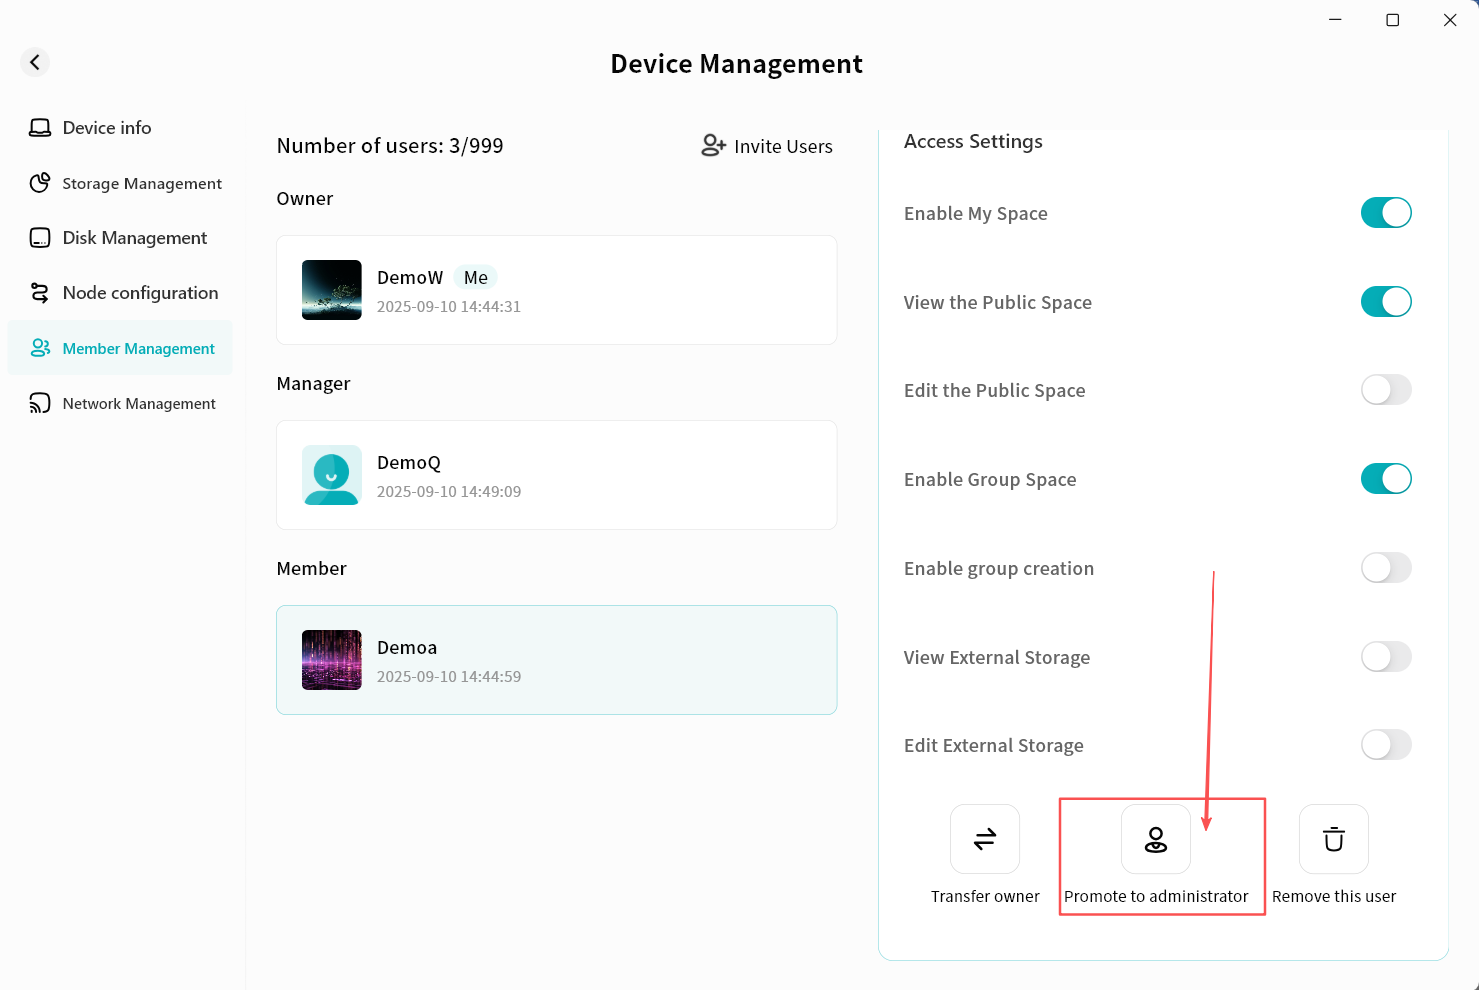
- The device will briefly go offline and then reconnect. After reconnection, the account will appear as an Administrator.
Demote Administrator to Member
- Select an Administrator account, then in the Permission Details section on the right, scroll down and click Demote to Member.
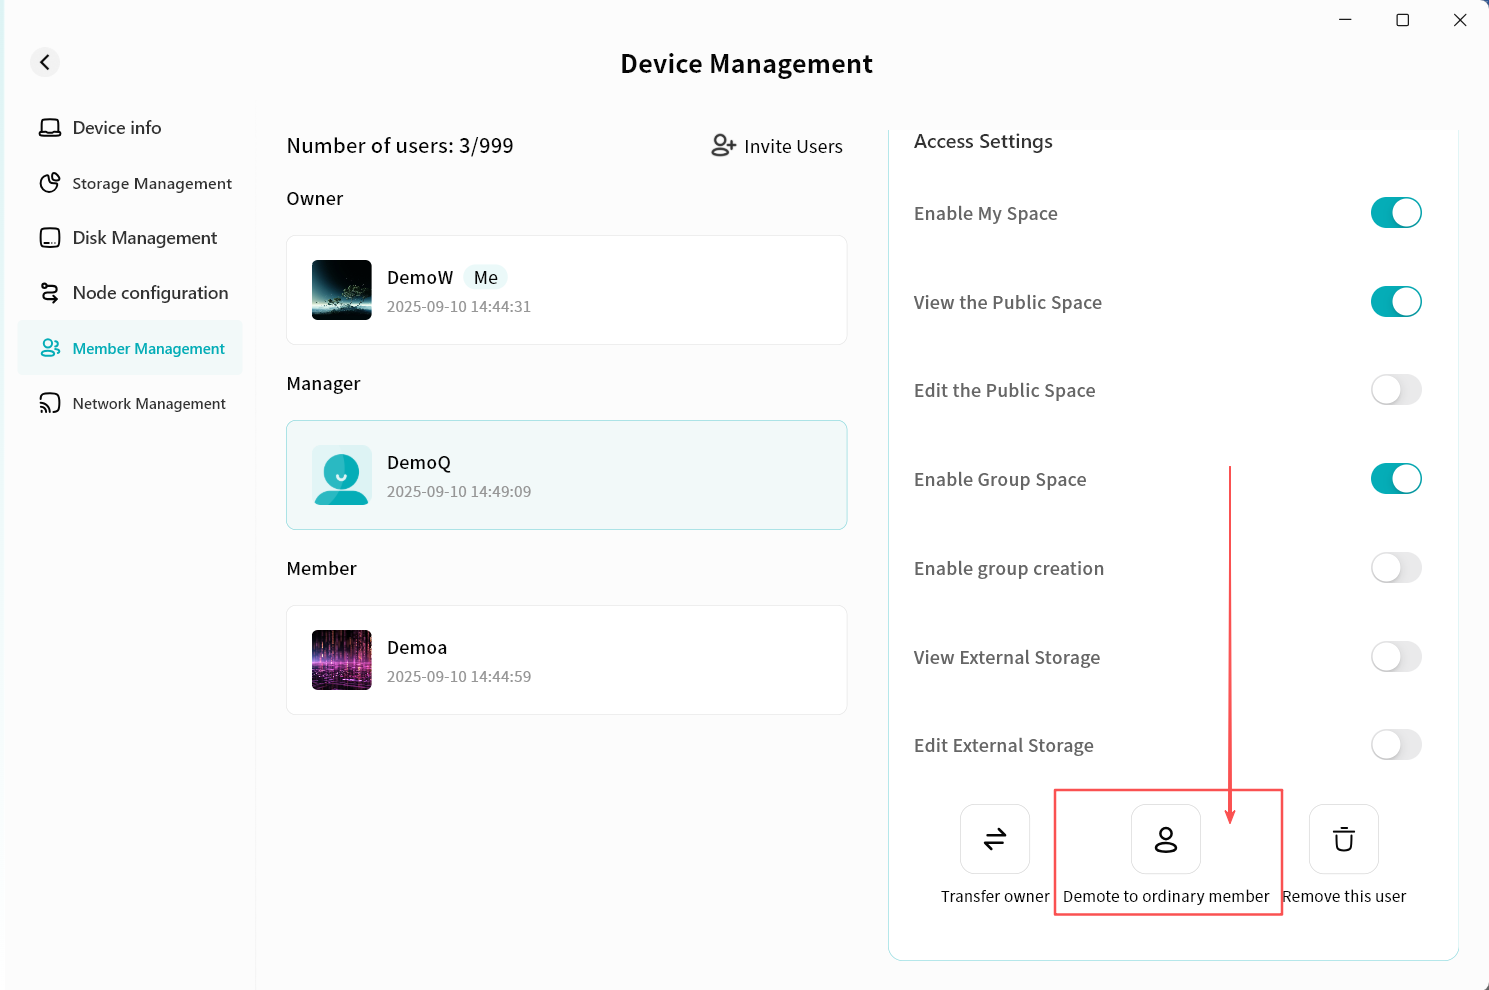
- The device will briefly go offline and then reconnect. After reconnection, the account will appear as a member.
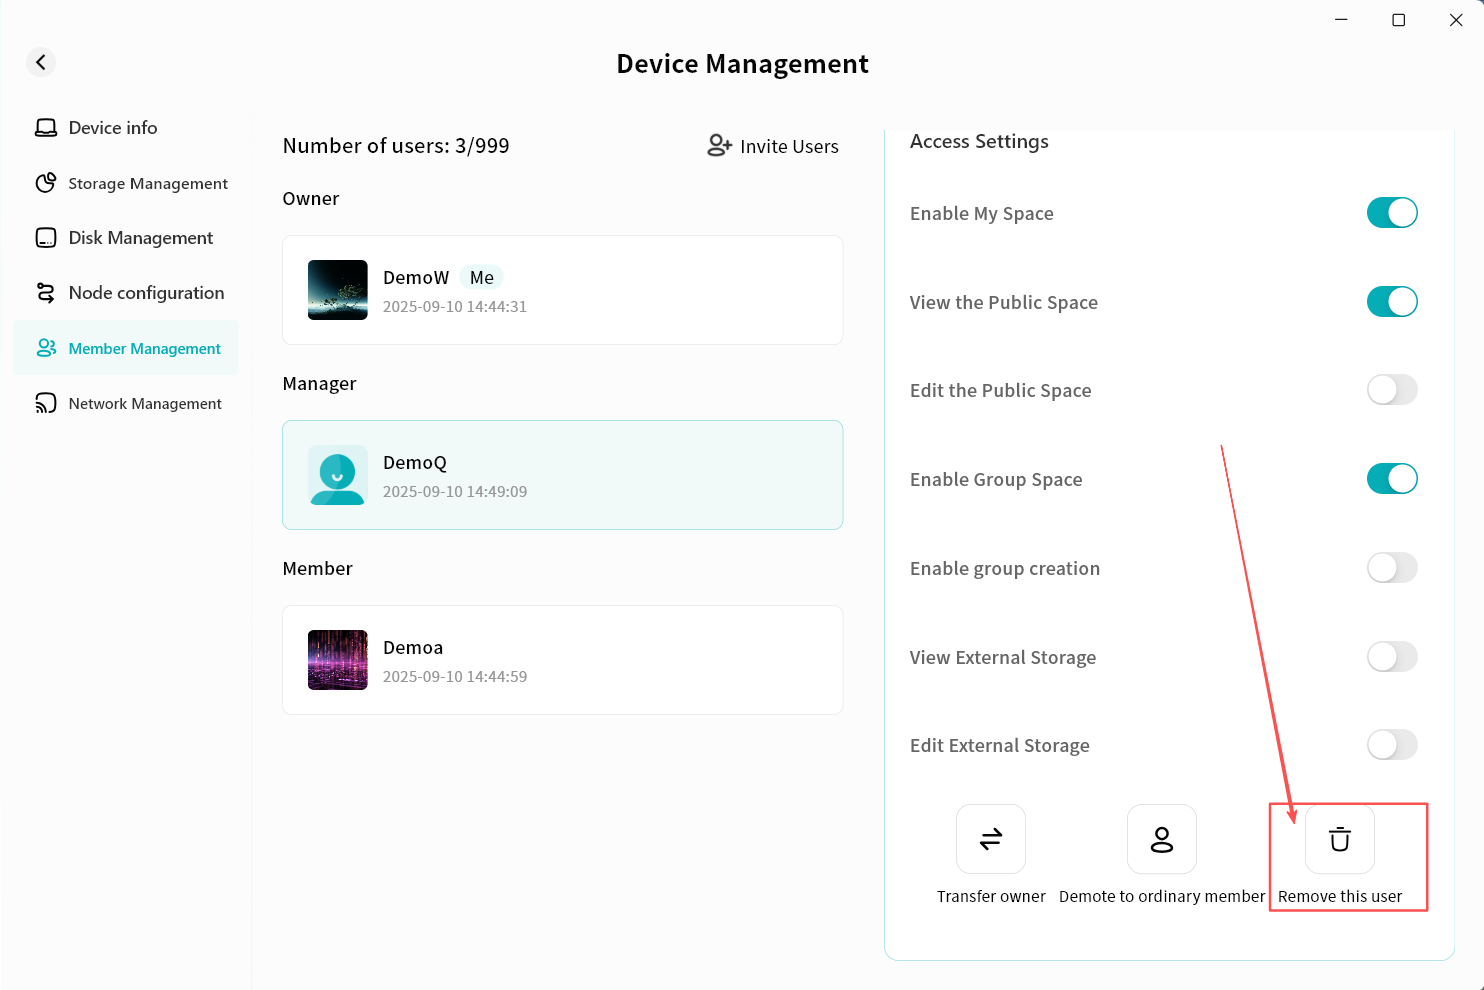
Remove User
You can remove a user to unbind them from the device. After removal, the user will no longer see the device.
-
Owners and Administrators can perform removals.
-
Owners can remove Administrators and members.
-
Administrators can remove members.
Steps:
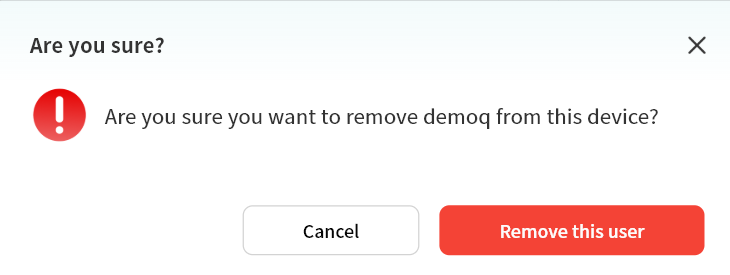
- Select a user account, then in the Permission Details section on the right, scroll down and click Remove This User.
-
In the pop-up window, click Remove This User. After system processing, the user will be removed from the device.
- When a user is removed, their personal storage data will also be cleared to free up space.
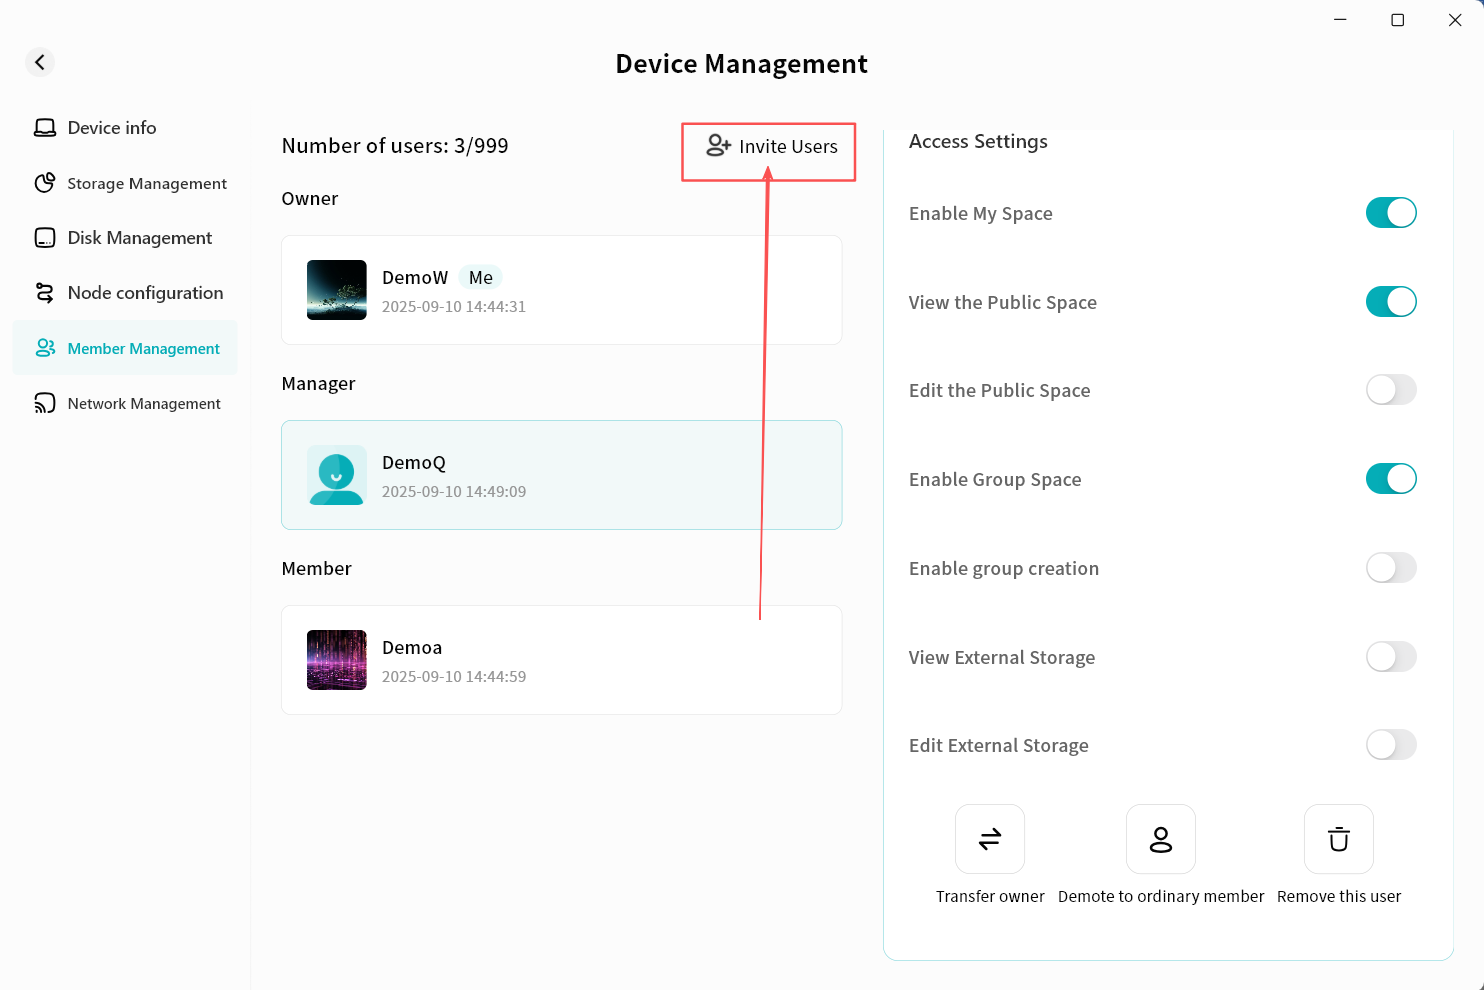
Invite Users
You can invite others to join the device via the Member Management page.
- Go to Device Management Member Management and click Invite Users.
-
The system will generate an invitation QR code window. You can send the QR code or invitation code to others.
-
On mobile: Scan the QR code with the DASSET mobile client.
-
On desktop: Enter the invitation code in the DASSET desktop client.
-
See the Add Device section for details on joining a device.
Options:
-
QR Code Display: Shows the invitation QR code.
-
QR Code Expiry: Valid until the specified time, after which it cannot be used.
-
Invitation Code: Equivalent to the QR code for invitation purposes.
-
Enable Sharing: Must be enabled to generate the invitation QR code.
-
Require Verification to add device: If enabled, Owner/Administrator approval is required before new users can join.
-
Allow regular Members to invite: If enabled, regular member accounts can also invite others.
-
Download QR Code: Save the QR code image to your computer's download directory.
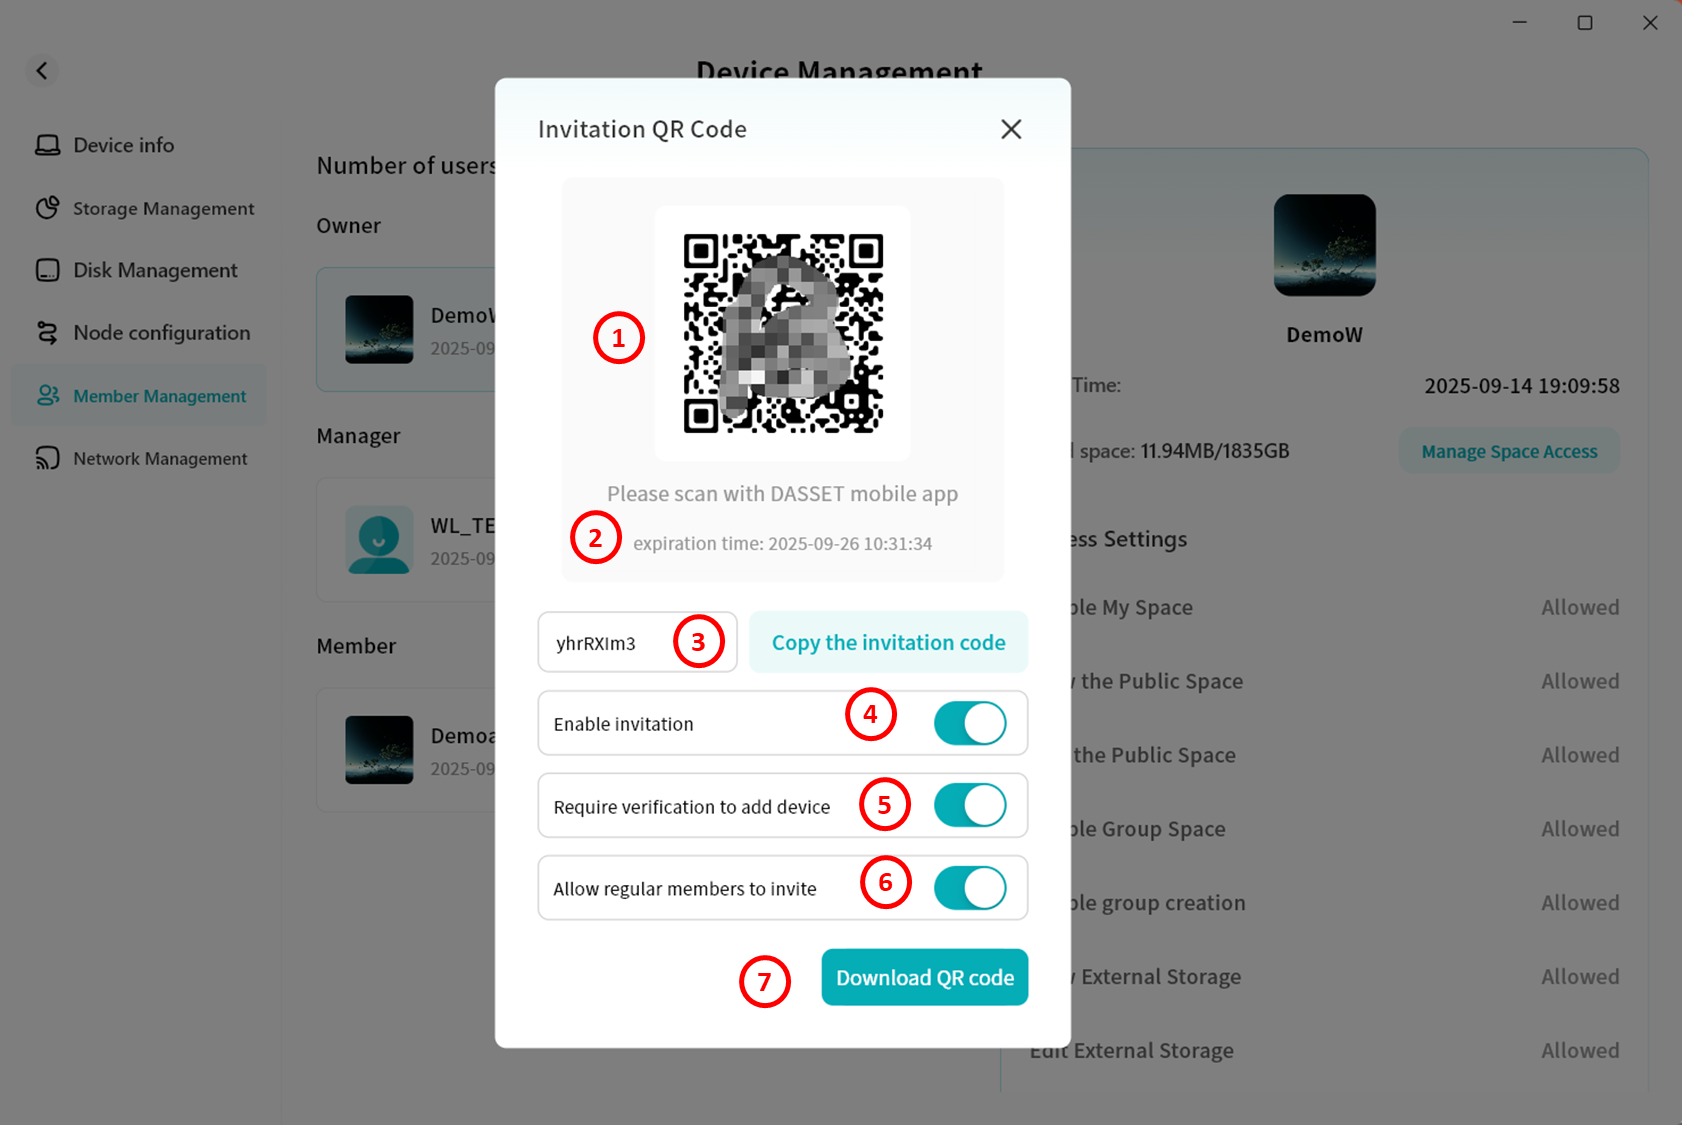
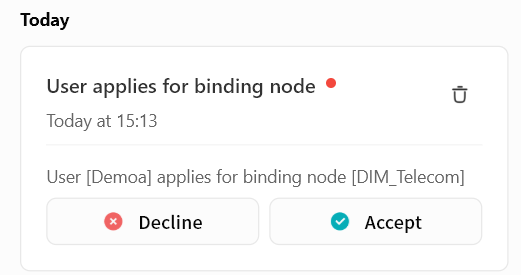
- If Verification Required is enabled, when someone applies to join, the Owner/Administrator will see a notification in the system. Only after clicking Accept will the user be bound to the device.
Network Management
On the Network Management page, you can configure:
-
LAN Settings: Change the password for Samba and Time Machine access.
-
LAN IP Management: Configure the DASSET device's network information.
-
Link Aggregation: If your device has multiple network ports, you can aggregate them into a single logical port to improve transfer performance.
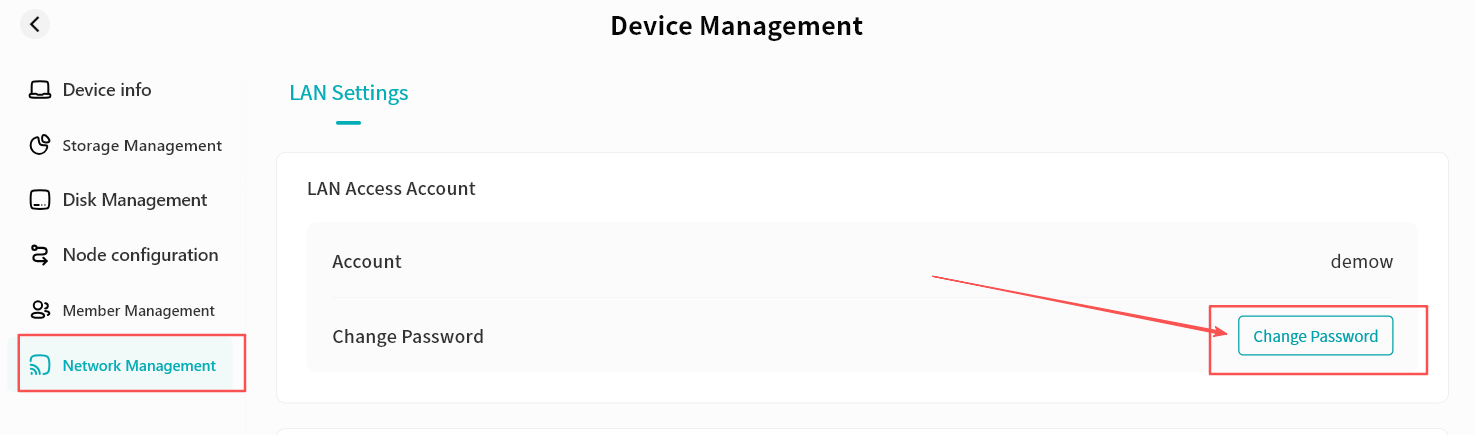
LAN Settings
-
Click Change Password.
-
In the pop-up window, enter the new password and click Confirm.
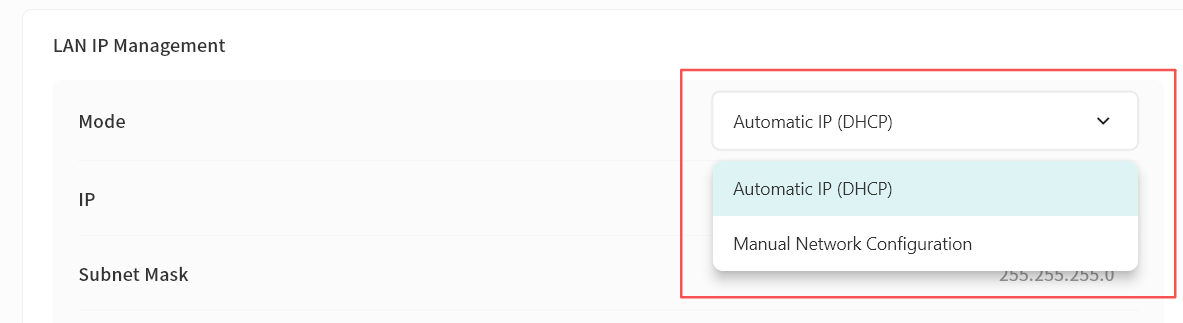
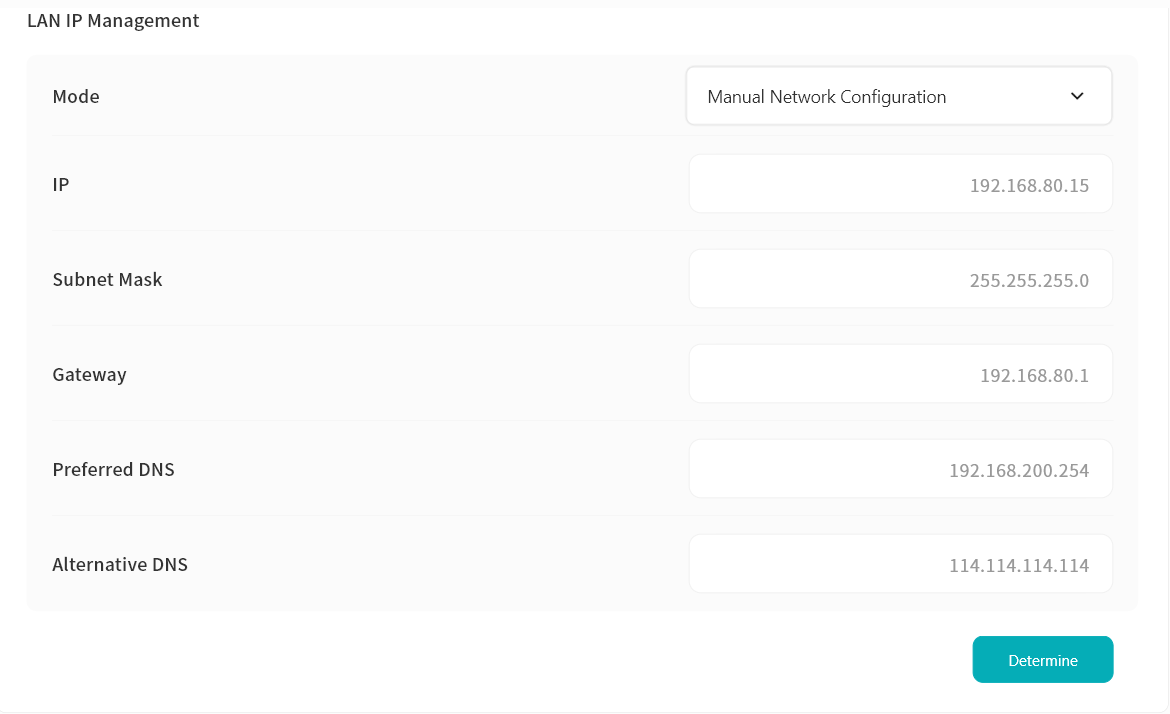
LAN IP Management
LAN IP address management supports two modes:
-
Automatic IP (DHCP): The switch assigns the device an IP automatically, requiring no manual configuration. Suitable for out-of-the-box use without networking knowledge.
-
Manual Network Configuration: Assign a fixed IP address to the device. Recommended for scenarios requiring a stable IP, such as Samba services.
When manually configuring IP, ensure the address matches the connected network segment and is not already in use. If the device cannot come online after manual configuration, press and hold the device's reset button to restore IP settings.
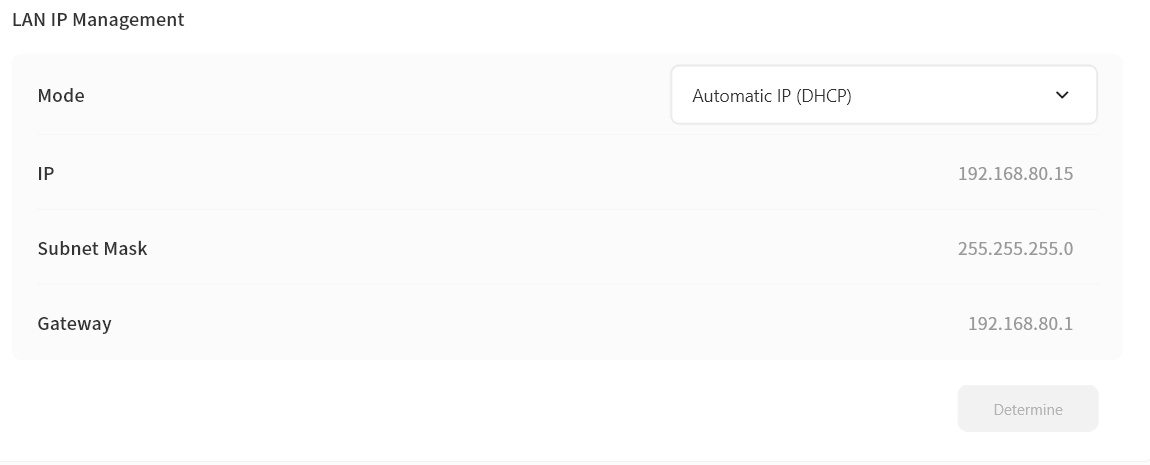
Automatic IP (DHCP)
By default, DASSET devices use DHCP for ease of setup.
On the LAN IP Management page, you can view:
-
Current IP address of the device
-
Subnet mask
-
Gateway IP address
DHCP-assigned IPs cannot be modified manually.
Manual Network Configuration
Recommended for Samba or similar services to avoid IP changes caused by DHCP.
When enabled, you can configure:
-
IP address
-
Subnet mask
-
Gateway
-
Primary and secondary DNS
After setup, you can access services like Samba using the fixed IP address.
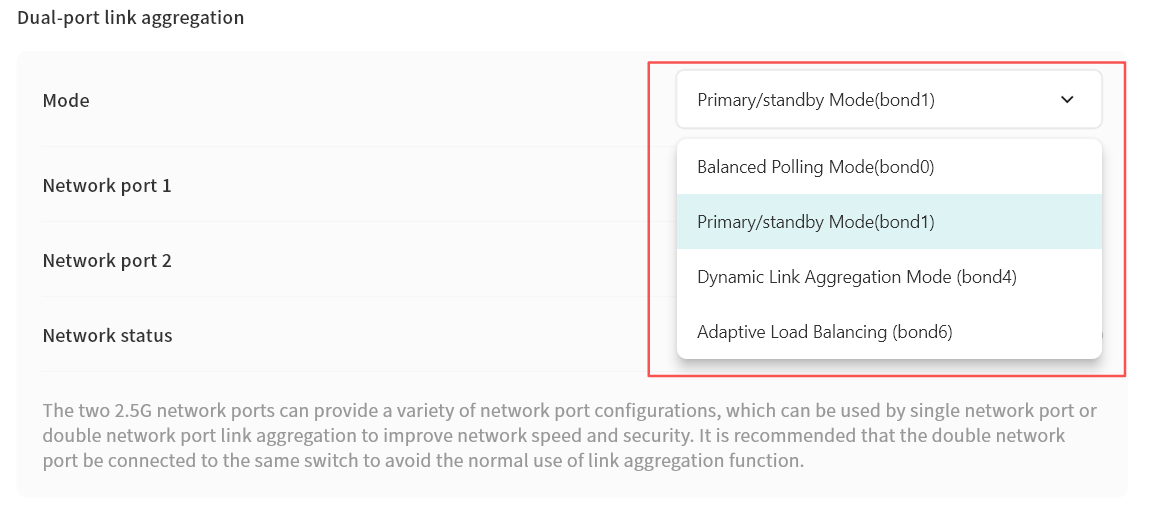
Dual-port Link Aggregation
If your device has multiple network ports, you can connect multiple cables and configure link modes in Network Management:
-
Balance Polling Mode: Network ports take turns transmitting packets, providing load balancing and fault tolerance. Requires switch support for port aggregation.
-
Primary/standby Mode: One port is active while the other serves as backup. The backup port takes over if the primary fails.
-
Dynamic Link Aggregation (IEEE 802.3ad LACP): For switches supporting LACP. Provides real-time link monitoring, load balancing, and failover.
-
Adaptive Load Balancing: Distributes traffic automatically across ports without requiring special switch support.
To avoid issues, connect both network ports to the same switch when using link aggregation.
File Management
Storage Spaces
DASSET does not expose the entire filesystem to ensure system files are not inadvertently removed or deleted. Additionally, this provides an extra layer of security where Owners or Administrator cannot access the data of other members on the device.
User data is exposed to through the implementation of three logical storage spaces in the DASSET system:
-
My Space - Accessible only to the logged-in user. Other members cannot view or modify files saved here.
-
Public Space - Accessible by all users bound to the DASSET device. Read/write permissions vary by user and can be configured.
-
Group Space - Accessible only by users within the same group.
File Management
The DASSET file browsing interface is similar to a standard file explorer UI, so you can use it with minimal learning.
-
Quick Space Entry: Switch quickly between My Space, Public Space, and Group Space.
-
Forward/Back: Navigate to the previous or next directory.
-
Refresh: Reload the current page to display the latest file changes (DASSET also auto-refreshes periodically).
-
Full Path Display: Shows the complete path of the current page. You can click any folder in the path to jump directly to it.
-
Search Bar: Enter a file name to search within the current directory and its subdirectories.
-
Function Bar: Perform operations on files/folders, including upload, download, copy, move, share, and delete.
-
File Filter Button: Display only certain file types, such as pc-images, videos, audio, documents, or compressed files.
-
Sort and View Options:
- Sort files by name, size, or modification date.
- Display files in list view or grid view.
-
File List Display: Shows file name, size, and modification date.
-
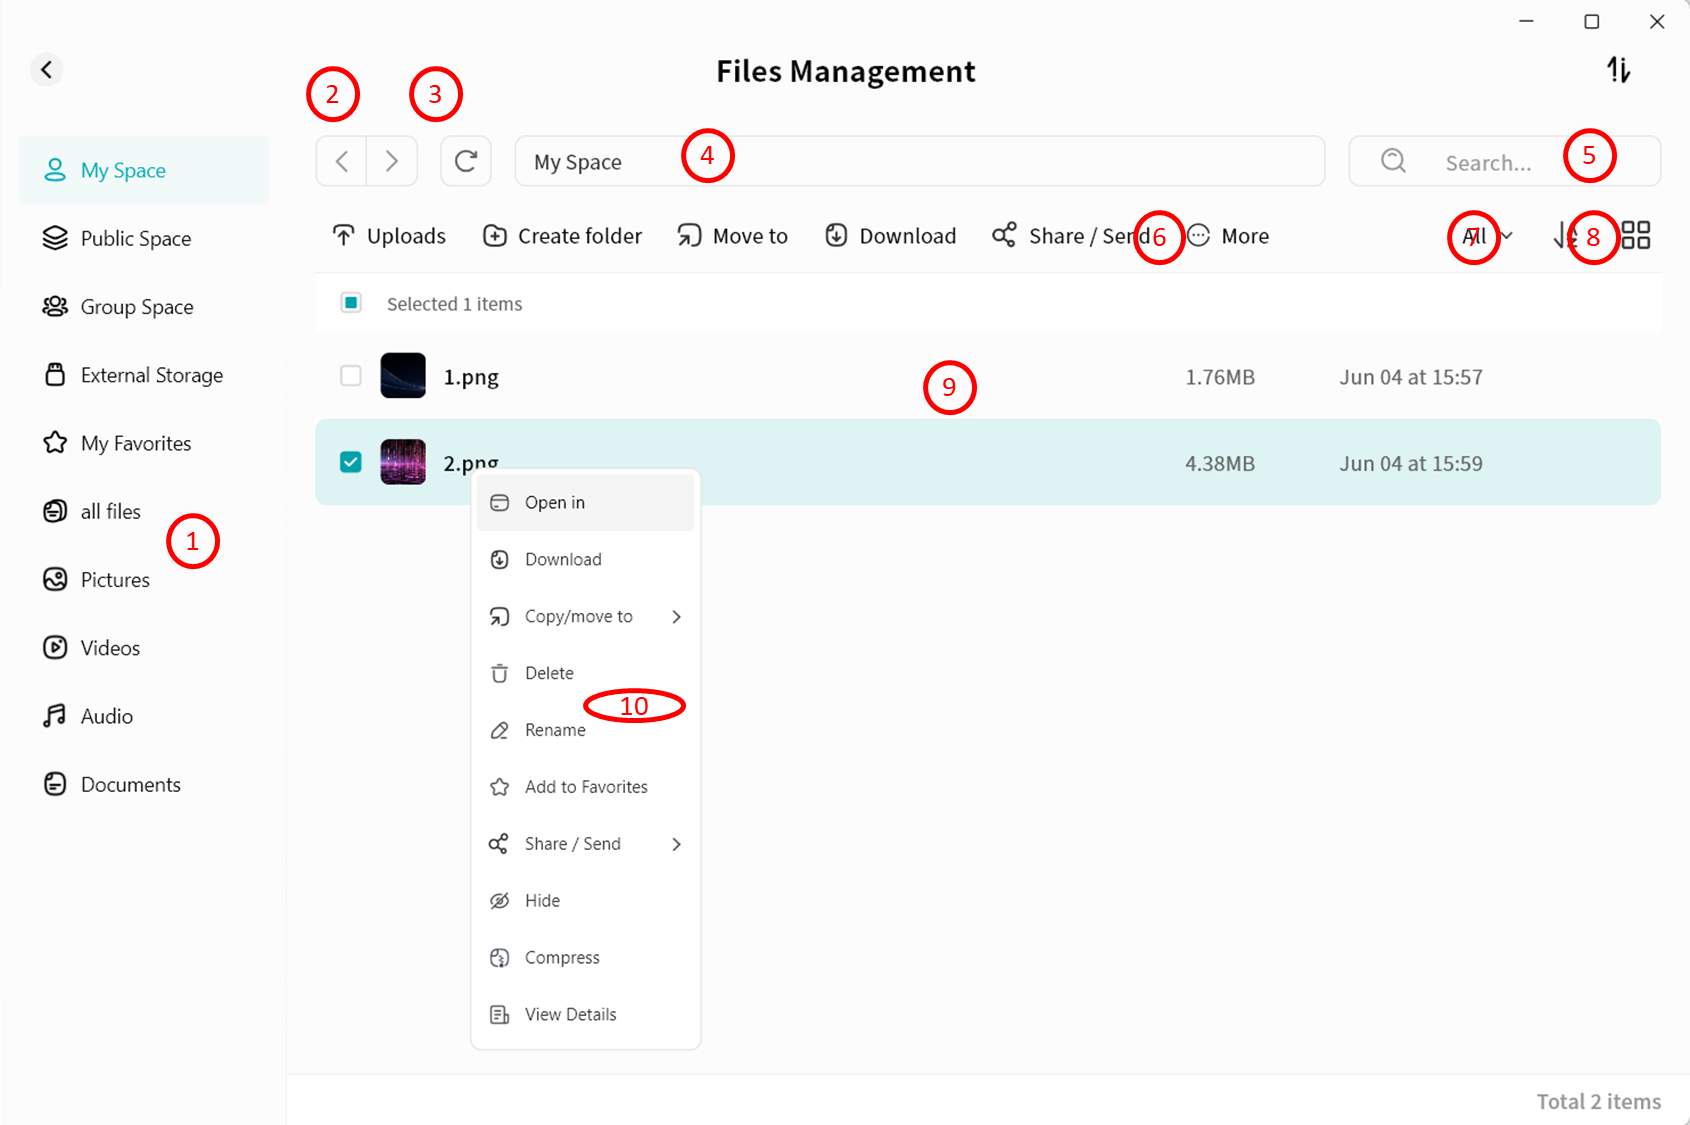
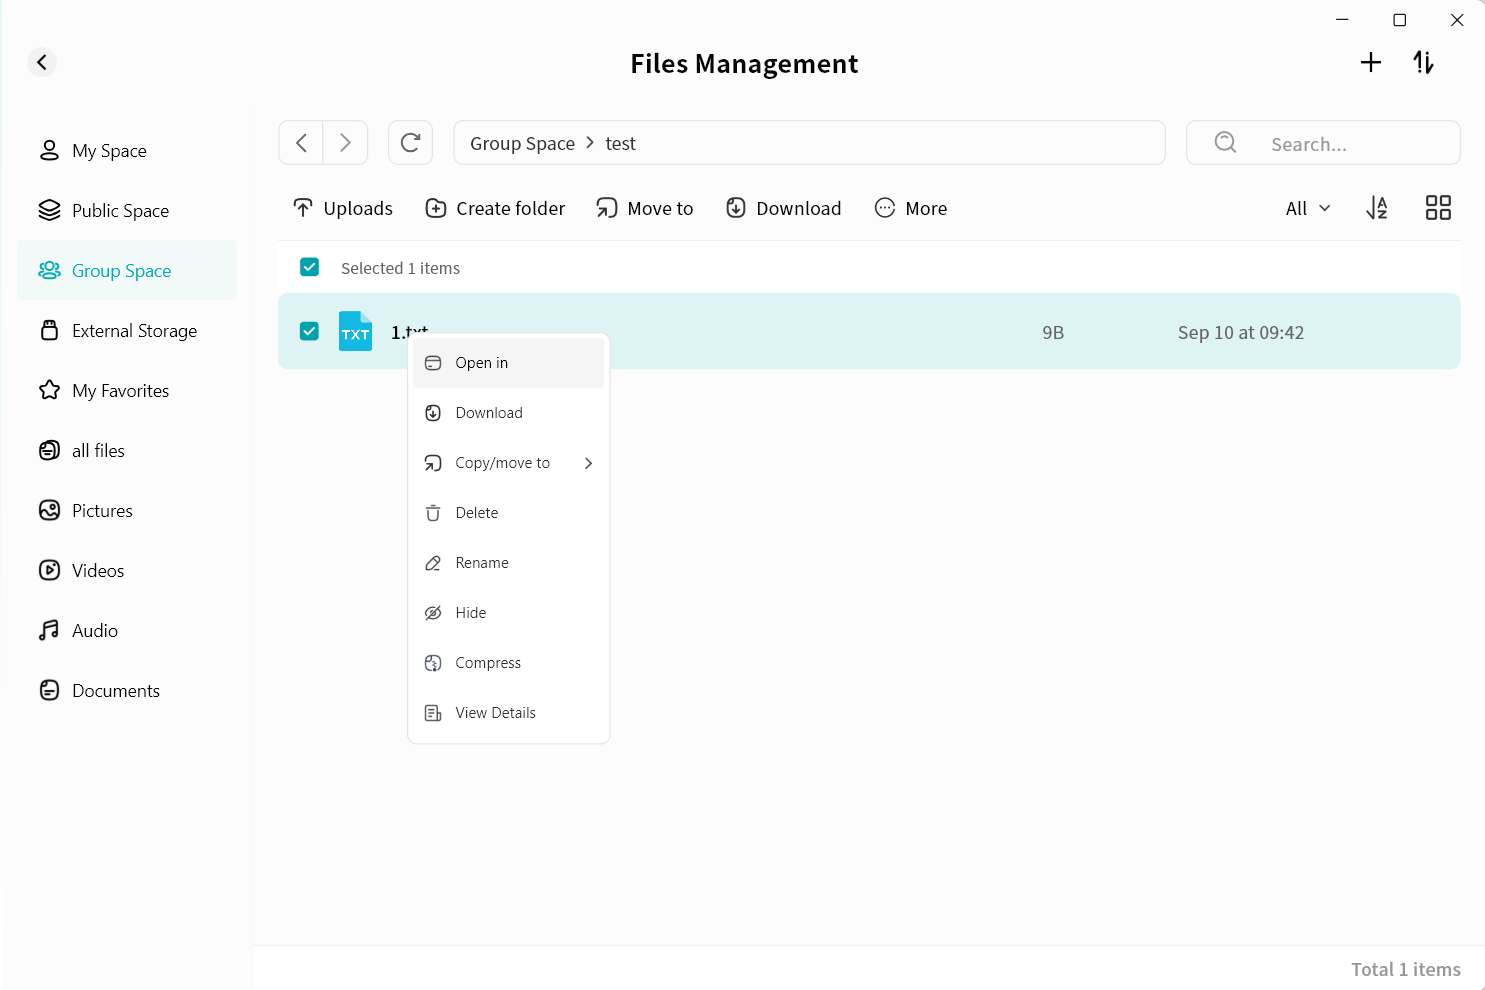
Right-Click Menu: Provides the same operations as the Function Bar.
Quick Space Entry
You can click different entries to quickly access the root directory of each space:
-
My Space
-
Public Space
-
Group Space: Displays all groups you belong to.
-
External Storage: Includes USB-connected storage devices and internal drives configured as external disks.
-
Favorites: Displays all files marked as favorites.
-
All Files: Displays all files in My Space (folders not shown).
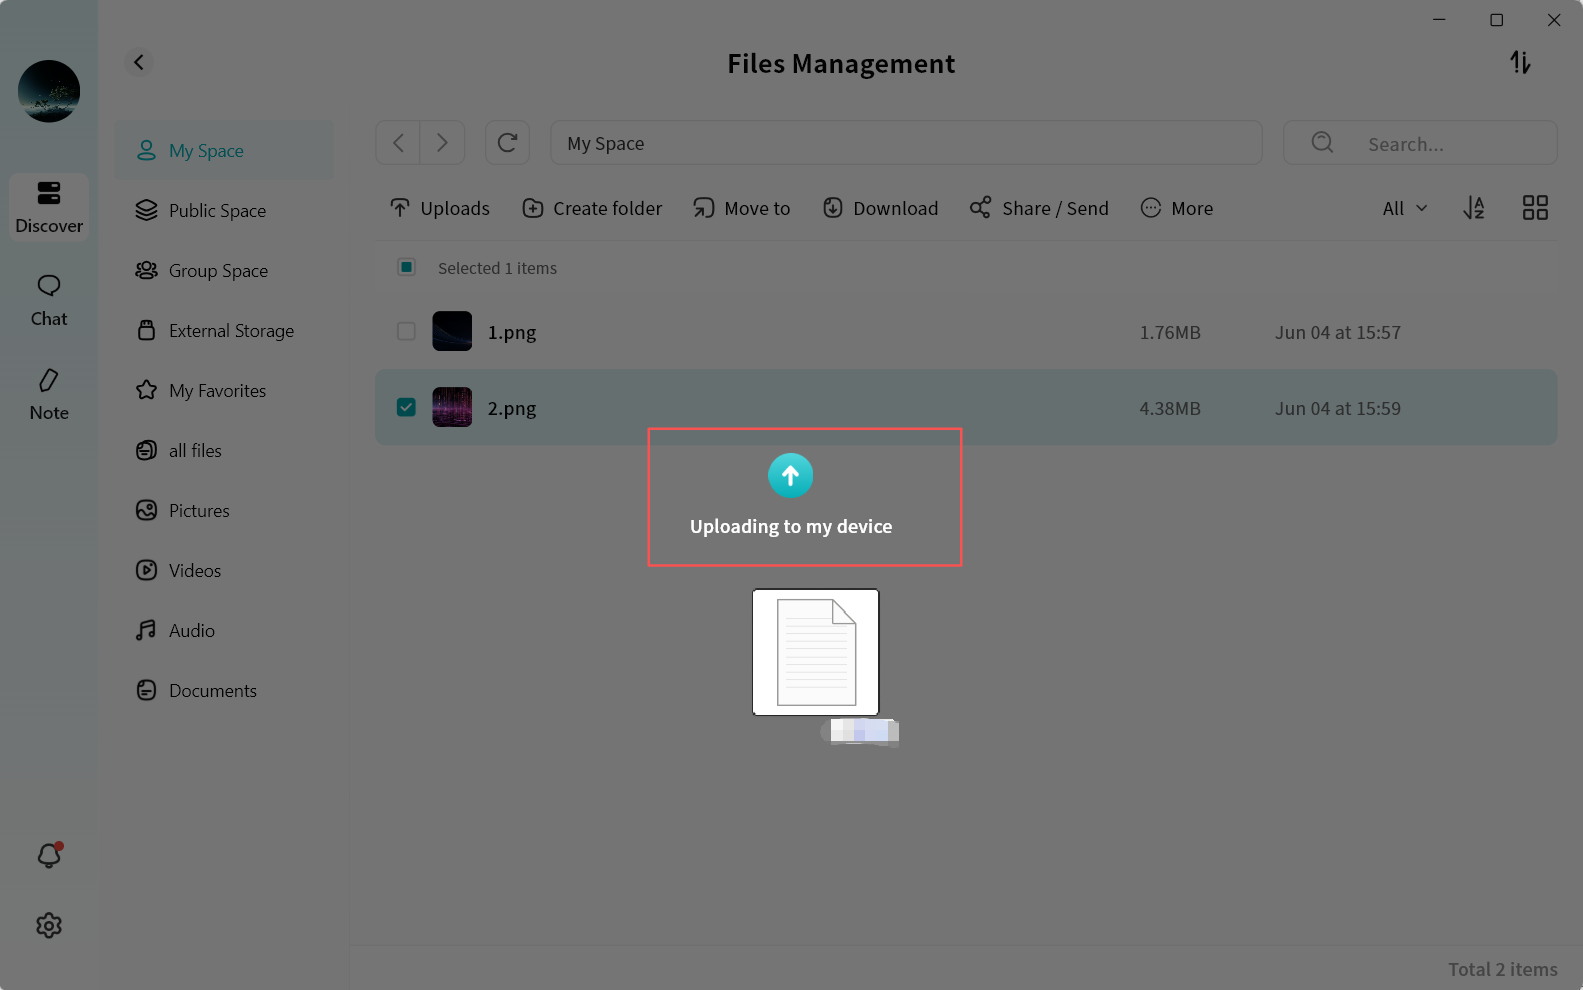
File Uploads
File uploads can be performed in two ways:
-
Use the Uploads button in the menu bar to upload files or folders from your computer to the DASSET device.
-
Drag and drop files or folders directly into the DASSET device. Drag-and-drop can be done either in a specific directory page or in the Task Center.
Method 1: Uploads Button
- Click Uploads and choose whether to upload files or folders.

-
In the pop-up window, select the files or folders you want to upload to the DASSET device (multi-selection supported).
-
After confirmation, DASSET will begin the upload process.
Method 2: Drag-and-Drop Upload
-
Supports dragging and dropping single or multiple files.
-
Supports dragging and dropping single or multiple folders.
-
Supports mixed drag-and-drop of files and folders.
There are two ways to drag-and-drop files/folders:
- Drag files/folders directly into a specific DASSET device directory.
- On the Task Center page, drag files/folders into the DASSET client interface. You will be prompted to select the destination path on the DASSET device.
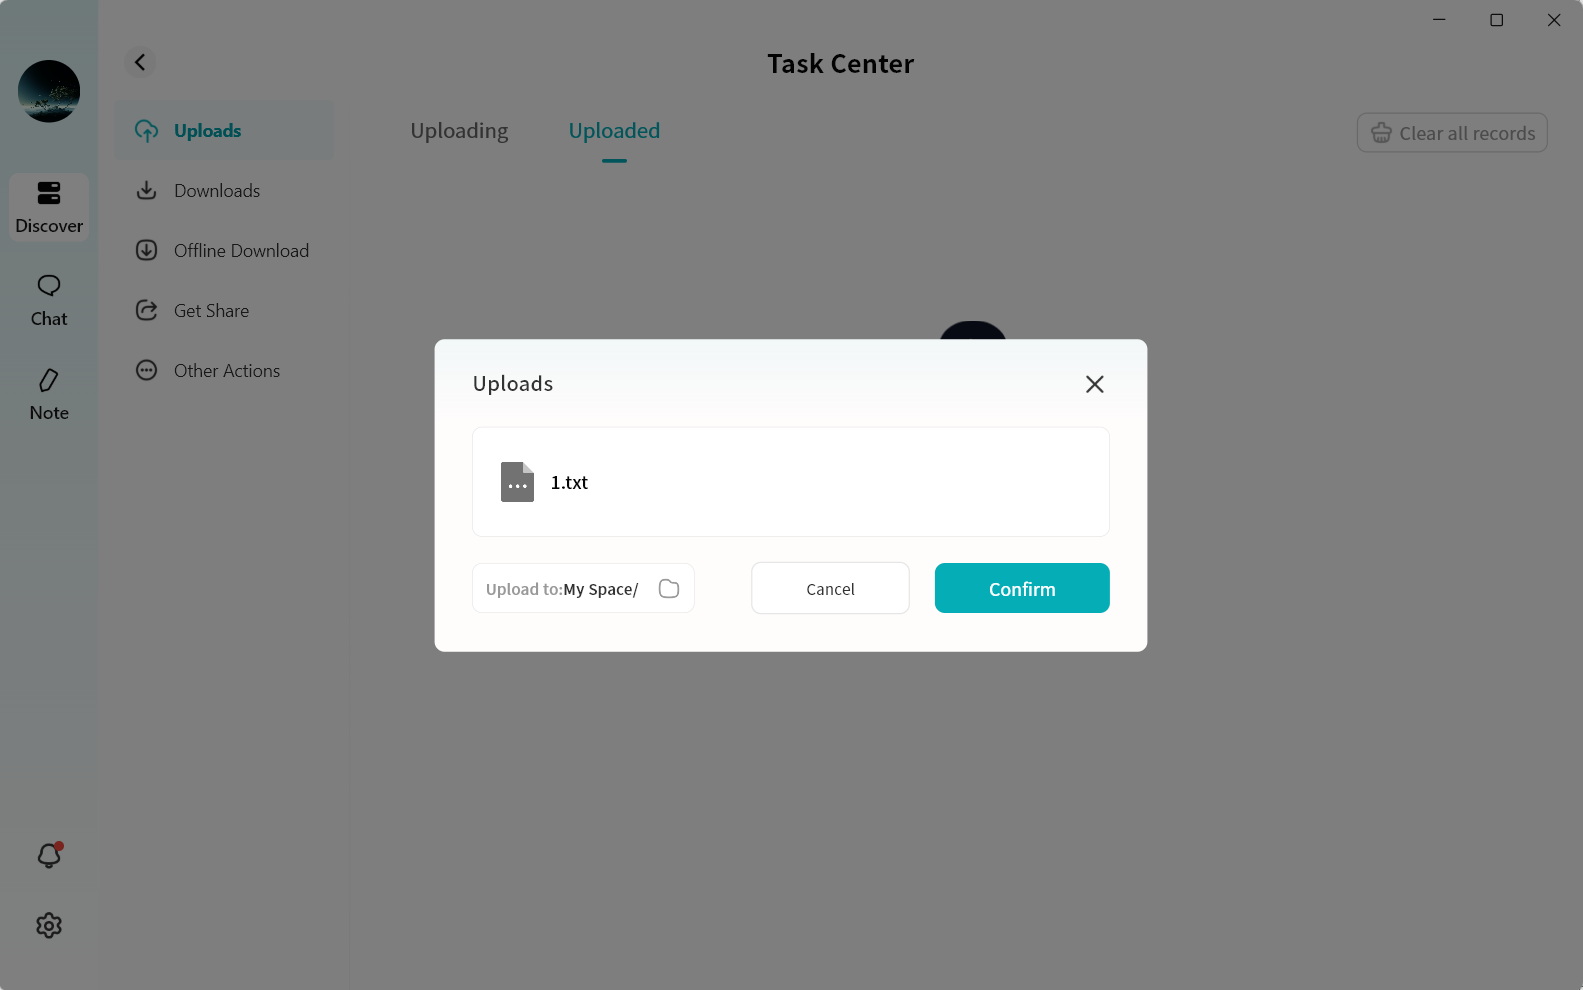
Upload Progress
You can view your upload progress and history under Task Center Upload.
File Downloads
File downloads can be performed in two ways:
-
Use the Download button in the menu bar to download files from the DASSET device to your computer.
-
Drag and drop files from the DASSET device to your computer.
Button Download
- Select the file(s) and click Download.
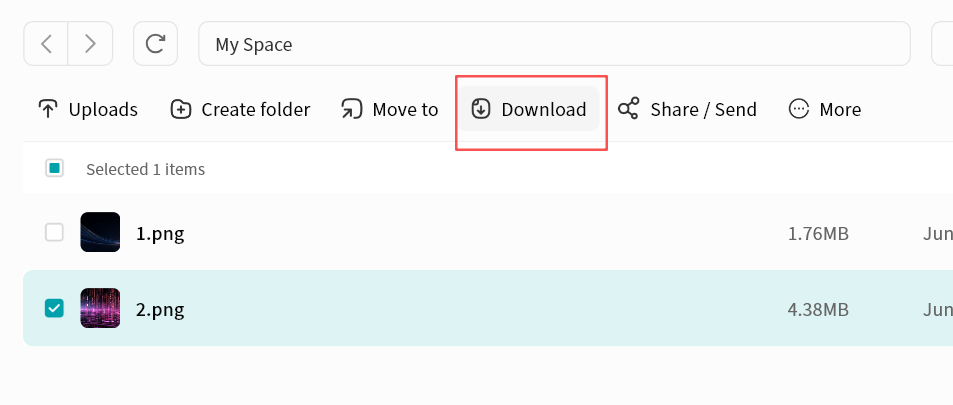
-
DASSET will automatically begin downloading.
-
Completed downloads will be saved in:
C:\users\[username]\DownloadsYou can also open the file location directly by clicking the completed task in Task Center.
Drag-and-Drop Download
You can select and hold files on the file page, then drag them into a folder on your computer.
The DASSET client will automatically create a download task and transfer the files from the DASSET device to your computer.
-
Supports dragging and dropping single or multiple files.
-
Supports dragging and dropping single or multiple folders.
-
Supports mixed drag-and-drop of files and folders.
Download Progress
You can view your download progress and history under Task Center Upload.
Copy/Move To
You can copy or move files to other directories at any time from the File Management page.
File Copy
Copying a file creates a duplicate in the target directory, while the original file remains in its original location.
- Select the file and click Copy/Move To - Copy To.
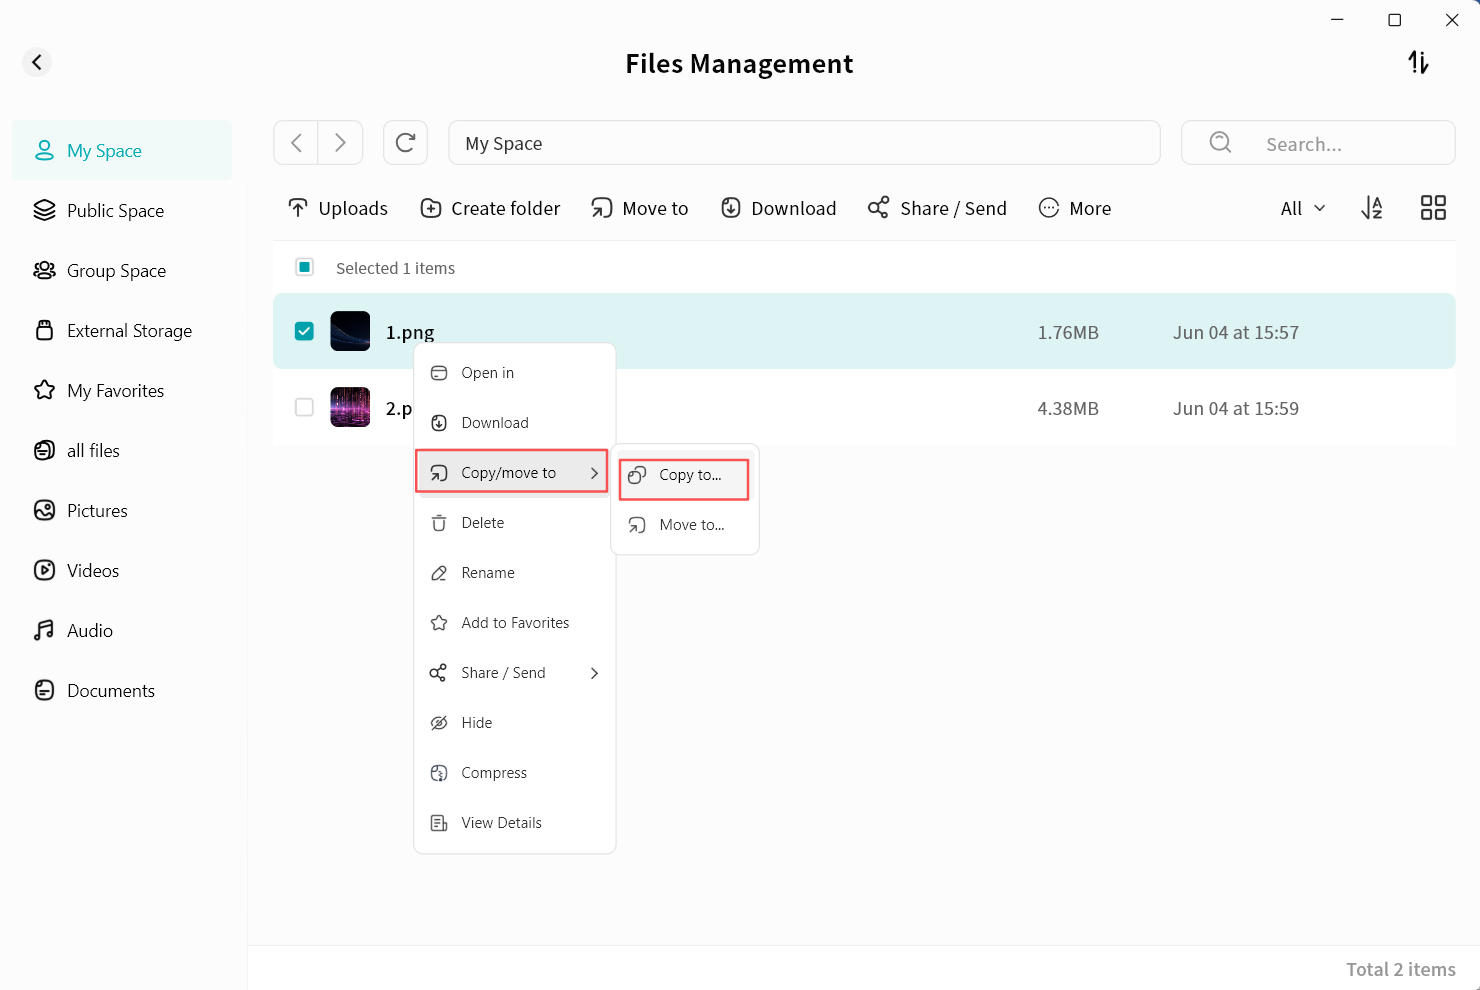
- In the pop-up window, select the target path. DASSET will list all available spaces.
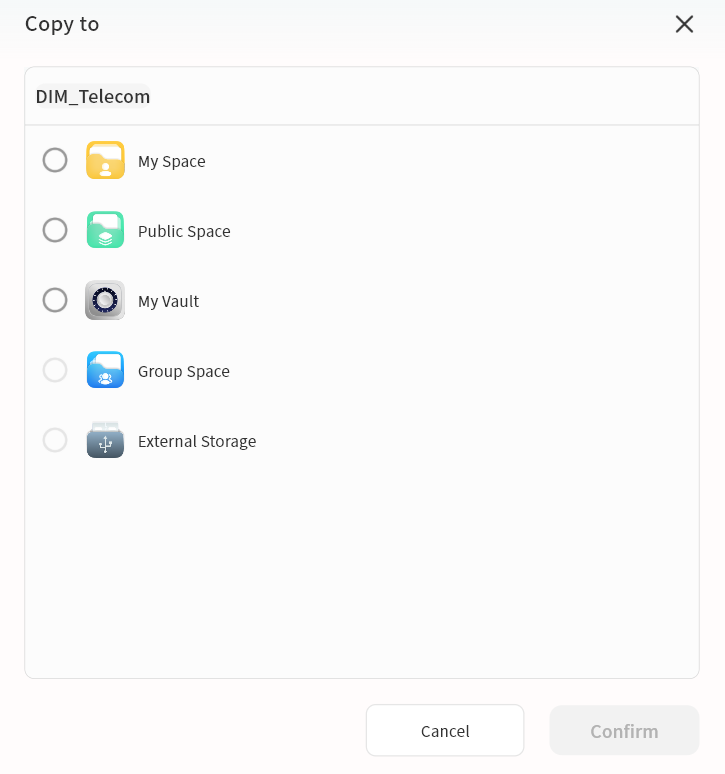
- Click Confirm to execute the copy operation.
File Move
Moving a file transfers it from one directory to another. After migration, the file will only exist in the new directory.
- Select the file and click Copy/Move To - Move To.

- In the pop-up window, select the target path. DASSET will list all available spaces.
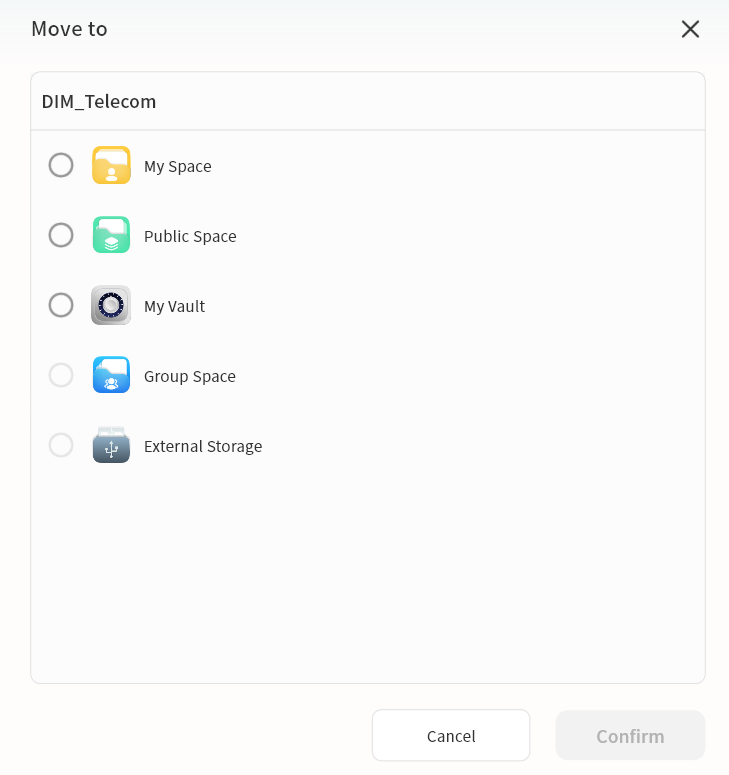
- Click Confirm to execute the move operation.
Progress View
You can view copy and move tasks under Task Center Upload - Other Operations.
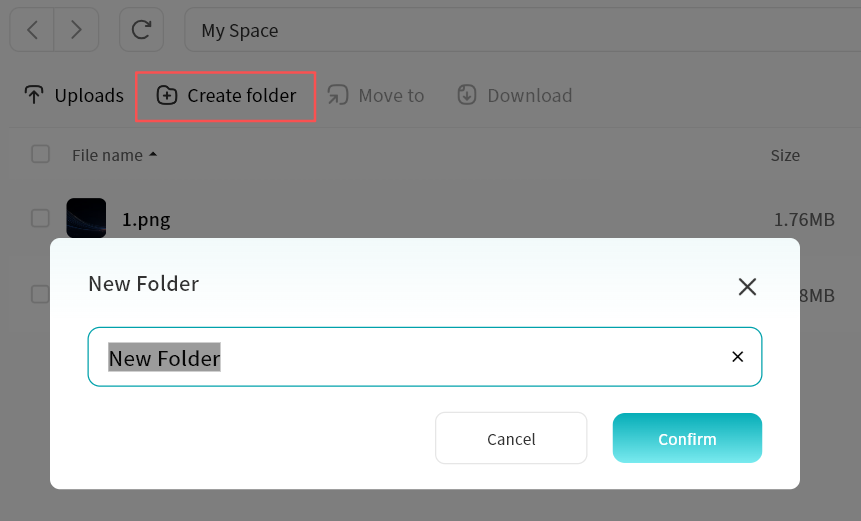
Create Folder
Click the Create Folder button to create a new folder in the
current directory.
When creating a folder, you can assign it a name.
Media File Online Playback
DASSET supports online playback of pc-images, videos, and audio files. Simply double-click the file you want to view.
-
Supported Video Formats:
- avi, flv, mpg, mov, mkv, mp4, m2ts, asf, wmv, vob, divx, 3gp, mpeg, mts, ts, f4v, hevc
-
Supported Image Formats:
- bmp, gif, heic, jpg, png, jpeg, tif, tiff, dng
-
Supported Audio Formats:
- mp3, wma, flac, wav, aac, ape, m4a, ogg
Video Playback
Double-click a video file to open the video player for online playback.
-
Play/Pause
-
Adjust volume
-
Video duration and current playback time
-
Progress bar (supports drag)
-
Switch between full screen and windowed playback
-
Share/Send: Share video via member share, QR code, or send to another device
-
Download: Save the file to your computer
-
Move To: Move the file to another directory on the DASSET device
-
Copy: Copy the file to another directory on the DASSET device
-
Delete: Remove the file
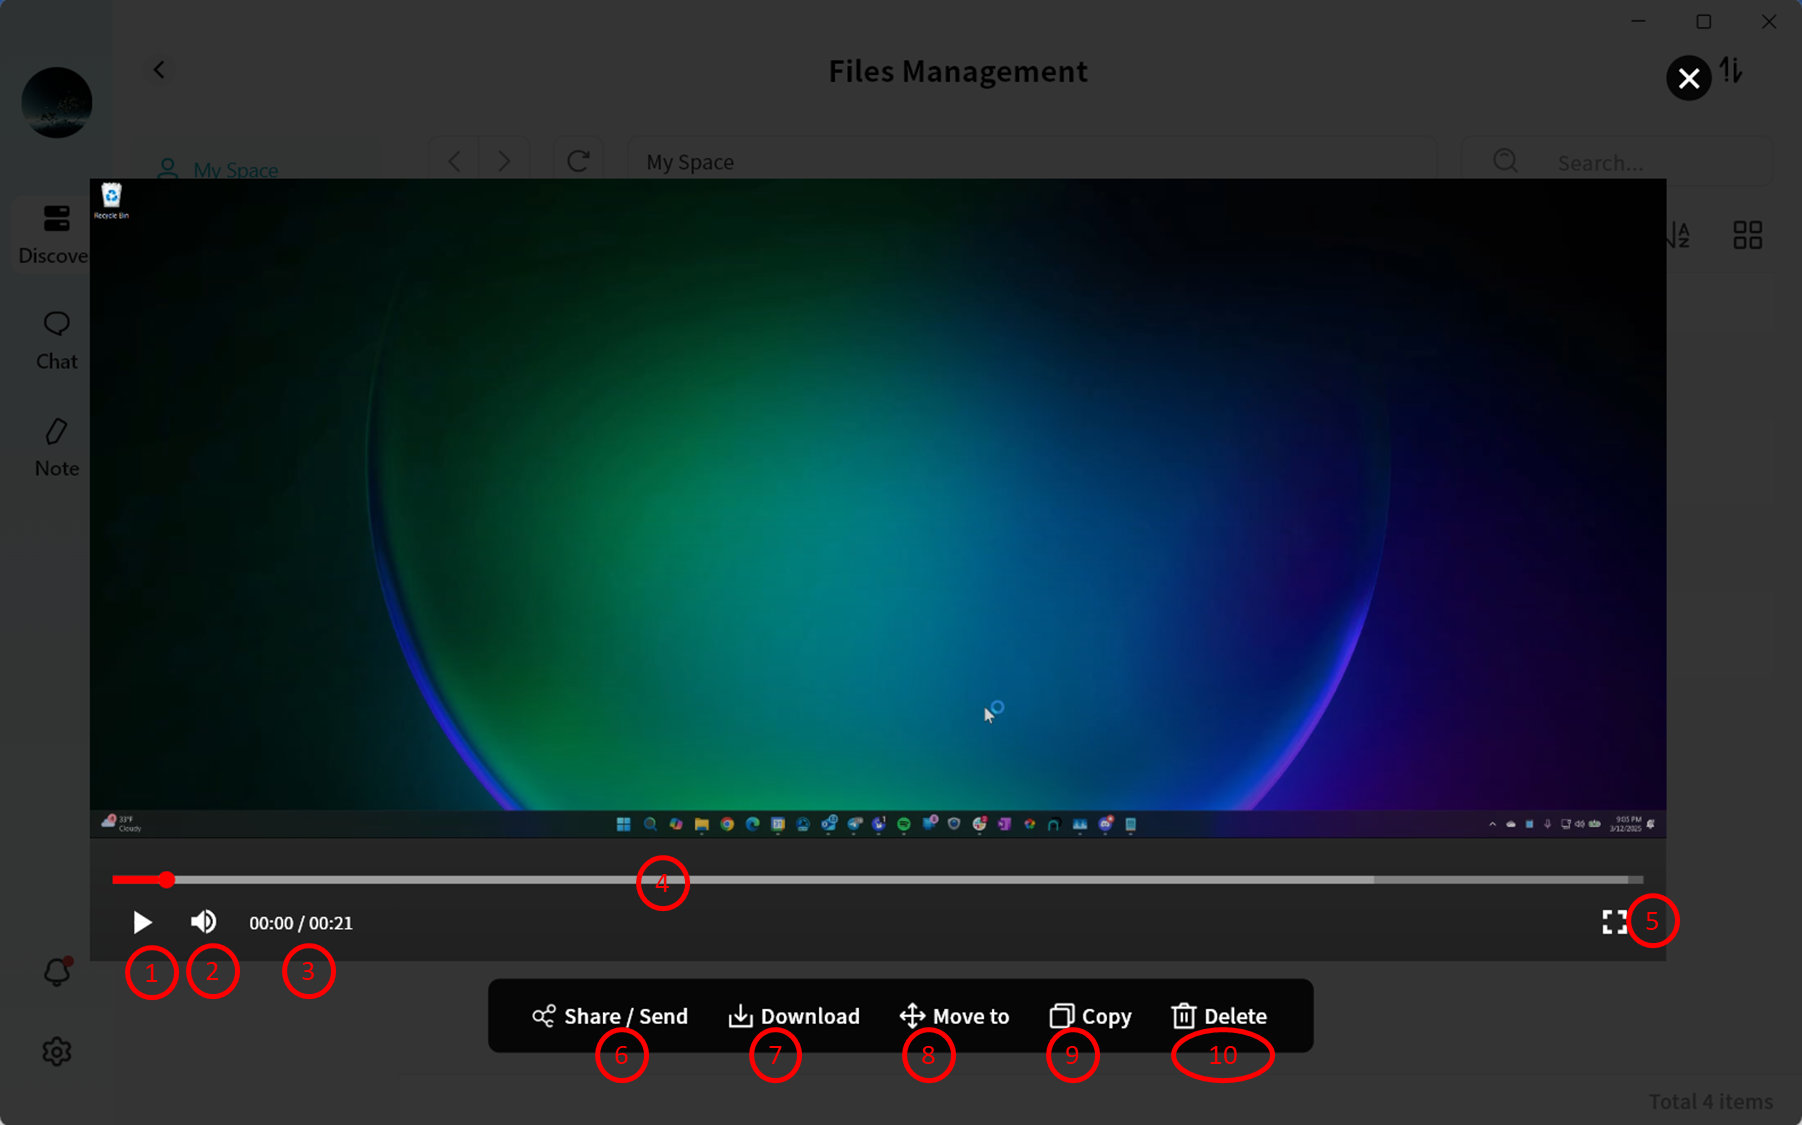
Image Viewing
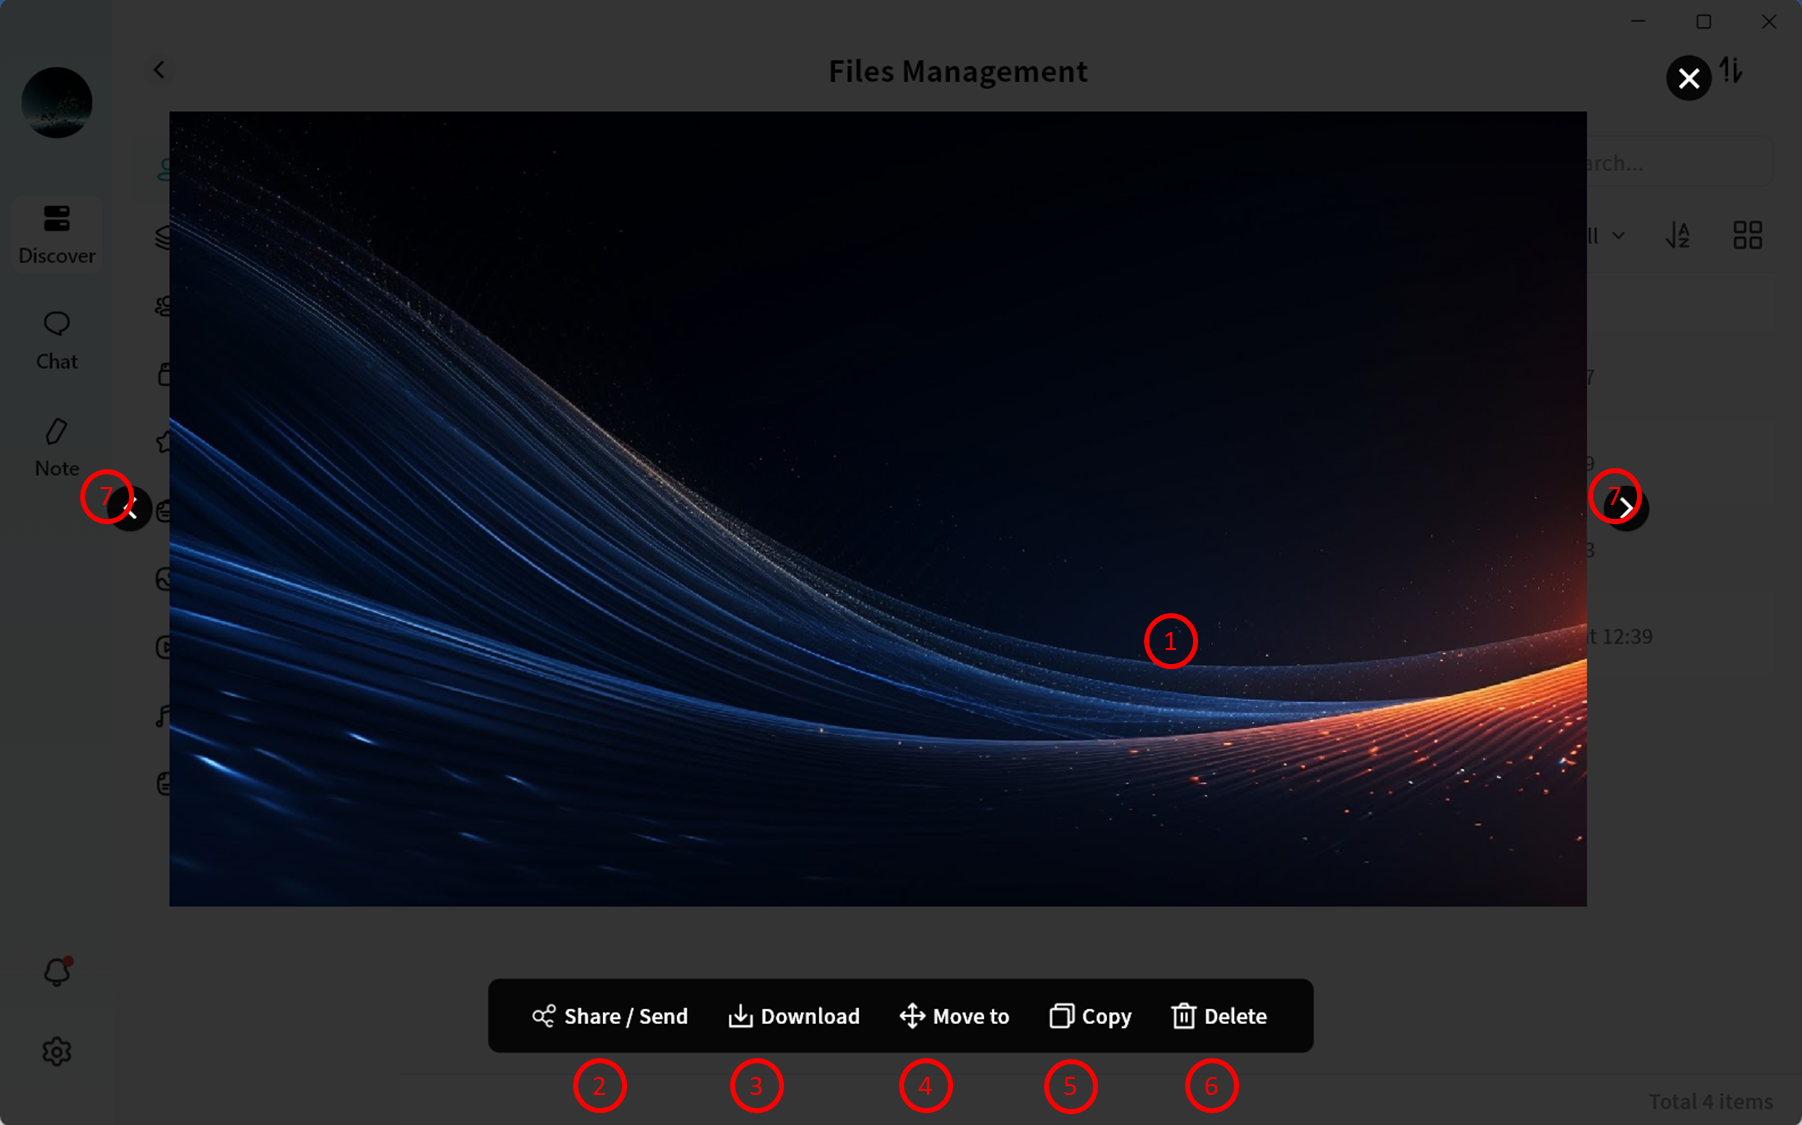
Double-click an image file to open the image viewer and display the original image.
-
Image display area
-
Share/Send: Share image via member share, QR code, or send to another device
-
Download: Save the file to your computer
-
Move To: Move the file to another directory on the DASSET device
-
Copy: Copy the file to another directory on the DASSET device
-
Delete: Remove the file
-
Image navigation: Switch between other pc-images in the same directory
Audio Playback
Double-click an audio file to open the audio player for online playback.
-
Play/Pause
-
Sequential/Shuffle play
-
Progress bar (supports drag)
-
Next/Previous track
-
Playlist (all audio files in the same directory are automatically added)
-
Audio file name
File Sharing / Sending
DASSET supports sharing files stored on a DASSET device in multiple ways, including sending them to other DASSET devices.
Member Sharing
Enables file sharing between members of the same DASSET device.
Suitable for relatively private file sharing without using Group Space
or Public Space.
This feature is available to all users.
QR Code Sharing
Generates a share code for a file, which can be provided to other DASSET users to retrieve the file.
Suitable when the sender and recipient are not on the same DASSET device and secure file sharing is required.
The recipient must be the Owner of a DASSET device to receive the file.
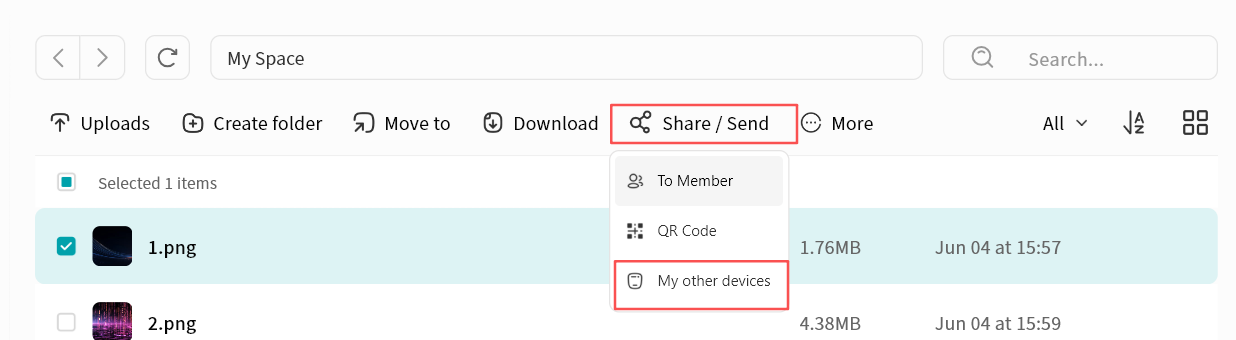
My Other Devices
Copies files from one DASSET device to another, suitable for users who own multiple devices and need cross-device file transfer.
The operator must be the Owner of the receiving DASSET device.
Sharing & Sending Files
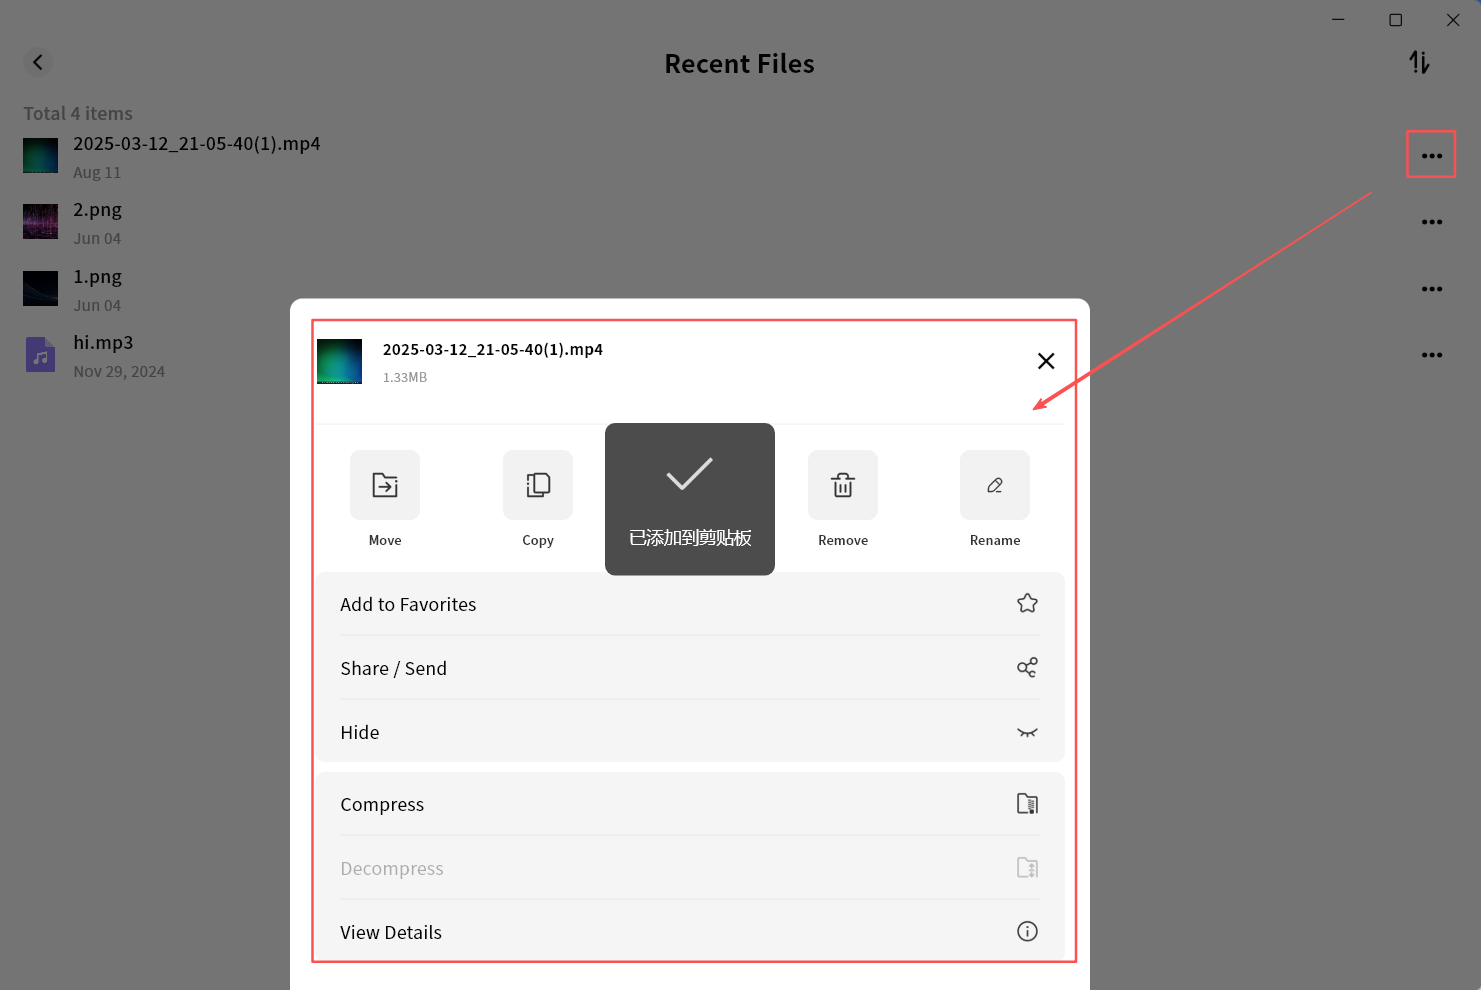
Right-click the file you wish to share/send, then select Share/Send from the context menu.
You can also select Share/Send from the top menu bar in the File Management interface.
Member Sharing
Member sharing enables file sharing between members on the same DASSET device.
This is useful for private file sharing without using the Group Space or Public Space.
All users can use this feature.
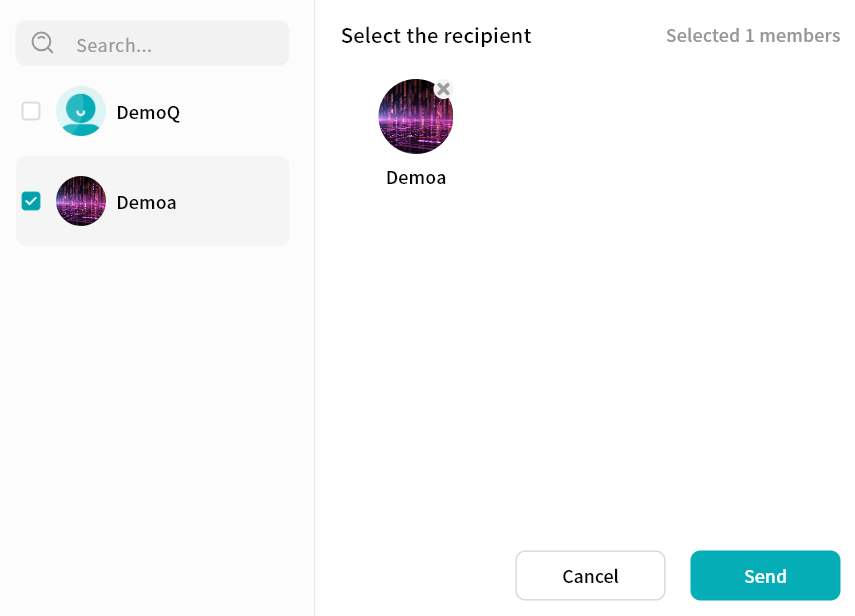
Send Files via Member Sharing
- Select the file, then right-click and choose Share/Send to Member
- In the pop-up window, select the member(s) to share with (multi-selection supported). Click Send to confirm.
Receive Files from Member Sharing
You can find sent sharing requests in Task Center - Received Shares on the DASSET device.
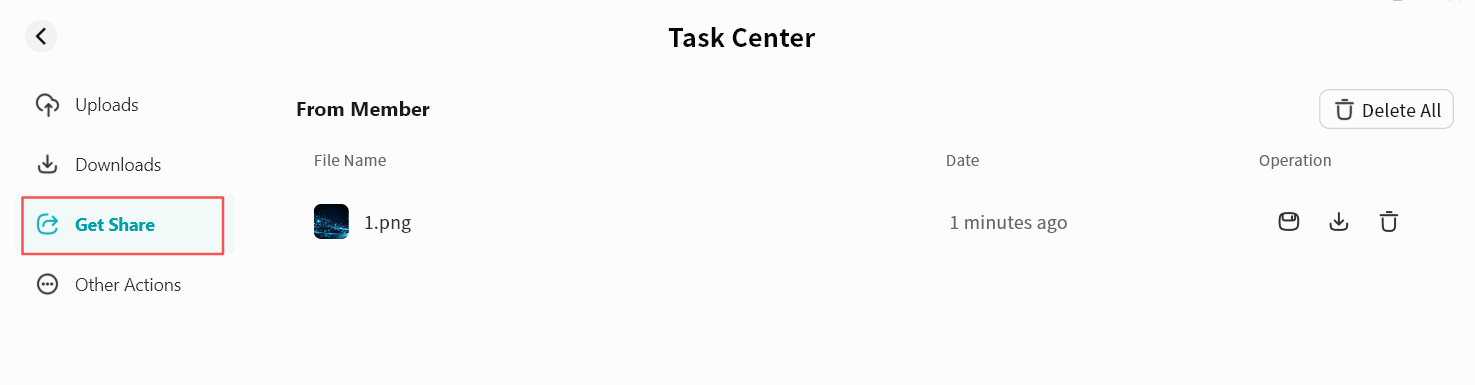
-
Save the file to My Space or My Vault.
-
Download the file to your local computer.
-
Delete the file share entry.
-
Delete all share entries.
QR Code Sharing
Generates a share code for a file, allowing other DASSET users to retrieve it.
Useful when the sender and recipient are on different devices and secure file sharing is required.
The recipient must be the Owner of a DASSET device to receive the file.
Create QR Code Share
- Select the file, then right-click and choose Share/Send QR Code.

-
Sharing via QR code allows you to set rules for accessing the downloaded file, giving you control over its access.
-
Expiration Date: Defines validity. After expiry, the share becomes invalid.
-
Downloadable: Maximum number of times the file can be downloaded. After the limit, the share becomes invalid.
-
Permission Settings:
-
Public: Anyone with the QR code can access the file. Suitable for low-security scenarios.
-
Require Password: A password must be entered to access the file. Suitable for high-security scenarios.
-
-
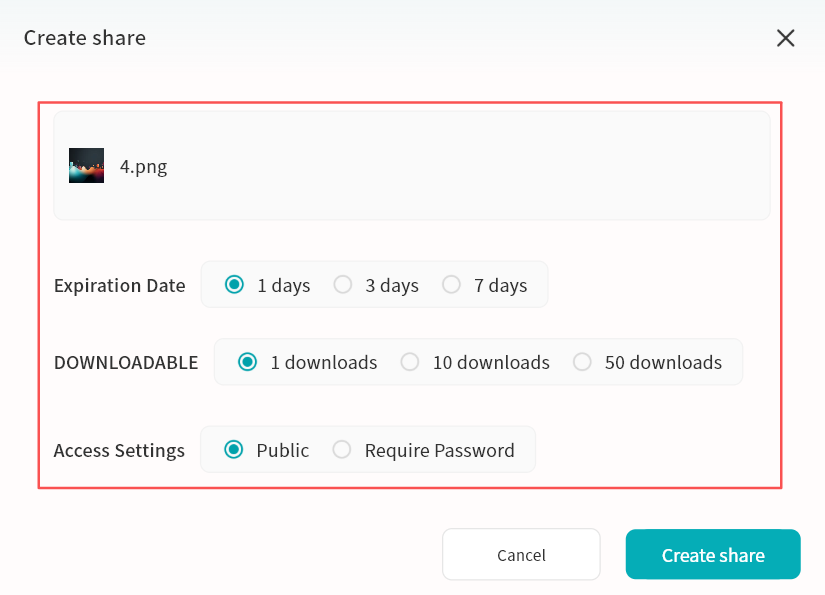
-
After setting the rules, click Create Share. A QR code share will be generated.
-
Click Copy Full Info to share all details.
-
Send only the QR code image.
Displayed information includes:
-
QR code (scannable in the DASSET app to retrieve the file)
-
Remaining download count
-
Share content
-
Expiration date
-
Share code (can also be entered in the DASSET app to retrieve the file)
-
Password required (only shown if a password was set)
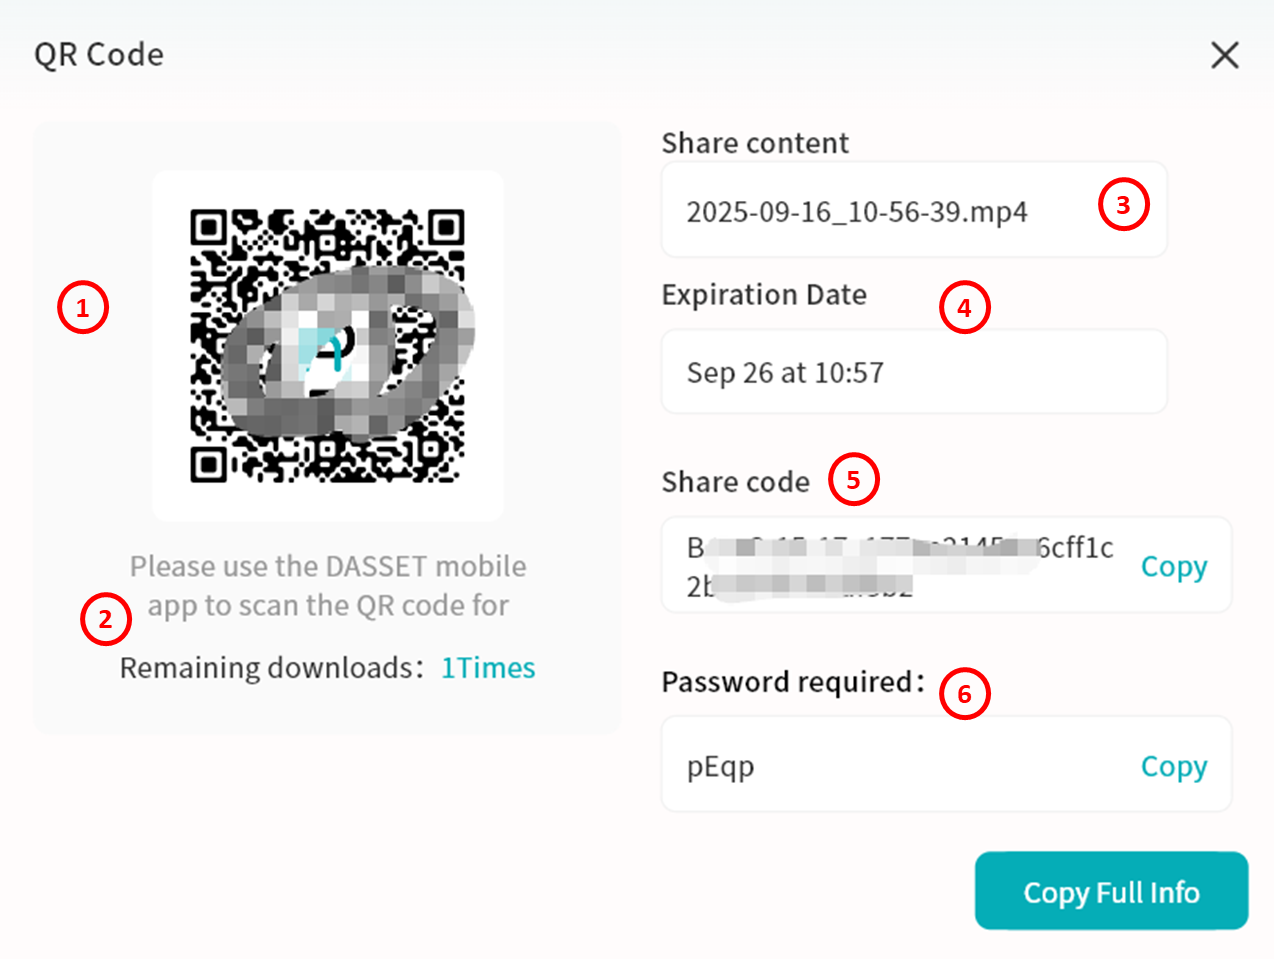
-
Retrieve Files via QR Code Share
-
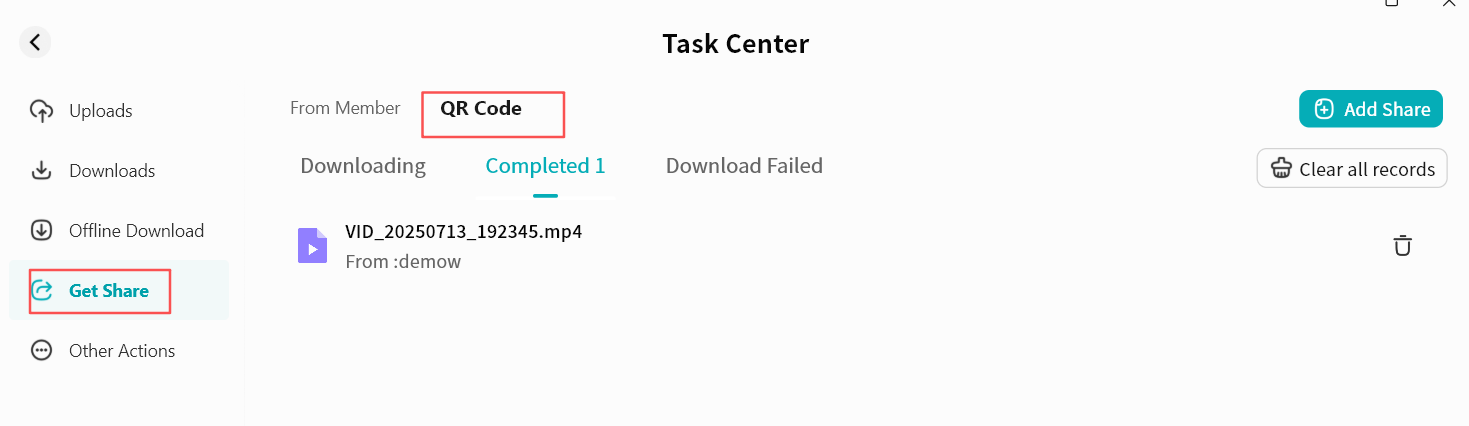
Go to Task Center - Received Shares - QR Code Share on your DASSET device.
-
Click Add Share.
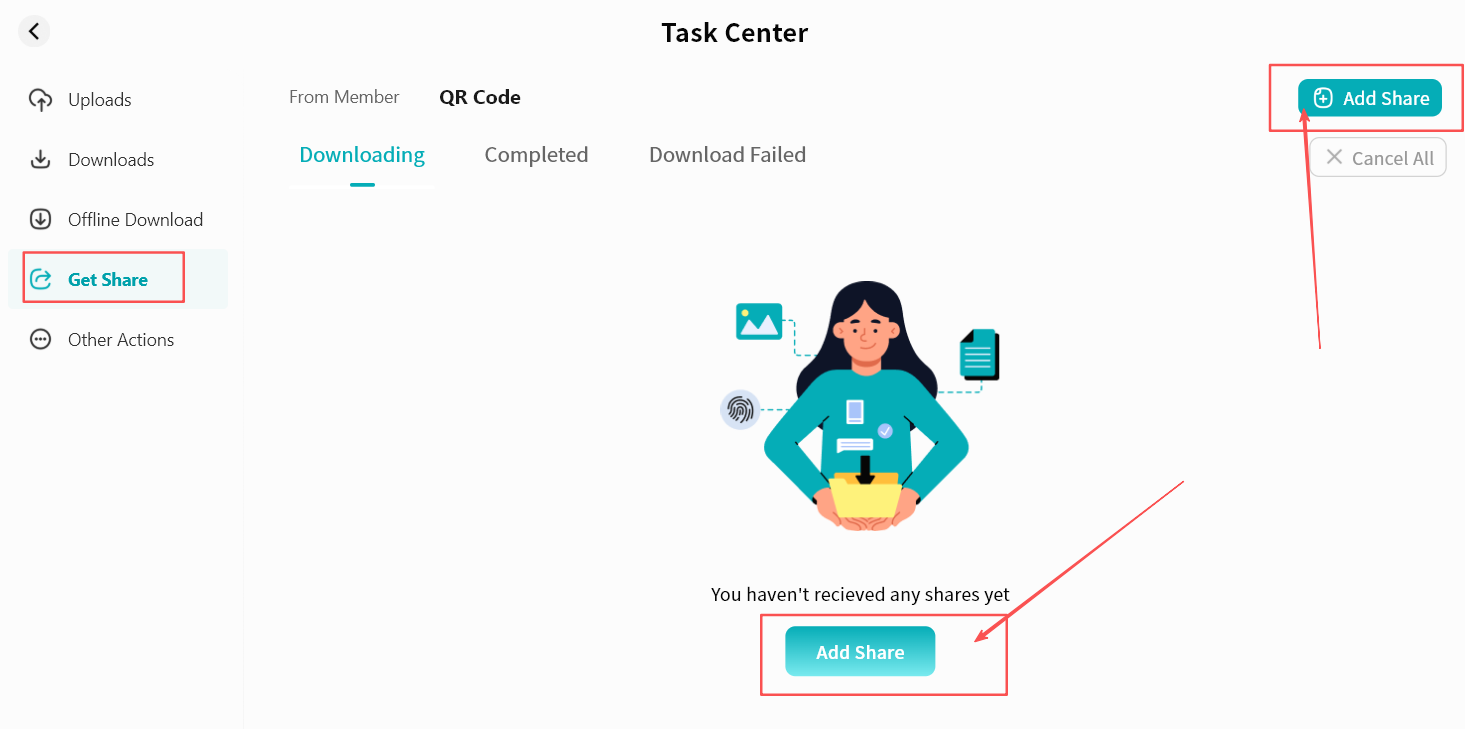
- In the pop-up window, enter the share code string and click Add.
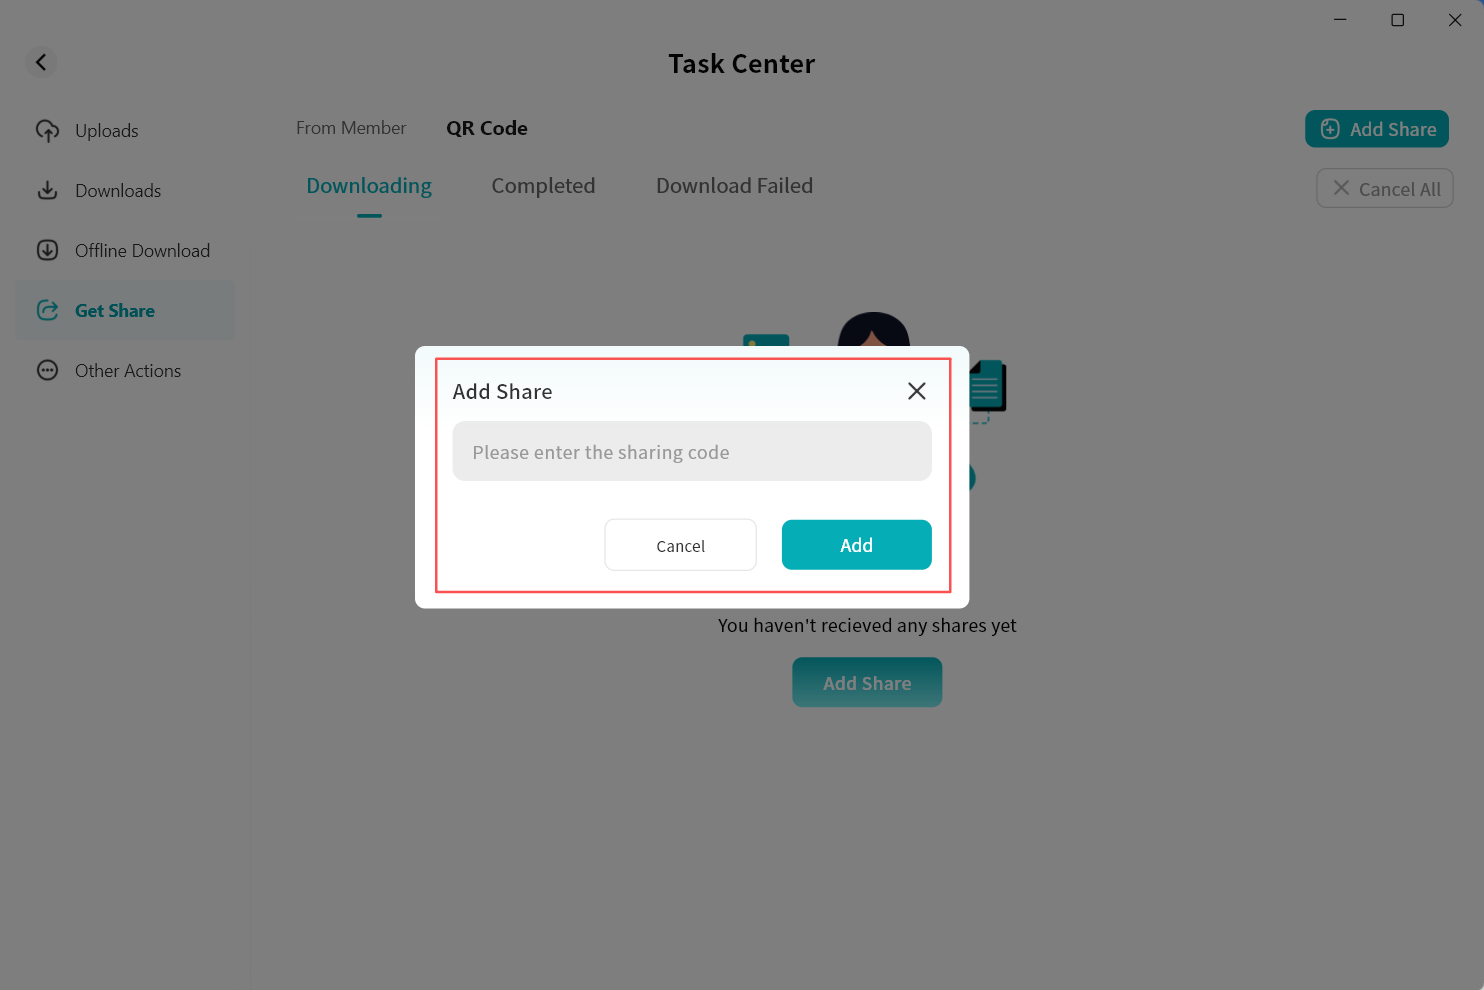
- If password-protected, enter the password.
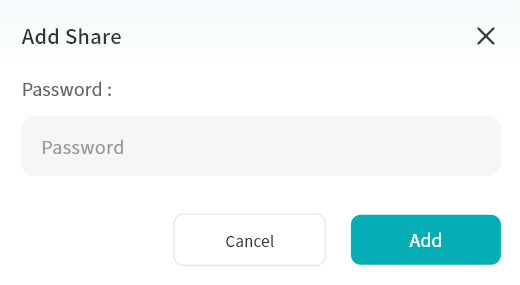
- After entering the correct code (and password, if required), the file information will appear. Select the file and click Save.

- Choose a directory and click Confirm. The file will be saved to your DASSET device.
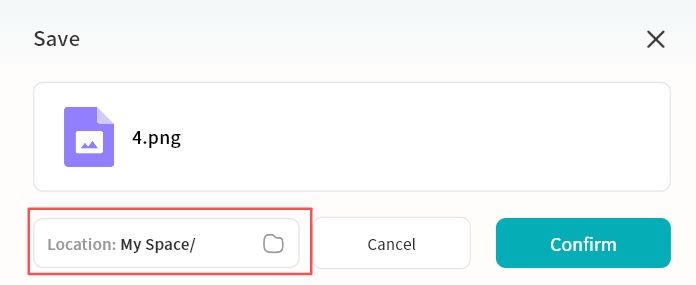
- You can monitor progress in the Task Center. Once completed, the file will be available in the selected directory.
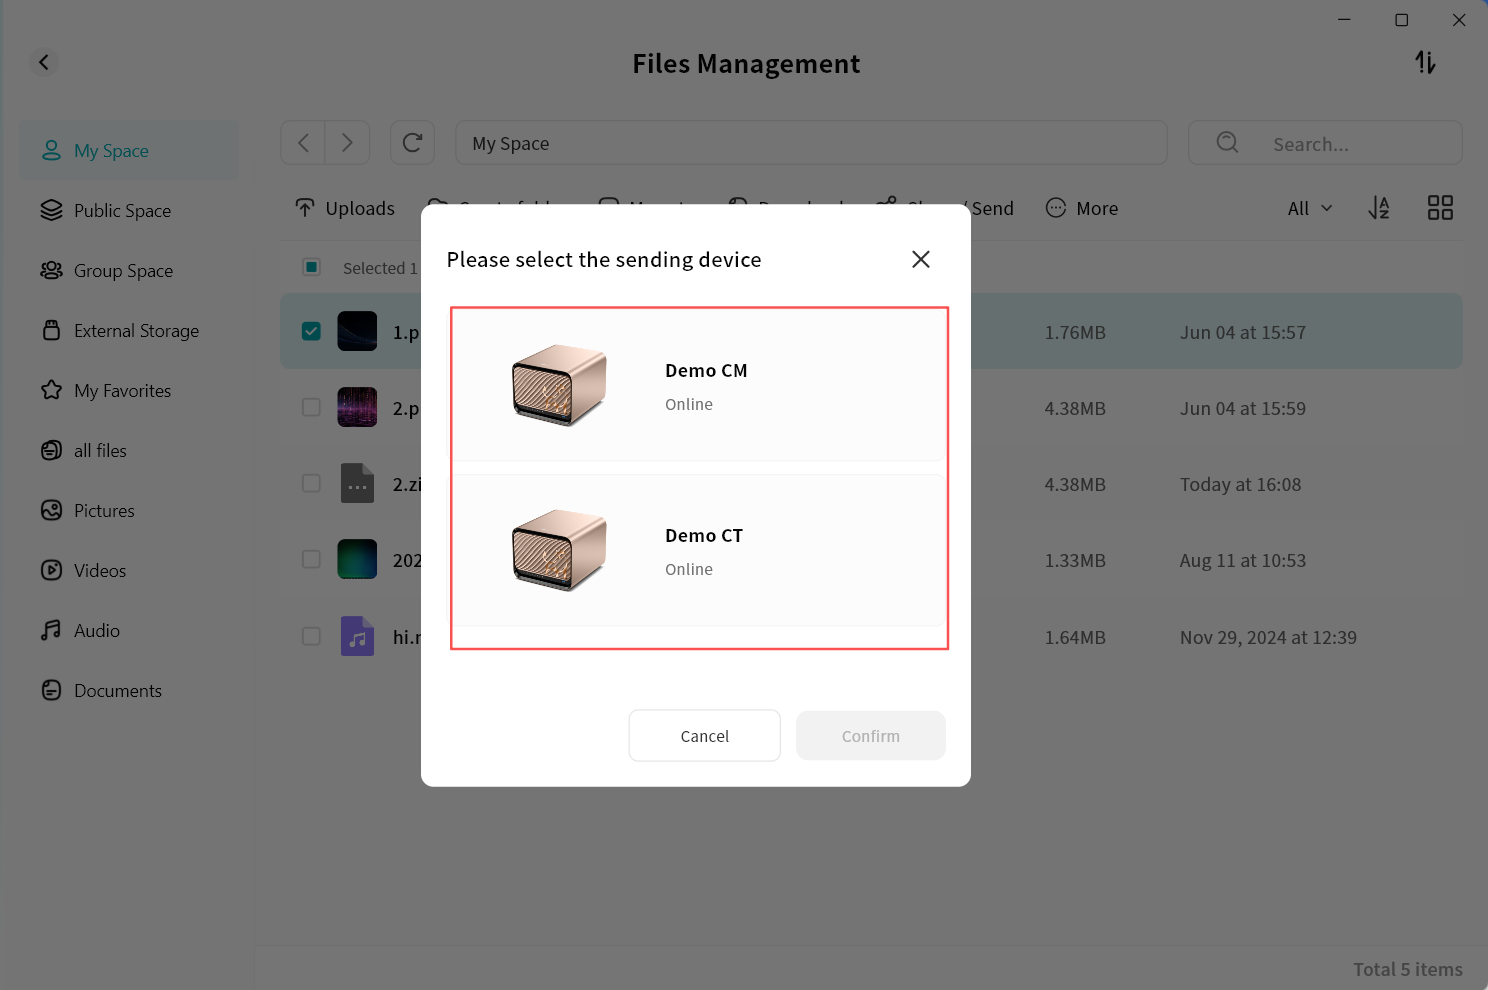
Send to My Other Devices
Copies files from one DASSET device to another.
Useful for users with multiple DASSET devices who need cross-device file transfers.
The operator must be the Owner of the receiving device.
Steps:
- Select the file, then click Share/Send My Other Devices.
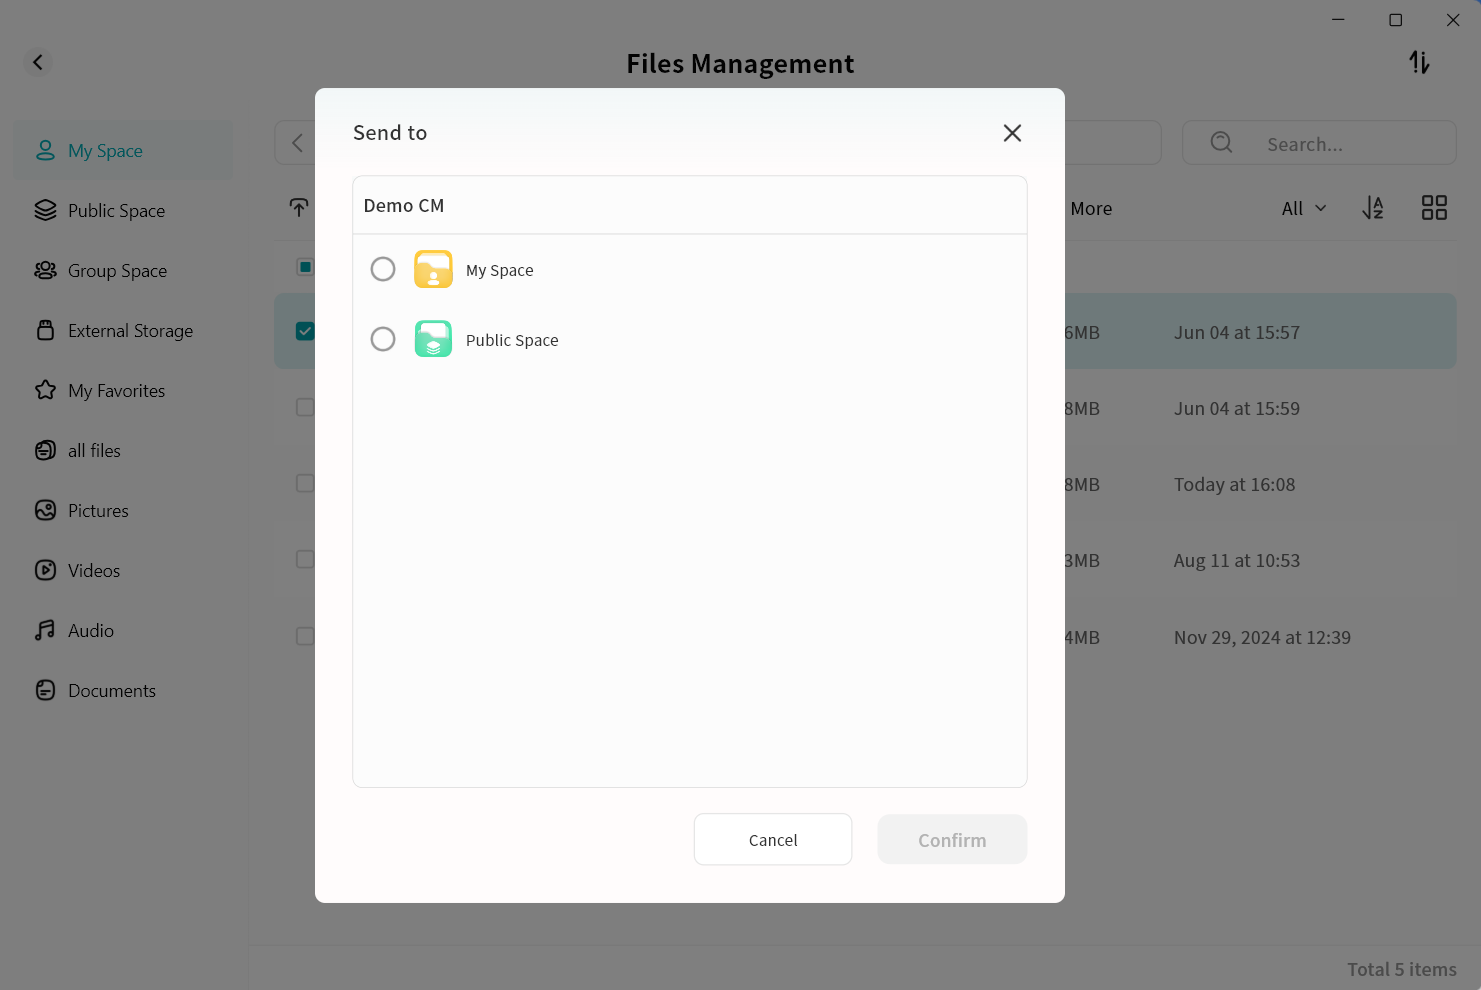
- In the pop-up window, select the target DASSET device and click Confirm.
Note: Only devices where you are the Owner will be displayed.
- Choose the save path for the file and click Confirm. The file will be transferred from the source to the target device.
- On the target device, go to Task Center Received Shares QR Code Share to view the transfer progress.
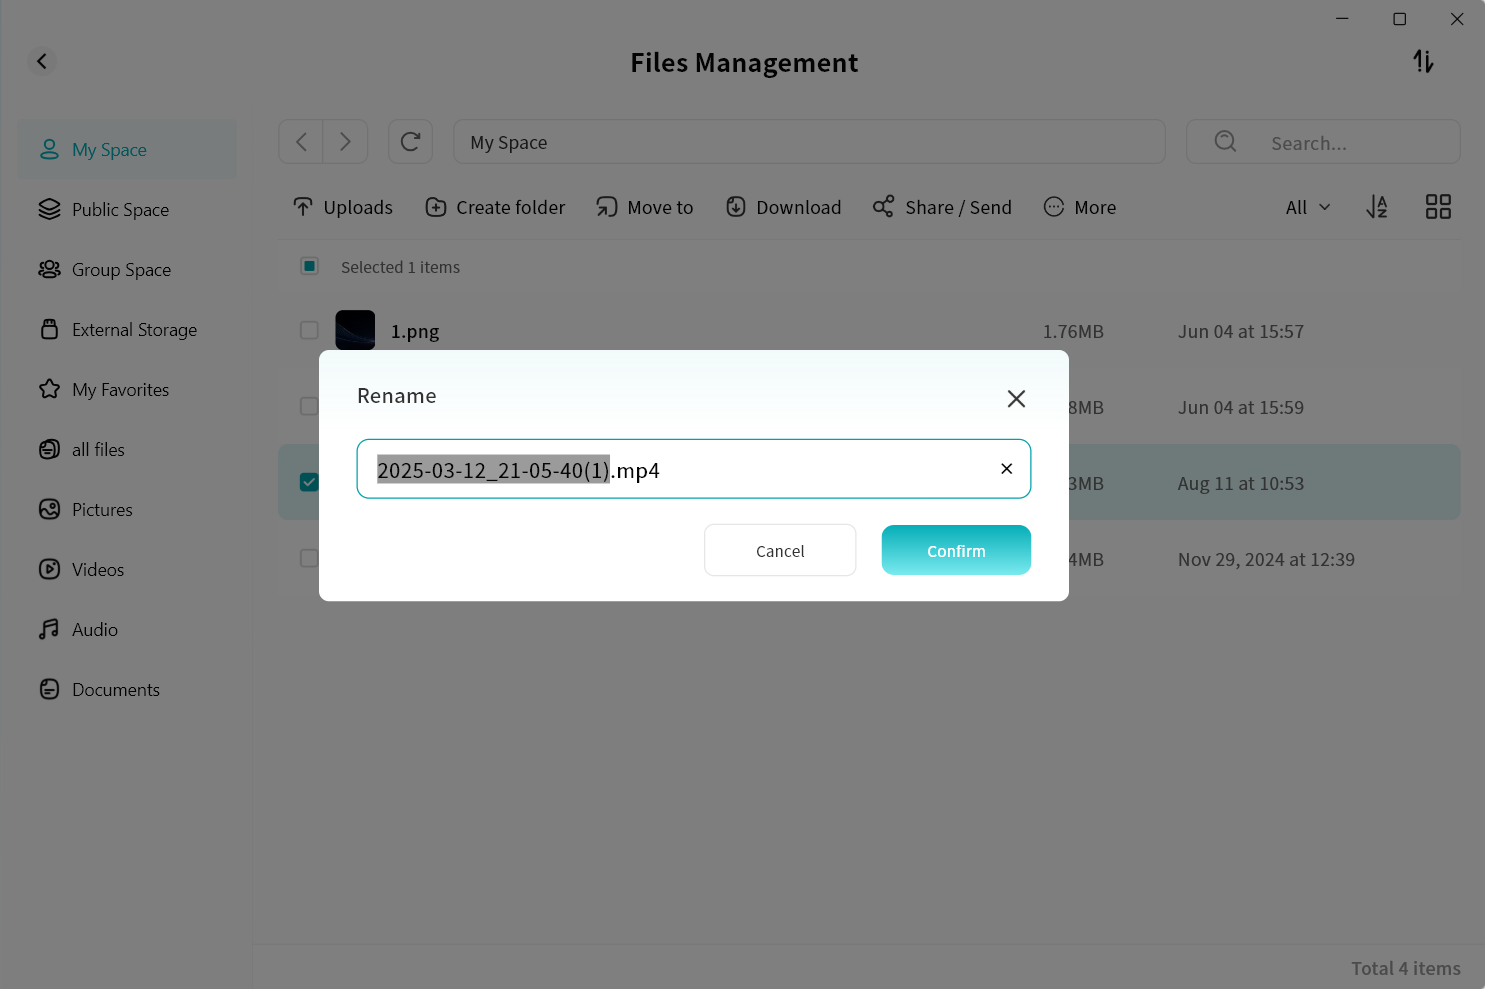
Rename
You can rename files stored on the DASSET device. Enter the new file name, click Confirm, and the change will be applied.
Favorites
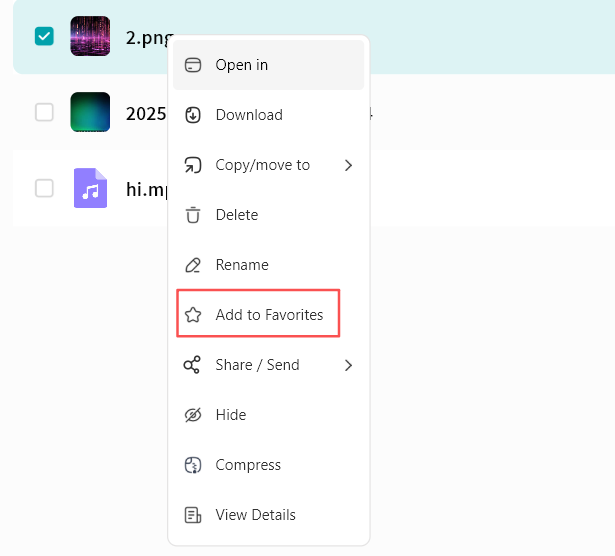
You can add files to Favorites either by right-clicking a file and selecting Add to Favorites or by clicking the Add to Favorites button in the top menu bar. Afterward, you can quickly access these files from the Favorites section.
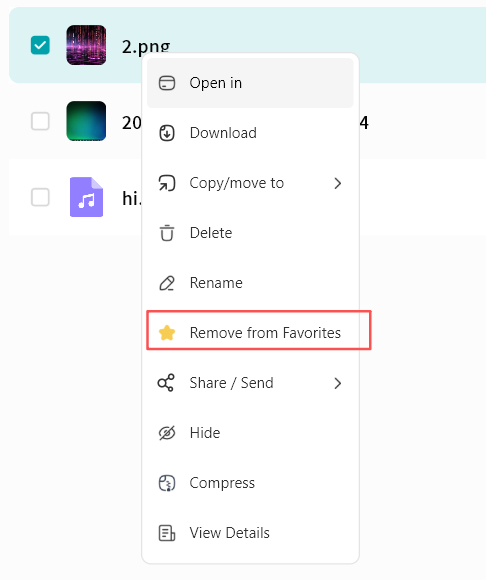
To remove a file from Favorites, perform the Remove from Favorites operation.
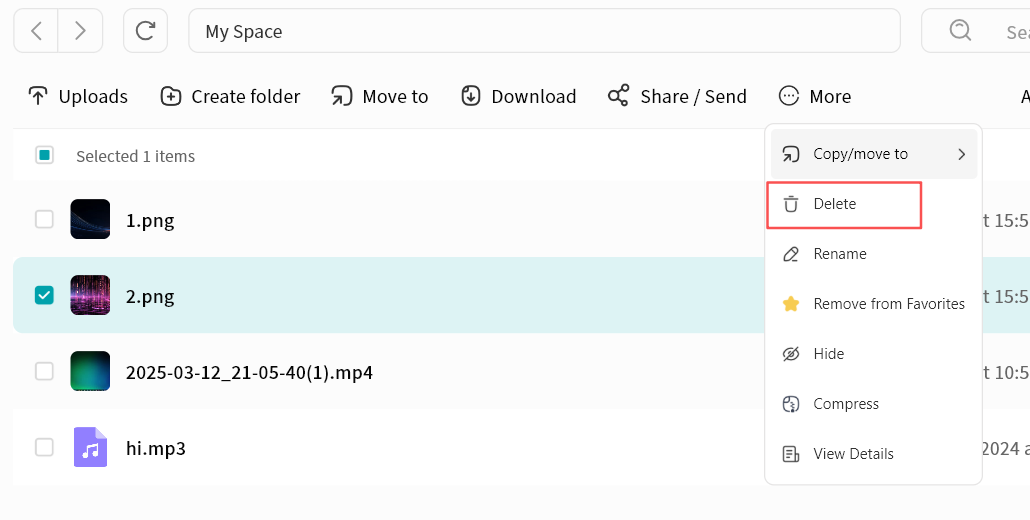
Delete
For unnecessary files, you can perform a delete operation. The Delete option is available in both the right-click menu and the top menu bar. Deletion supports both single and multiple files.
- Click the Delete button.
-
Choose one of two options:
-
Permanent Delete: When selected, the file is immediately deleted and cannot be recovered.
-
Recycle Bin (default): If permanent delete is not selected, the file will first be moved to the Recycle Bin for 30 days before being permanently deleted.
- Files in the Recycle Bin can be restored to their original directory if deleted by mistake.
-

Hide Files
For sensitive files, you can hide them by doing the following:
- Select one or multiple files and click Hide.
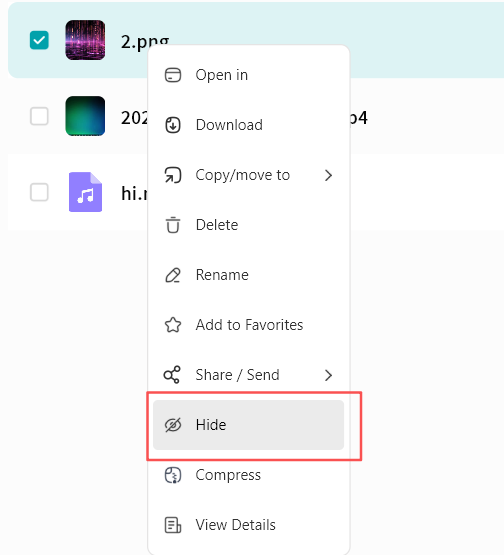
- Hidden files will no longer appear in the file list by default.
Show Hidden Files
If you want to display hidden files:
-
On the device home page, click the top-right corner.
-
Select Security Settings.
-
Enable Show Hidden Files and Folders.
-
Hidden files will now be visible in the file list.
File Compression and Decompression
DASSET supports online file compression and decompression without requiring local download.
-
Supported Decompression Formats: .rar, .zip, .tar, .tar.gz
-
Default Compression Format: Files are compressed into .zip for cross-platform compatibility.
Compression
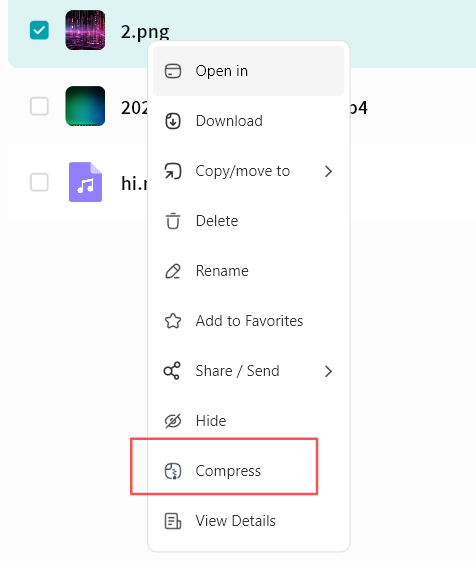
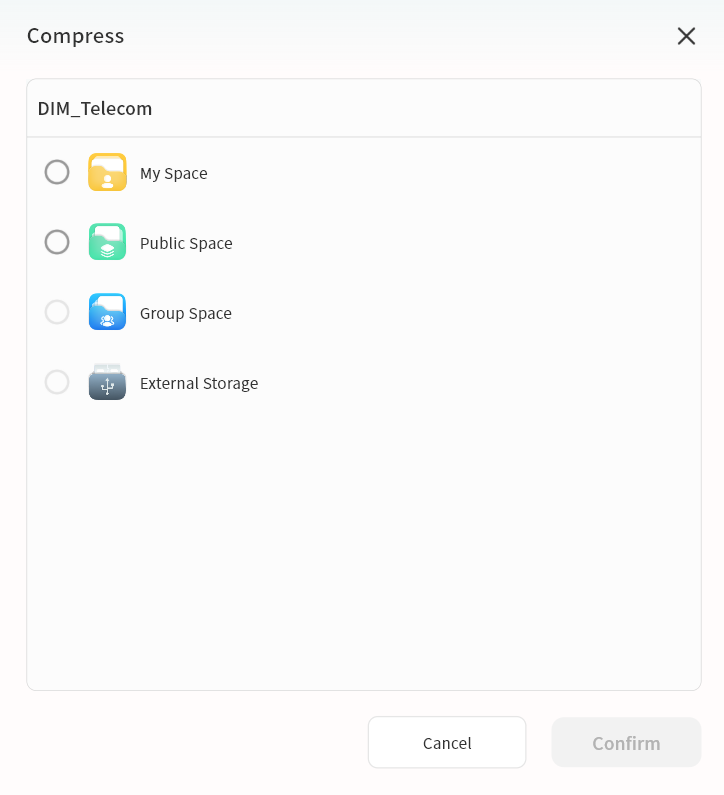
- Select one or multiple files, then click Compress from the right-click menu or top menu bar.
- In the pop-up window, choose the save path for the compressed file. You may also create a new folder.
-
After completion, the compressed file will be saved to the selected path.
-
Multiple files compressed together will generate an archive named Archiver.zip.
-
A single file compressed will generate an archive named [Original Filename].zip.
-
Decompression
- Select a compressed file, then click Decompress from the right-click menu or top menu bar.
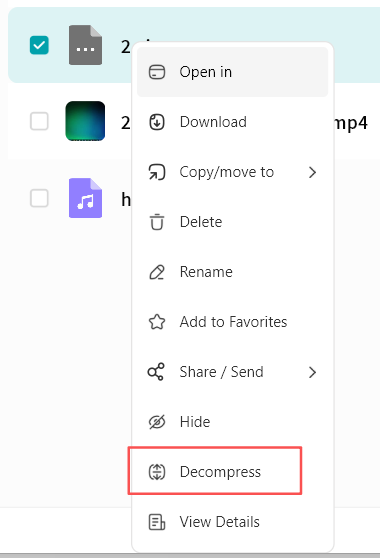
- In the pop-up window, choose the save path for the decompressed files. You may also create a new folder.
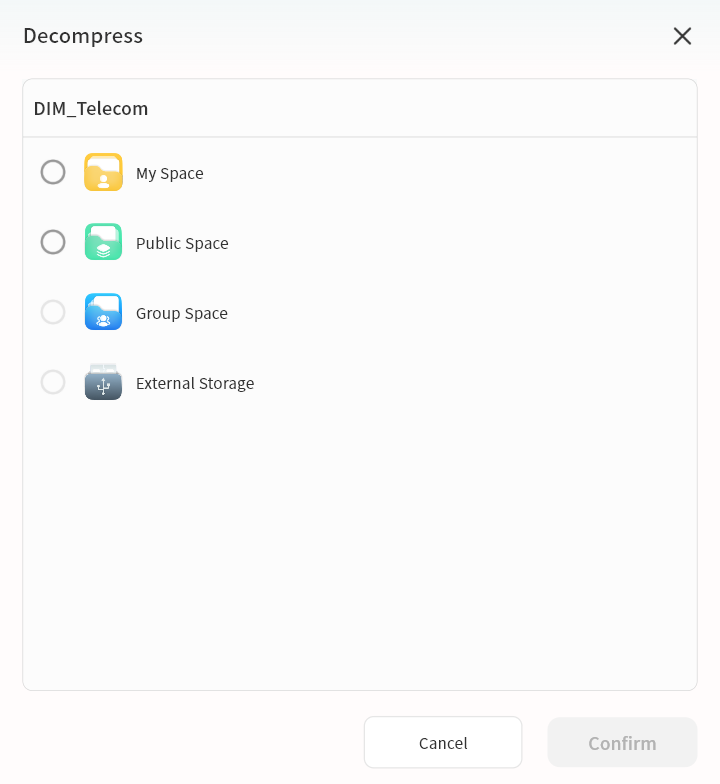
- After completion, the decompressed files will be saved to the specified path.
Progress Tracking
You can view compression and decompression tasks under Task Center - Other Operations.
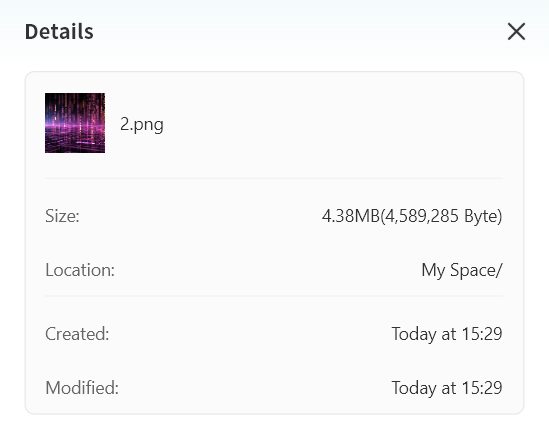
View Details
You can view details of files/folders at any time.
Details include file size, file location, creation time, modification time, and other attributes.
Displayed details may vary depending on the file type.
DASSET Applications
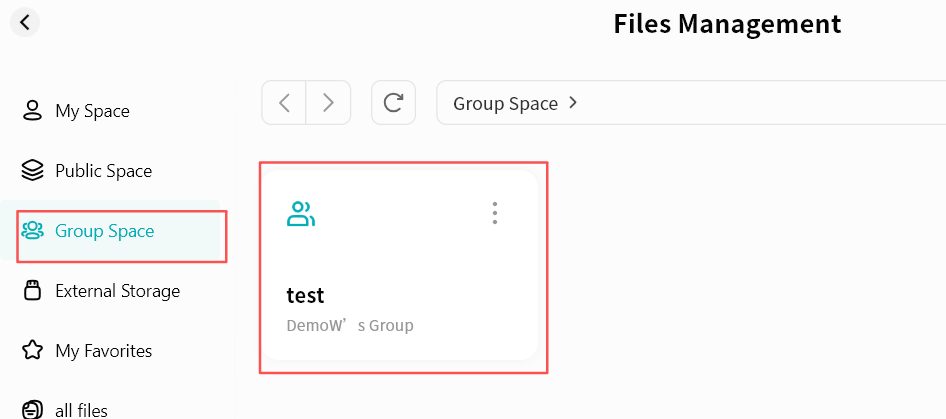
Group Space
In Group Space, users with Group Space permissions can create group folders and invite specific members to join. Only members can access files within a group folder, with access controlled by predefined read/write permissions.
Group Space is useful when certain photos, videos, or files need to be shared only with selected users. By creating multiple groups, different content can be shared with different users, providing resource sharing and collaboration for families or small teams.
Group Space supports multi-device, cross-platform access but does not support Samba access.
Files in Group Space are permanently deleted once removed and do not enter the Recycle Bin.
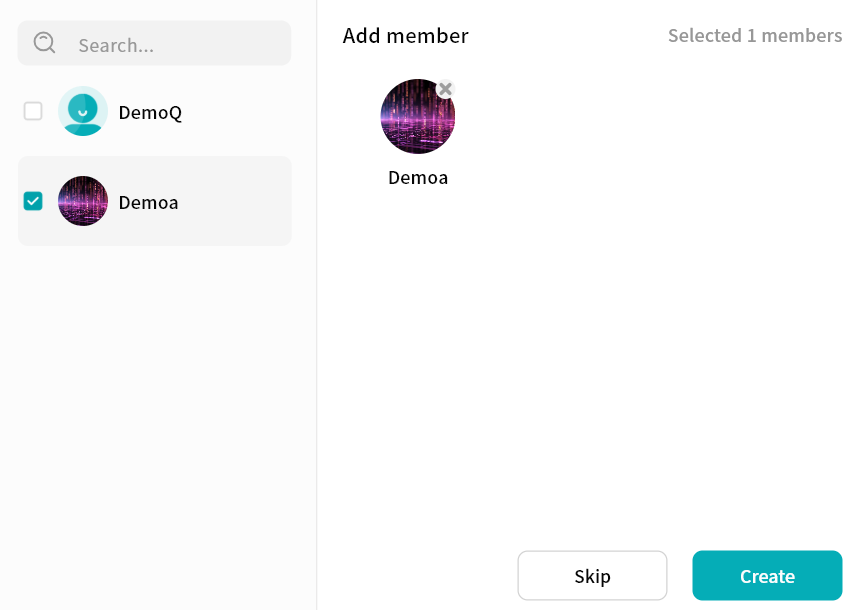
Create a Group
- Click Group Space +, then enter the group name.
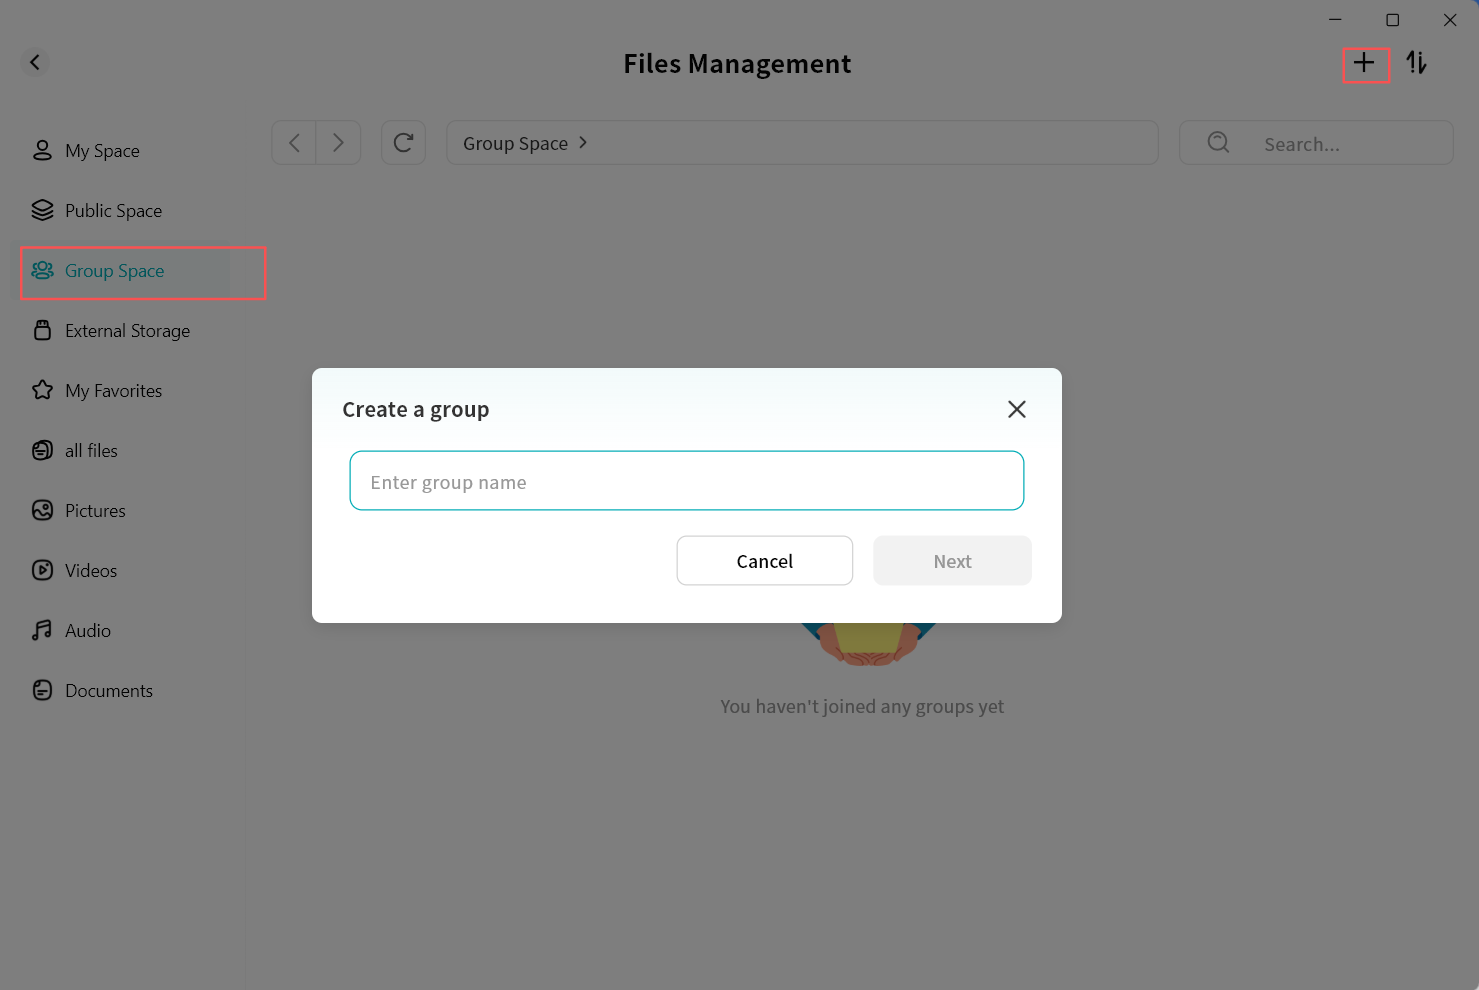
-
In the pop-up window, select one or multiple members to join the group:
-
Member list supports multi-selection.
-
Click the "x" on a member's avatar to cancel an invitation.
-
Keyword search is supported for quickly finding members.
-
After selection, click Create.
-
- Once created, the group will appear on the Group Space page.
Using Group Space
Group Space usage is consistent with other file management pages. You can:
-
Upload files to a group
-
Download files from a group
-
Create new folders
-
Move/Copy files within a group
-
Rename files/folders
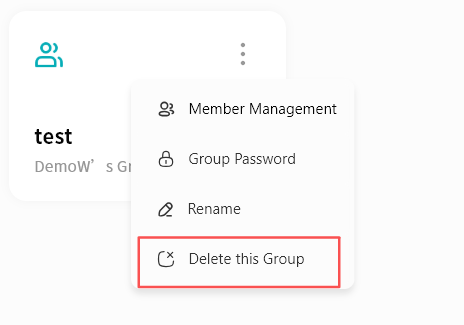
Group Management
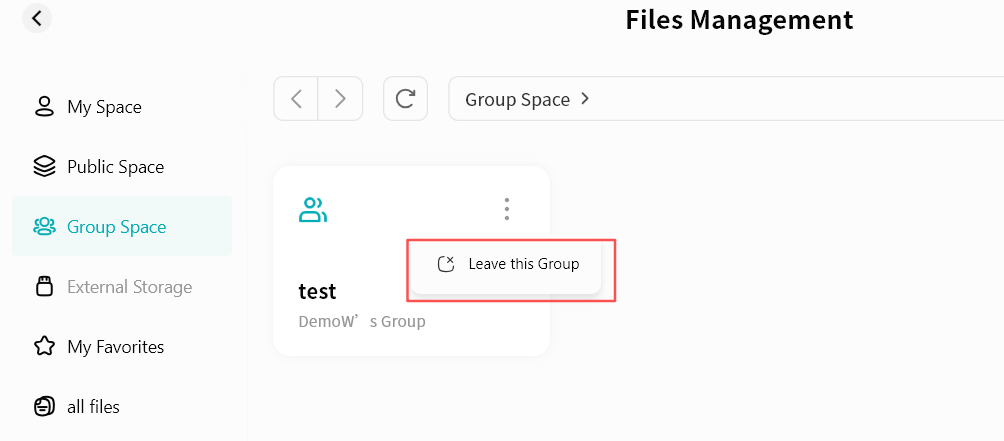
Creators of the group have permission to manaage a group. On the group list, click the ellipsis icon to open the Group Management menu:
-
Member Management: Add or remove members.
-
Group Password: Set a password required for accessing files.
-
Rename: Modify the group name.
-
Delete Group: Delete the group, including all files within.
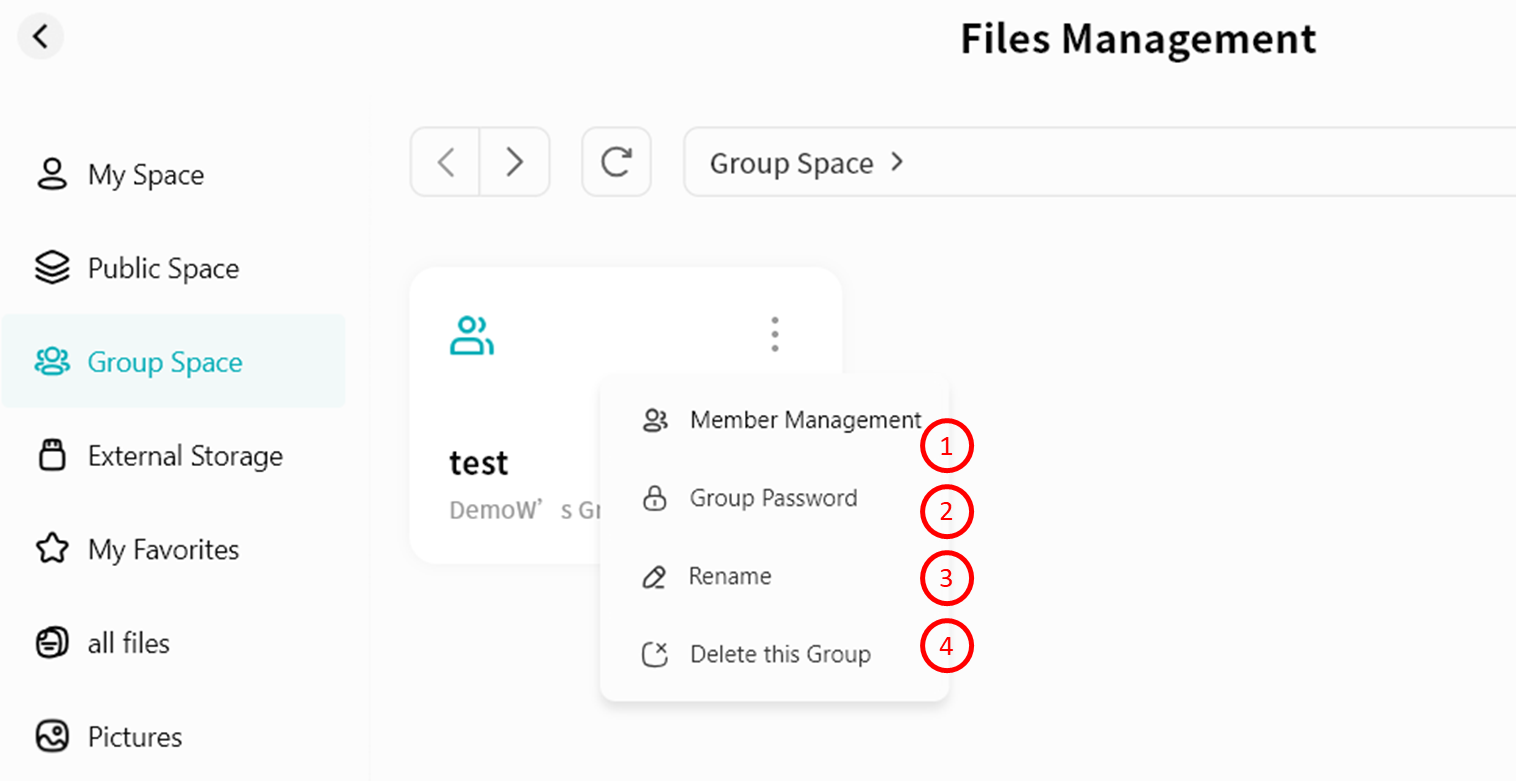
- Exit Group (Members only): Members of a group can choose to exit the group.
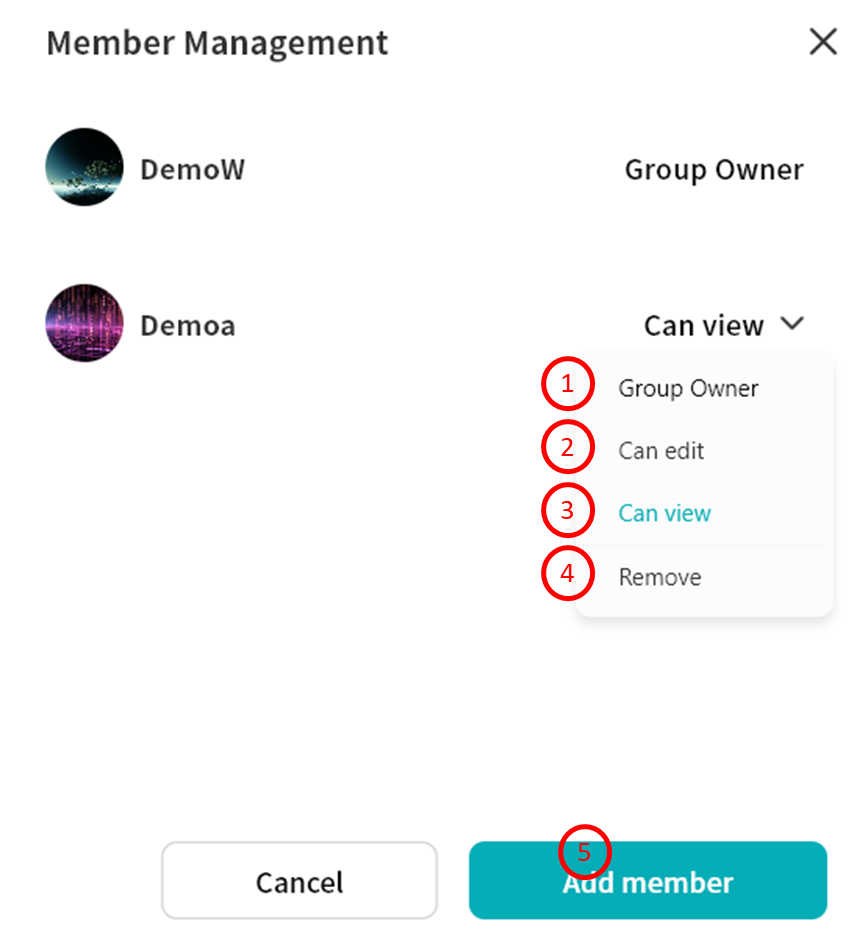
Member Management
In the Member Management page, you can add/remove members or configure permissions:
-
Transfer Ownership: Assign group Owner role to another member.
-
Edit: Members can write to the group, performing all file operations including upload, download, move, etc.
-
View Only: Members can only view files and perform limited actions such as download, copy, or view details.
-
Remove: Remove the member from the group. The removed user cannot access the group.
-
Add Members: Add new members to the group.
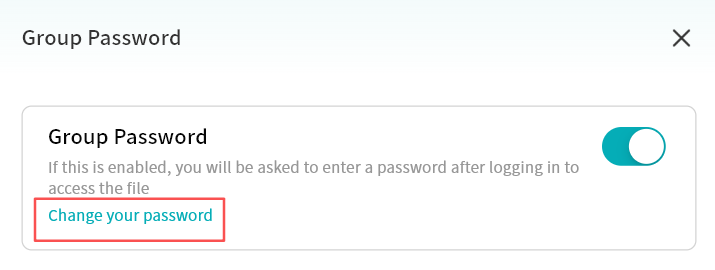
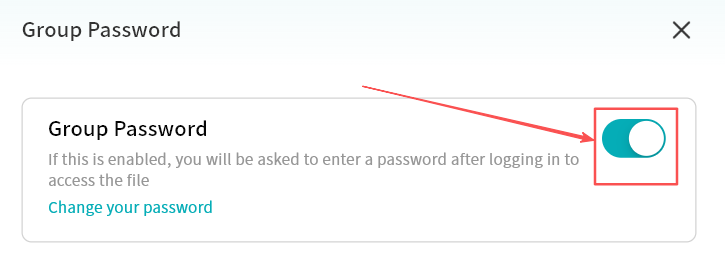
Group Password
You can set a password for the group, requiring members to enter it before accessing files.
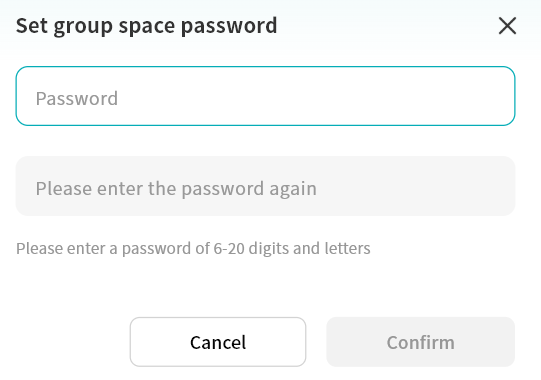
Set Group Password
-
Click Group Password.
-
In the pop-up window, enable Group Password.
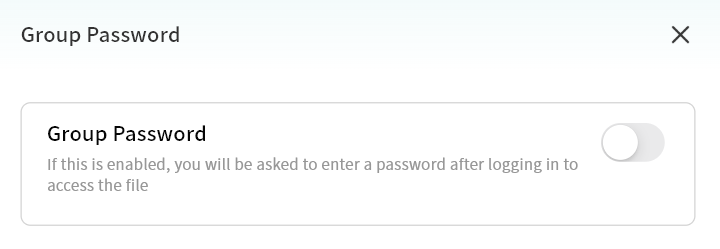
- Set the password and click Confirm.
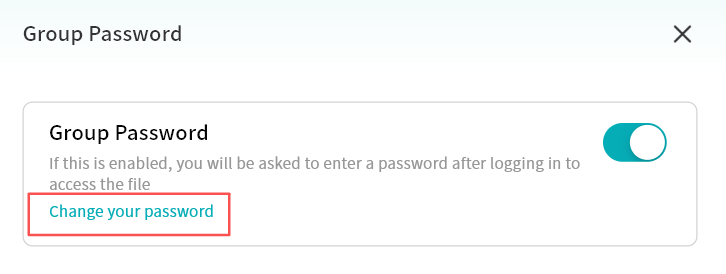
Modify Group Password
-
Click Group Password.
-
Select Change Your Password.
-
Enter the current password and click Confirm.
-
Set a new password.
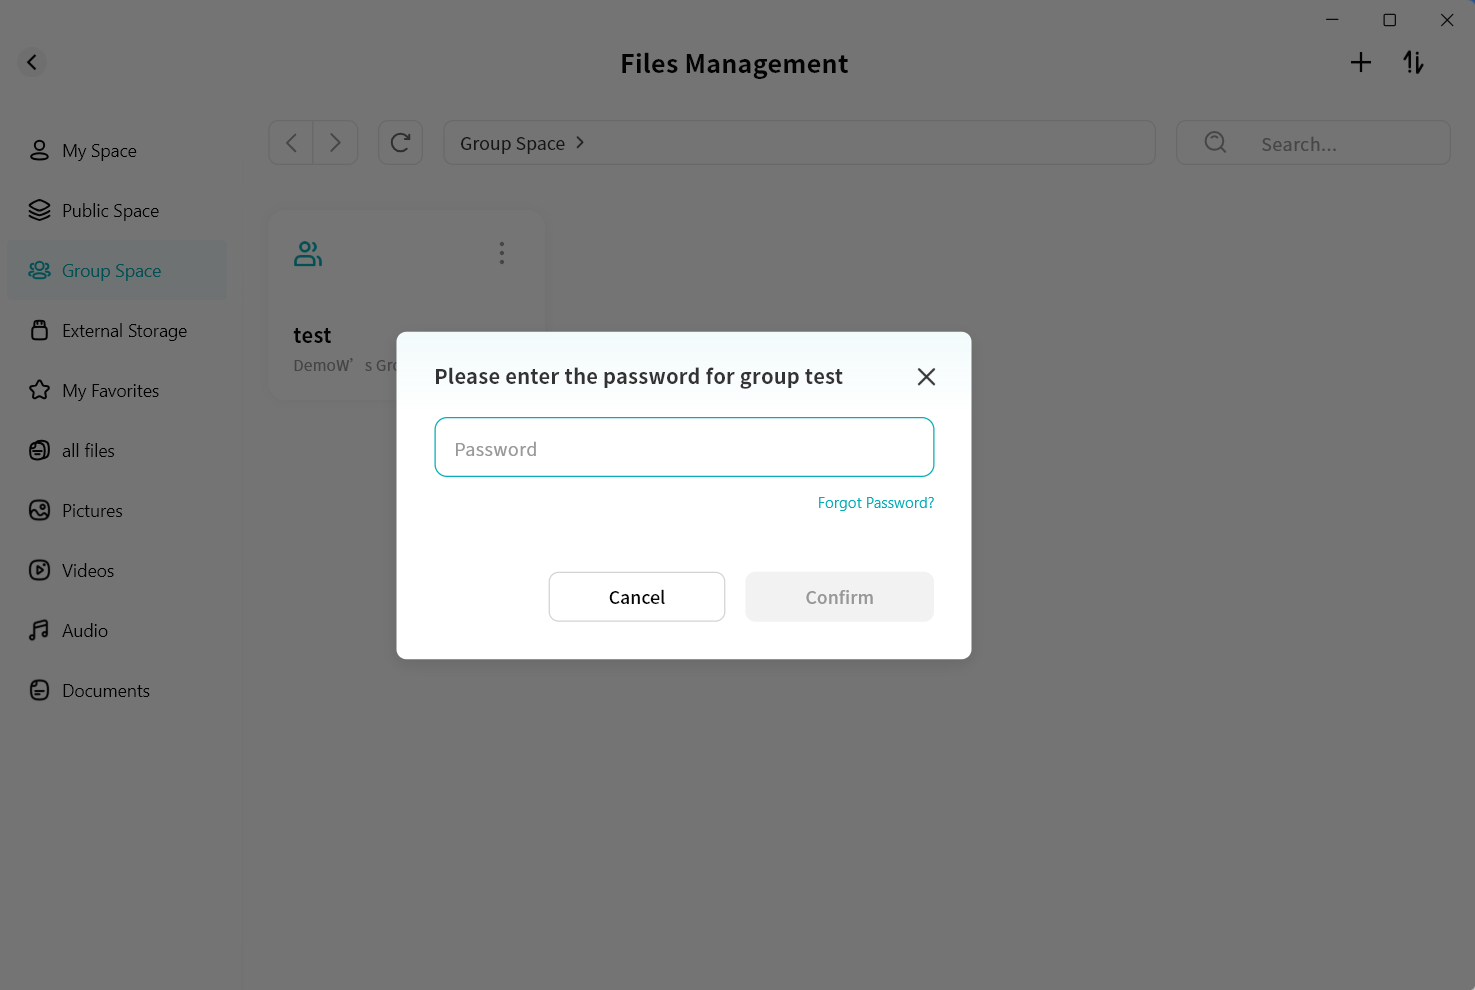
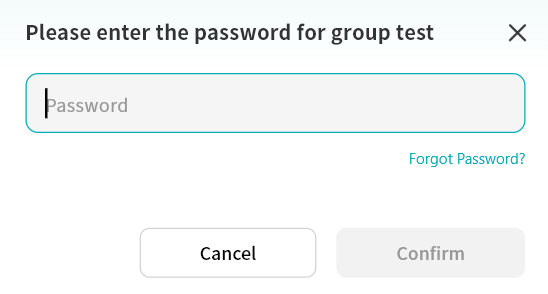
Access Group with Password
-
Click the group.
-
In the pop-up window, enter the correct password to access Group Space.
Recover Group Password
- Click Group Password Change Password.
- Select Forgot Password.
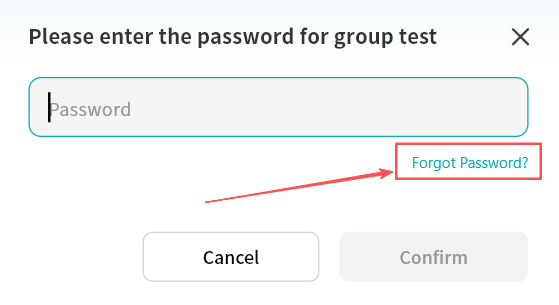
-
Enter your DASSET account email or mobile number for identity verification.
-
Enter the email/SMS verification code.
-
After verification, you can reset the group password.
Disable Group Password
- Click Group Password Disable.
- Enter the current group password.
- The password will be successfully disabled.
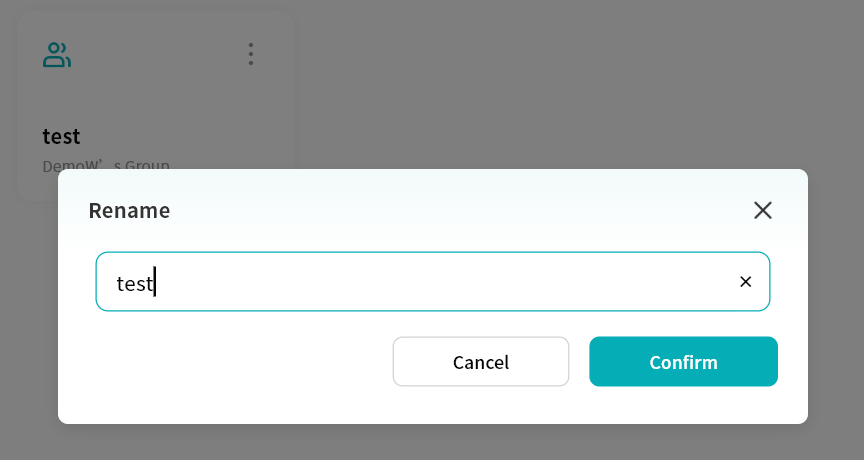
Rename Group
Click Rename, then enter a new group name in the pop-up window to update the name.
Delete Group
Click Delete This Group to permanently delete the group and all its contents.
Task Center
All file uploads, downloads, and related operations are displayed centrally in the Task Center.

From the device home page, click the Task Center icon in the upper right corner.
A number displayed on the icon indicates the count of ongoing tasks.
Within the Task Center, operation progress is categorized as follows:
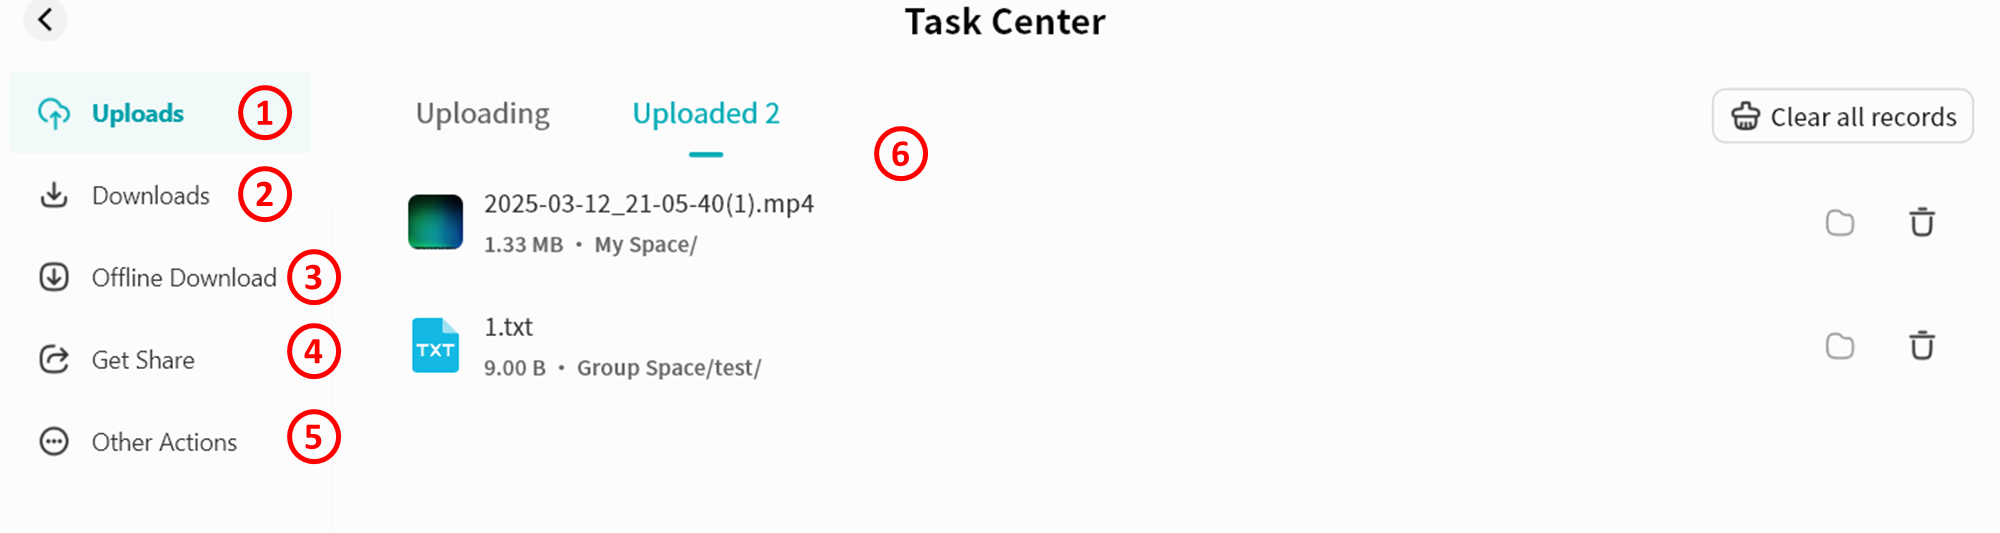
-
Upload: Shows all ongoing and completed upload tasks
-
Downloads: Shows all ongoing and completed download tasks
-
Offline Download: Shows ongoing, completed, and failed offline download tasks
-
Get Share: Shows files you have received or shared with others
-
Other Actions: Shows ongoing and completed operations such as move, copy, decompress, and compress
-
Task Details Page: Displays a complete record of all tasks
My Vault tasks are displayed separately to ensure your privacy.
Upload
In the Upload section, you can view ongoing and completed uploads, and control tasks at any time (pause, resume, cancel).

-
Upload tasks display current upload speed, uploaded size, and total file size.
-
You can click the control button to pause/resume/cancel all current upload tasks at once.
-
You can also manage individual tasks using the control button on each task entry.
-
You can delete all task records, or delete a single record.
-
Clicking a task's path button opens the file's storage location on the DASSET device.
Downloads
In the Download section, you can view ongoing and completed downloads, and control tasks at any time (pause, resume, cancel).
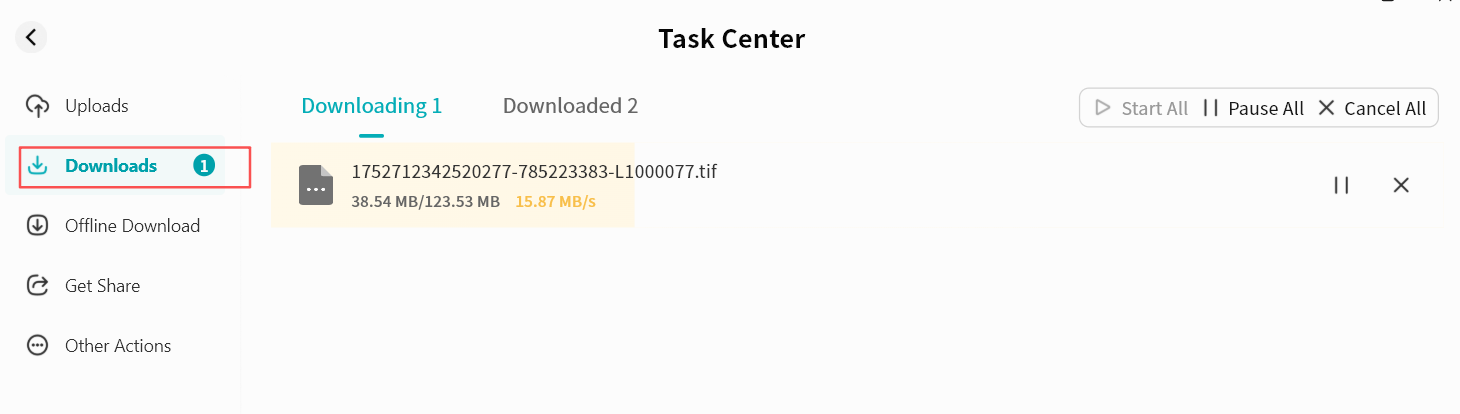
-
Download tasks display current download speed, downloaded size, and total file size.
-
You can click the control button to pause/resume/cancel all current download tasks at once.
-
You can also manage individual tasks using the control button on each task entry.
-
You can delete all task records, or delete a single record.
-
Clicking a task's path button opens the file's saved location on your computer.
Offline Download
For details, refer to the Offline Download section.
Get Shares
The Received Shares section includes two types of file sharing:
-
From Members: File sharing between members on the same DASSET device (available to all users).
-
QR Code Sharing: Receive files shared by other DASSET users via QR code or share code. Files are downloaded to the recipient's DASSET edge device (available only to device Owners).
From Members
You can view all files shared with you by other members on the same device.
-
Save files to My Space or My Vault
-
Download files to local storage
-
Delete individual share entries
-
Delete all share entries
QR Code Sharing
The QR Code Sharing page provides:
-
Add Share: Enter a share code to obtain shared files
-
Download Status: Displays progress for ongoing, completed, or failed downloads
For detailed sharing instructions, refer to the Sharing section.
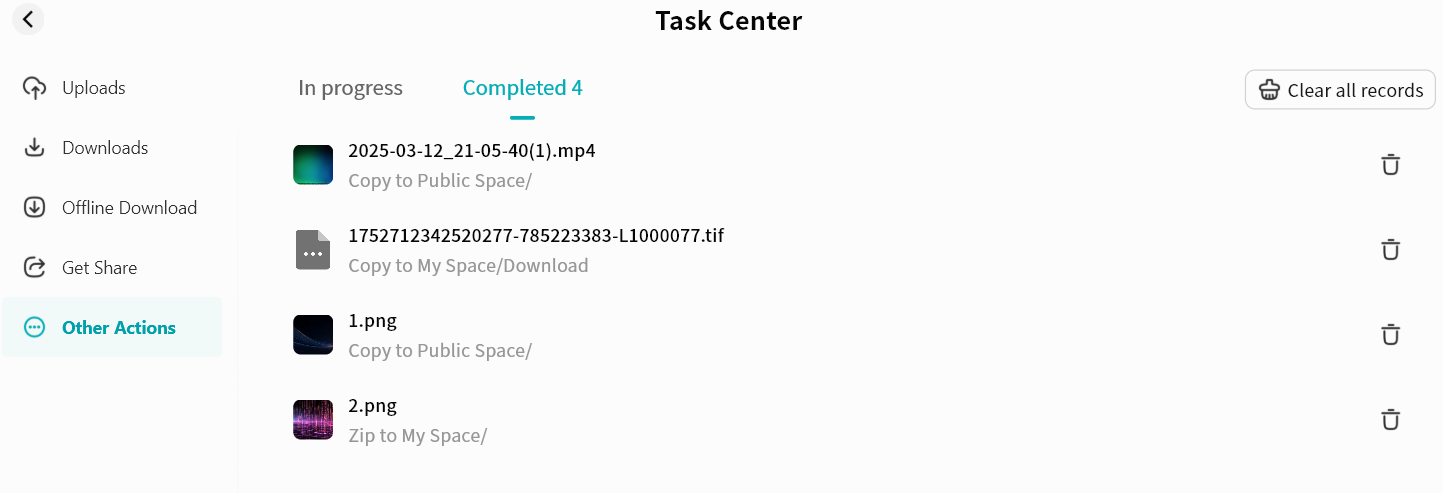
Other Actions
All move, copy, decompress, and compress operations are displayed in Other Operations.
You can view task progress, specific actions, and target paths clearly.
You can delete all task records, or delete a single record.
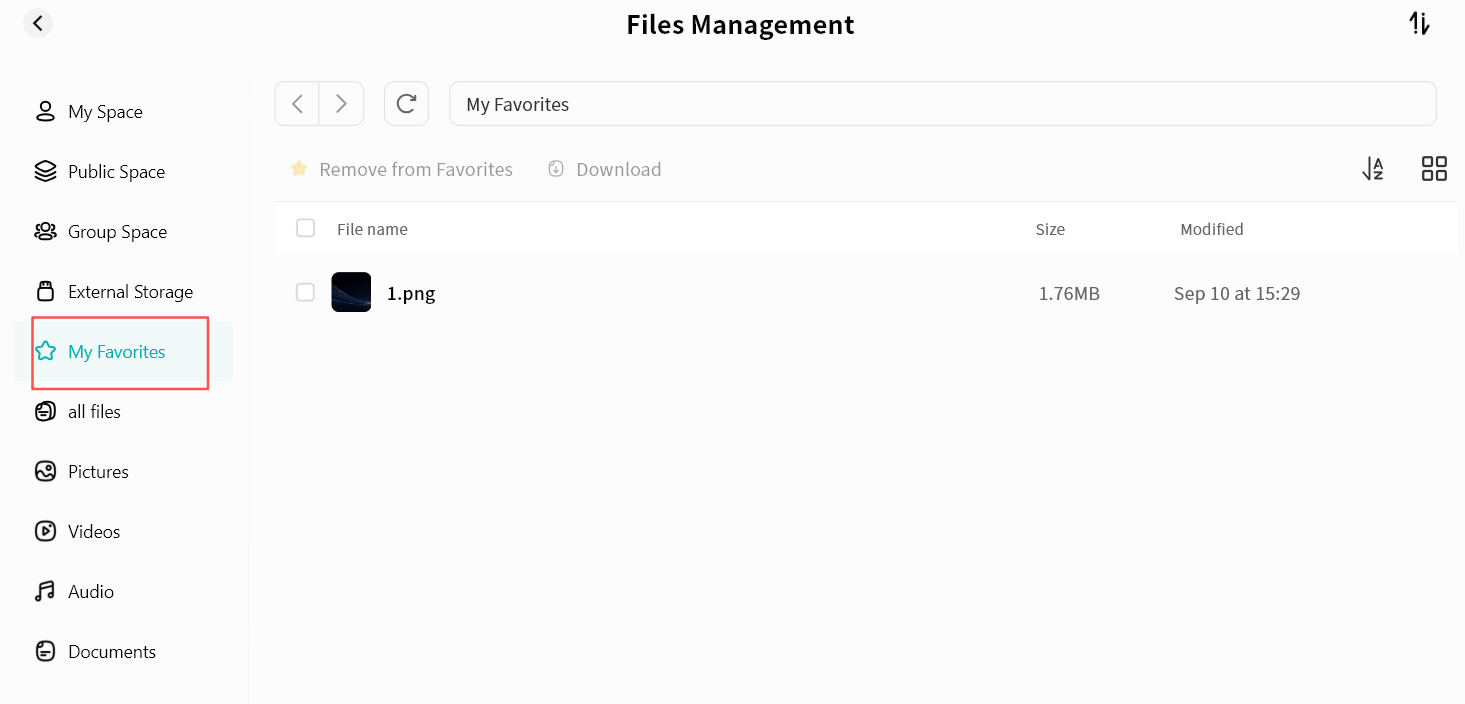
My Favorites
You can add data stored on the DASSET device to My Favorites, allowing quick access at any time.
Enter Favorites by clicking the My Favorites icon in the DASSET app, or by selecting My Favorites from the left sidebar in File Management.
In Favorites, you can:
-
Cancel favorites for single or multiple files
-
Download files directly
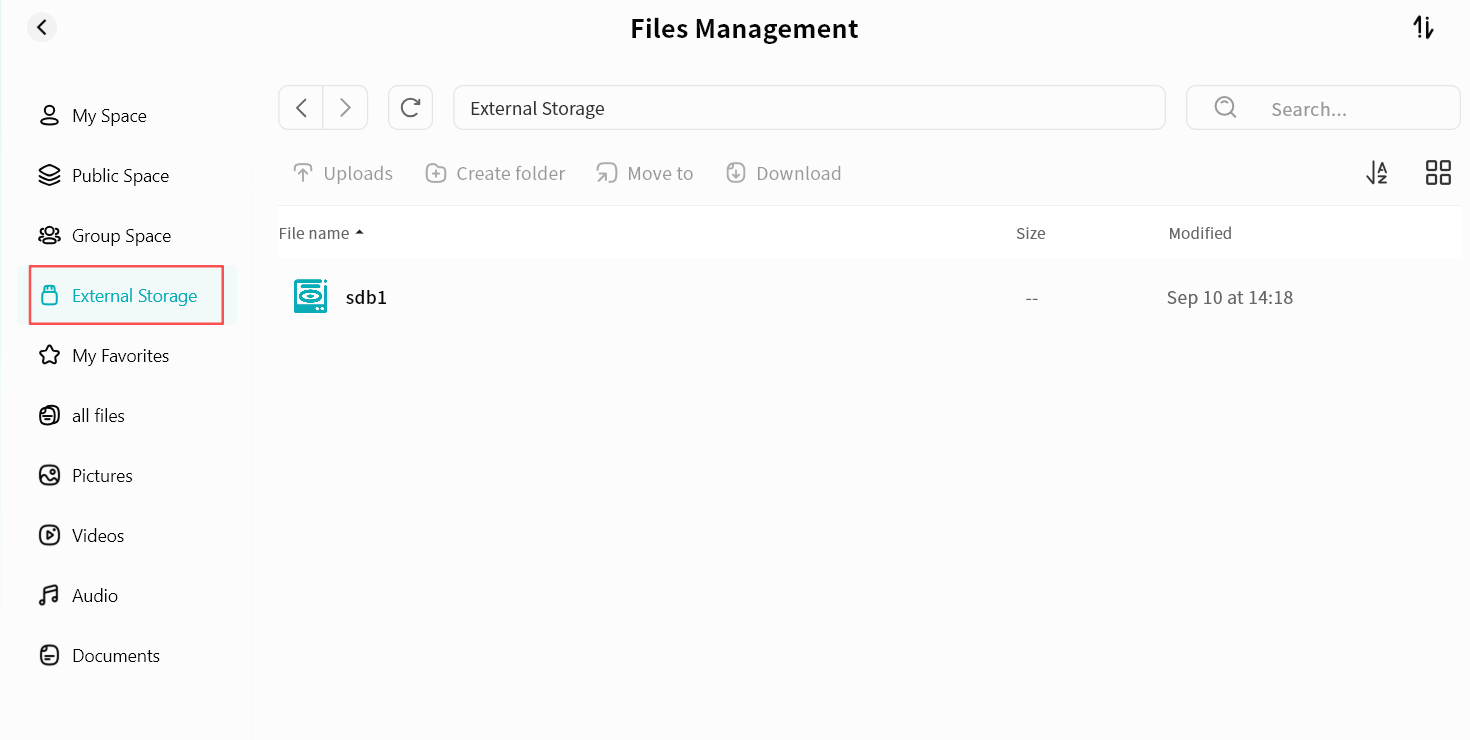
External Storage
When a USB drive is connected to the DASSET device, you can access its data through the External Storage function in the client.
Files on the USB drive can be managed in the same way as files in other DASSET spaces.
You can enter External Storage by clicking the External Storage icon in the app, or by selecting External Storage from the File Management sidebar.
Supported Disk Formats: exfat, fat32, vfat, ext4, NTFS
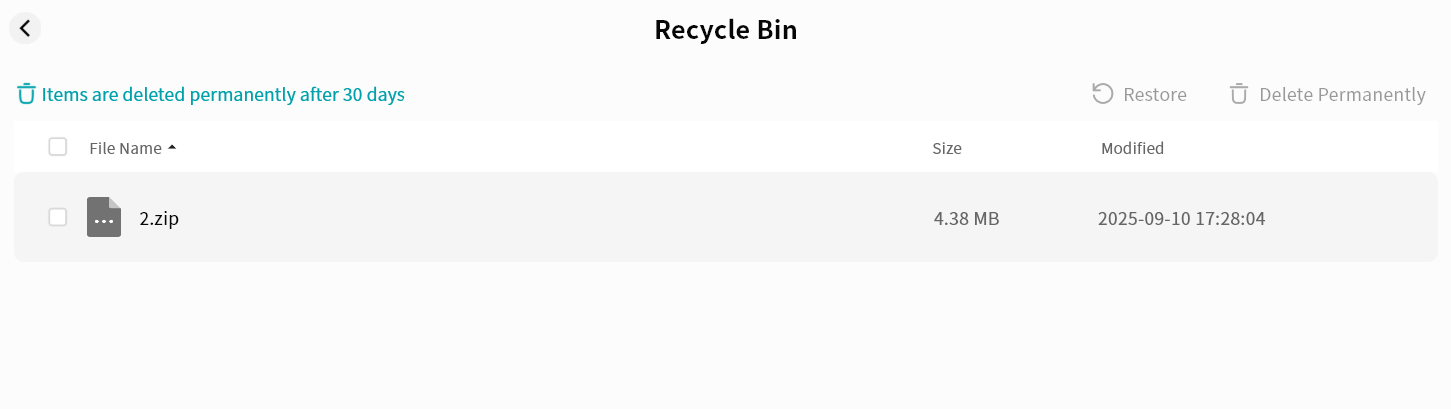
Recycle Bin
All deleted files from the DASSET device are placed in the Recycle Bin.
You can restore or permanently delete files at any time.
Files remaining in the Recycle Bin for 30 days will be permanently deleted.
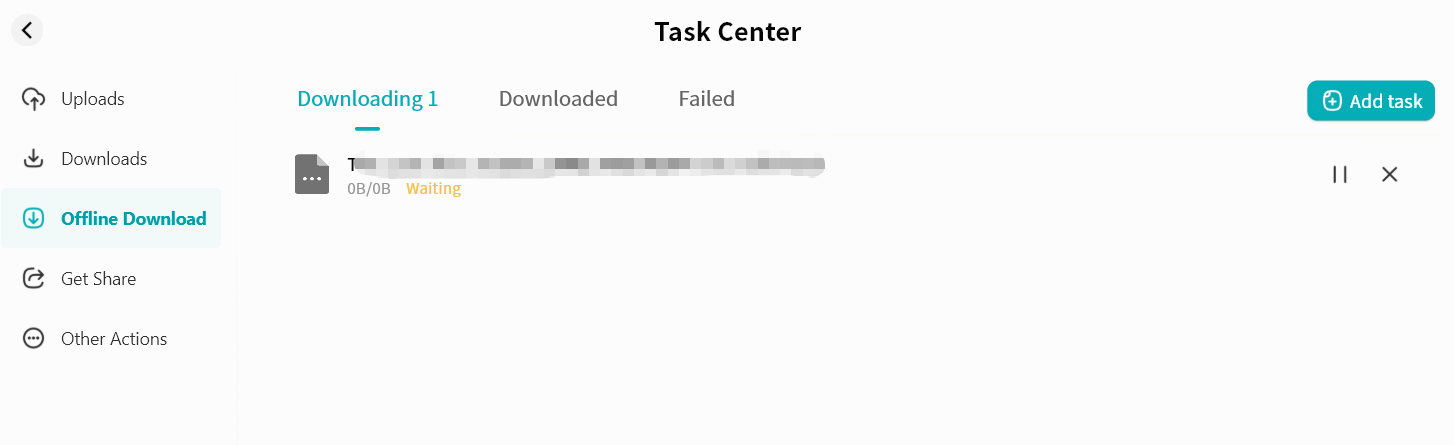
Offline Download
Offline download allows the DASSET device to run 24/7 to automatically download resources.
This feature is available only to Owner and Administrator accounts.
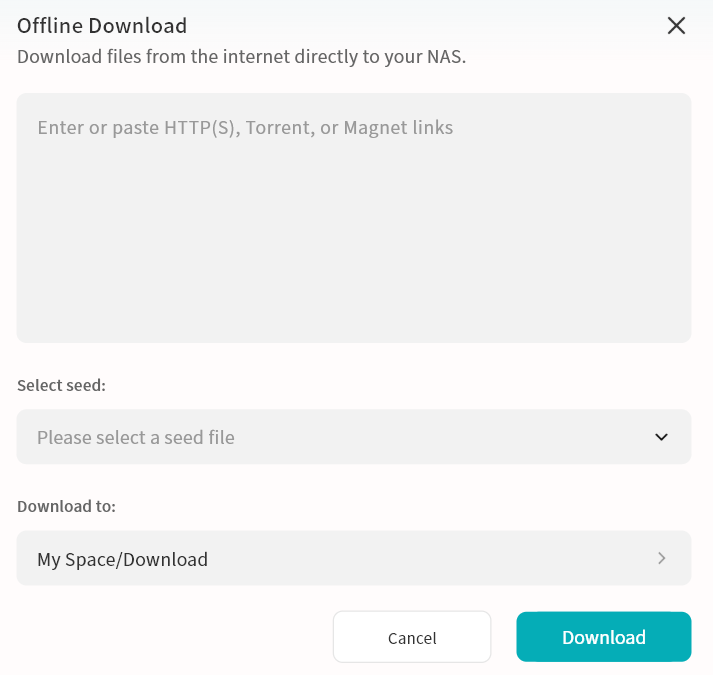
-
Supports http, https, ftp, magnet, and torrent downloads.
-
Torrent files can be uploaded locally or selected from those stored on the device.
-
Default download path: My Space/Download (custom paths supported).
-
Progress can be viewed in Task Center Offline Download.
-
You can also click New Task in Task Center to quickly create new offline download tasks.
Download speed depends on network conditions, resource availability, and thread control.
My Shares
My Shares provides centralized management for all file sharing tasks you created, including Member Sharing and QR Code Sharing.
-
Member Sharing: Shows tasks where you shared files with members on the same device.
-
QR Code Sharing: Shows all QR code share tasks and cross-device share tasks you created.
Member Share Task Management
Displays all ongoing member share tasks.
- You can cancel any share task.

QR Code Sharing
Displays all QR code share tasks and cross-device share tasks you created.
-
Cancel share tasks at any time.
-
Click a task to redisplay its QR code and details.
- Even if you lose the original QR code, you can retrieve it here and share it again with other DASSET users.

File Dedupe
File dedupe helps identify and remove duplicate files on the DASSET device, saving storage space.
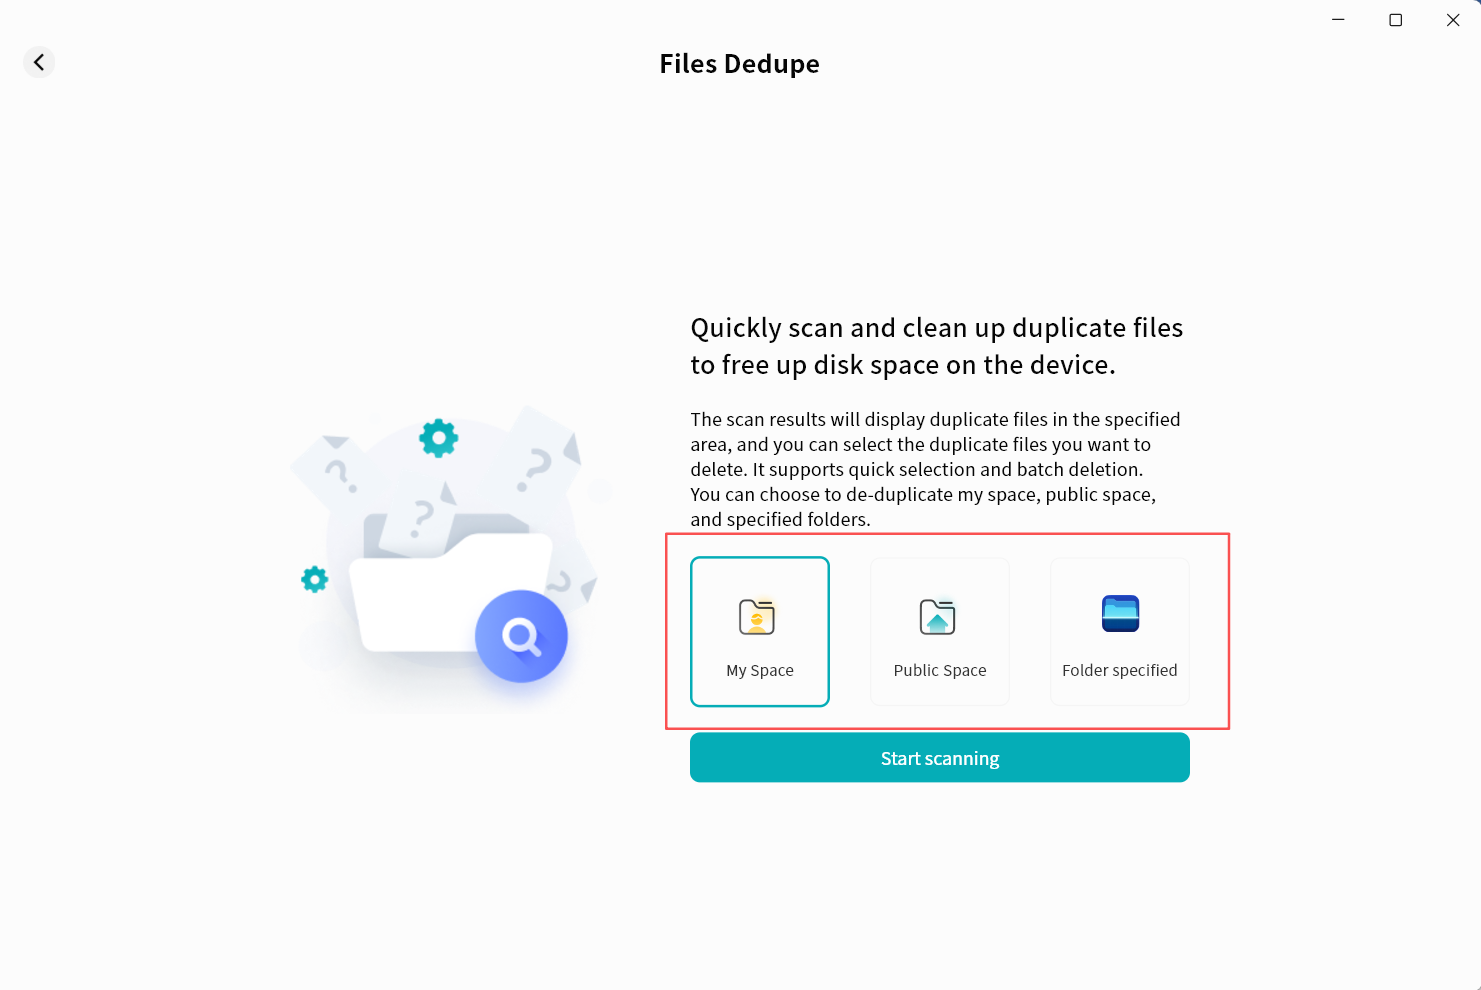
Deduplication can be performed in three ways:
-
My Space: Find duplicates within My Space.
-
Public Space: Find duplicates in Public Space (Owner/admin only).
-
Folder specified: Scan selected folders where you have permission for deduplication.
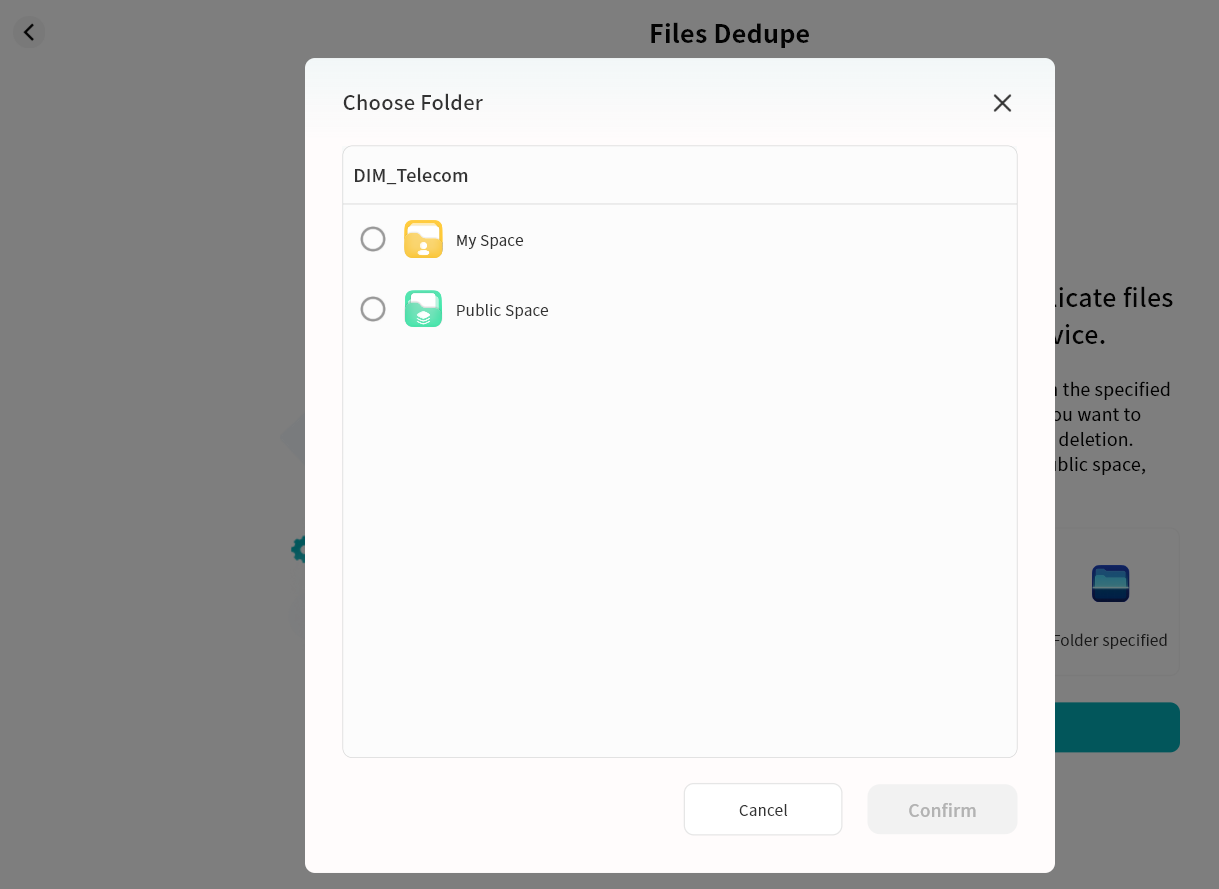
Multiple paths can be selected for deduplication. After selection, click Start Scanning to begin duplicate file scanning.
Deduplication Operation
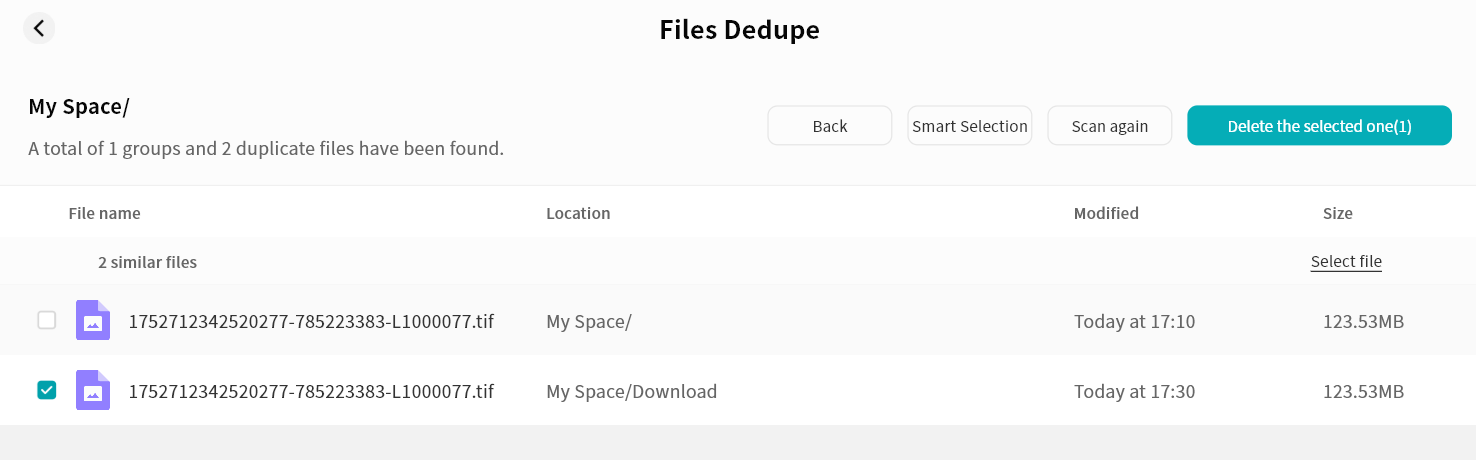
After specifying the target path, DASSET will automatically search for duplicate files and display the results in a list.
Once confirmed, click Delete the selected one to remove duplicates.
Deduplication Rules
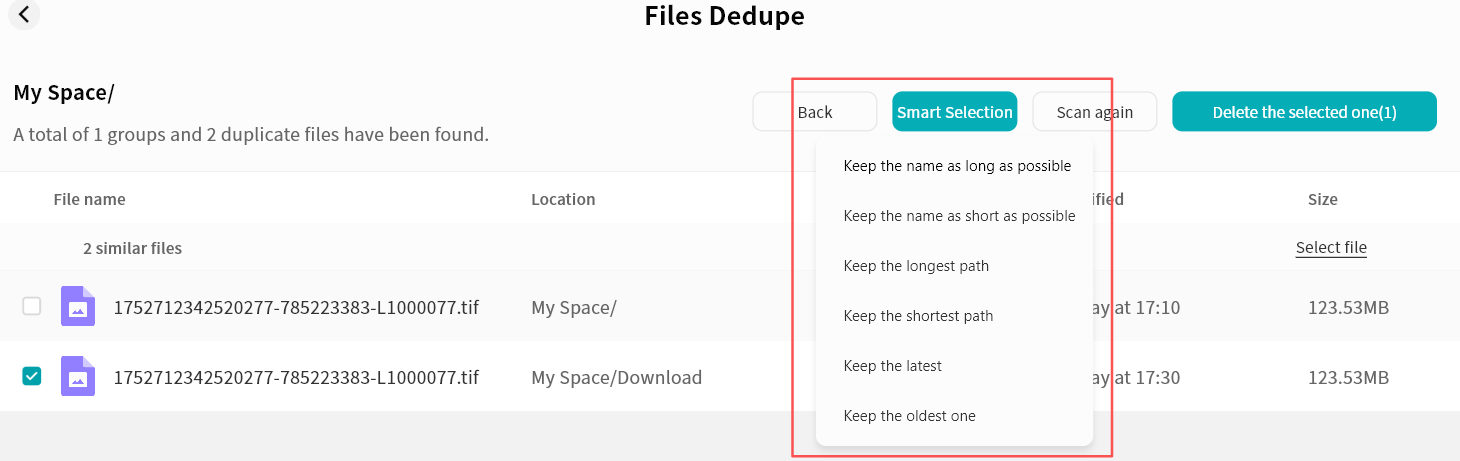
Click Smart Selection in the duplicate file list to define deletion rules:
-
By file name length
-
By file path length
-
By file modification time (earliest/latest)
Files Sync
Files Sync allows you to synchronize files between devices including PCs/Macs and other DASSET devices.
Files Sync is only available to the Owner of the DASSET device.
-
Synchronize files between DASSET devices and computers, ensuring data consistency across devices.
-
Synchronize files between DASSET devices, enabling remote backup and improving data redundancy.
DASSET supports three synchronization modes:
-
Two-Way Synchronization: Keeps files consistent between a DASSET edge device and a computer, or between two DASSET devices. Any file change on one side will be automatically synchronized to the other side.
-
Sync from Device A to Device B: Only new or modified files from Device A will be synchronized to Device B. File changes on Device B will not be synchronized back to Device A.
-
Sync from Device B to Device A: Only new or modified files from Device B will be synchronized to Device A. File changes on Device A will not be synchronized back to Device B.
Configure Synchronization Between DASSET device and a Computer
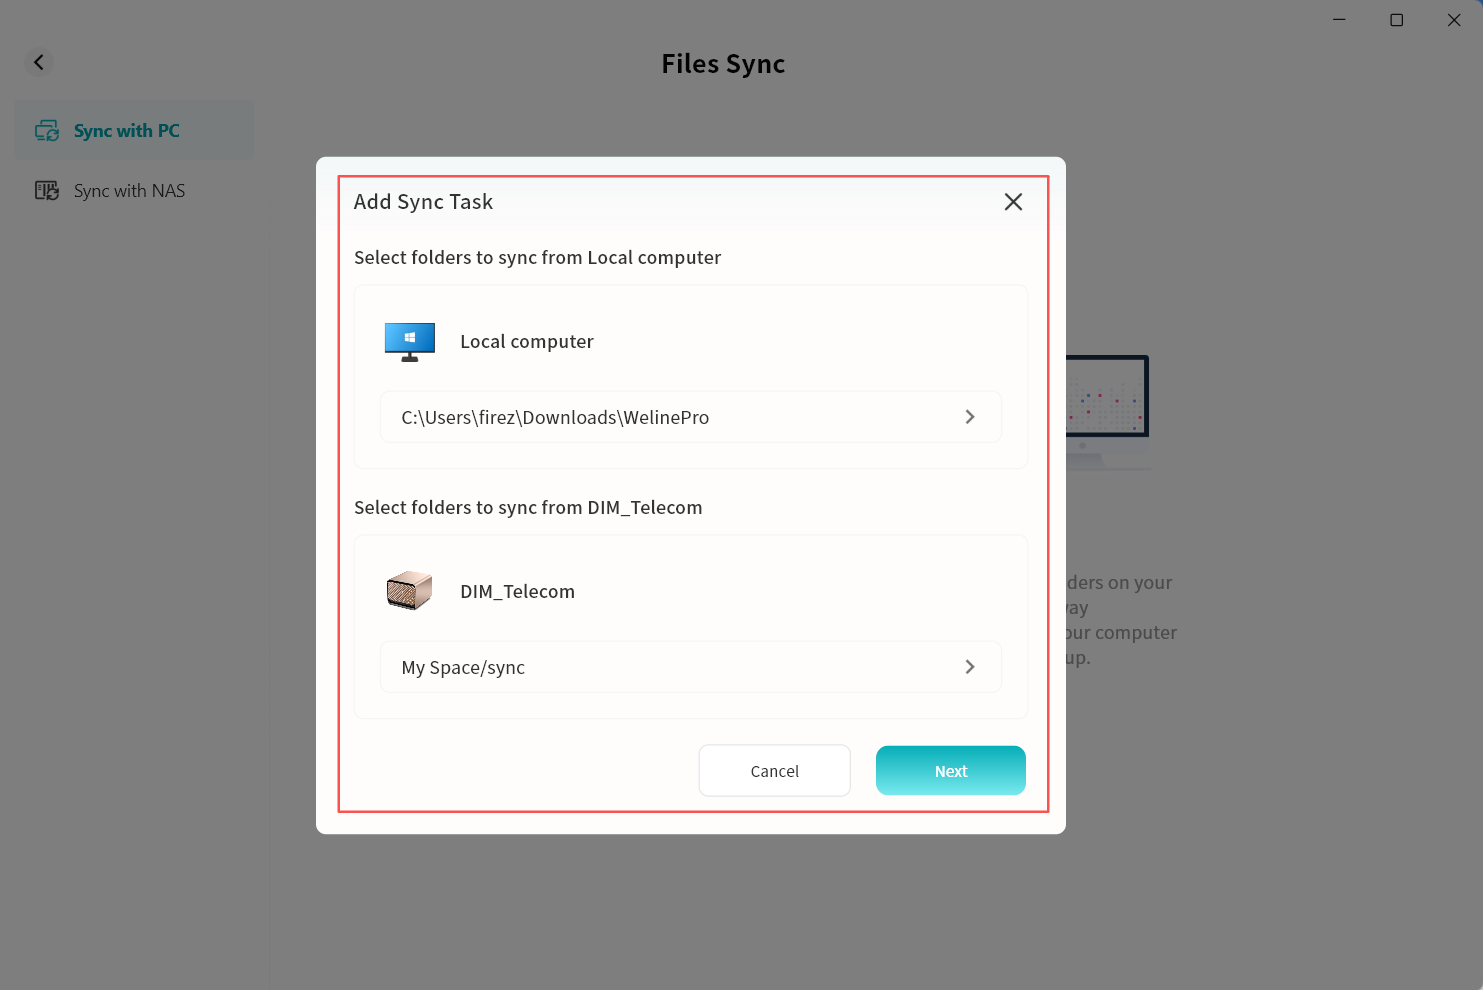
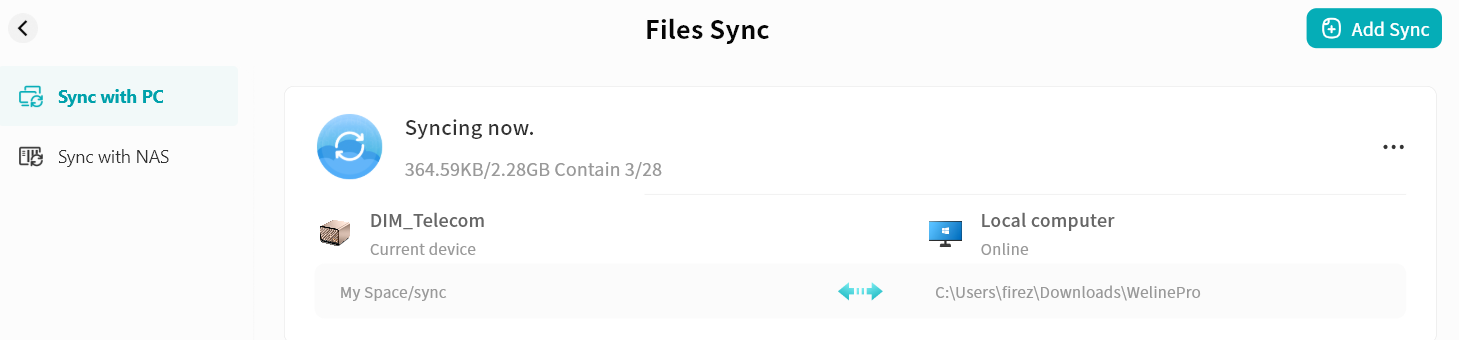
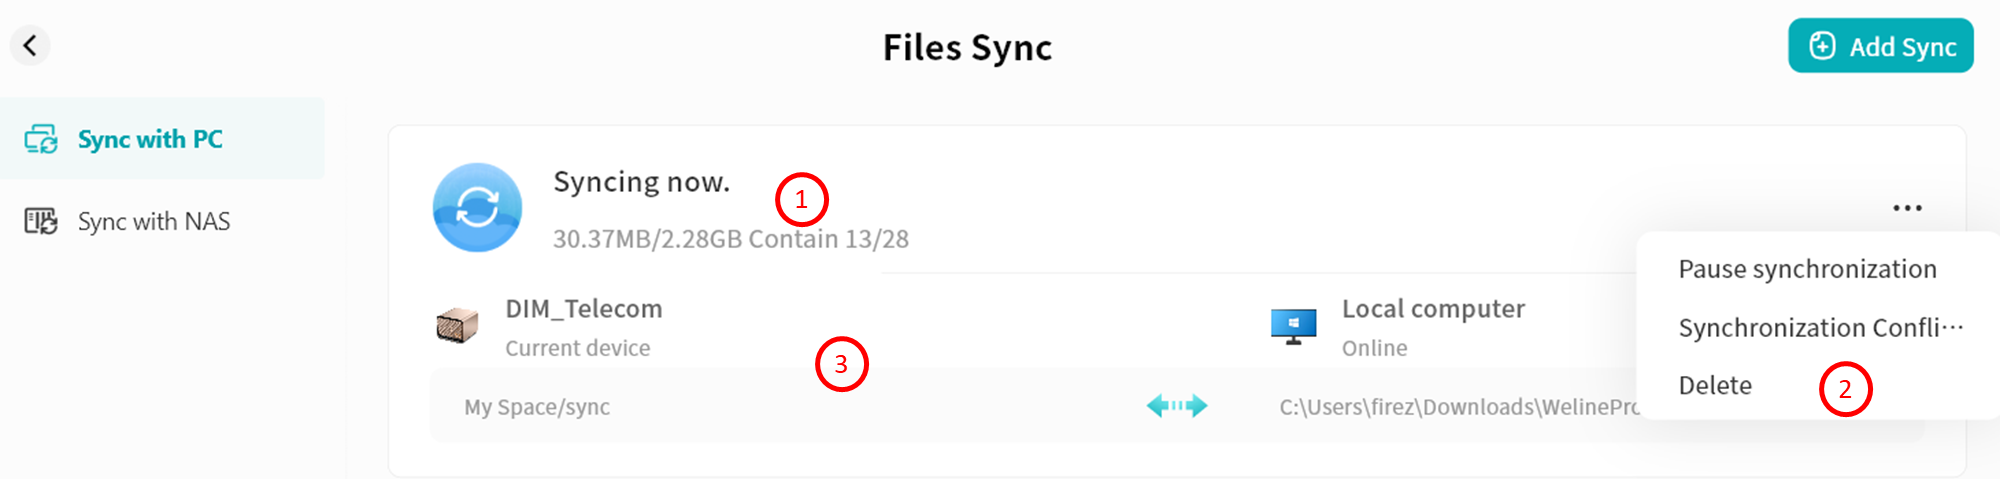
- Go to Files Sync - Sync with PC - Add Sync.
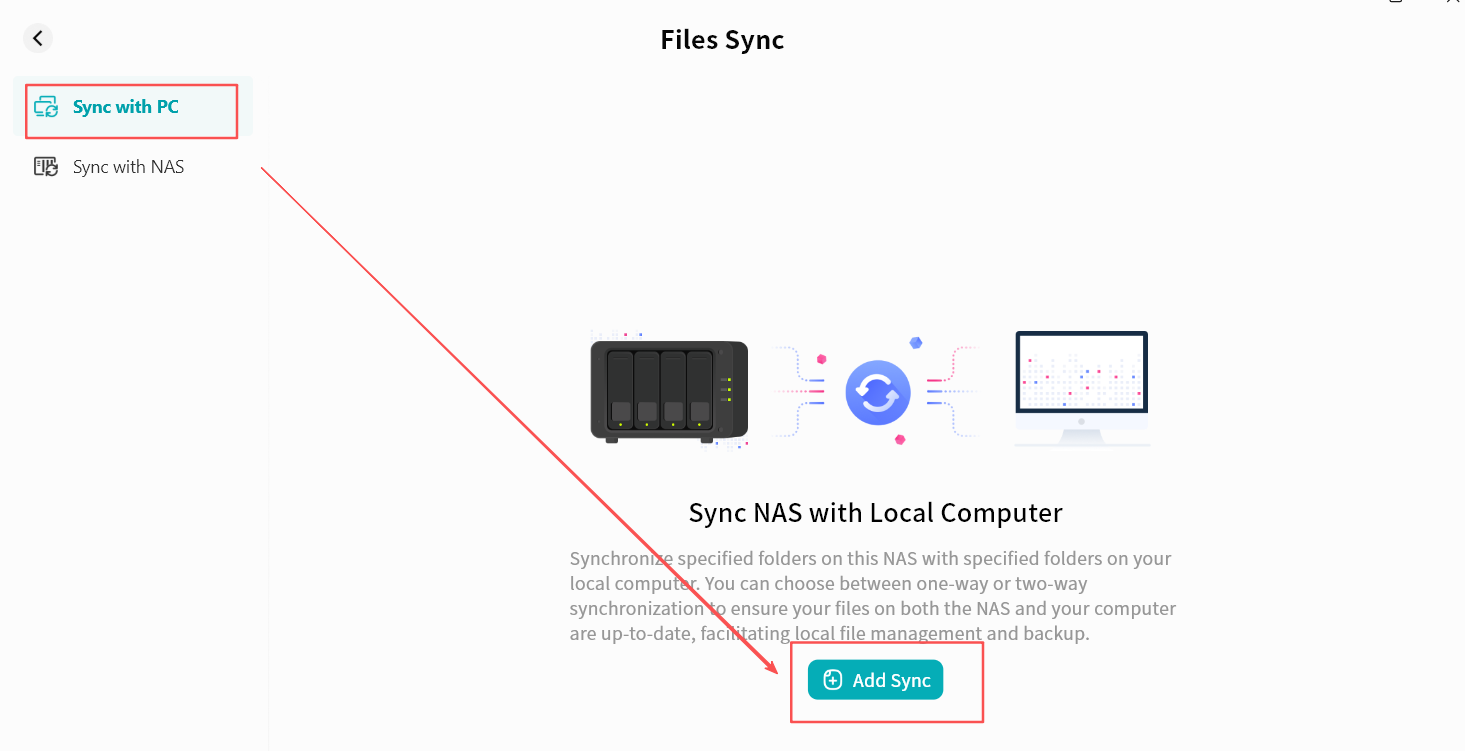
-
In the pop-up window, set the directories for synchronization:
-
Select folders to sync from Local computer: on the local computer, select the folder that will be synchronized with the DASSET device.
-
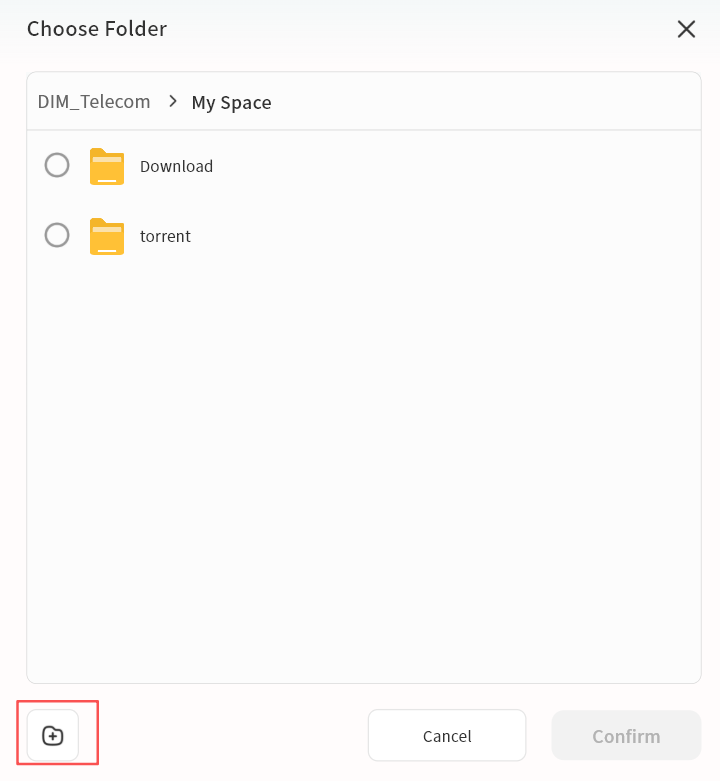
Select folders to sync from DASSET device: on the DASSET edge device, select the folder for synchronization. You can choose from My Space, Public Space, or Group Space.
-
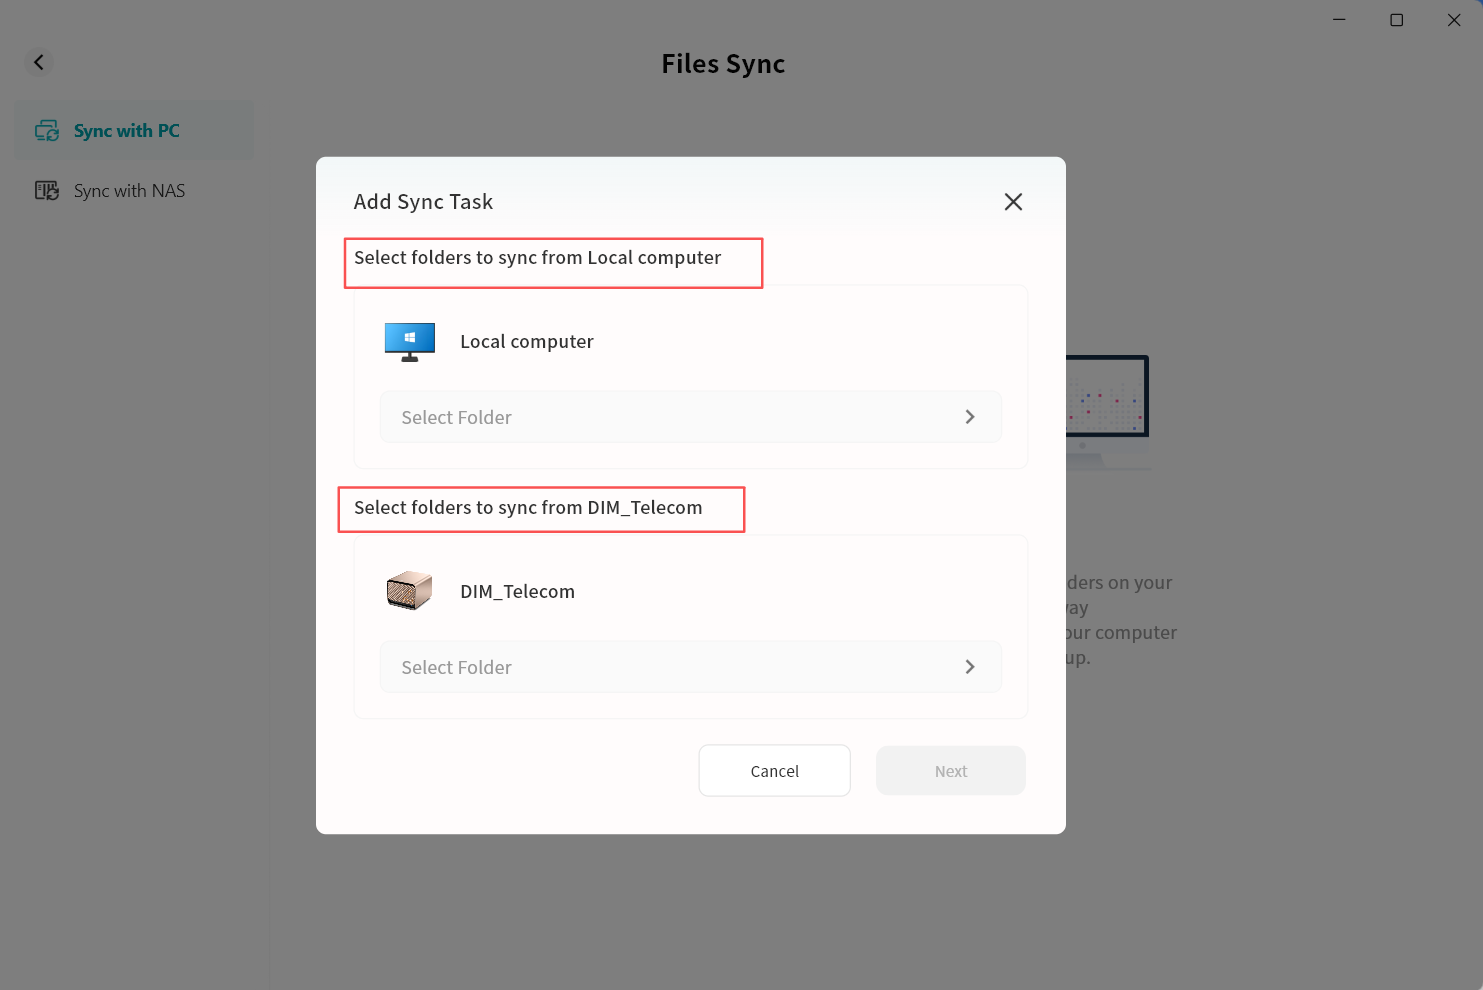
- On the DASSET device, select the folder to be synchronized. You may use an existing folder or create a new one.
- On the local computer, click Select Folder, then choose the desired directory in the file explorer and confirm.
The local computer refers to the machine where the DASSET client is running. The selected folder will be used as the synchronization directory.
- In the Add Sync Task window, confirm that both the synchronization folder and the synchronization target are correctly set. Click Next to continue.
-
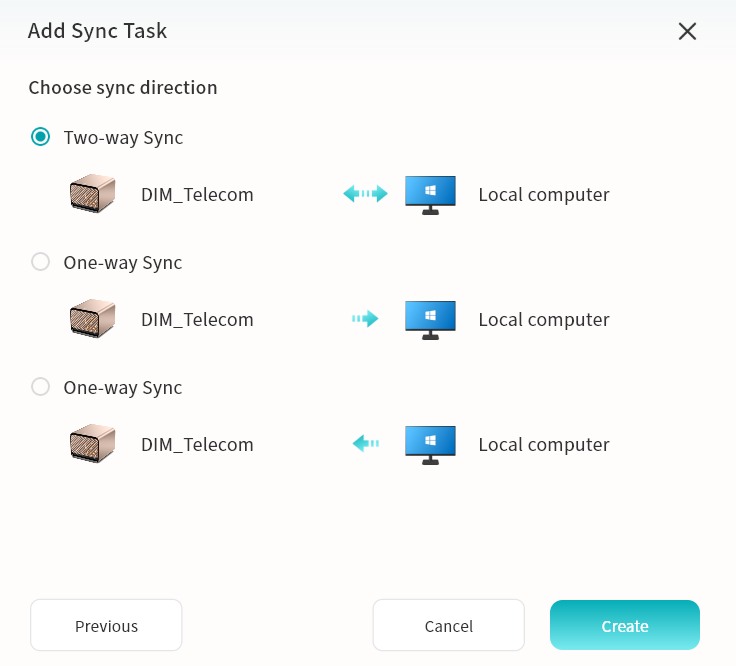
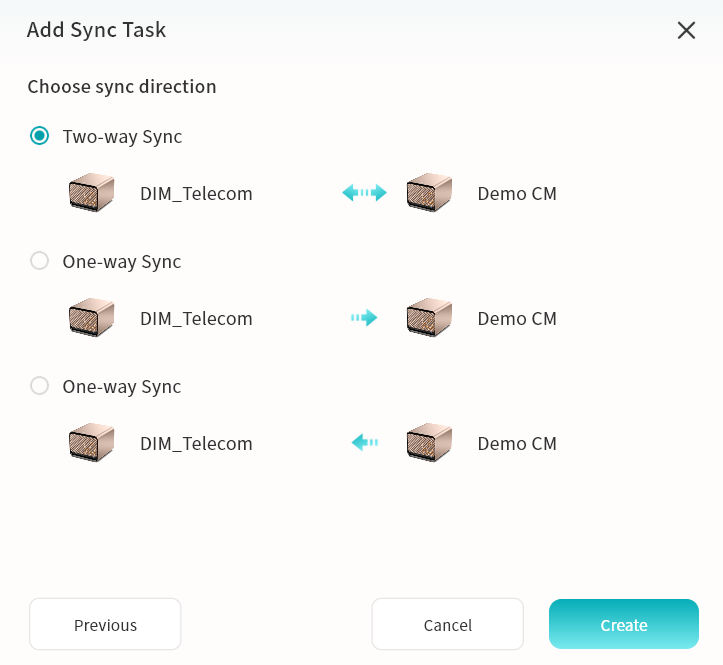
Select the required synchronization mode and then click Create:
-
Two-way sync: Keeps files consistent between the DASSET device and the computer. Changes on either side will be synchronized automatically.
-
One-way sync from device to local computer: Only new or modified files from the DASSET device will be synchronized to the computer. Changes on the computer will not be synchronized back.
-
One-way sync from local computer to device: Only new or modified files from the computer will be synchronized to the DASSET device. Changes on the DASSET device will not be synchronized back.
-
- The synchronization task will start automatically. While the DASSET client remains online, any detected changes in the selected directories on either the computer or the DASSET device will trigger synchronization.
Configure Synchronization Between two DASSET Devices
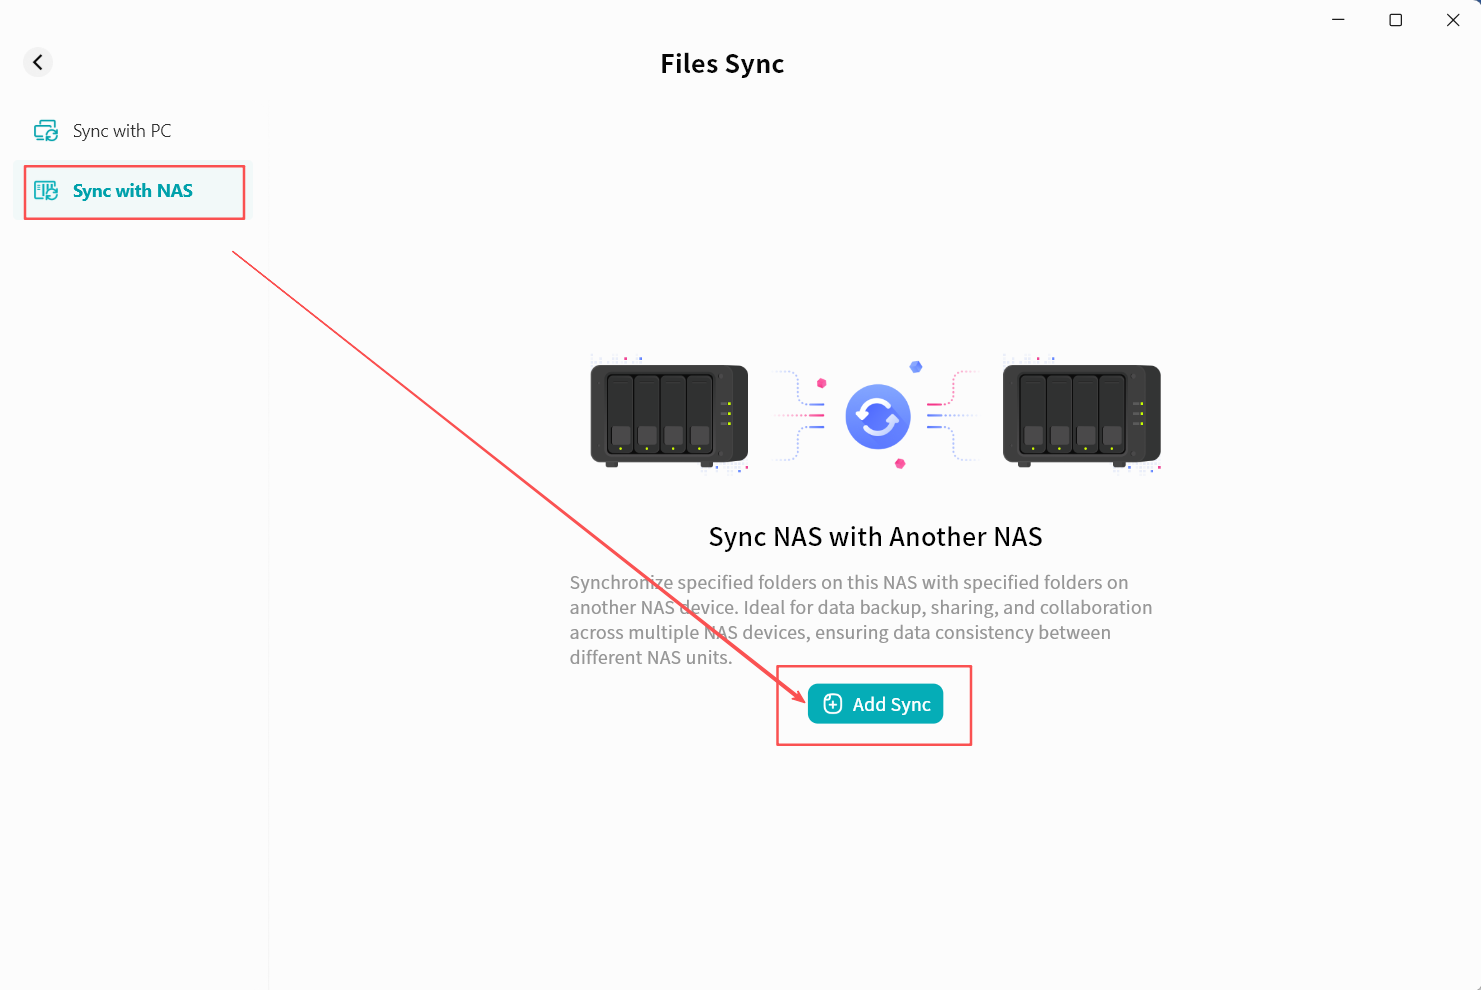
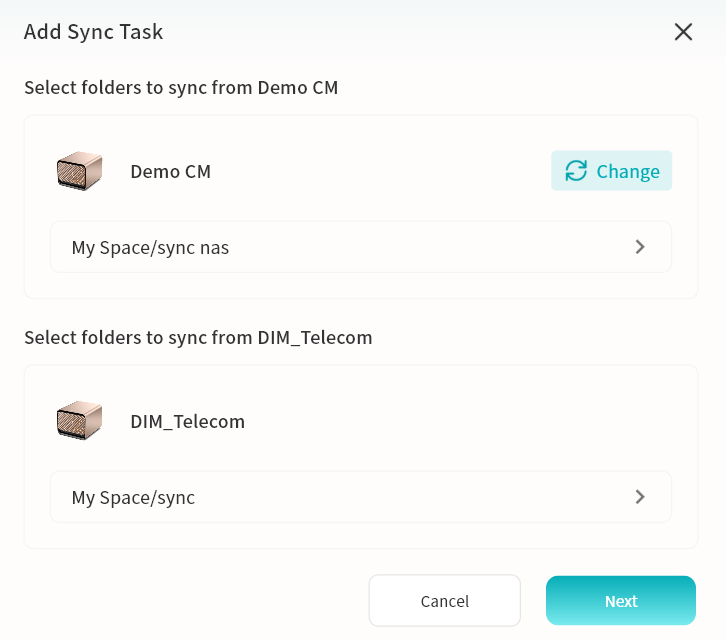
- Go to Files Sync Sync with NAS Add Sync.
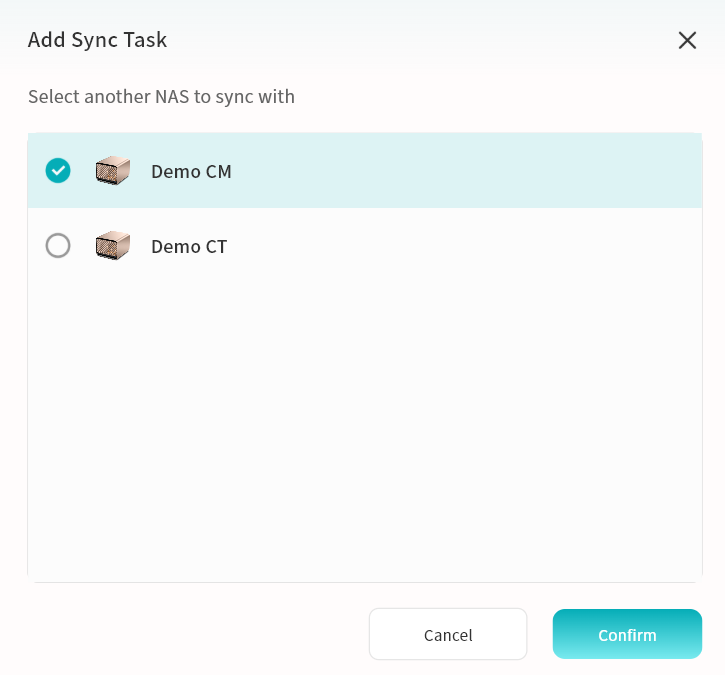
- In the Add Sync Task window, select another DASSET device to participate in synchronization and click Confirm.
Only devices owned by you will be displayed. You must select one of your owned devices as the synchronization target.
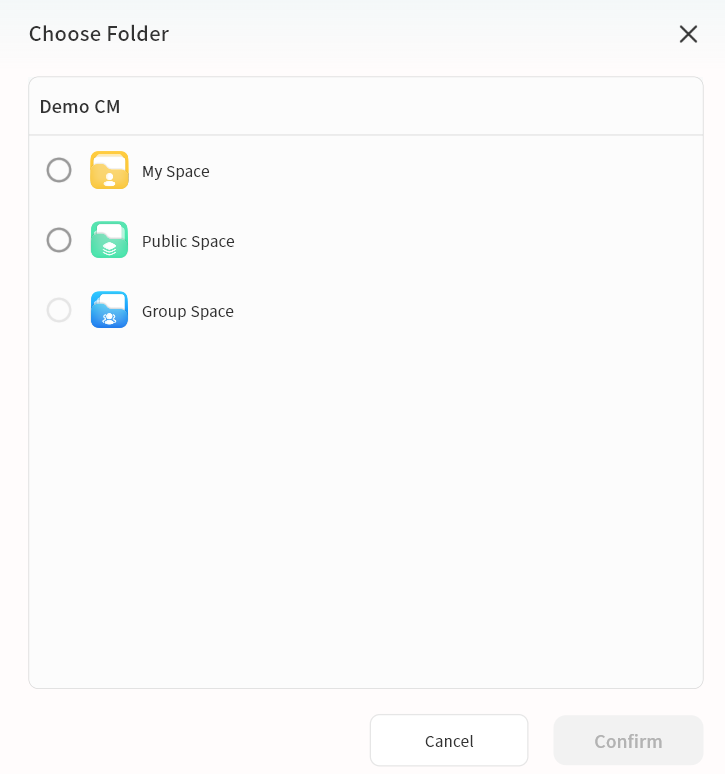
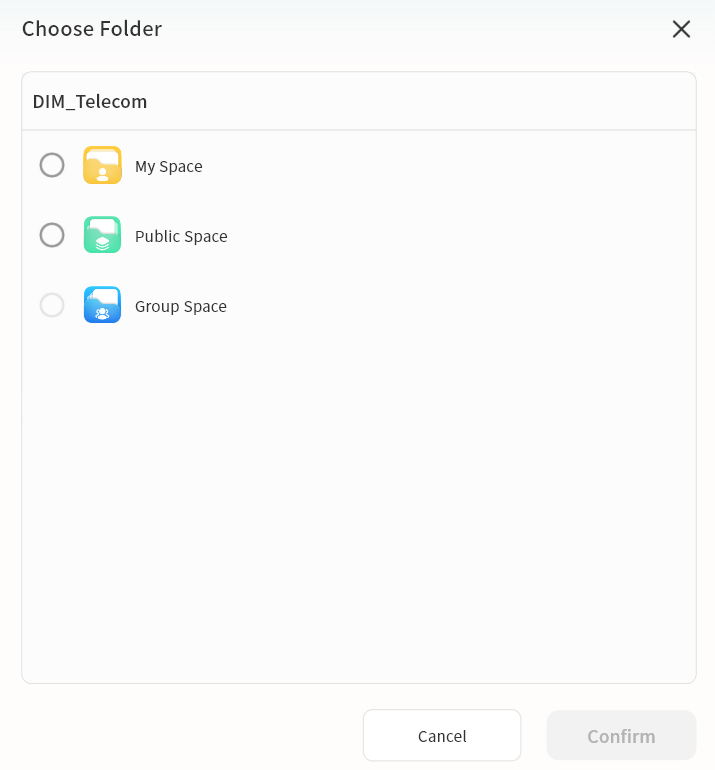
- In the pop-up window, choose a directory on the target DASSET device to serve as the synchronization directory. You may select a folder from My Space, Public Space, or Group Space.
- The target synchronization folder on the other DASSET device will be displayed. On the current device, select a folder to serve as the synchronization directory.
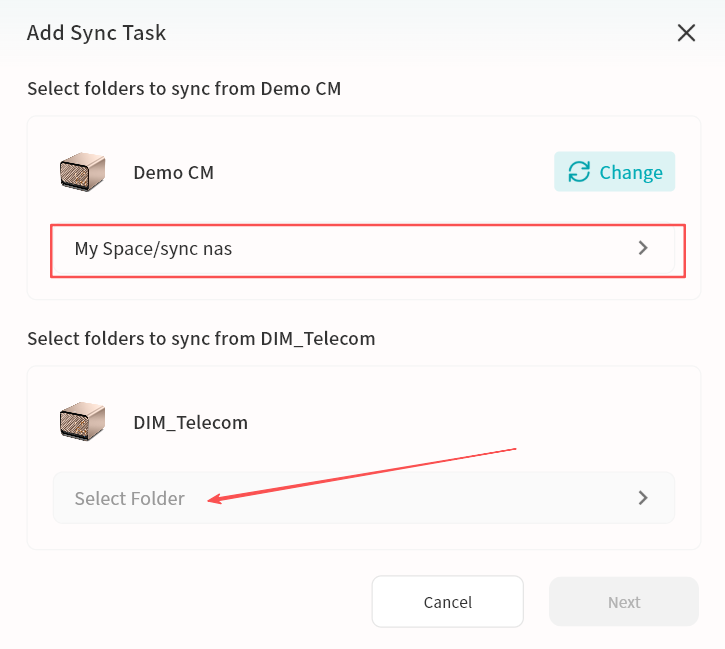
- Specify the folder to be synchronized. You may use an existing folder or create a new one.
- In the Add Sync Task window, confirm that both the folder to be synchronized and the synchronization target are correctly set. Click Next to continue. You may also click Change if you need to modify the synchronization folder.
-
Select the required synchronization mode and click Create:
-
Two-way sync: Keeps files consistent between the two DASSET edge devices. Any changes on either side will be automatically synchronized.
-
One-way sync: Transfers only new or modified files from one DASSET device to the other, as indicated by the direction of the arrow.
-
- The synchronization task will start automatically. Once changes are detected in the designated synchronization directory on either device, synchronization will be triggered.
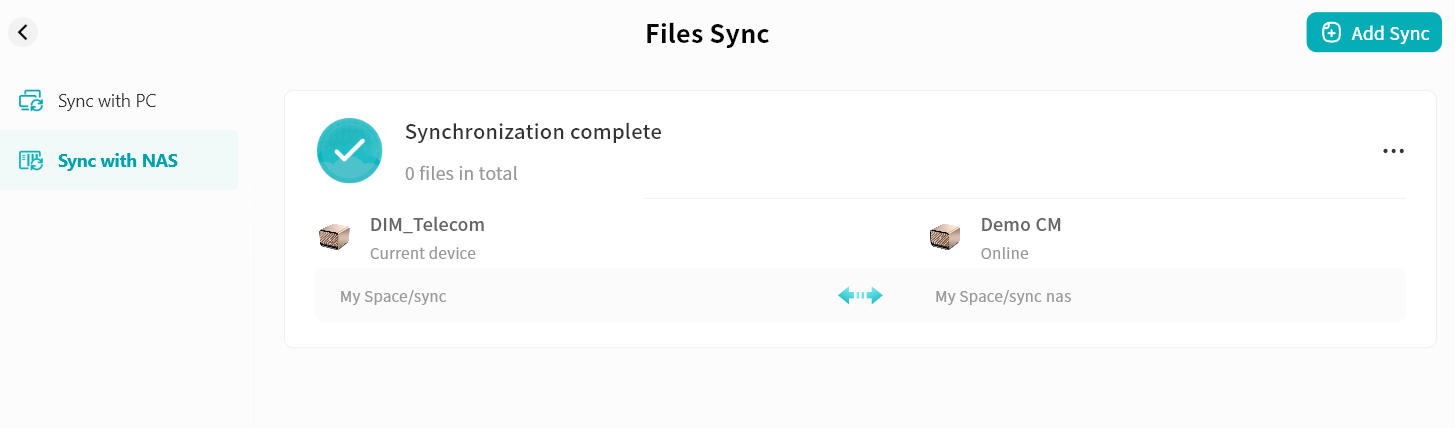
Viewing Synchronization Tasks
You can view the synchronization tasks you have configured:
-
Task Status
-
Synchronization status: In Progress, Completed, or Error
-
Size of synchronized files
-
Number of synchronized files
-
-
Task Configuration Menu
-
Pause/Resume synchronization: You can pause or start the synchronization task
-
Synchronization configuration: You can change the synchronization mode
-
Delete: You can remove the synchronization task
-
-
Detailed Information
You can view the device names of both sides, the synchronization directory paths, and the synchronization mode icons.
Recent Files
In Recent Access, you can view files on DASSET devices that you have recently opened. From this list, you can perform all file operations such as move, copy, download, and delete.
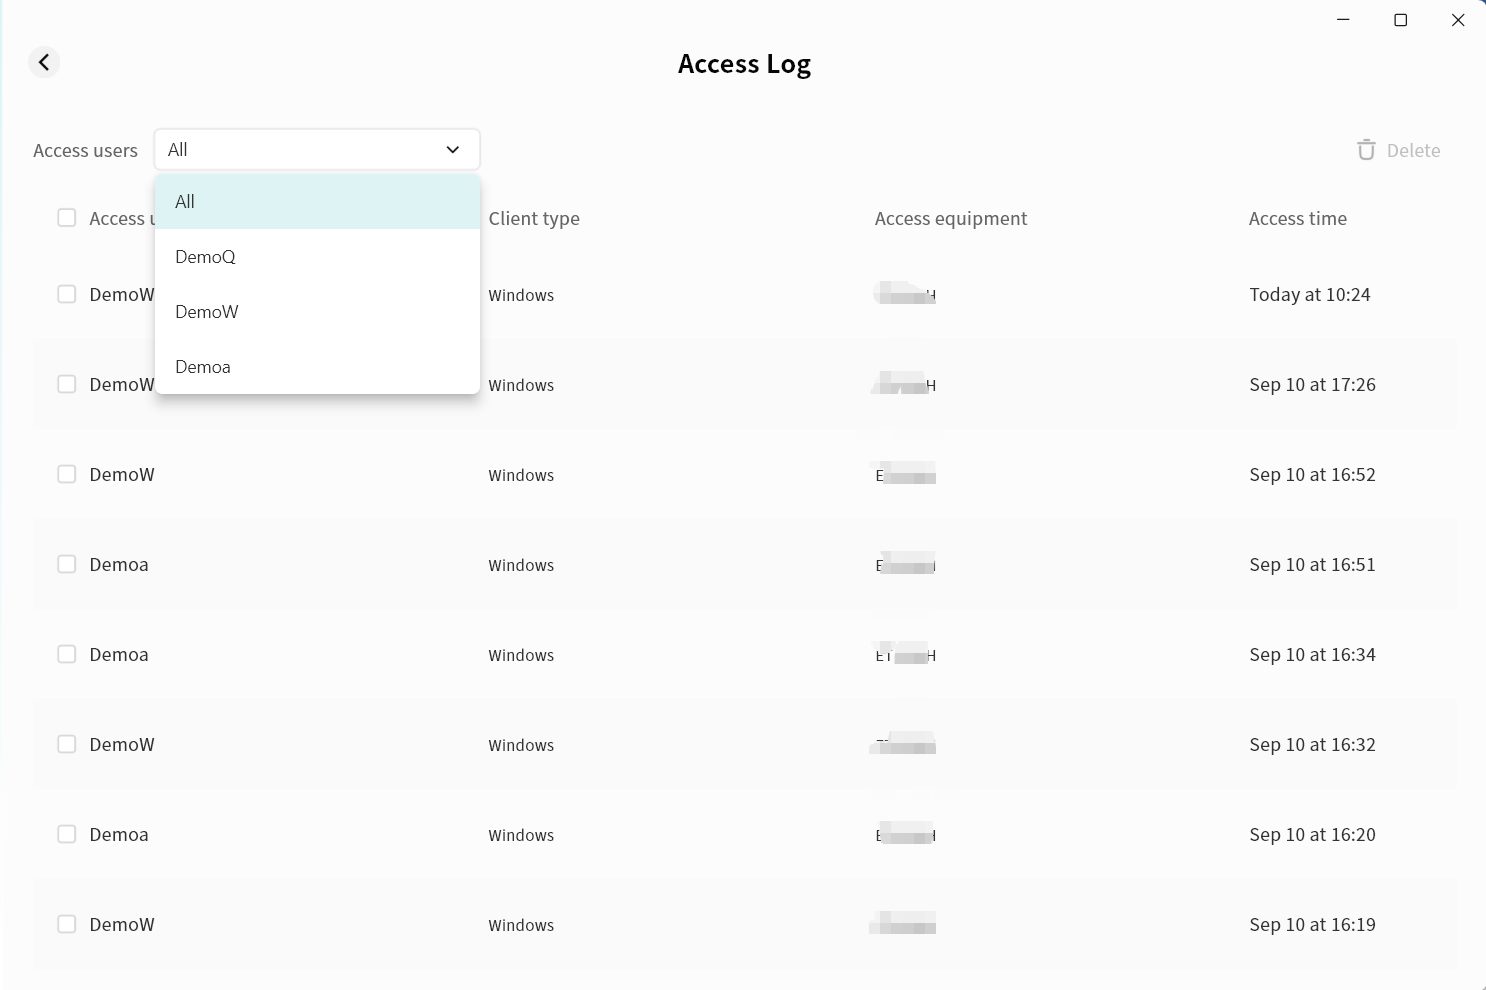
Access Logs
In Access Records, you can view all member access records for this DASSET device, including account name, client type, device name, and access time.
You can also filter records by selecting a specific account from the user dropdown menu.
Multiple records can be selected at once for deletion.
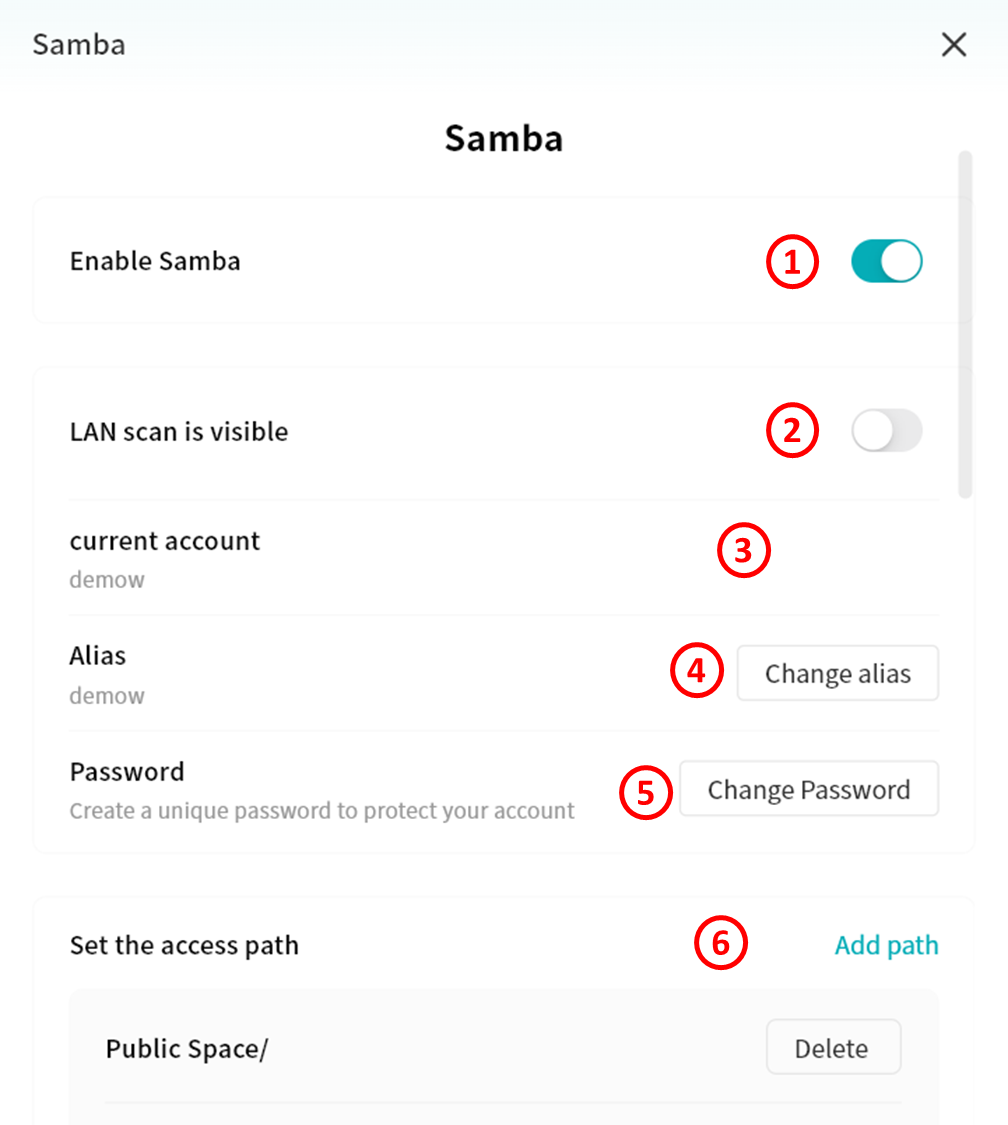
Samba
The DASSET device supports the Samba protocol. Once enabled, you can connect from a computer, smart TV, or other devices to access files stored on the DASSET device via Samba.
-
Enable or disable Samba protocol
-
Allow discovery of the Samba service on your DASSET device through LAN scanning
-
Current account: Samba login account
-
Alias: You can set an alias for Samba and use it later to log in
-
Password: Set the Samba login password
-
Set the access path: Define the directories on the DASSET device that are accessible through Samba
Windows Connection to Samba
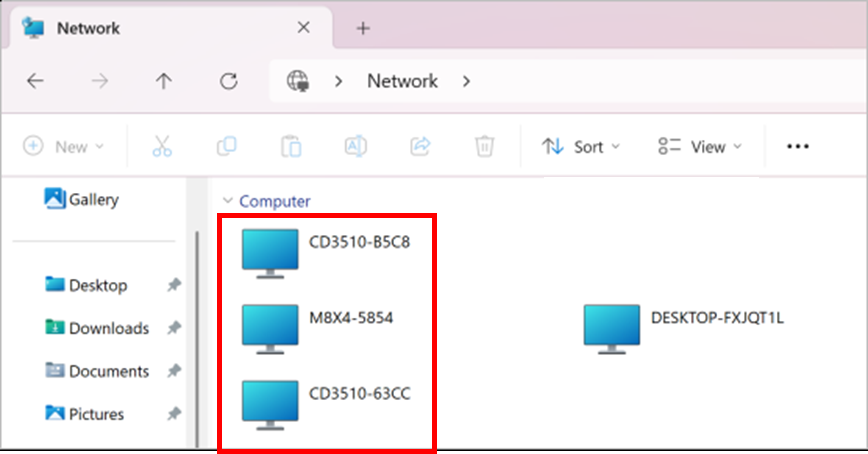
Access via Network Discovery
When " Visible in LAN Scan" is enabled on Smart DAS, the device will appear automatically under the Network section in File Explorer.
Simply double-click the DAS icon and enter your username and password to log in.
Map as a Network Drive
- Open File Explorer, type
\\[DASSET device IP address\]in the address bar, and press Enter.
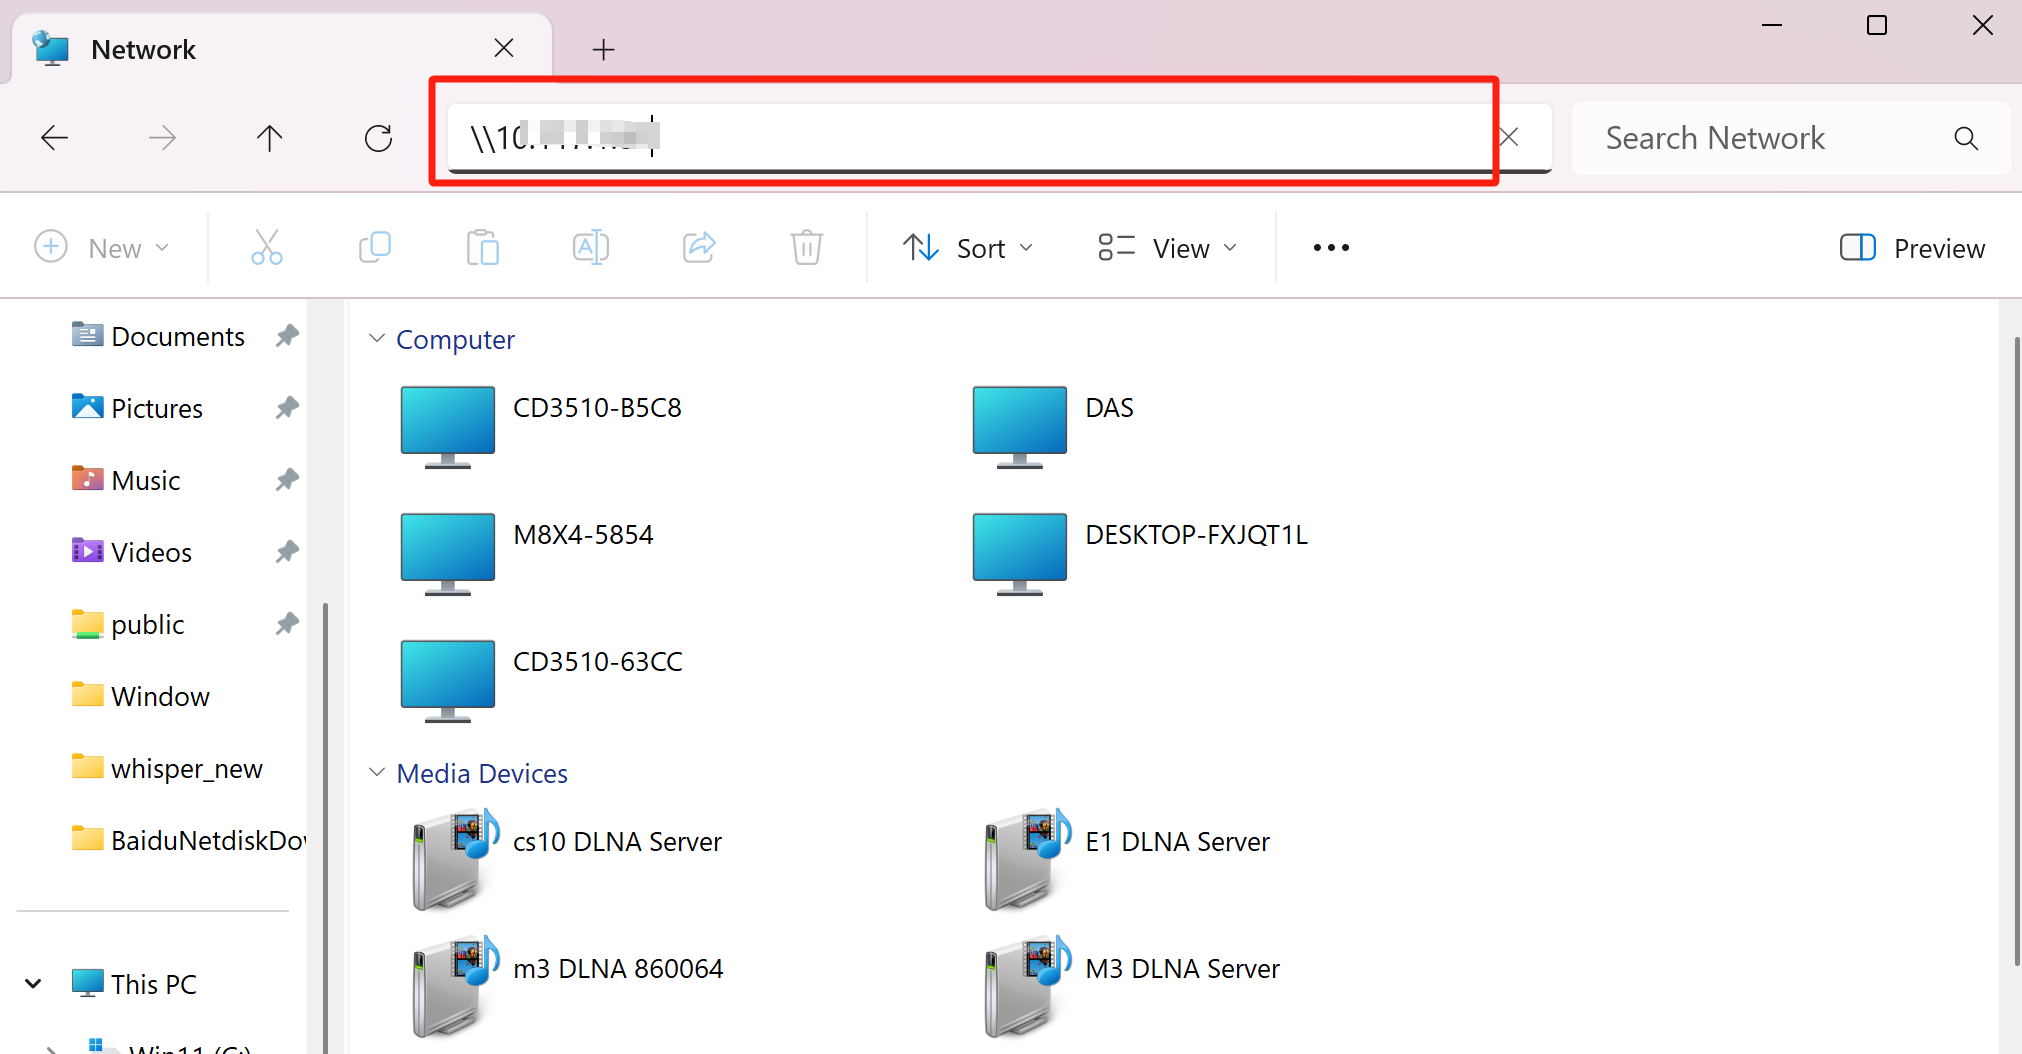
- When prompted, enter your username and password, then click OK.
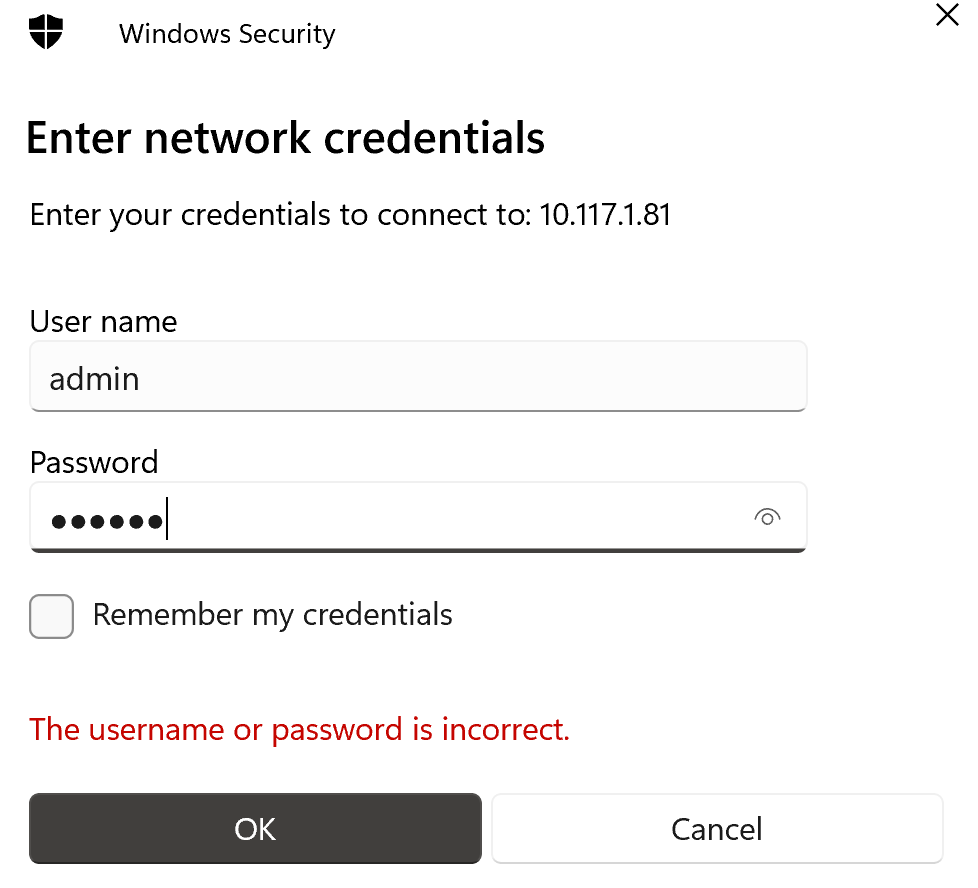
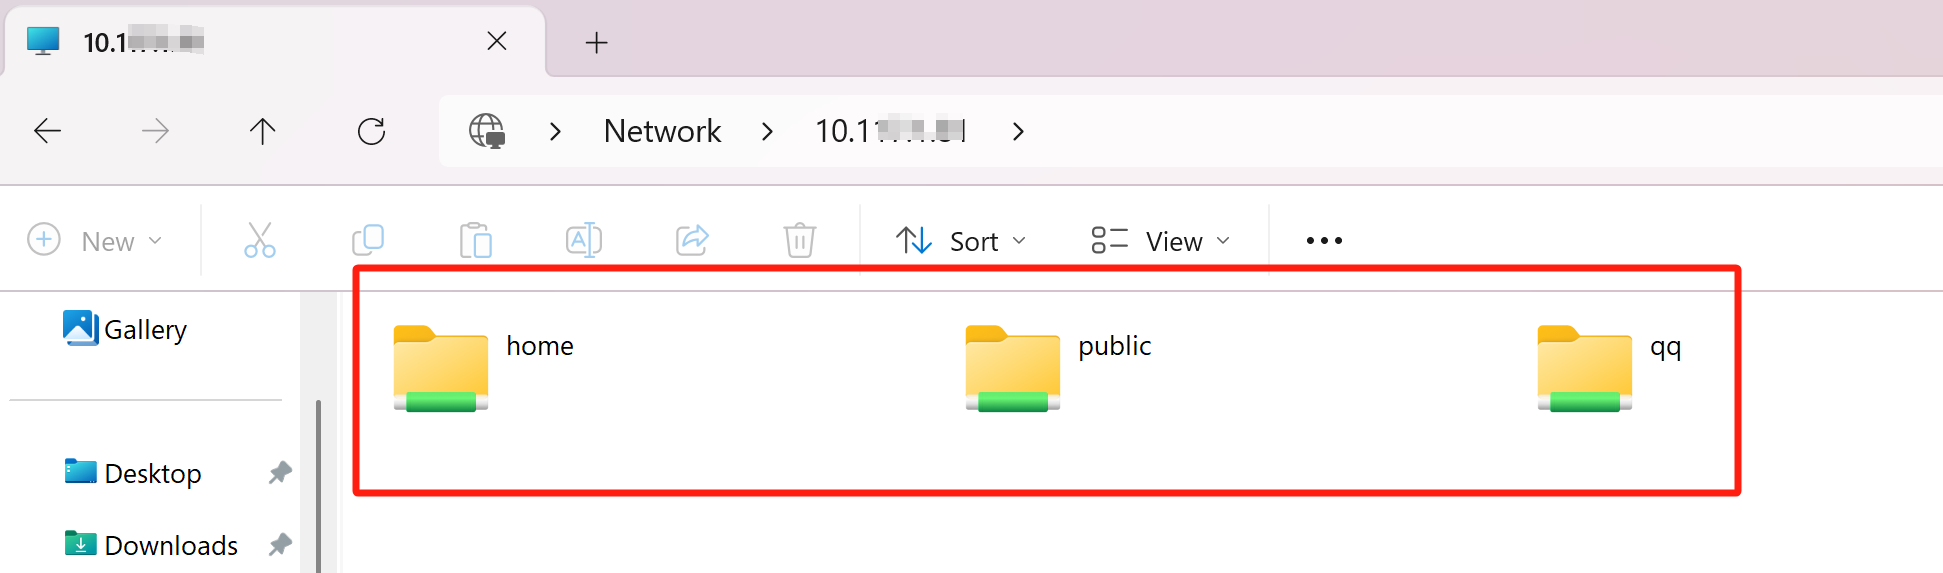
- Once authenticated, File Explorer will display all folders accessible under your DASSET account.
-
home: Your personal space on Smart DAS.
-
public: The Public Space accessible to all users on Smart DAS.
-
Other directories: Shared Group Spaces that your account has joined on Smart DAS.
- Right-click the folder you access frequently, and select Map network drive....
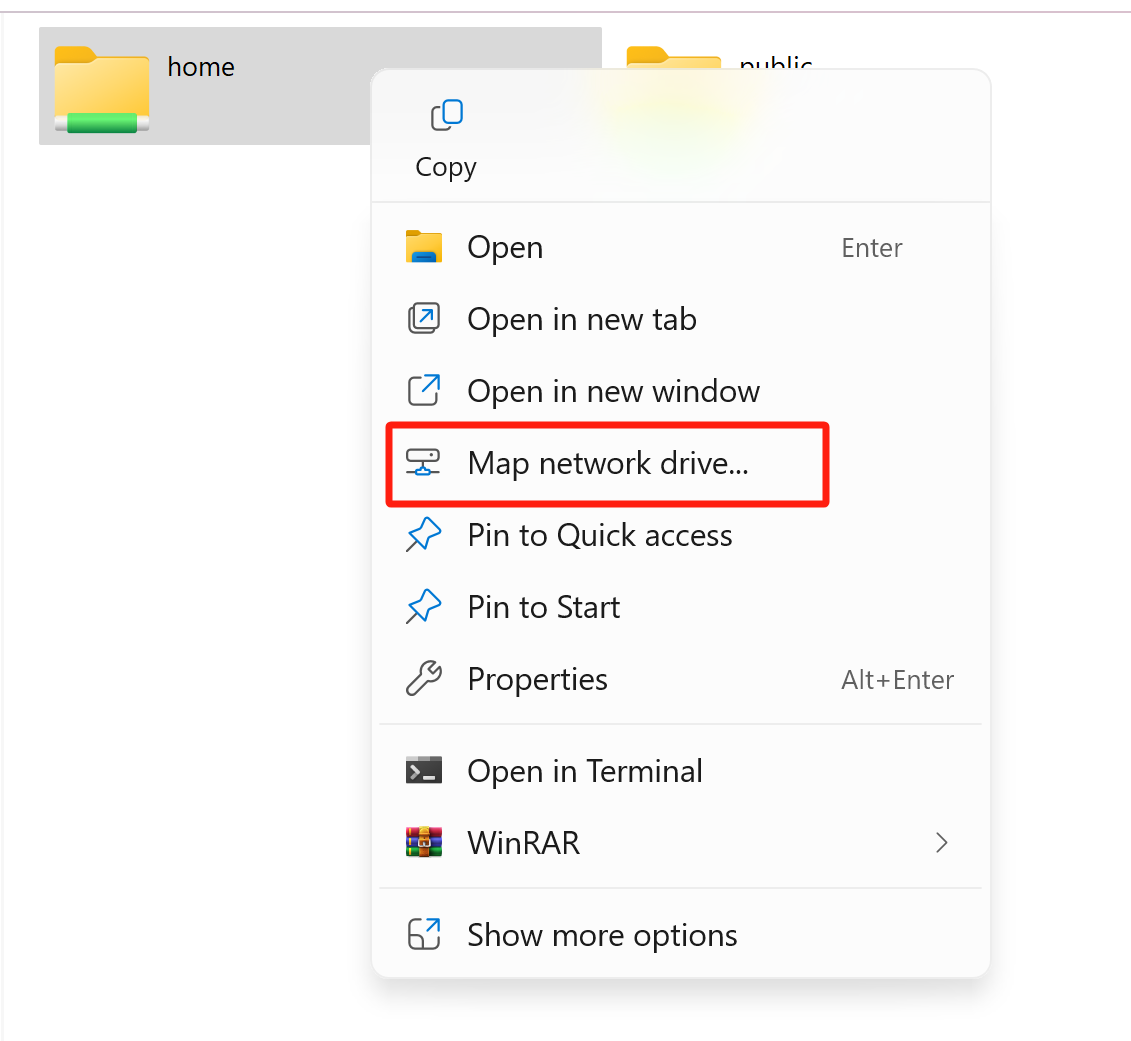
- Choose an available drive letter, check Reconnect at sign-in, and click Finish.
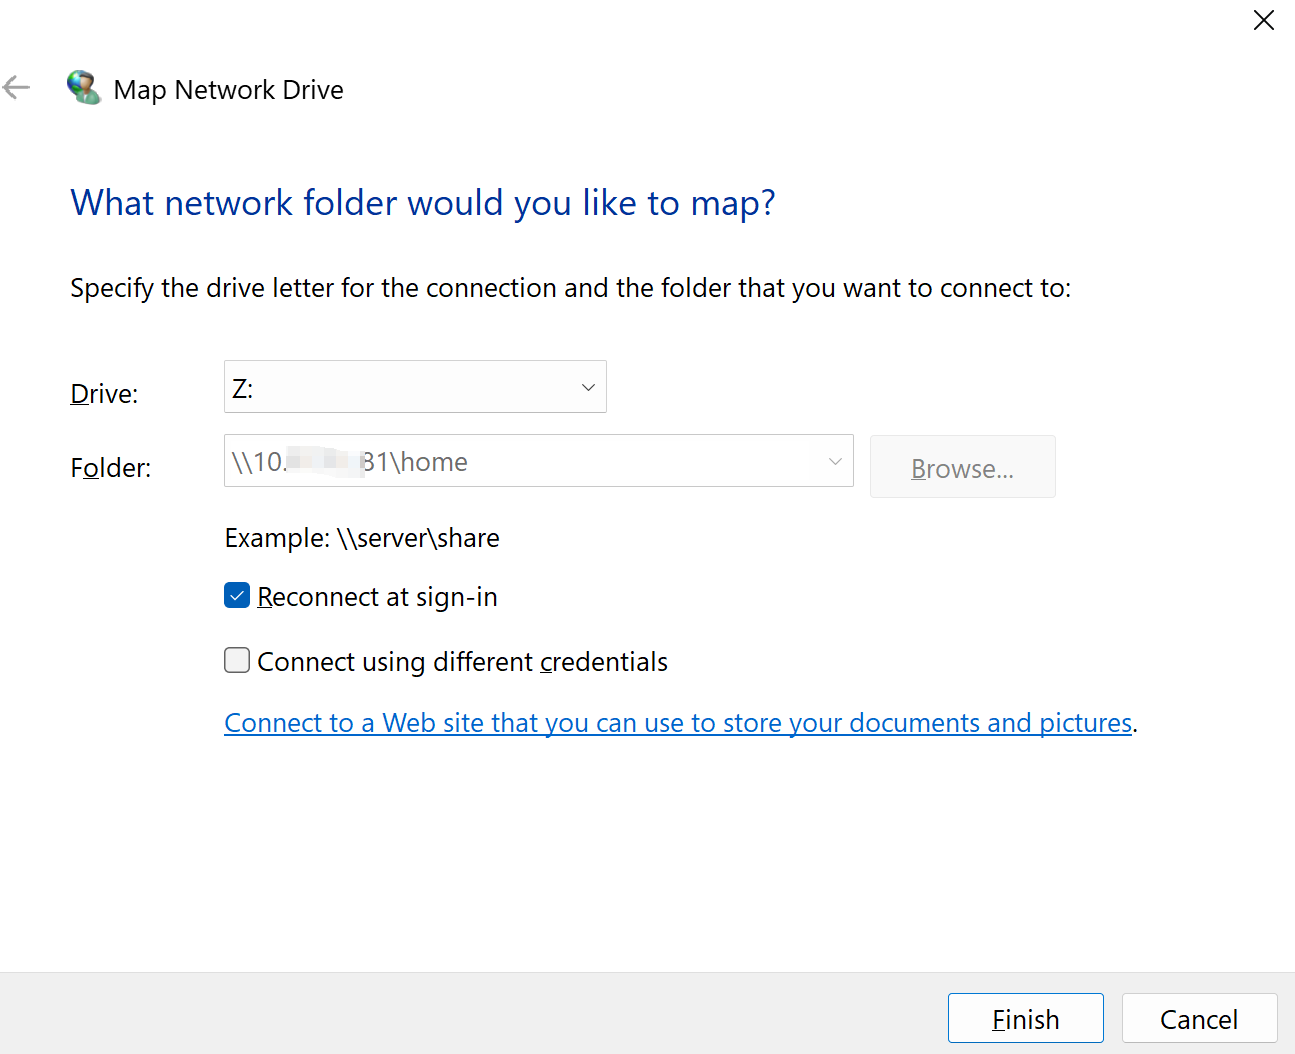
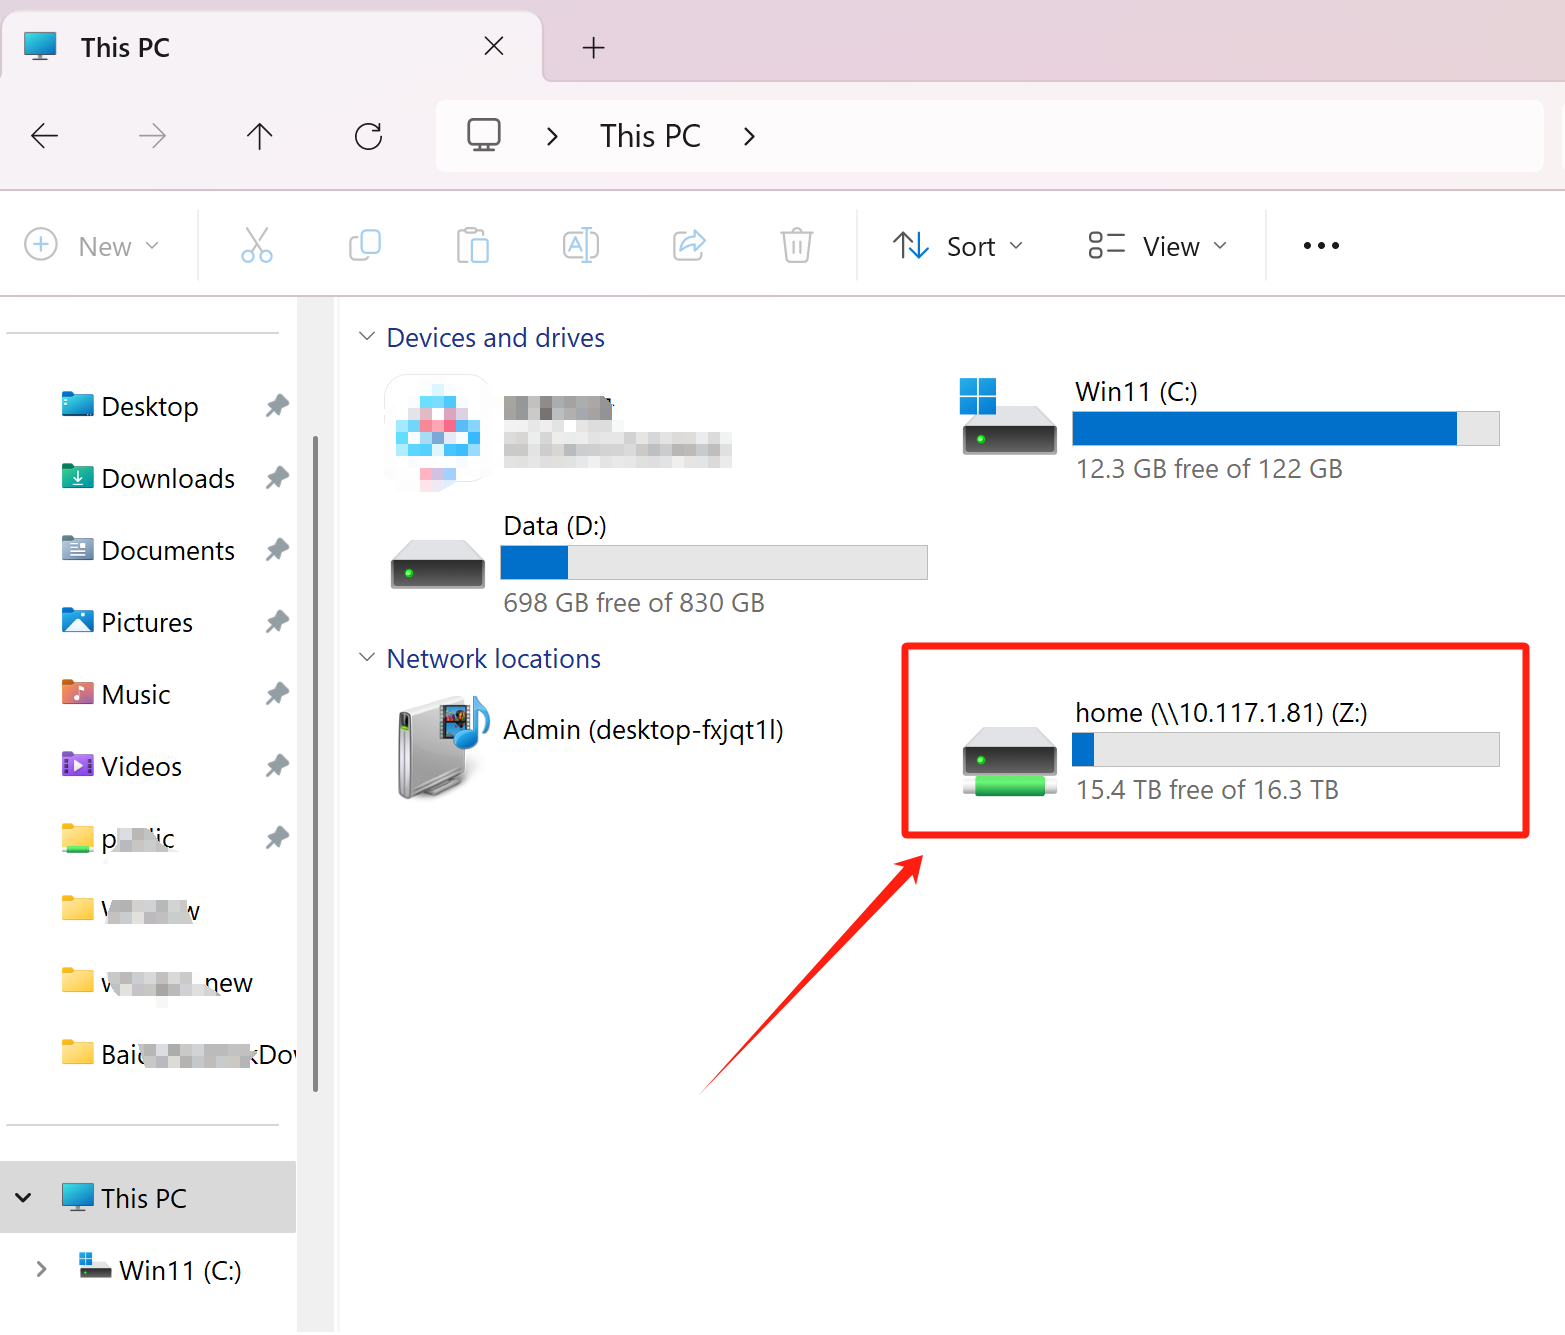
- The mapped network drive will now appear under This PC, allowing quick access to shared files on your DASSET device.
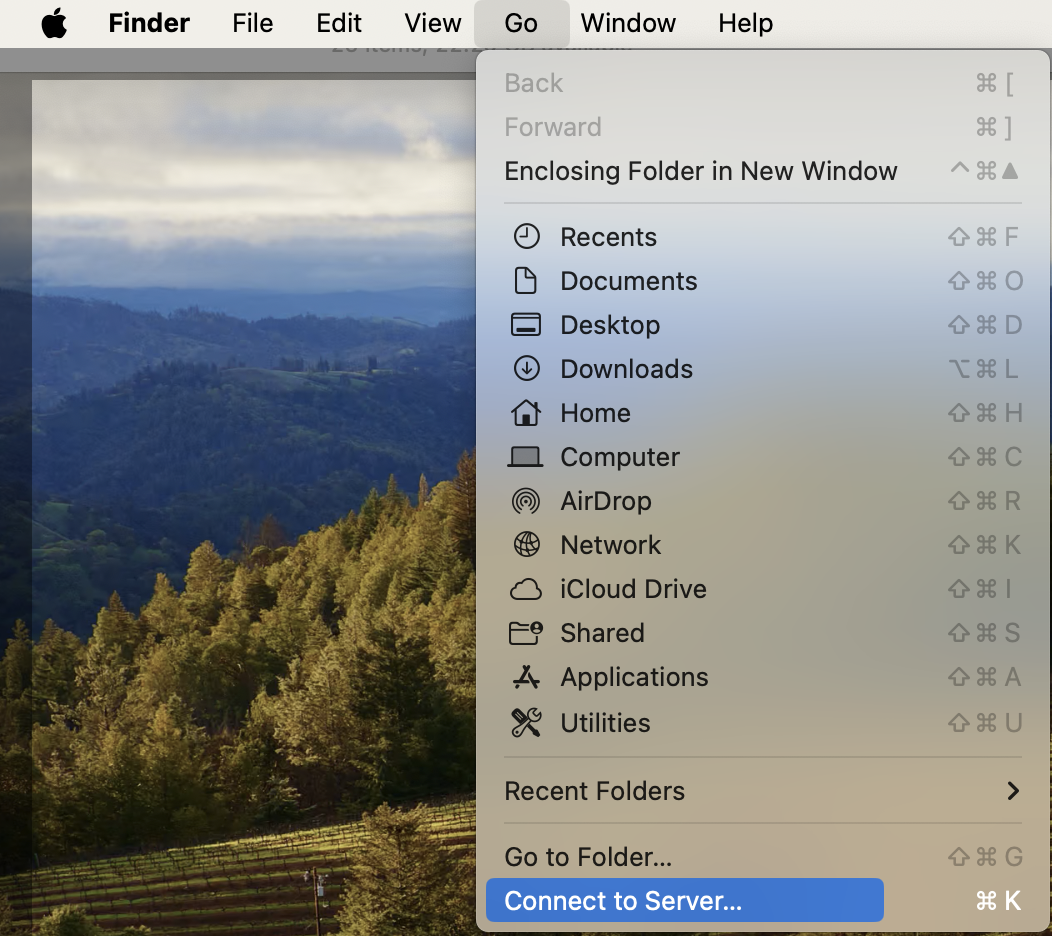
macOS Connection to Samba
- Open Finder Go Connect to Server.
-
In the server address field, enter:
smb://Smart_DAS_IP_address
(The Samba application interface will display your current IP s address.)
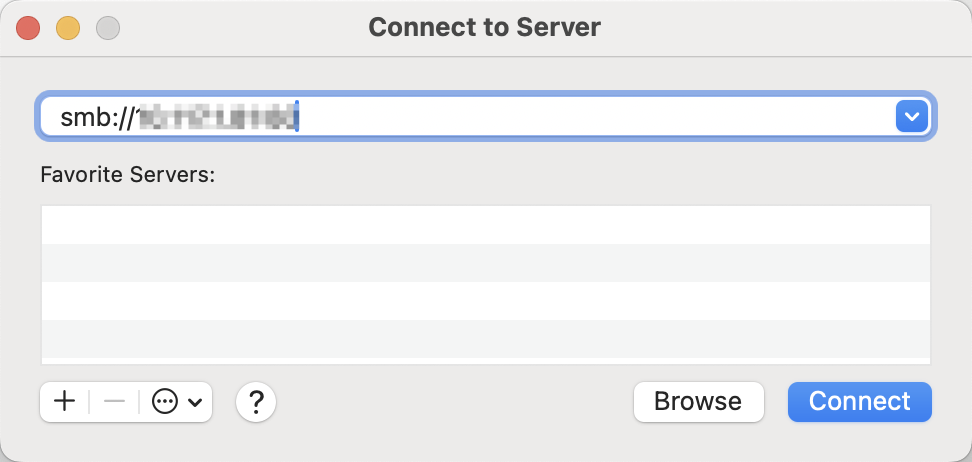
-
Click Connect Select Registered User
-
Enter your Samba username and password and click Connect.
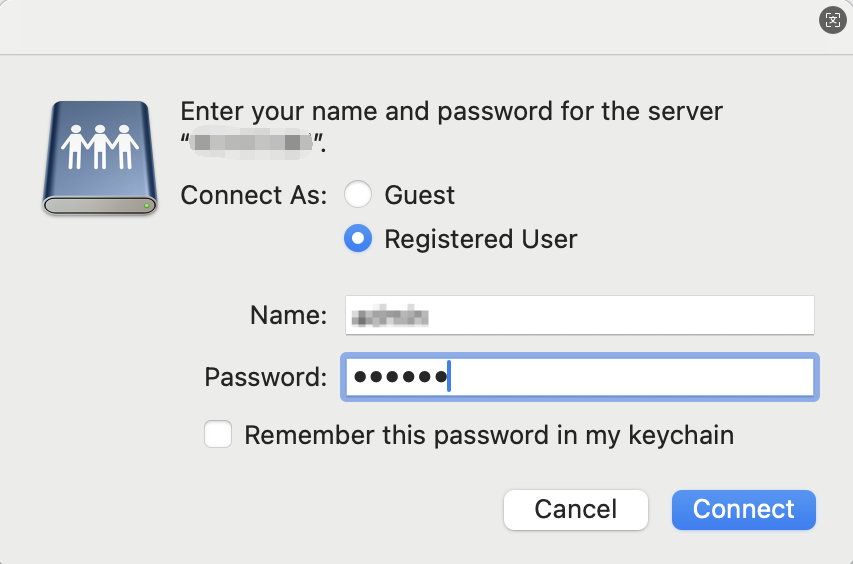
- Select shared directories to access:
-
home (My space)
-
public (Public space)
-
Group spaces (if available)
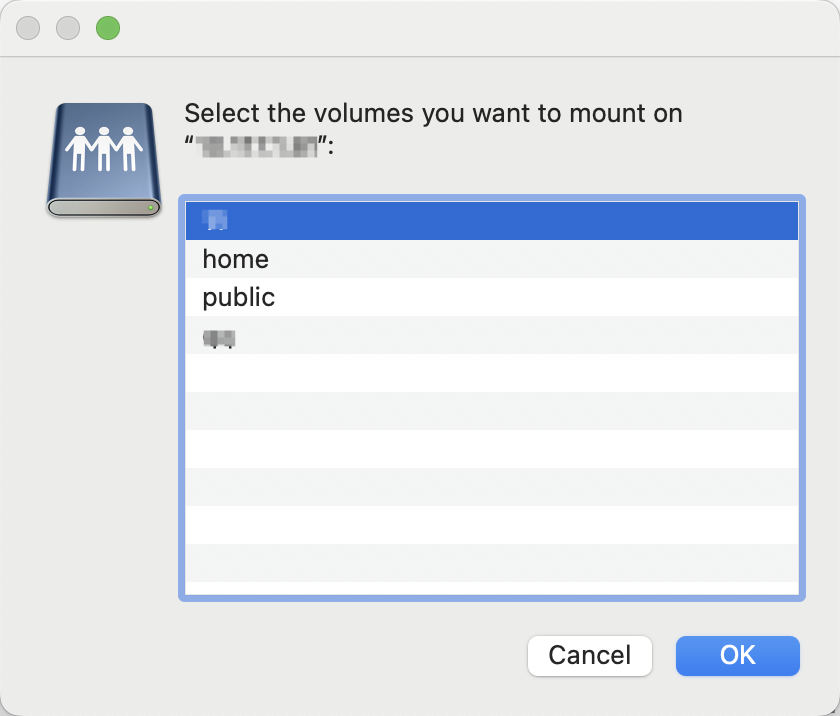
- Quick access setup: Drag frequently used folders to the "Locations" section in Finder's sidebar
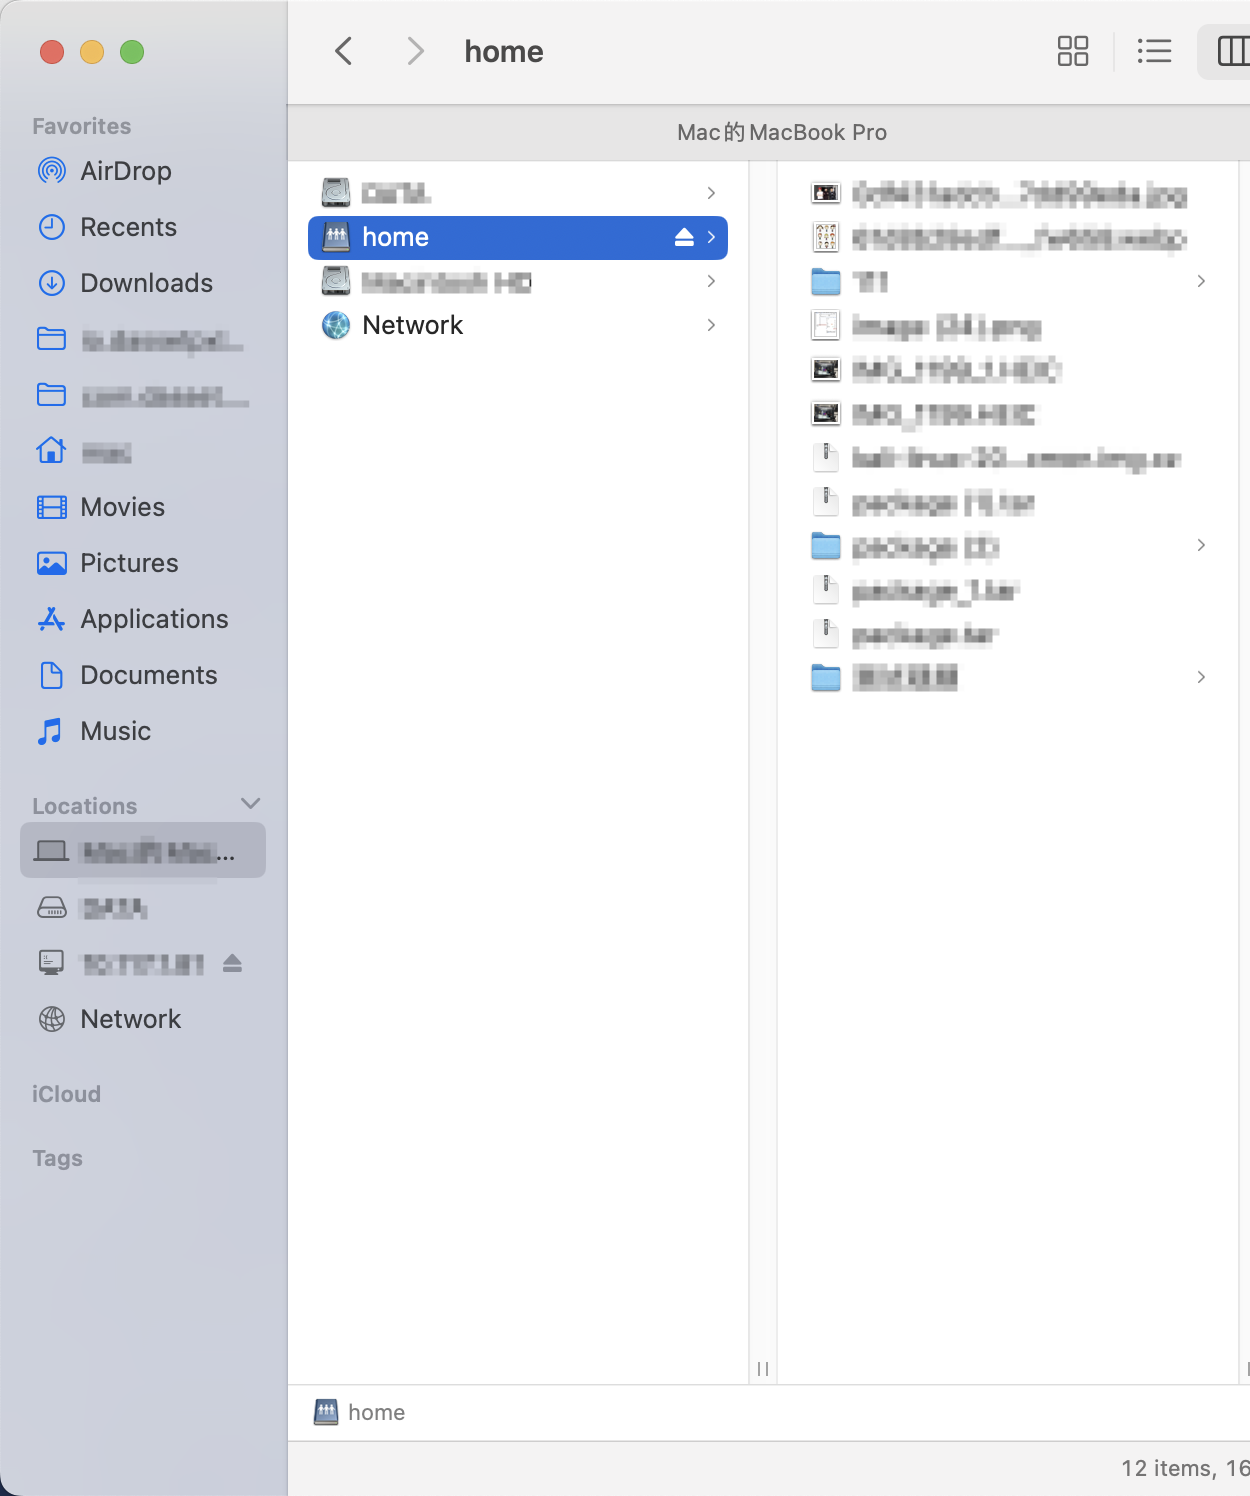
DLNA
The DASSET device supports the DLNA protocol. Once enabled, your computer, mobile phone, smart TV, and other devices can discover this device and access its media files directly.
When using DLNA for the first time, you must add a DLNA scan path. Only media files stored in the added paths will be accessible to other devices on the LAN.
- Click Add.
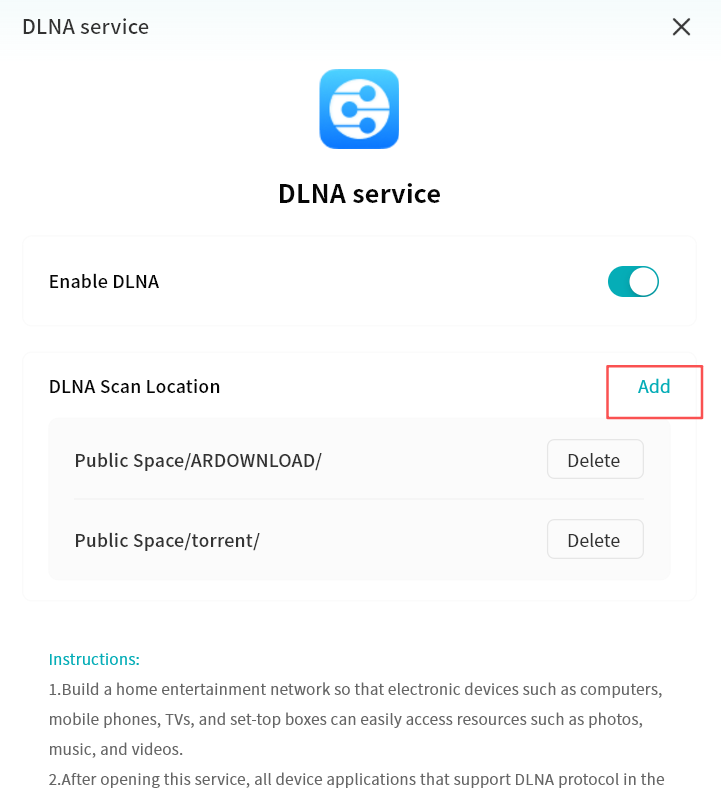
- In the pop-up window, add the folder you want to make available via DLNA.
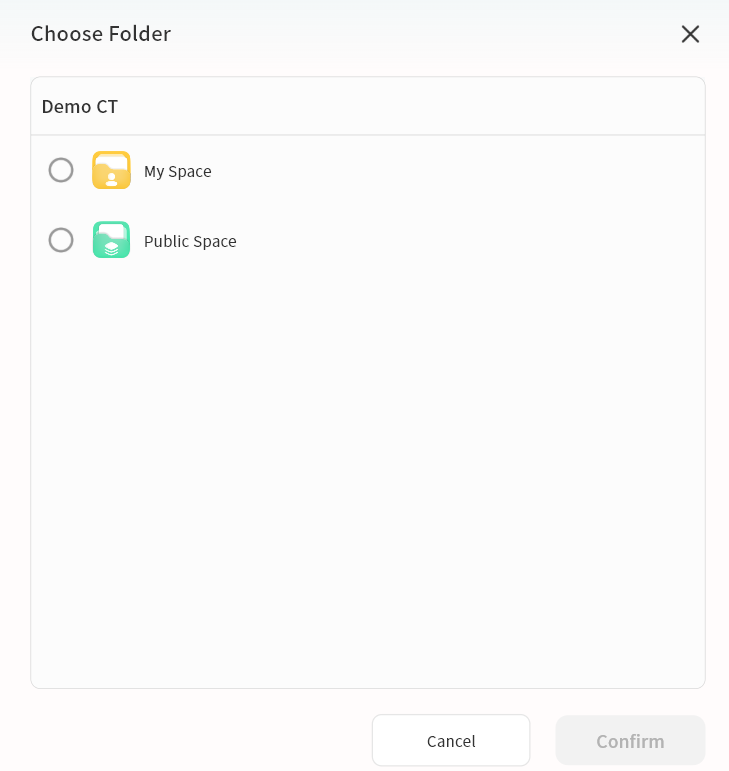
- Once added, any device on the LAN that supports DLNA will be able to discover the DASSET device and play the shared media files.
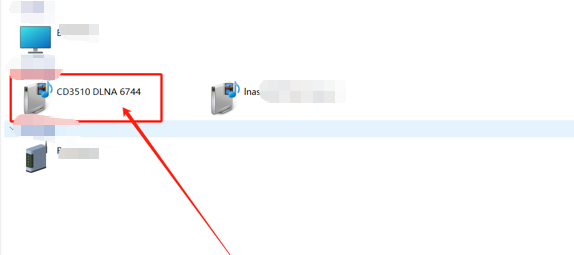
- You can modify or remove directories from the DLNA interface at any time. Once a folder is removed, other devices on the LAN will no longer have access to its contents.
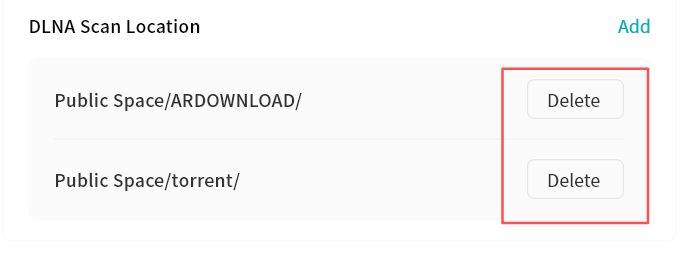
DLNA is a standardized protocol that allows compatible devices (such as smart TVs, mobile phones, computers, and speakers) to automatically discover each other over a home network and directly stream or play music, videos, and photos stored on another device---without the need for manual file transfers or physical media such as USB drives.
Time Machine
The DASSET device supports Apple's Time Machine feature. Once enabled, you can back up your Mac directly to the DASSET device using Time Machine.
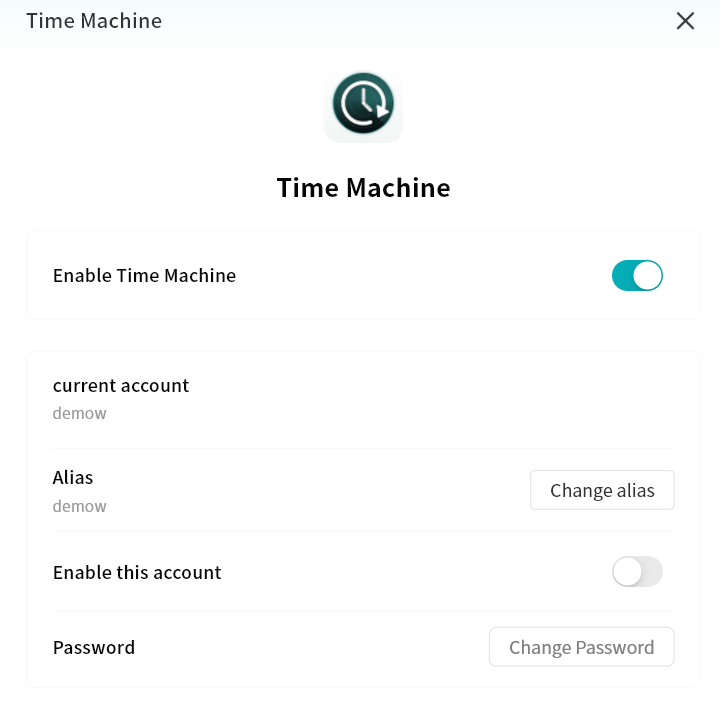
-
Enable or disable Time Machine. When enabled, your Apple device can connect to the DASSET device for data backup and recovery.
-
Time Machine account: The account used on your Mac to log in to the DASSET device for Time Machine backup.
-
Alias: You can set an alternate account alias to be used as the login credential for Time Machine.
-
Password: When enabling Time Machine for the first time, you must set a password for account authentication from your Mac.
Apple Time Machine does not support the @ symbol in account
names.
Connecting a Mac to Time Machine
-
On your Mac, go to System Settings General Time Machine.
-
Select Add Backup Disk..., then choose your device from the list and click Set Disk....
-
Enter the corresponding network account and password in the pop-up window, then click Connect.
-
After setup is complete, your Mac will automatically back up files to the DASSET device using Time Machine.
Cloud Drive
DASSET supports integration with third-party cloud drives. You can upload files from the DASSET device to a cloud drive, download files from a cloud drive to the device, and synchronize data between them.
Currently supported services include Google Drive, OneDrive, and Dropbox.
Cloud Drive Login
Log in to Google Drive
-
For first-time use, click Install.
-
After installation, click Open.
-
Read and agree to the Google Drive usage terms, then click Confirm.
-
Click Authorize Login.
-
Enter your Google account on the authorization page and click Next.
-
Enter your password and click Next.
-
Click Advanced.
-
Select Proceed to Google Drive.
-
On the permissions page, click Continue.
-
Once logged in, your Google Drive files will be accessible.
Log in to OneDrive
-
For first-time use, click Install.
-
After installation, click Open.
-
Read and agree to the OneDrive usage terms, then click Confirm.
-
Click Authorize Login.
-
Enter your OneDrive (Microsoft) account and click Next.
-
Verify using either a password or a verification code.
-
Choose whether to stay logged in (recommended for convenience).
-
Once logged in, your OneDrive files will be accessible.
Log in to Dropbox
-
For first-time use, click Install.
-
After installation, click Open.
-
Read and agree to the Dropbox usage terms, then click Confirm.
-
Click Authorize Login.
-
Log in using your Dropbox account credentials, or with a Google or Apple account.
-
Once logged in, your Dropbox files will be accessible.
Cloud Drive Operations
Interface
After login, the Cloud Drive interface provides:
-
Home: Access the file list of the cloud drive.
-
Upload to Net Disk: Upload files from the DASSET device.
-
Download to NAS: Download files from the cloud drive to the DASSET device.
-
Create Folder: Create folders in the cloud drive.
-
Task List: View upload/download progress and history.
-
File List: Browse files in the drive.
-
Logout: Exit the cloud drive (requires re-login for next access).
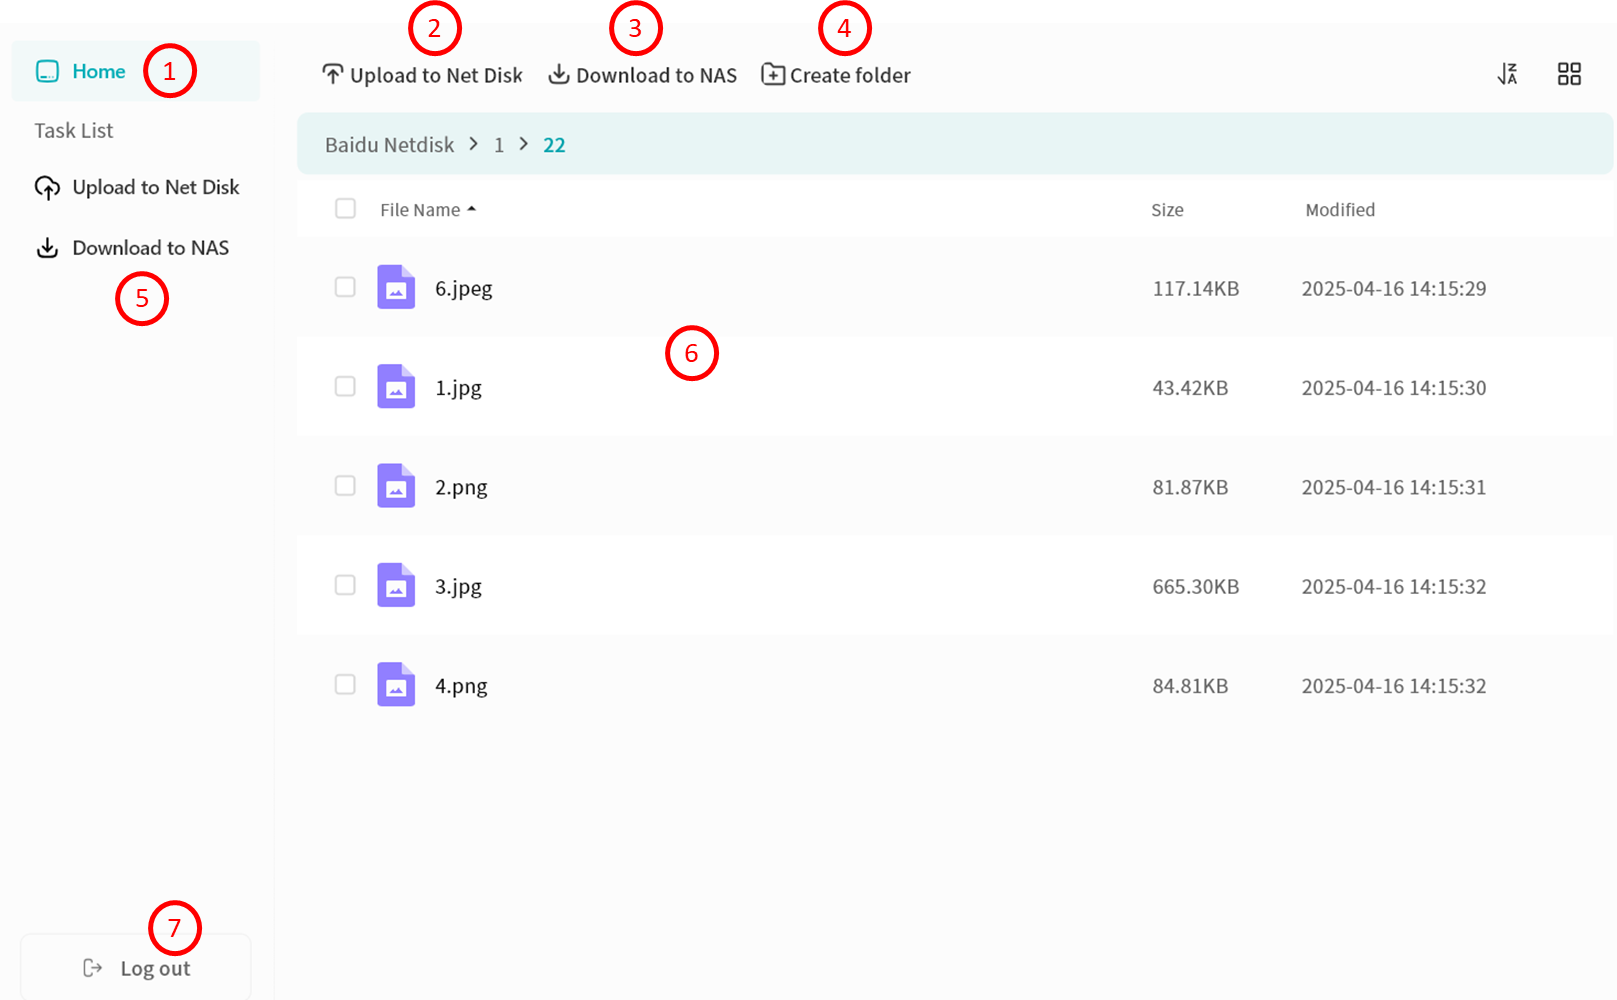
Upload Files to Net Disk
-
Click Upload to Net Disk.
-
In the pop-up, select files or folders from My Space (multi-select supported).\
importantFor security reasons, only files from My Space can be uploaded.
-
Confirm to start upload.
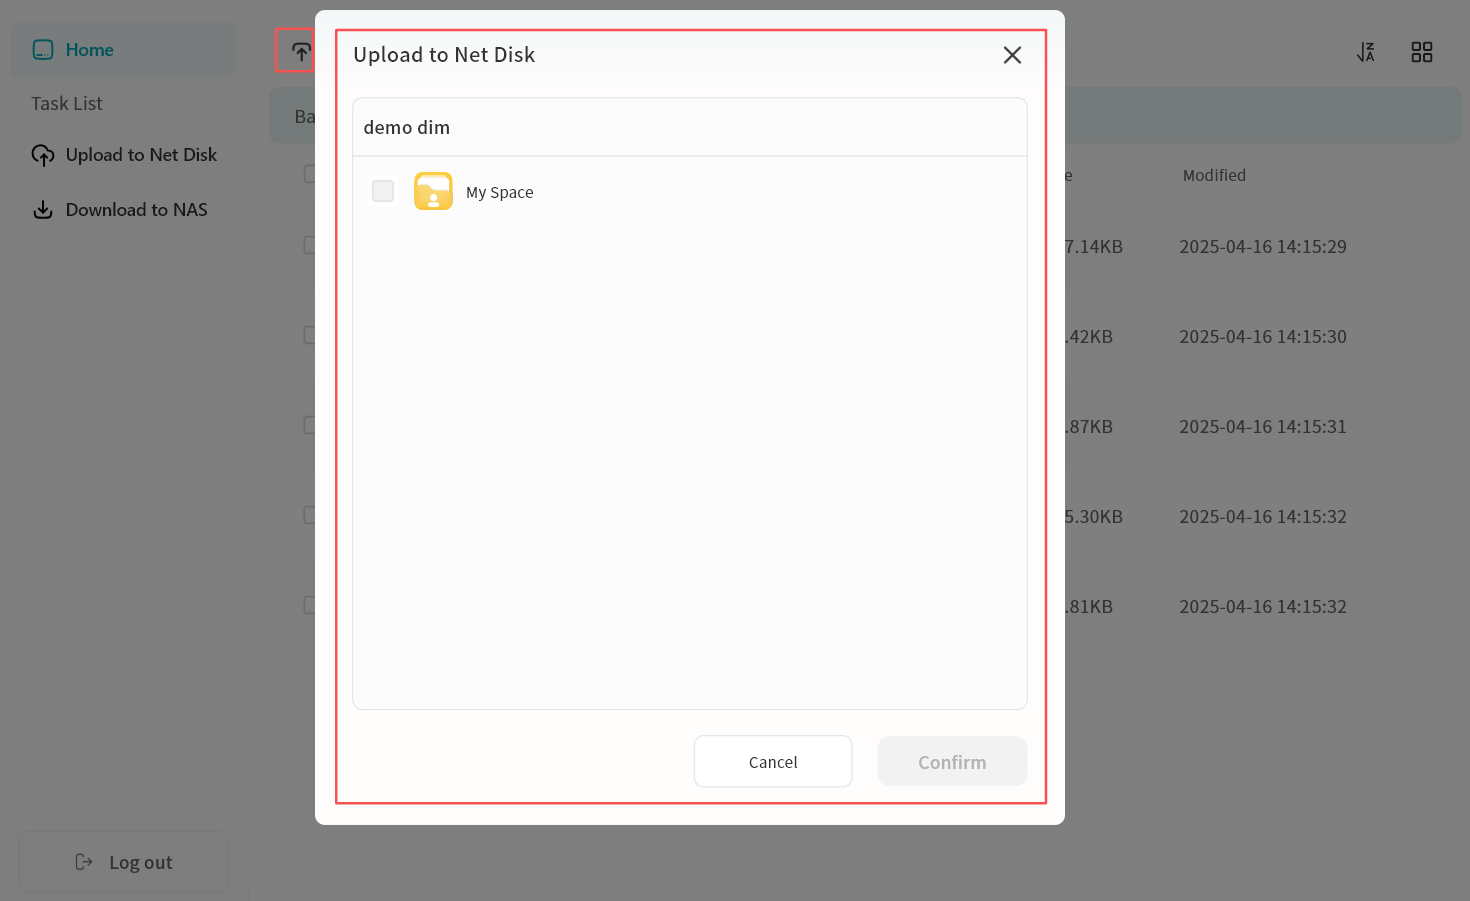
Download Files to NAS
-
Select files (single or multiple) and click Download to NAS.
-
In the pop-up menu, choose a target path.
importantFor security reasons, files can only be downloaded to My Space or My Vault.
-
Confirm to start download.
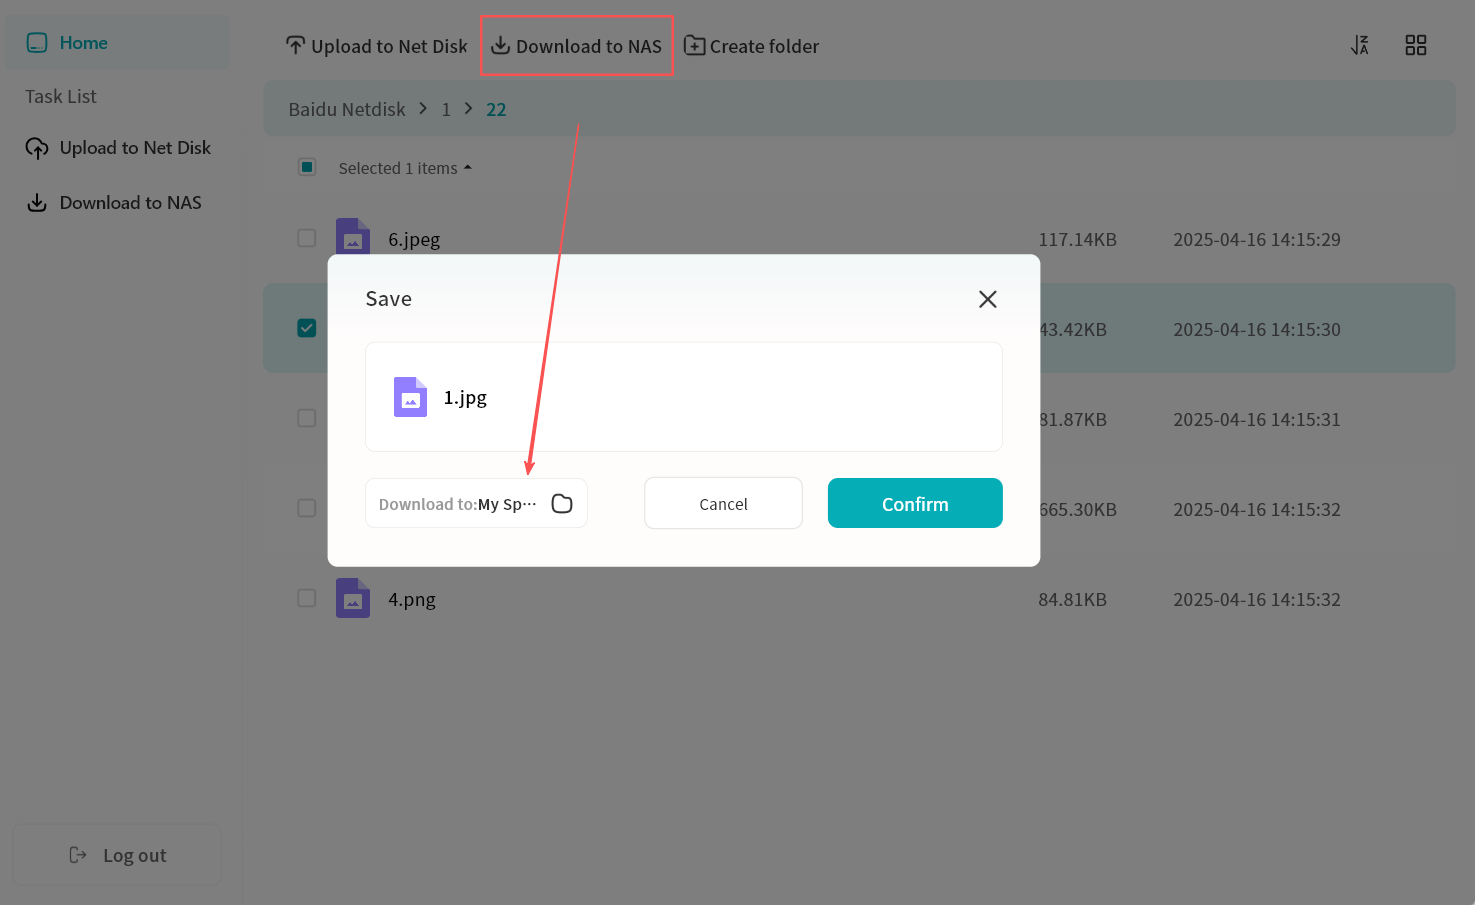
File Operations
-
Top Menu: Create new folders in the cloud drive.
-
Right-Click Menu:
-
Move: Move files between folders in the cloud drive (batch supported).
-
Copy: Copy files to other folders in the cloud drive (batch supported).
-
Delete: Remove one or more files.
-
Rename: Edit file or folder names.
-
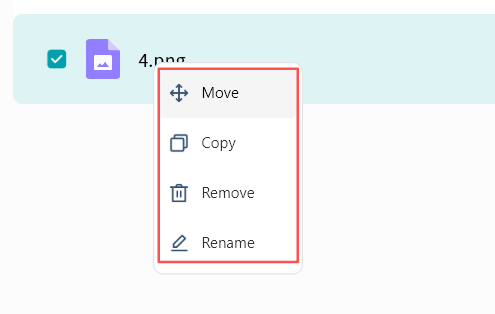
Task List
All upload and download activities are displayed in the Task List.
-
Uploads:
-
Pause, resume, or cancel multiple tasks.
-
View or clear completed tasks.
-
Review failed uploads.
-

-
Downloads:
-
Pause, resume, or cancel multiple tasks.
-
View, clear individual tasks, or clear all completed tasks.
-
Jump directly to the file's save location.
-
Review failed downloads.
-
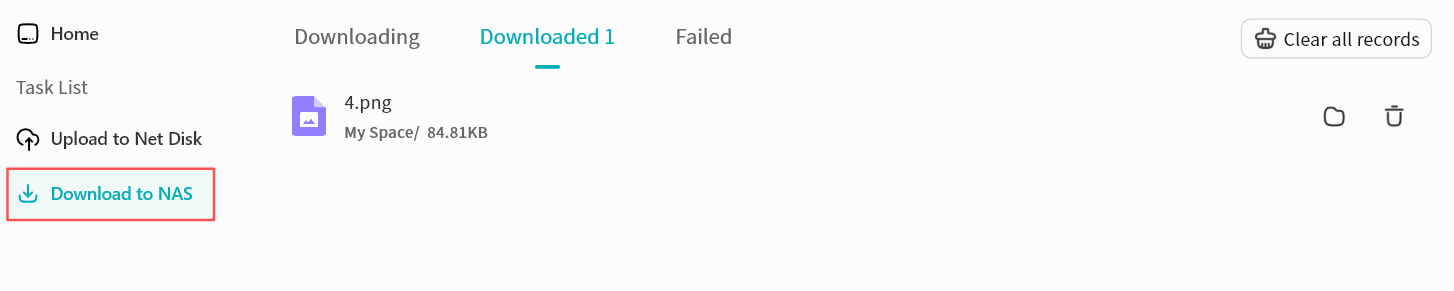
My Vault
The My Vault is a secure area within the DASSET device. All files stored in My Vault are protected with strong encryption to ensure security. Without entering the correct password, My Vault cannot be accessed from the DASSET client.
Creating a Vault
When using My Vault for the first time, follow the setup guide to create a password and a security question.
- Create a My Vault password
The password must contain 6--20 characters, consisting of numbers or letters.
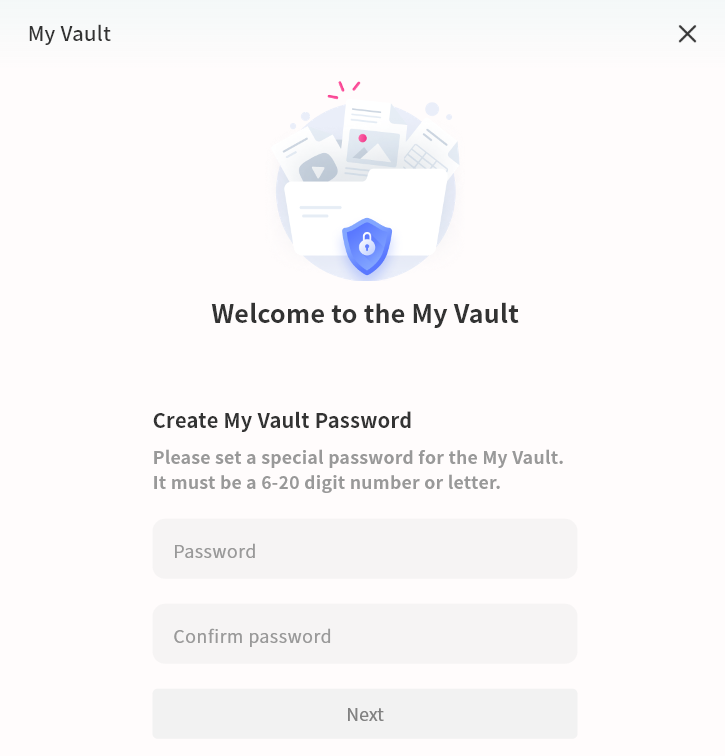
- Set a security question
Create a security question to help recover your My Vault password if needed.
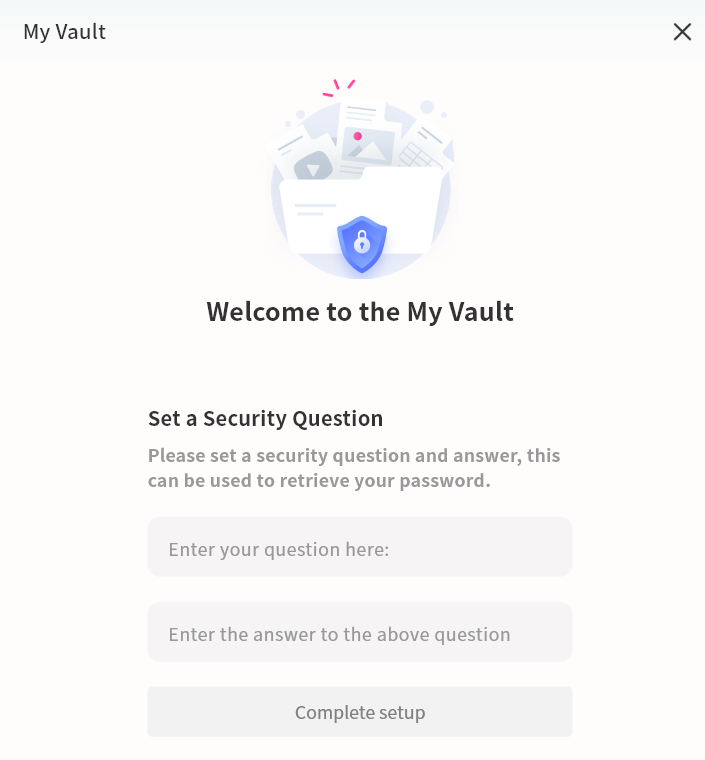
My Vault Operations
Within My Vault, you can manage files in the same way as in other areas of DASSET.
-
My Vault: Opens My Vault file management interface.
-
Task list -- Upload: Displays the progress and history of files being uploaded from the computer to My Vault.
-
Task list -- Download: Displays the progress and history of files being downloaded from My Vault to the computer.
-
Task list -- Other operations: Displays the progress and history of actions such as moving or copying files within My Vault.
-
Settings: Manage My Vault password and related information.
-
File operations:
-
Files can be uploaded directly from the computer to the "My Vault", or downloaded from My Vault to the computer.
-
Files from any DASSET space can be copied or moved into the "My Vault".
-
Files in My Vault can be moved or copied to other spaces such as My Space.
-
Files deleted from My Vault are permanently erased and will not go to the recycle bin. Exercise caution when deleting.
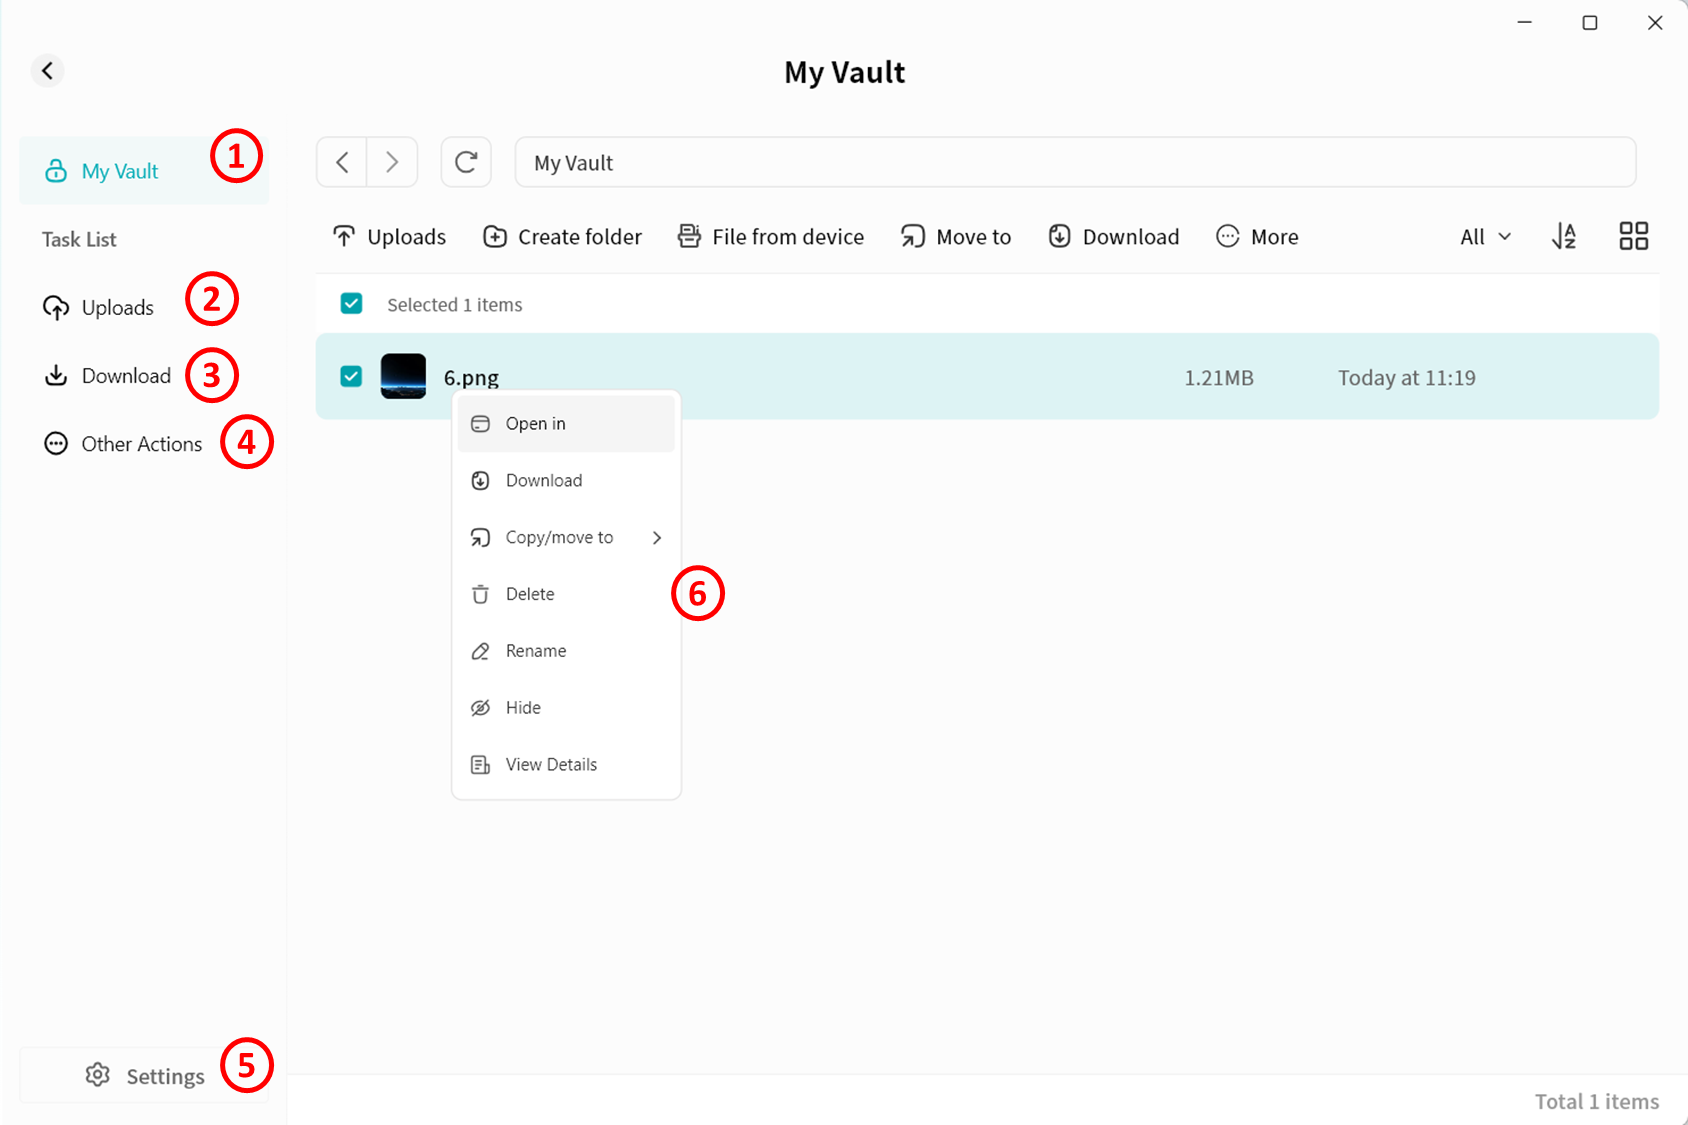
My Vault Settings
On My Vault settings page, you can configure:
-
Unlock Settings: Define different ways to access My Vault.
-
Change your password
-
Change security questions
-
Reset My Vault. Resetting requires verifying your DASSET account password.
dangerResetting My Vault will permanently delete all data contained in the vault.
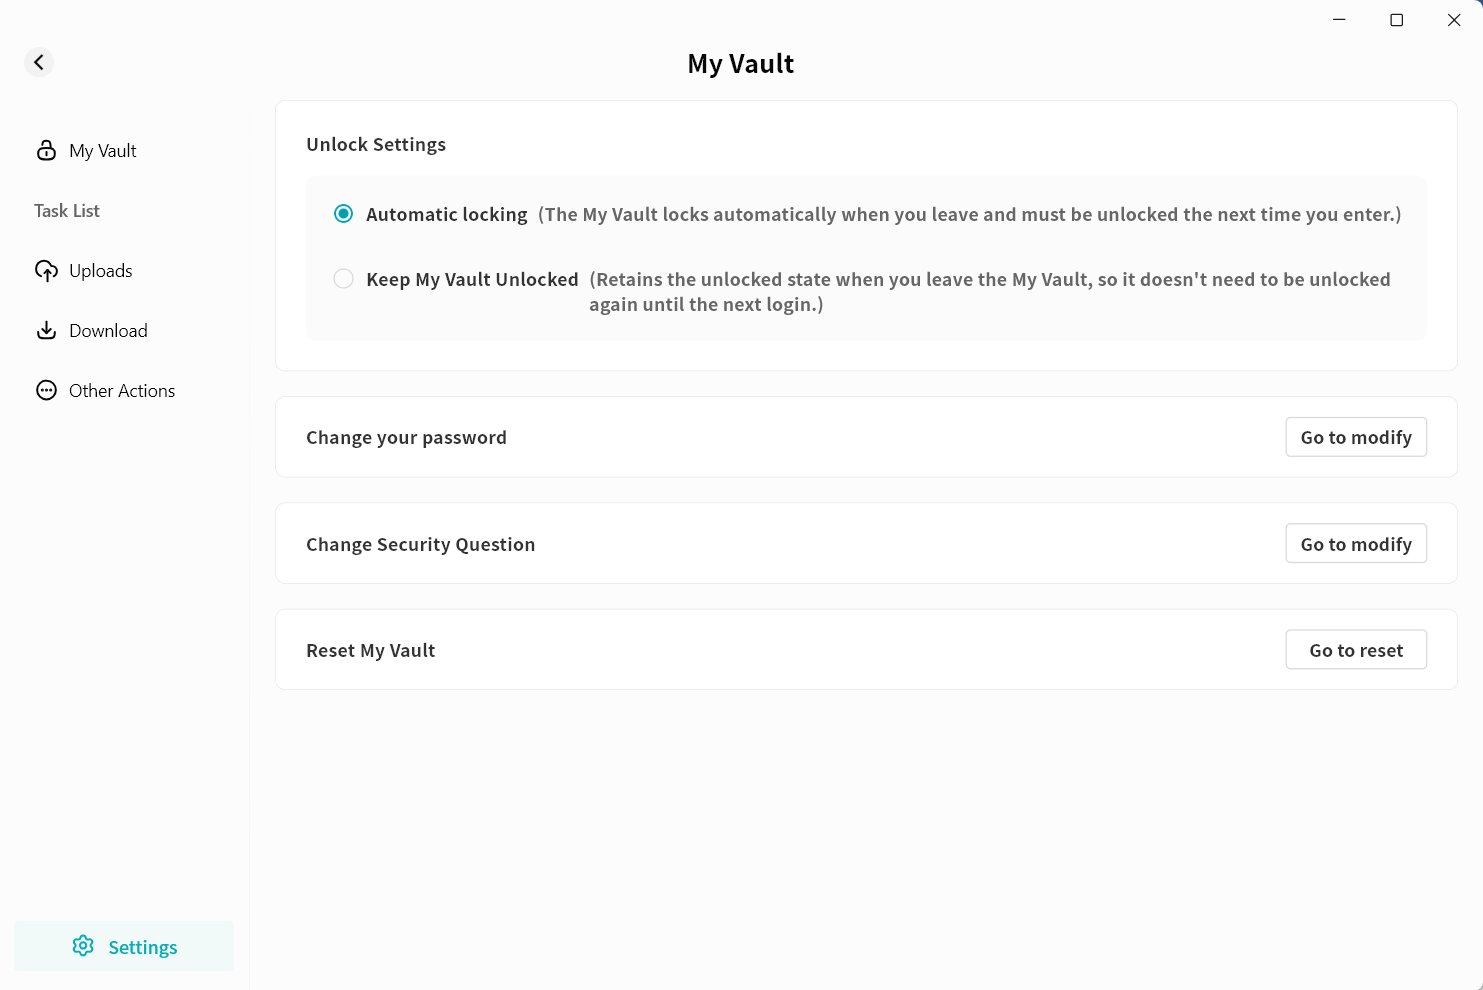
My Vault Password Recovery
If you forget your My Vault password, use the Forgot Password option on My Vault login page to reset it.
Enter the correct answer to the security question in the pop-up menu, then set a new password for My Vault. This operation will not affect the data stored inside.
The My Vault password is stored on the DASSET device. If you forget both the password and the security question, the data inside the My Vault will be permanently inaccessible. Be sure to keep your "My Vault" credentials safe.
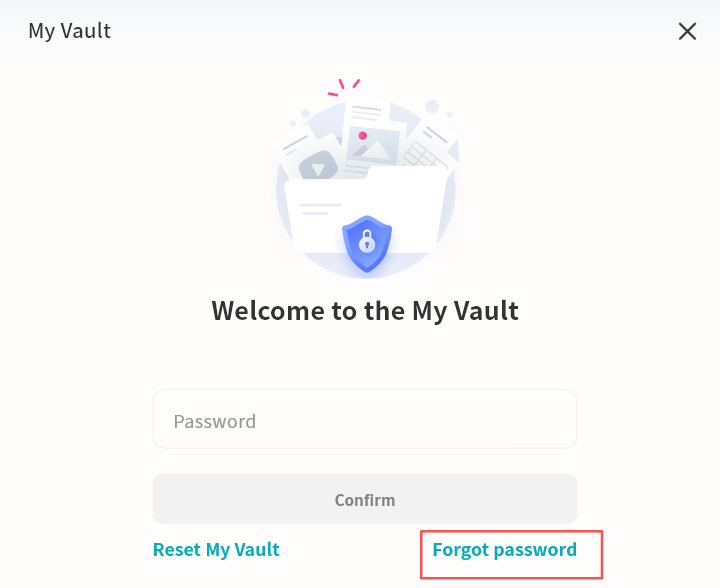
Lite NVR
The DASSET device supports cameras compatible with the Onvif protocol, enabling centralized management of cameras, storage of surveillance video, real-time and historical video viewing, and PTZ (pan-tilt-zoom) control. You can securely view surveillance footage anytime, anywhere without the privacy risks associated with uploading video to the cloud.
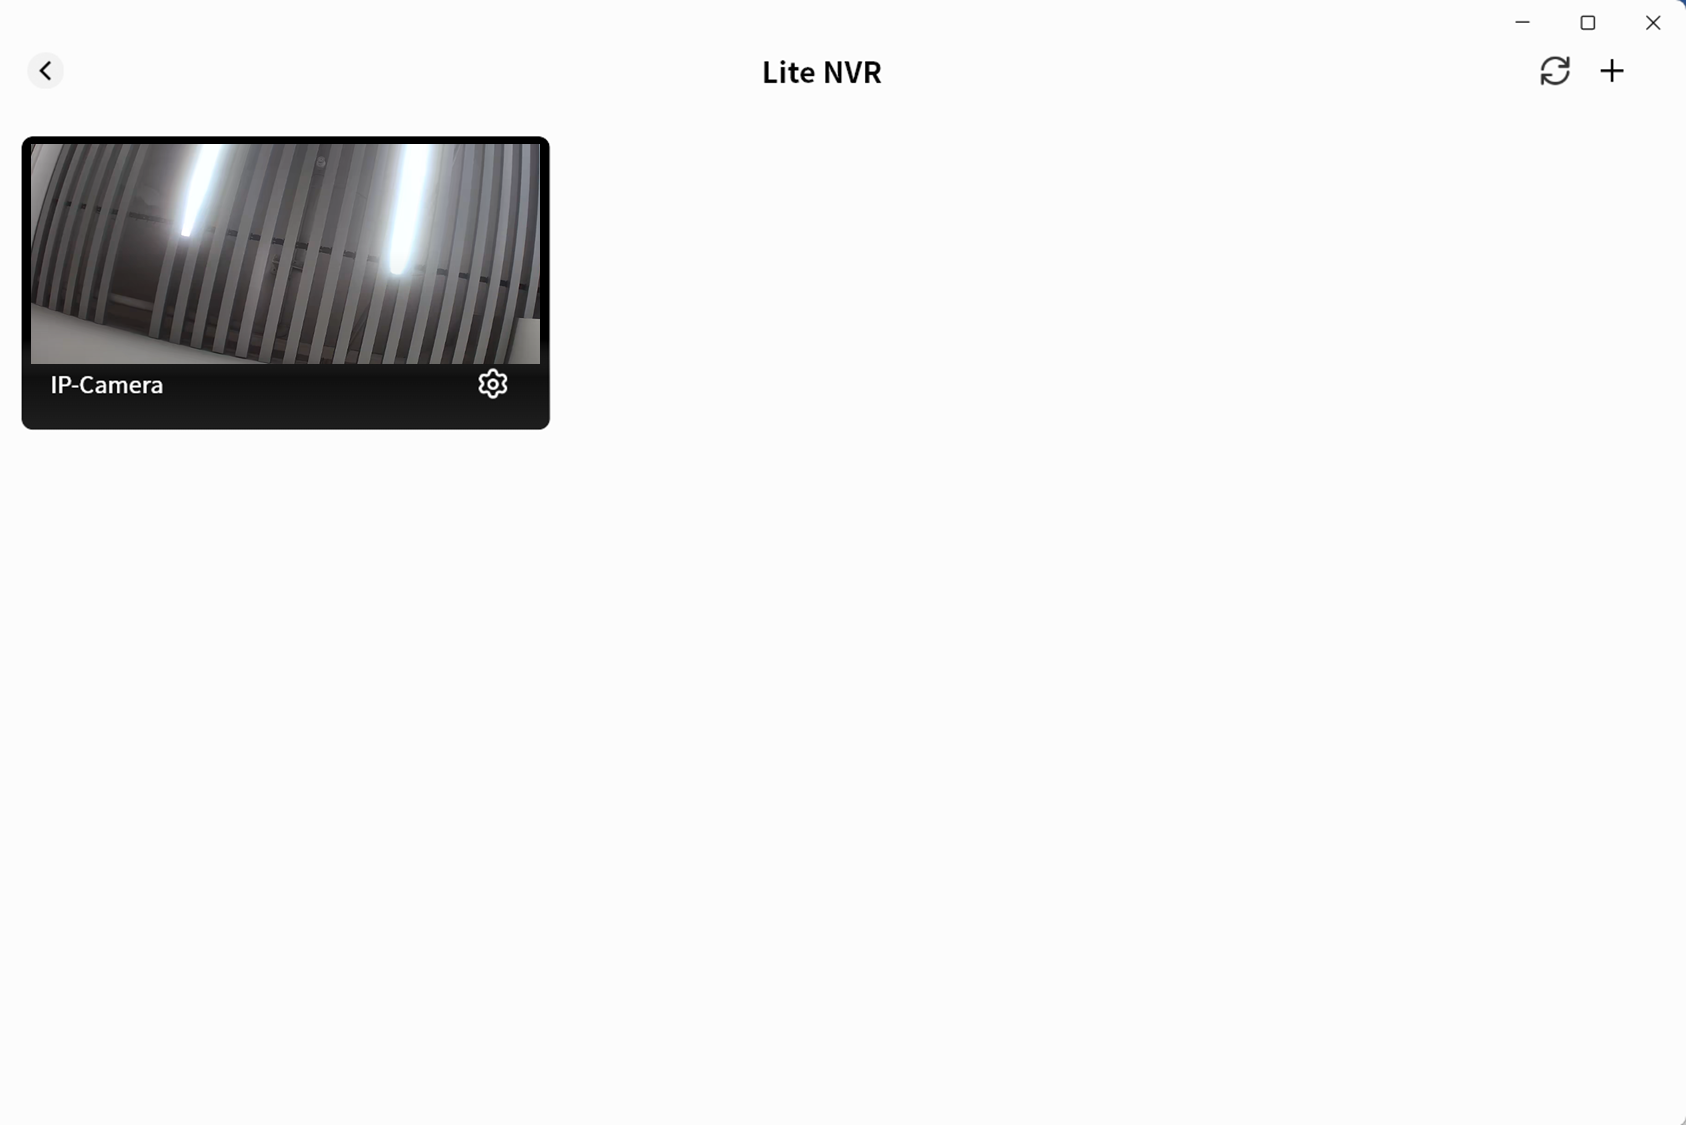
Add a Camera
- Click + to search for cameras on the same LAN as the DASSET device.
Ensure the camera and DASSET device are connected to the same LAN, the camera supports Onvif, and the camera is powered on with network access.
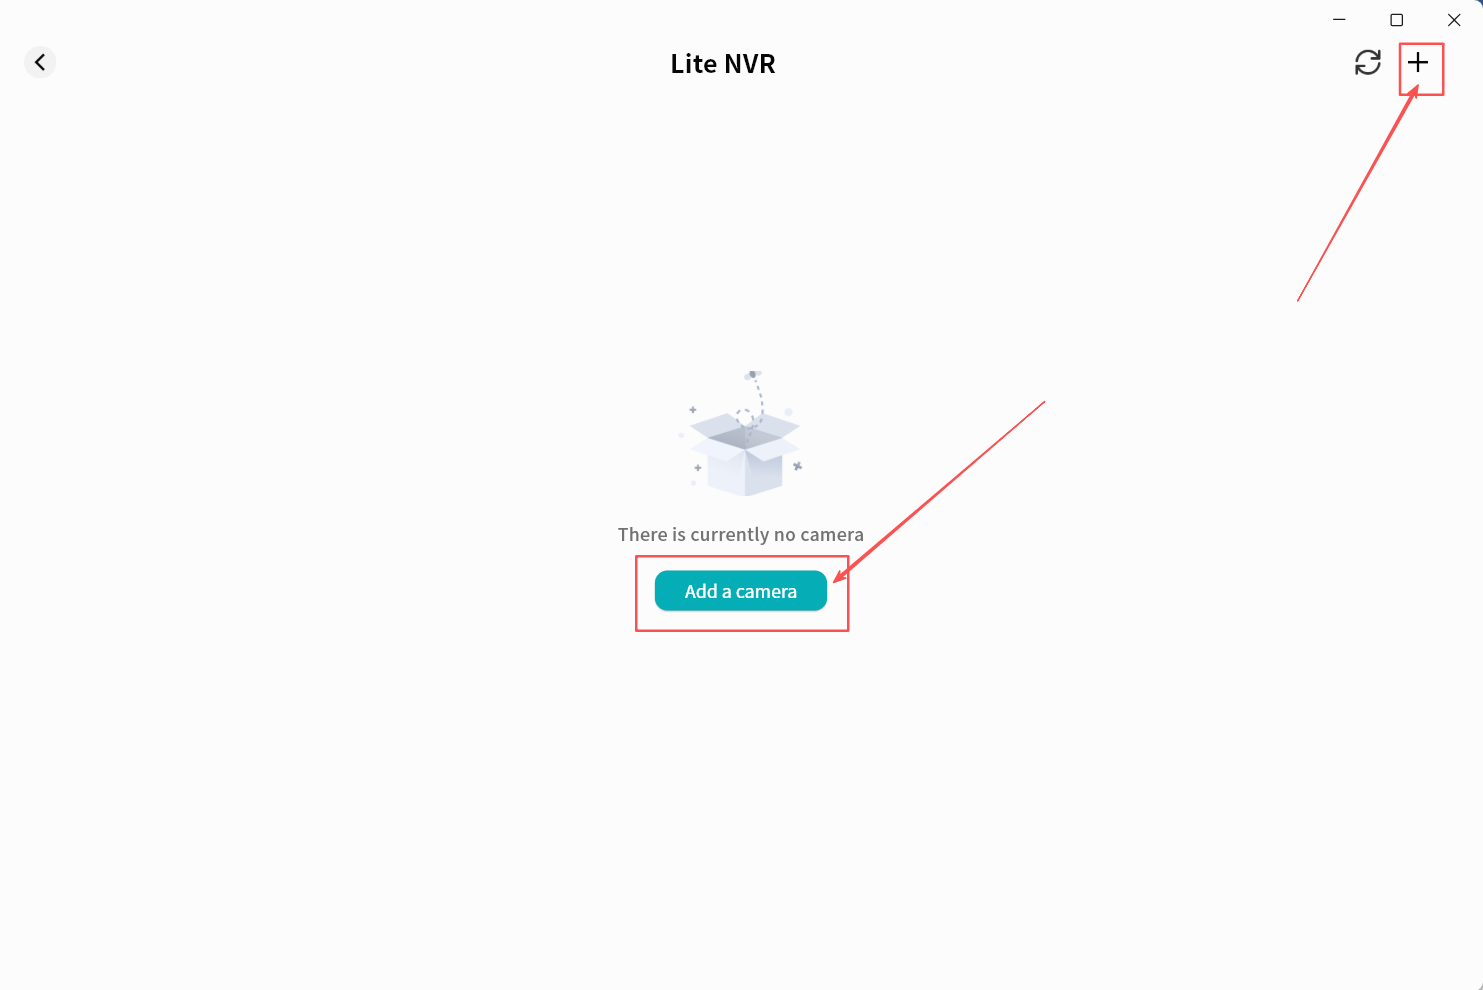
- Wait for the search results. The process is usually quick.
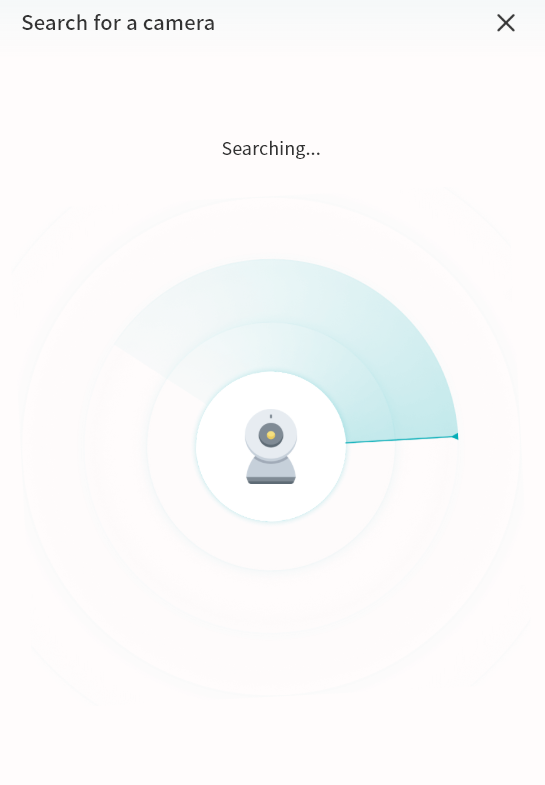
- Once discovered, the camera will appear in the results list.
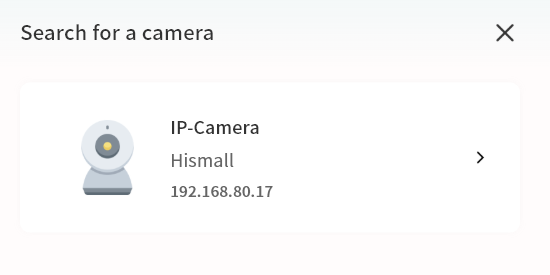
-
Click the camera to open its configuration page. If authentication is required, enter the username and password of the camera (check the camera manual or contact the manufacturer if needed).
-
On the add-camera page, configure the following settings:
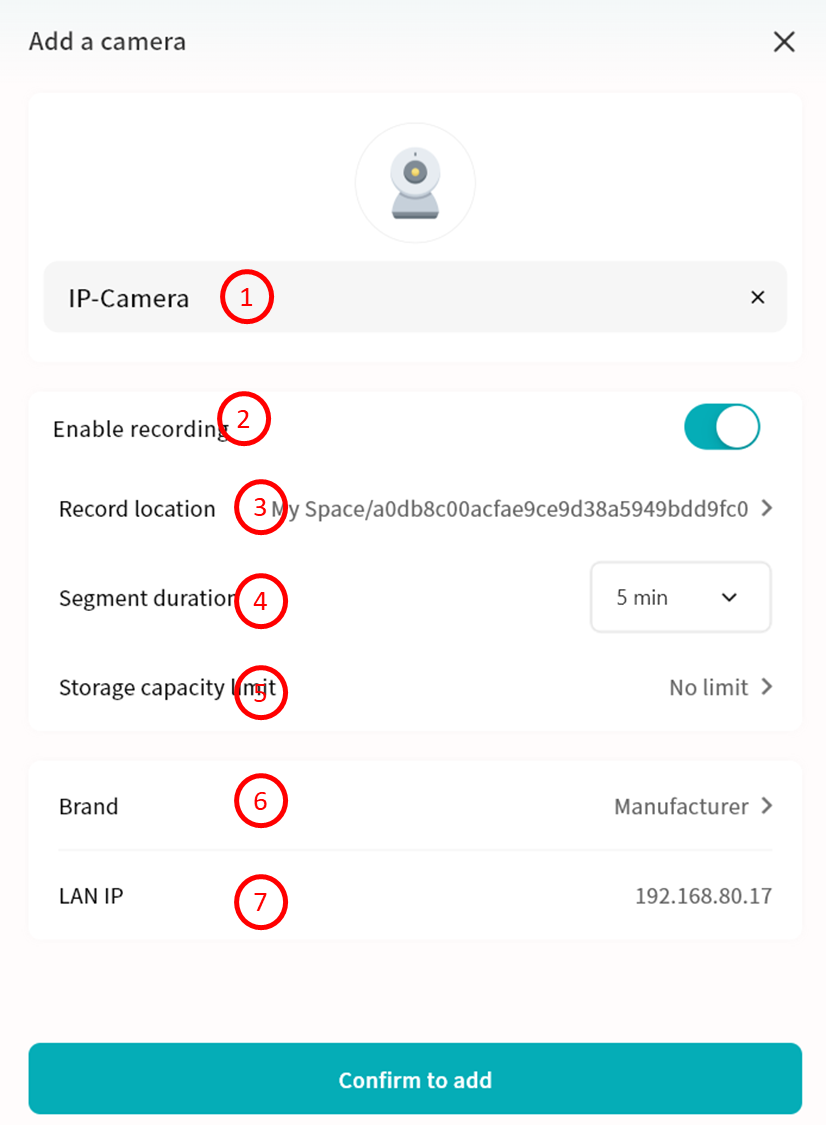
-
Camera Name: Display name in the Video Monitor application.
-
Enable recording: Enable recording to save camera footage to the DASSET device.
-
Record Location: Specify where video files will be saved.
Unless the video needs to be shared with other DASSET members, save it in* My Space or Group Space (accessible only by group members).
- Segment Duration: Define the length of each video file. DASSET will split and save videos accordingly.
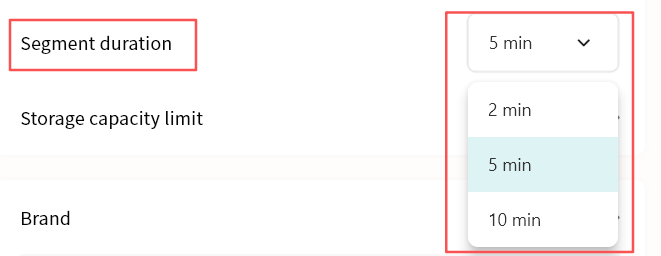
- Storage Capacity Limit: Set a maximum storage capacity for video files. Once reached, older recordings will be overwritten to free space.
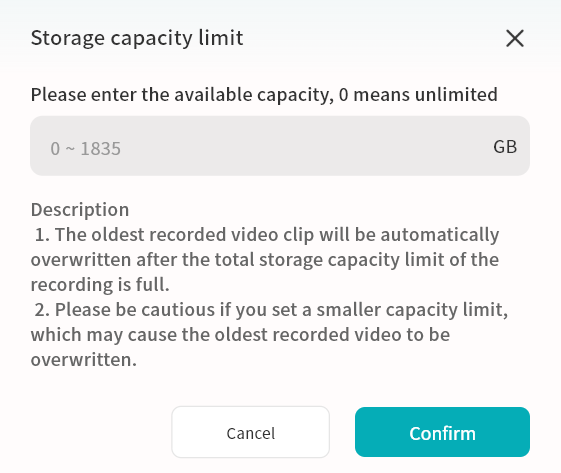
- Brand: The system will auto-detect the brand via the Onvif protocol. You can manually correct this if necessary.
-
LAN IP: Displays the current LAN IP address of the camera.
-
Click Confirm Add. The camera will now appear in the Video Monitor page.
View Live Video
In the Video Monitor page, you can view connected cameras with a static preview, camera name, and timestamp. You can also edit or refresh the camera view.
-
Camera preview and current time
-
Camera name
-
Camera configuration (including delete option)
-
Refresh the current page
-
Add a new camera
Camera Monitoring Operations
Click a camera preview to enter its monitoring interface. You can:
-
View the live feed with timestamp
-
Adjust audio volume
-
Switch to fullscreen
-
Use PTZ controls
-
View recorded playback
-
Edit camera settings (see Add Camera section)
PTZ Control
Click the directional keys to adjust the camera angle.
If PTZ is not supported by your camera, a notification will be displayed.
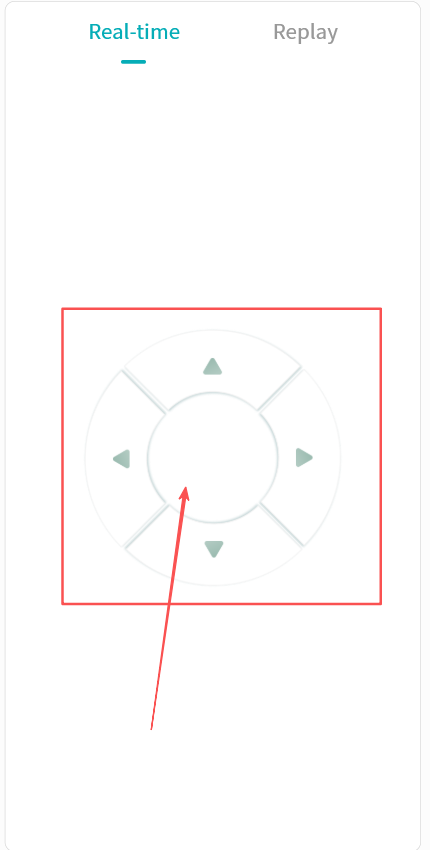
View Playback
- In the monitoring interface, click Playback to view recorded videos stored on the DASSET device. Recordings are listed chronologically based on recording duration.
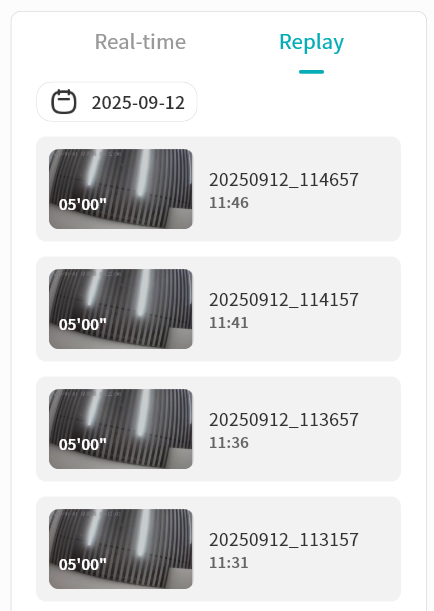
- Use the calendar to locate recordings from a specific date.
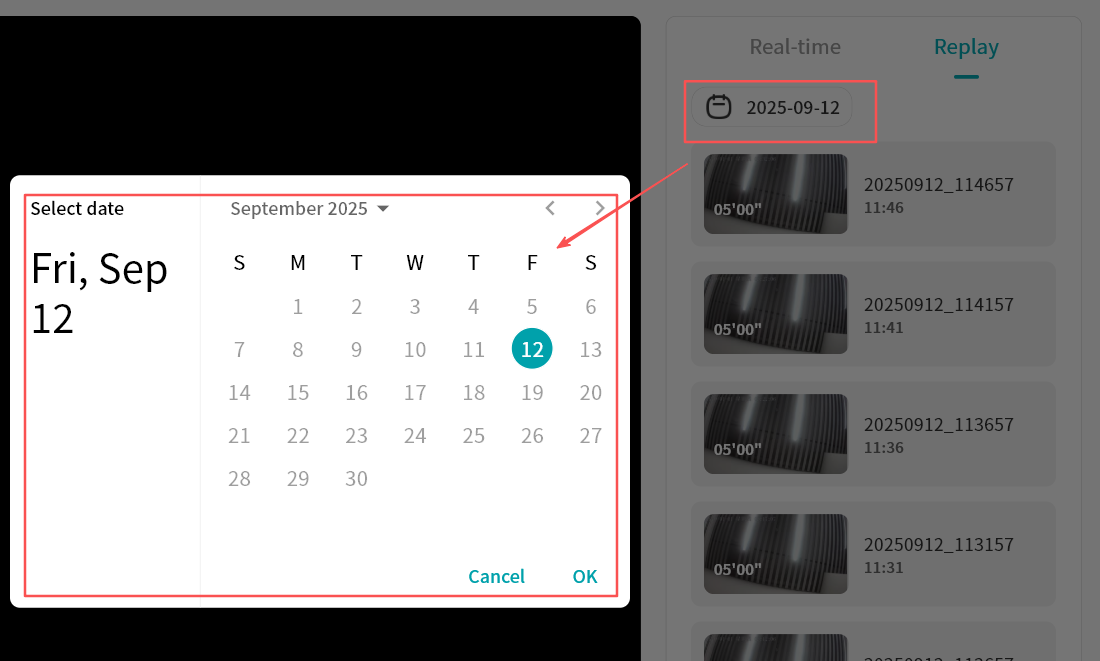
-
Click a video segment to play it. Options include:
-
Switch quickly between previous/next recordings
-
Pause/Play
-
Adjust audio volume
-
Display video duration and current playback timestamp
-
Fullscreen playback
-
Show the file name of the current video
-
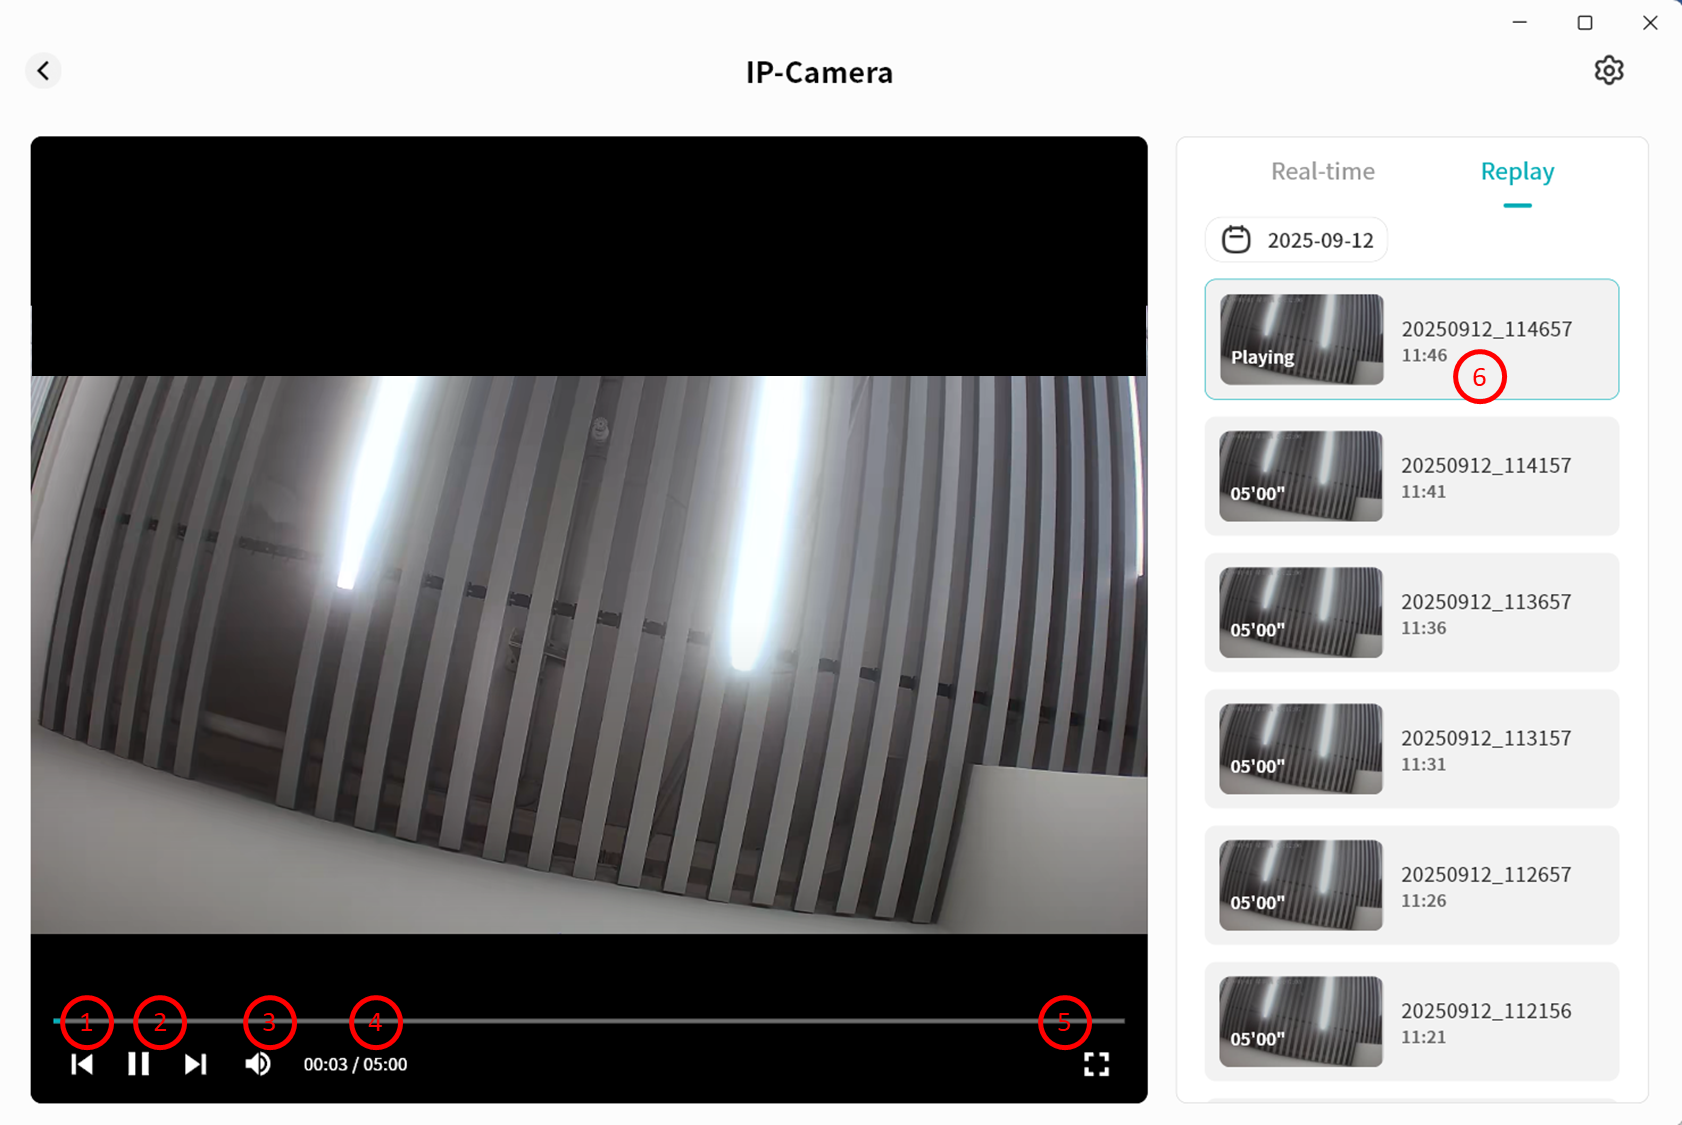
Delete a Camera
You can remove cameras from the DASSET device at any time.
-
From the Video Monitor home page or monitoring interface, click the gear icon.
-
Select Delete Camera to complete the removal.
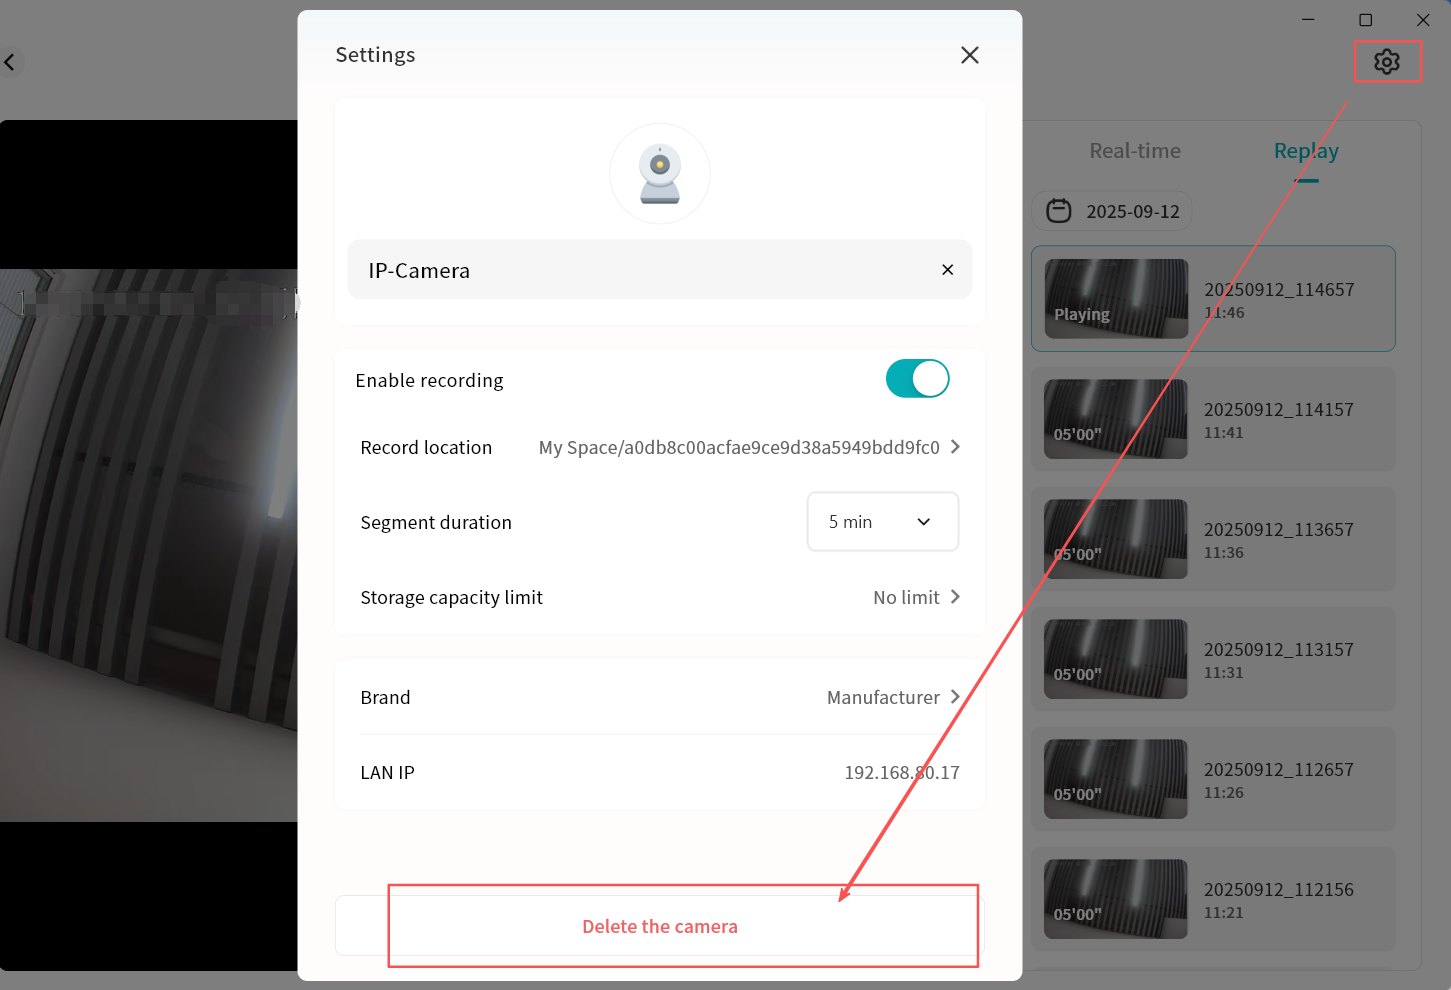
Container Tool
Using Docker containers, you can run a variety of third-party applications on the DASSET device to expand its capabilities. The container tool is available only to the Owner account.
-
Overview: Displays current CPU usage, memory usage, and the list of running containers on the DASSET device.
-
Containers: Create and manage your containers.
-
pc-images: Manage stored image files.
-
Repository: Connect to image repositories to search and download required pc-images.
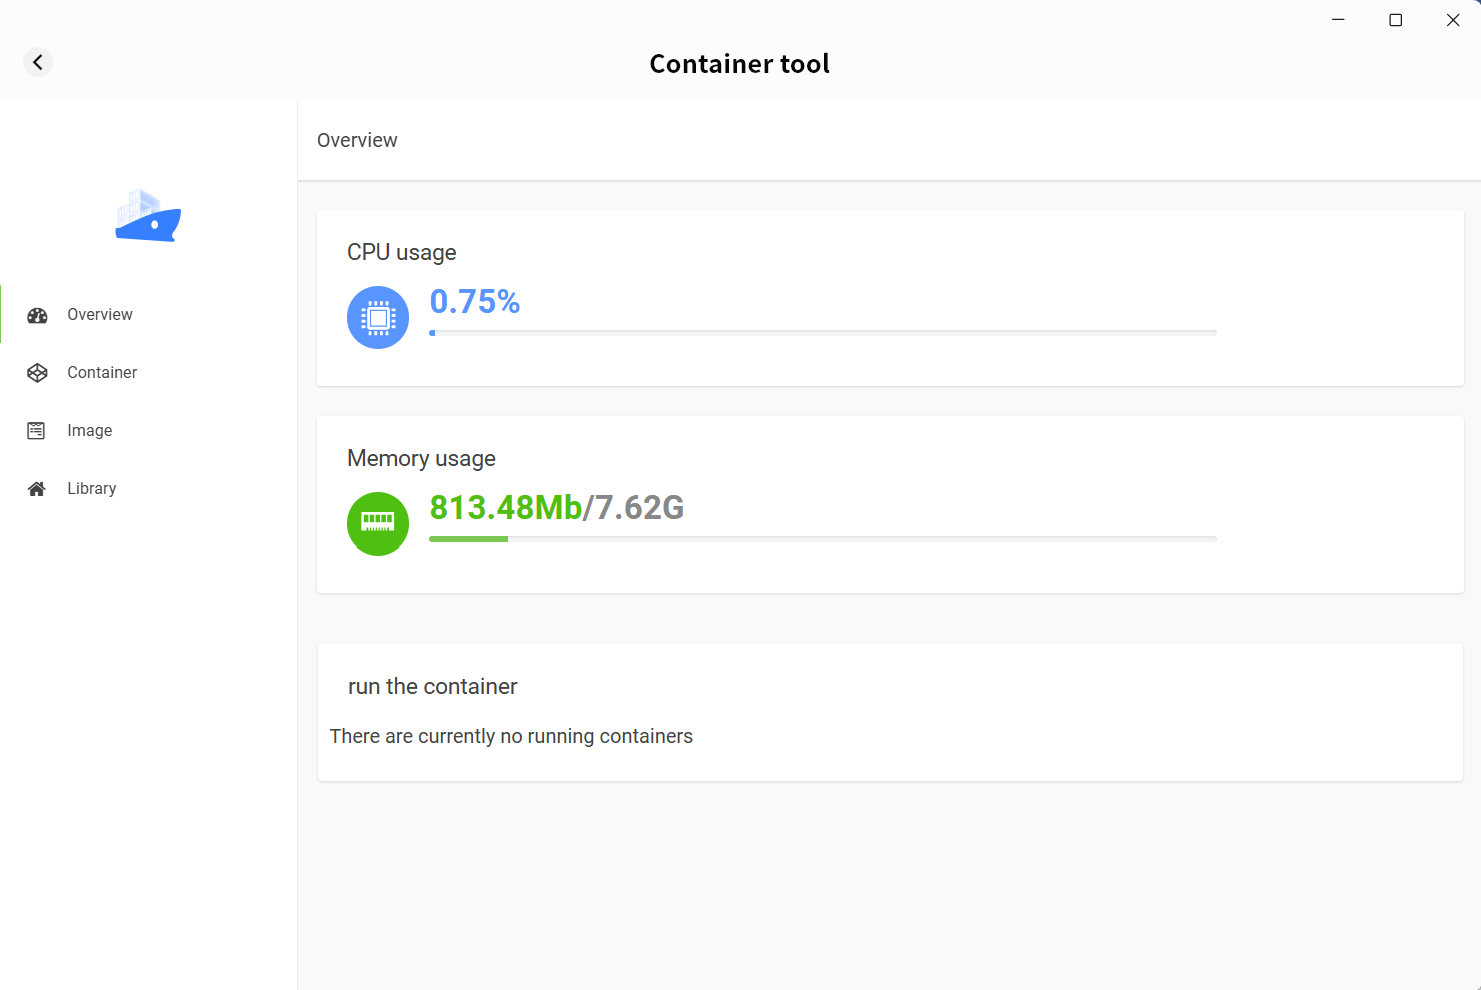
Containers
On the container page, you can create new containers using previously added pc-images.
-
Basic settings:
-
Select image
-
Set container name
-
Allocate memory for the container
-
Set CPU priority (not recommended to set to High, to avoid excessive resource consumption)
-
-
Advanced settings: Configure additional parameters required for container creation, including:
-
Run with high privileges or not
-
Automatically restart container after DASSET device reboot
-
Container network mode
-
Container startup parameters
-
Port mapping (defines which port to use when accessing the container)
-
Directory mapping between the container and the DASSET device (enables the container to access specific directories on the device)
-
Environment variables required for the container
-
Different containers may have different configuration requirements. Refer to the official configuration guide of the container you are creating. For detailed container creation steps, see Appendix 1.
Image
All downloaded pc-images are stored on the pc-images page for unified management.
-
Import: Import image files from the computer into the DASSET device.
-
Export: Export stored image files from the DASSET device to the computer.
-
Batch delete: Select multiple image files to delete at once.
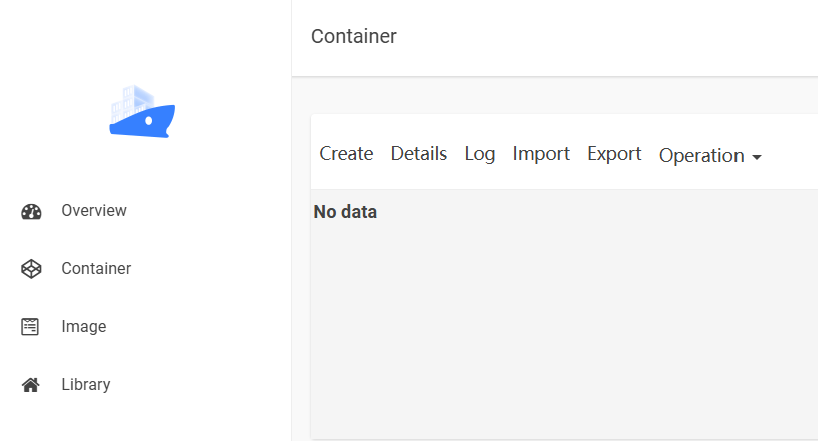
Library
The library connects to centralized Docker image distribution sites, allowing you to search for and download any required pc-images directly to the DASSET device.
Online Document Editing
DASSET provides a third-party online document editing tool as an extension application. With this tool, you can view and edit documents stored on the DASSET device directly.
Supported formats include major Microsoft Office file types (DOC, DOCX, XLS, XLSX, PPT, PPTX, Visio, MS Publisher), standardized open document formats (ODT, ODS, ODP), and PDF.
Installing the Online Document Editing Tool
- In the third-party applications, select Online Document Editing Install.
-
Wait for the installation to complete. The tool will be automatically installed on the DASSET device. You may also use the dropdown menu to disable or uninstall the tool.
-
Once installed, you can open and edit documents stored on the DASSET device directly.
Document preview and editing are performed on the DASSET device itself, without downloading files to your computer.
Online Document Preview and Editing
You can select any document stored on the DASSET device and choose Online Edit to preview or edit its content.
All edits are saved directly on the DASSET device.
Example using a Word document:
- Select the document and choose Online Edit.
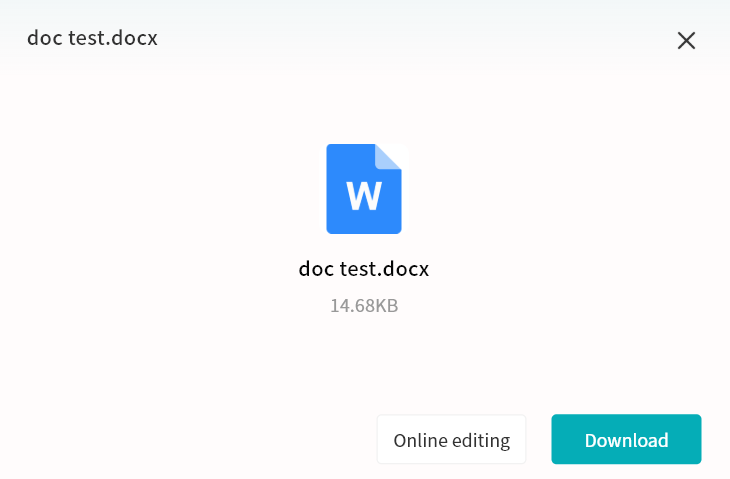
- The online editing tool will open the Word document, allowing you to view and edit it.
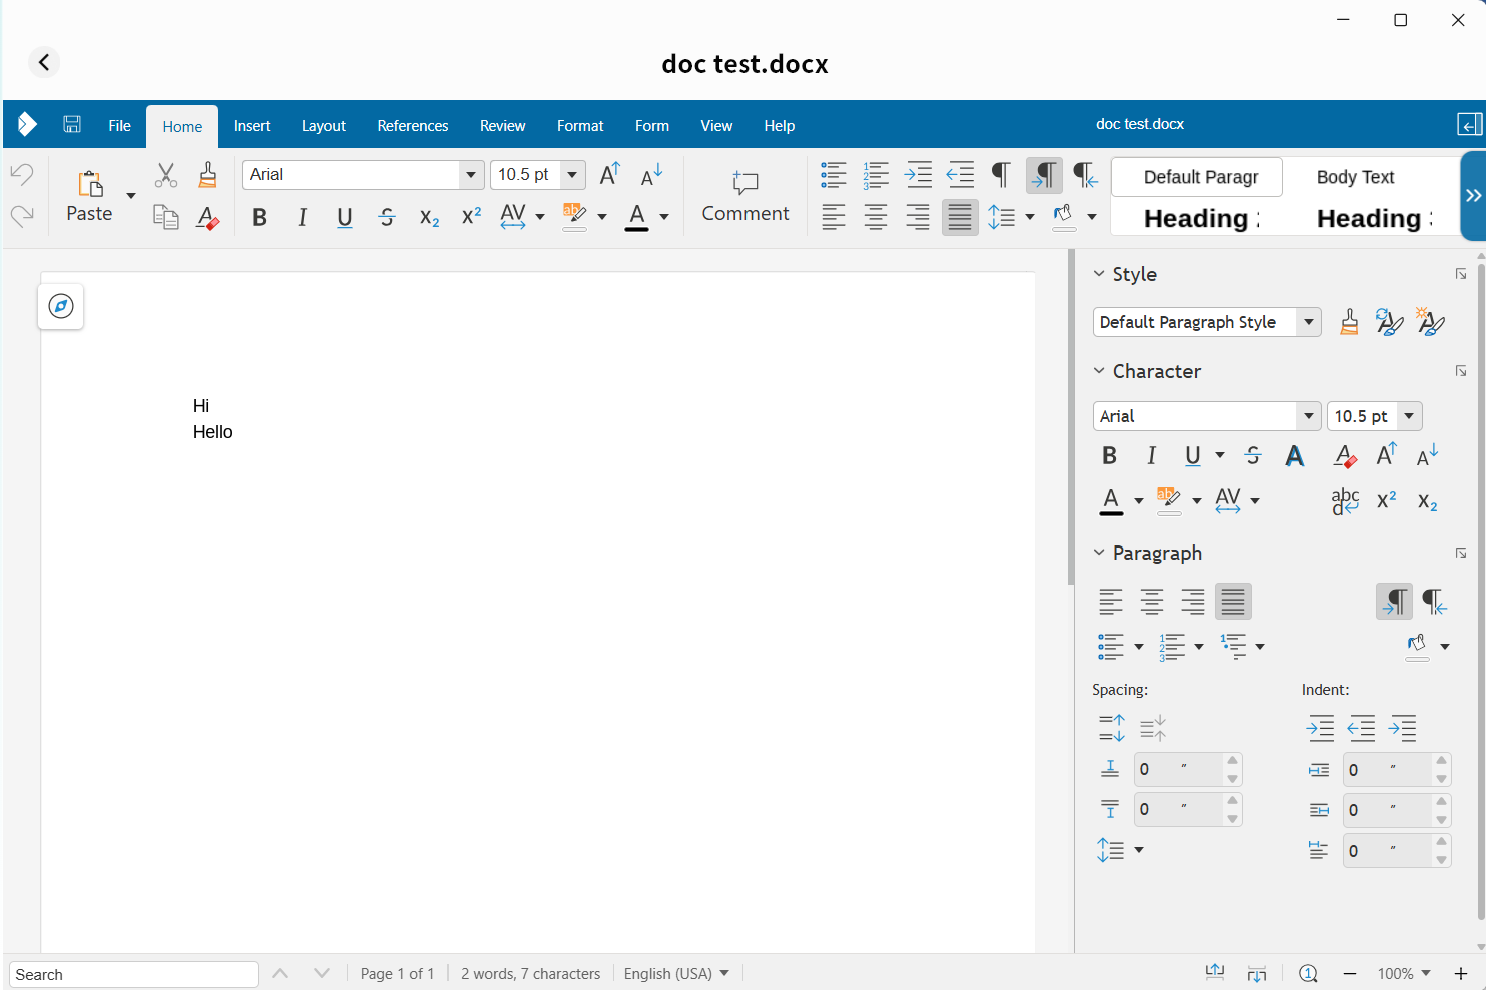
For more details on using the online document editing tool, refer to its built-in help documentation.
Note
Note Overview
Click the Note button to enter your private notes page:
-
Notebooks: Create, rename, and delete notebooks.
-
Note Display: Shows all notes stored in the selected notebook.
-
Waste Paper Basket: Deleted notes and notebooks are temporarily stored here.
-
Note Settings: By default, notes are saved on your local computer. You can choose to sync them to your DASSET device.
-
Recording: Uses the computer's microphone to record audio. After recording, a new note with the audio file will be created in the selected notebook.
-
New Note: Creates a new note in the selected notebook.
Markdown syntax content can be copied directly into a note while retaining its original format.
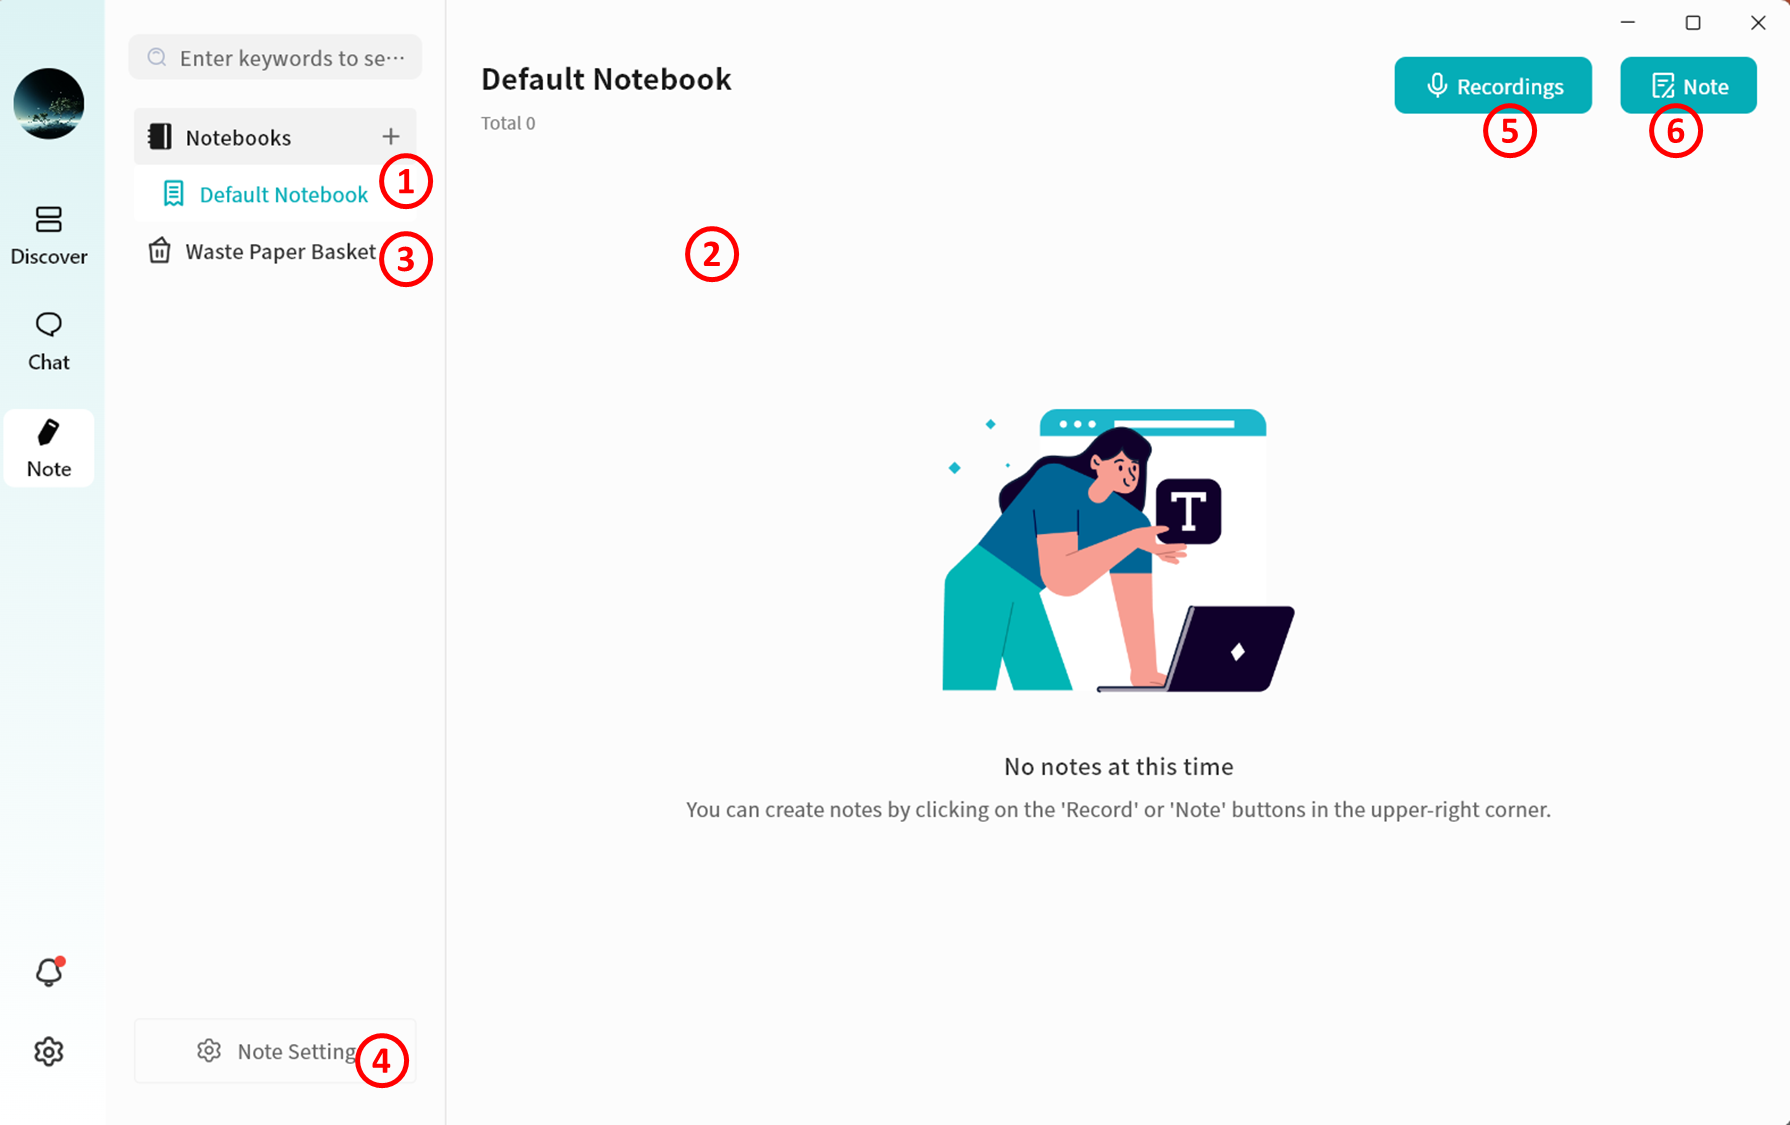
Notebook Management
Multiple notebooks are supported to help organize your knowledge.
-
Create Notebook: Click the plus sign (+) to create a new notebook.
-
Manage Notebook: Right-click a selected notebook to rename or delete it.
Deleting a notebook will also delete all notes inside it. Restoring a deleted note from the Trash will also restore its associated notebook.
Note Management
When you select a notebook, all notes stored inside it are displayed in the notes window.
Note Status
If note synchronization is enabled, each note will show its current sync status in the top-right corner:
-
 Waiting to sync
 -
 Sync complete
 -
 Sync in progress
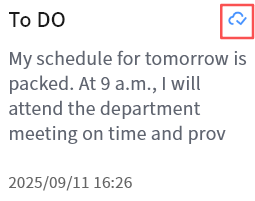
Audio Notes
Click Record to start recording. Once recording is finished, a new note containing the audio file will be created automatically.
-
Stop Recording: Ends the recording and saves the audio file in the new note.
-
Start/Pause Recording: Allows you to pause and resume recording.
-
Exit: Cancels the current recording.
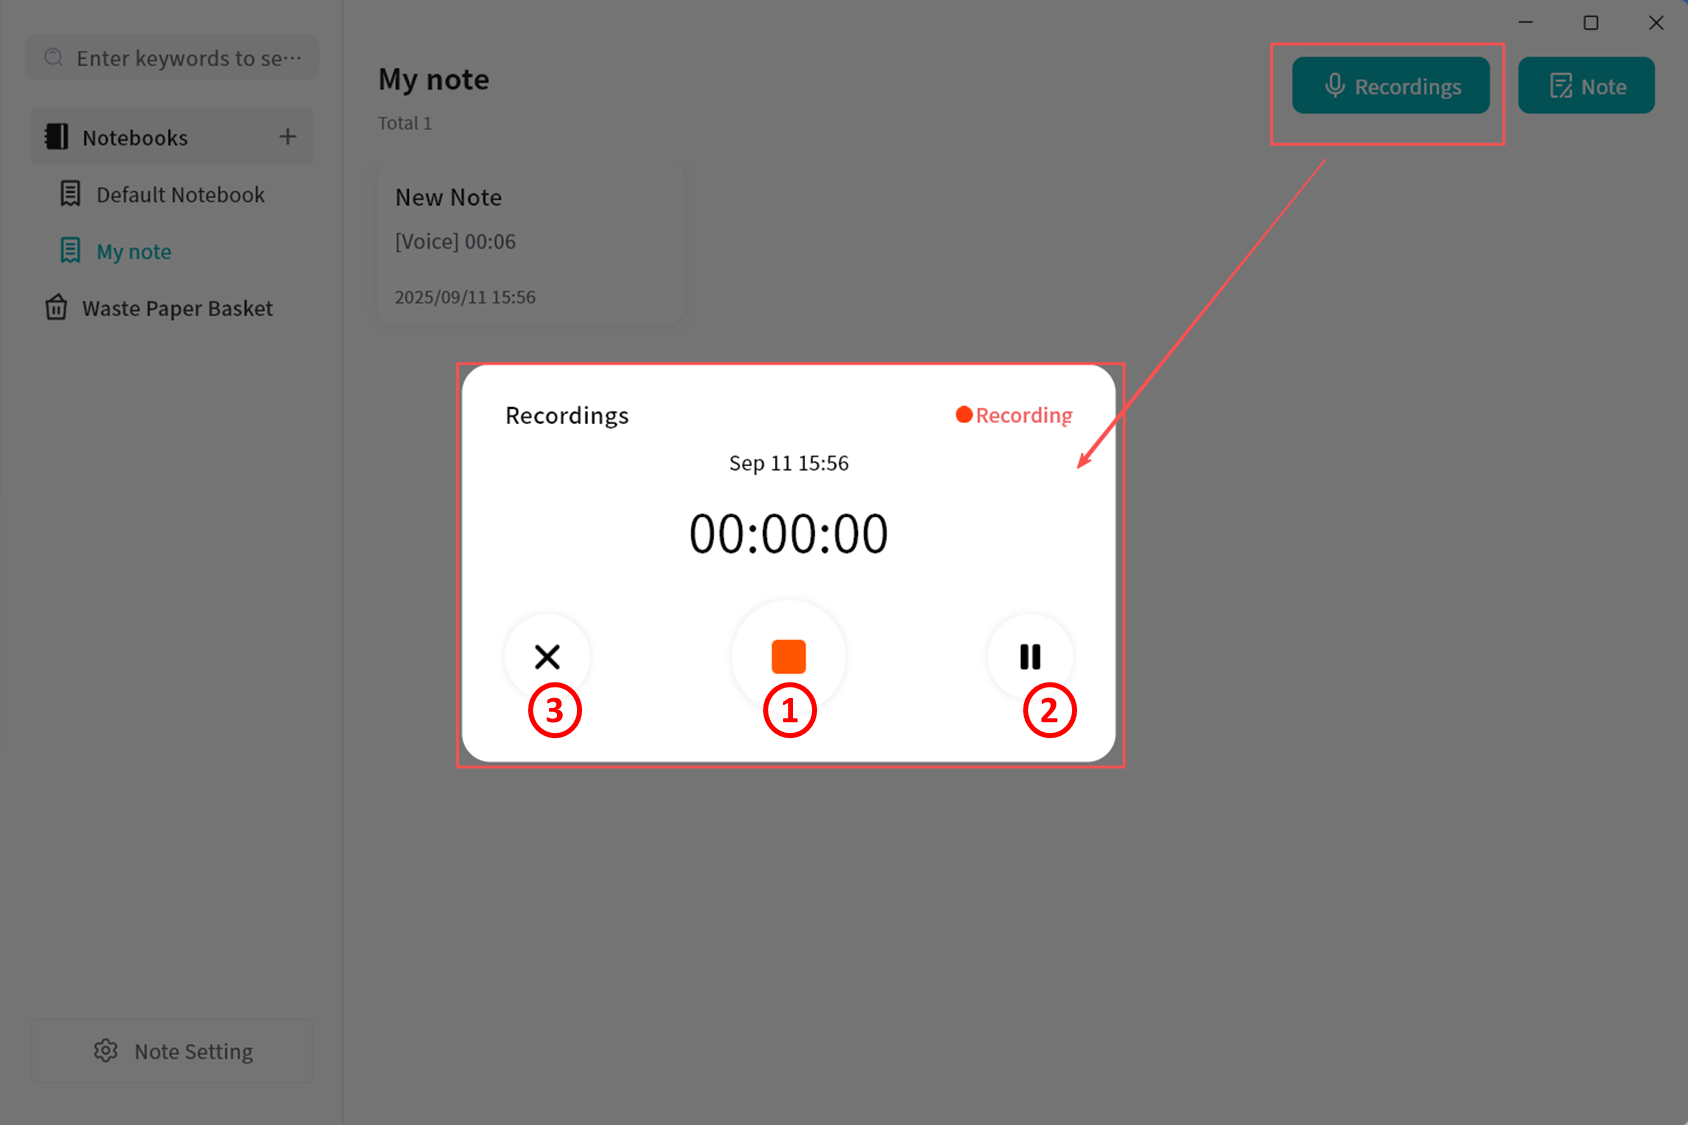
Note Editing
Notes support rich text editing as well as basic formatting:
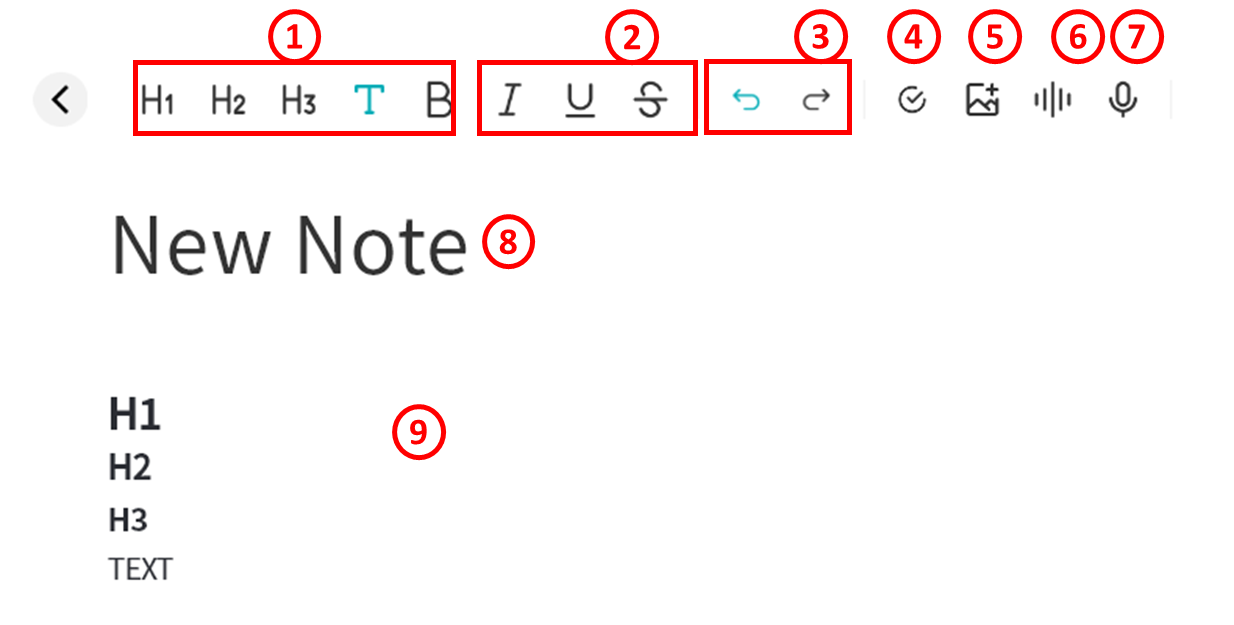
-
Set document structure, including Heading 1/2/3 and body text.
-
Format text with bold, italic, underline, and strikethrough.
-
Undo/Redo: Cancel the current edit, or restore what was just undone (only available if no further actions have been taken after the undo)
-
Create to-do items, which can be marked as Completed.
-
Insert media files, including pc-images and videos. pc-images can be pasted directly from copied files or screenshots.
-
Insert audio files.
-
Start live audio recording.
-
Edit note title.
-
Edit note body.
Supported formats:
-
Audio: mp3, wma, flac, wav, aac, ape, m4a, ogg
-
pc-images: gif, jpg, png, jpeg
-
Videos: avi, flv, mov, mkv, mp4, wmv
Right-Click Menu in Note Editor
While editing a note, you can right-click to perform various actions:
-
Cut: Remove selected content.
-
Copy: Copy selected content.
-
Paste: Insert copied content.
-
Select All: Select the entire content of the note.
-
Translation: Use the AI Agent to translate selected content into Chinese, English, or Japanese.
-
Organize Delegated Tasks: Use the AI Agent to convert selected content into a to-do list.
-
Summarize: Use the AI Agent to generate a summary of selected content.
-
Generate Blog: Use the AI Agent to create blog-ready text from selected content.
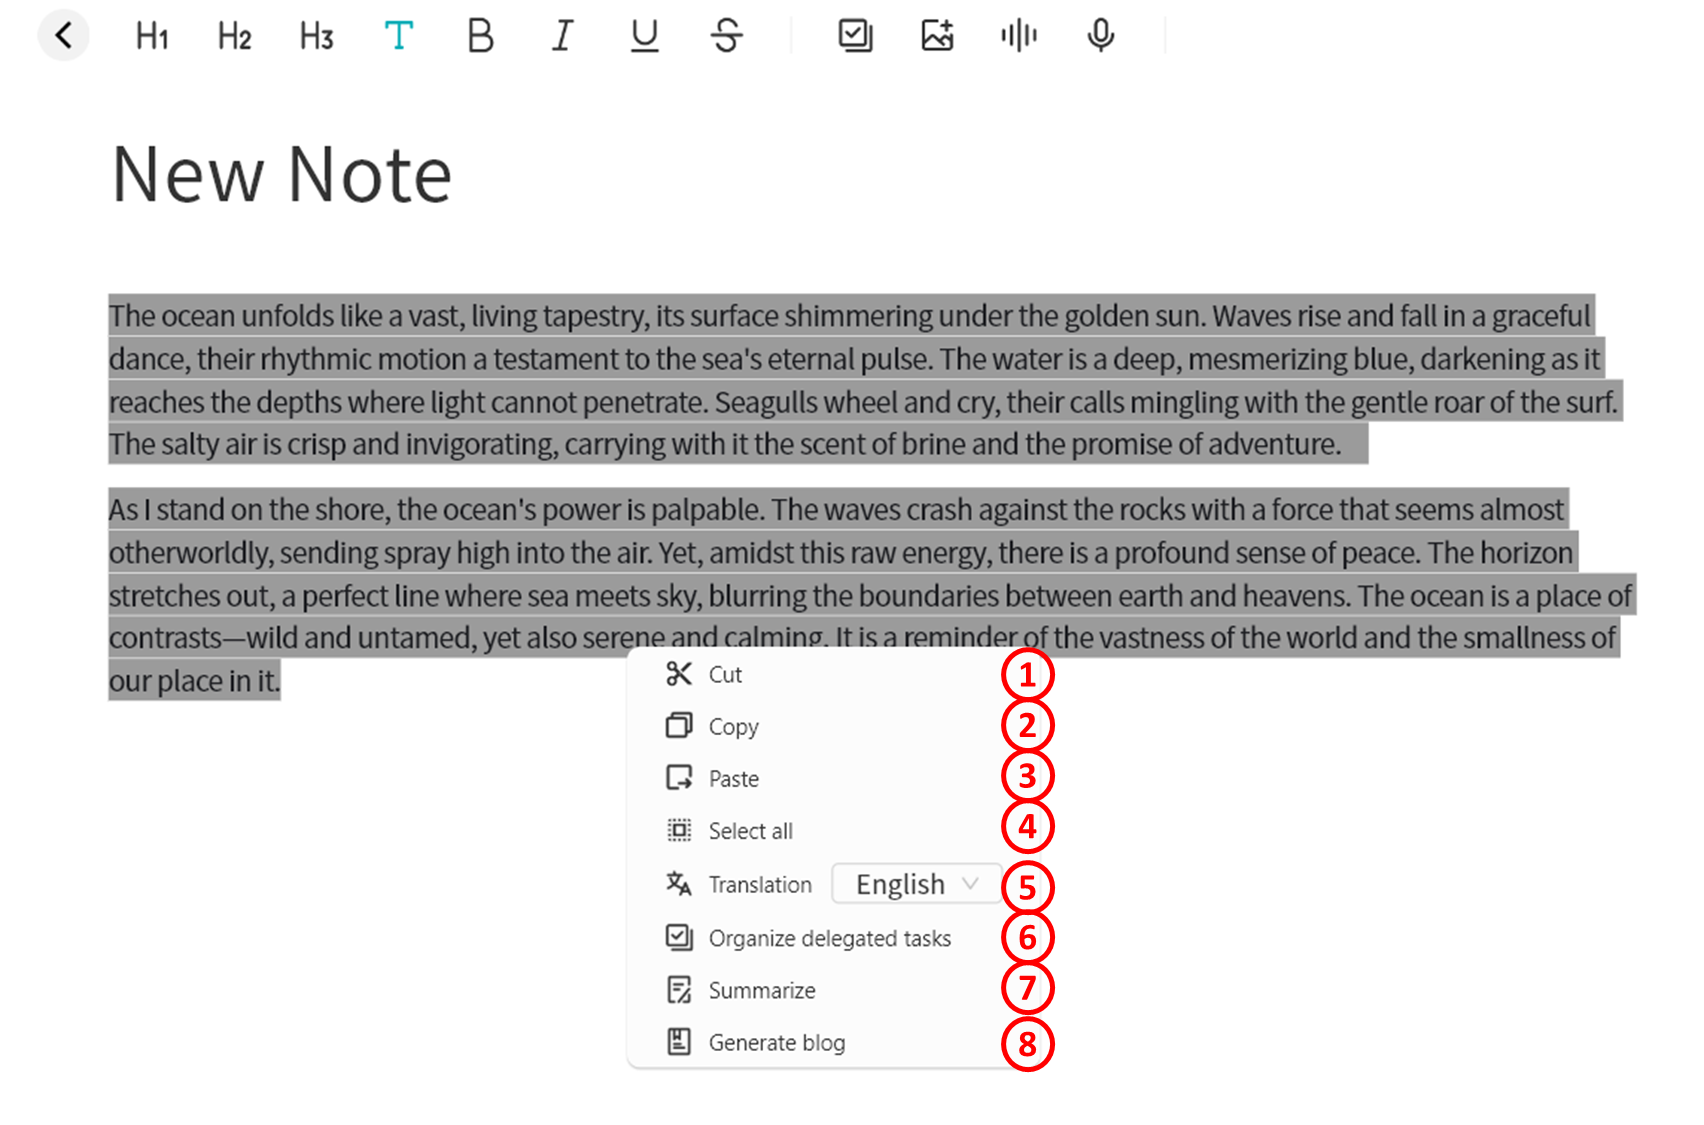
Note Management from the List Page
On the notes list page, you can right-click a note to perform the following actions:
-
Move To: Move the note to another notebook.
-
Top: Pin the note at the top of the current notebook.
-
Copy: Copy the note to another notebook.
-
Delete: Remove the note.
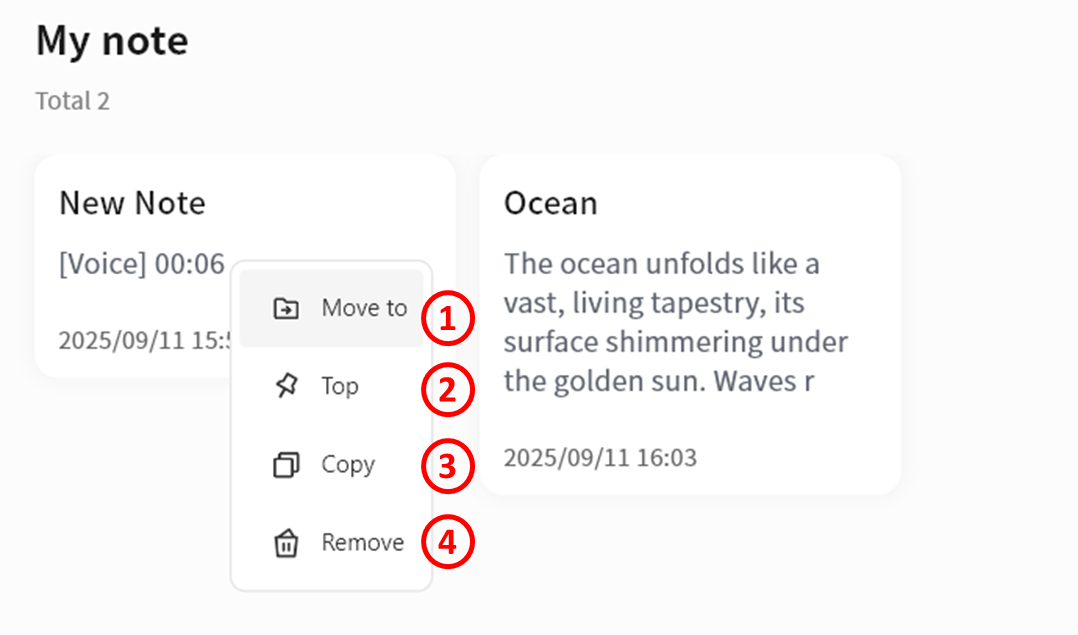
Search
Enter keywords in the search bar to quickly locate the notes you need.

Notes AI Agent
The Notes feature includes multiple AI Agent capabilities that can be invoked at any time to improve efficiency.
Image Analysis
You can use the Image Understanding function to generate AI-based descriptions of pc-images in a note.
- Right-click on an image and select Image analysis.
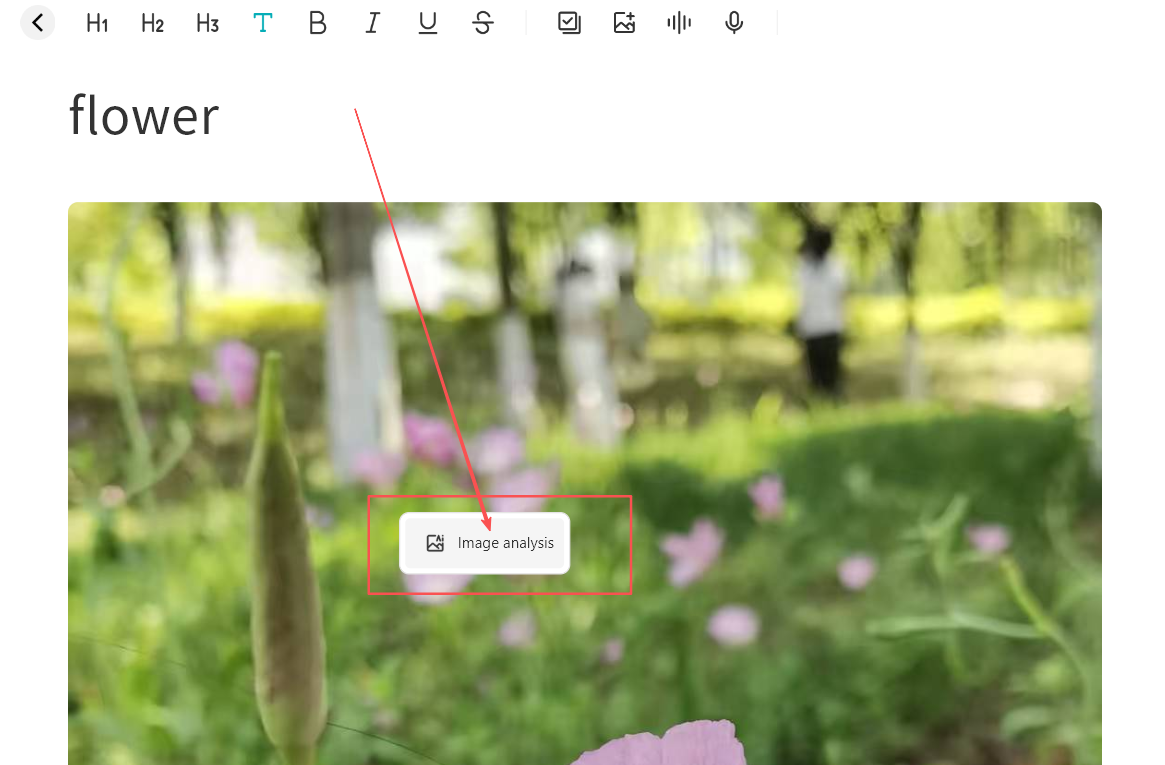
- The DASSET AI Agent will analyze the image automatically.
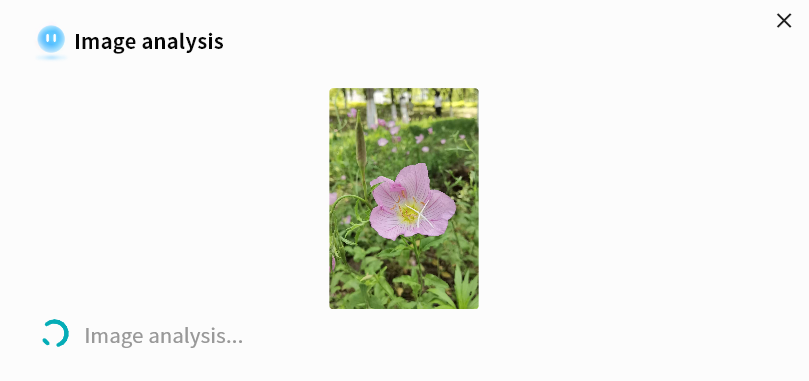
-
Once complete, the AI Agent generates descriptive text. You may then:
- Save as Note: Store the generated description as a new note.
- Insert Text: Insert the generated description into the current note.
- Re-recognition: If the description is unsatisfactory, run the analysis again for a new result.
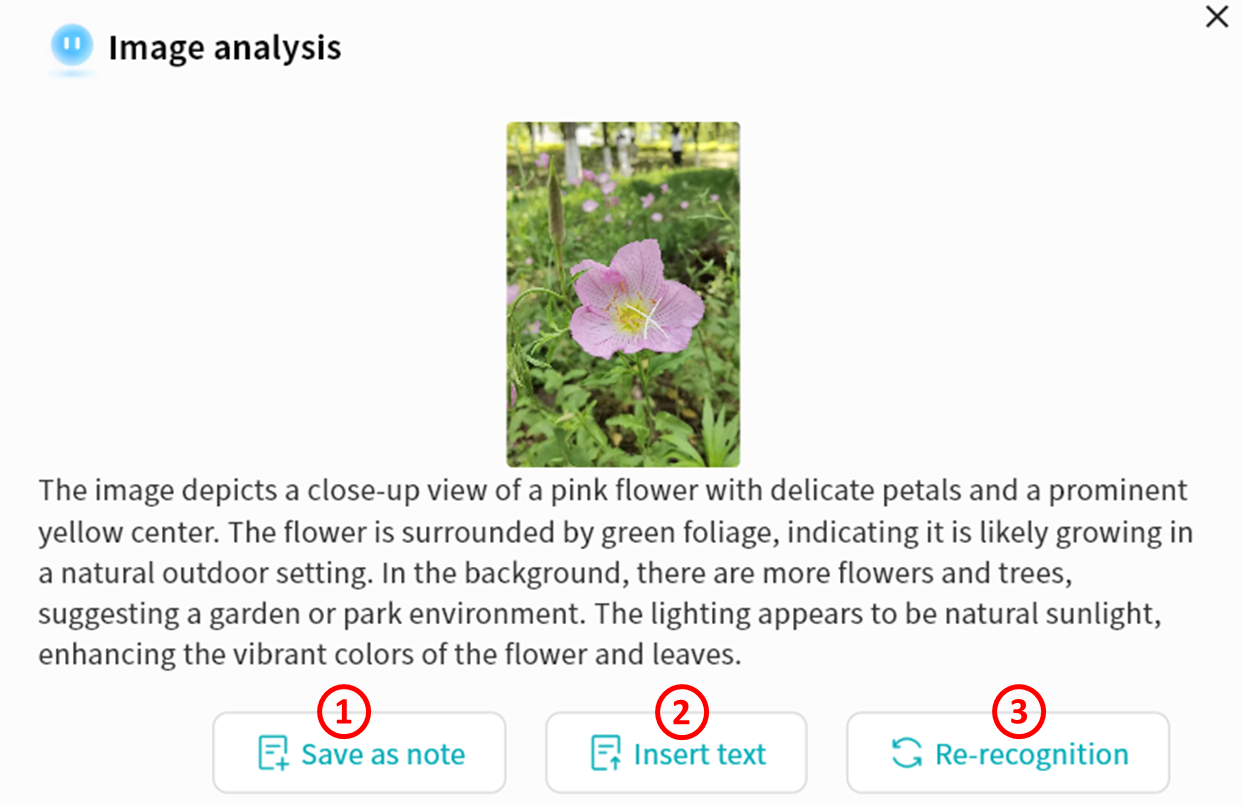
Text Translation
The Text Translation function allows AI to translate selected text into other languages. Currently supported: Chinese, English, and Japanese.
- Highlight text, then right-click Translation select target language.

-
The DASSET AI Agent will translate the text.
-
After translation, you may:
-
Save as Note.
-
Insert Text into the current note.
-
Re-run for a new translation.
-
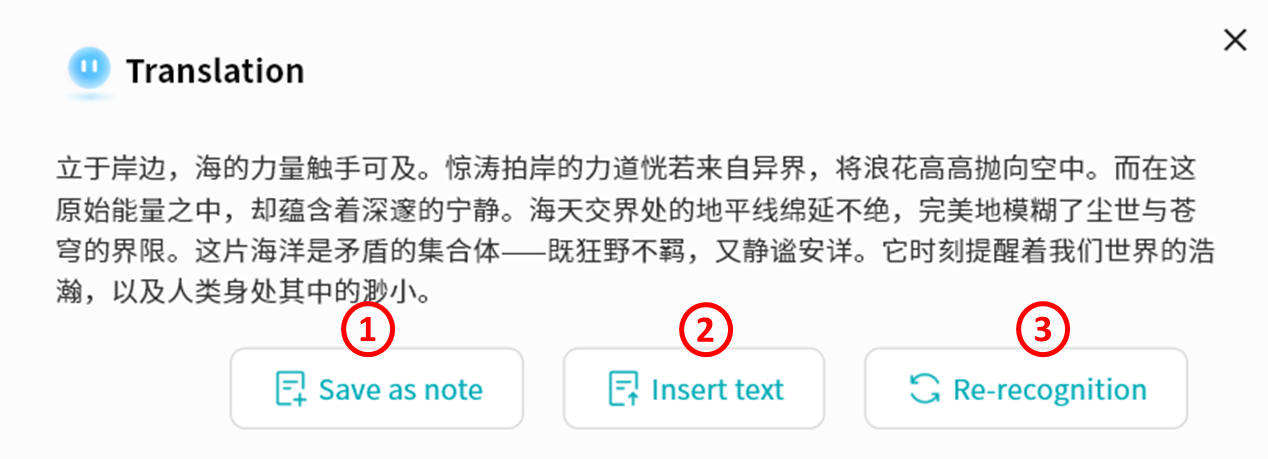
Organize Delegated Tasks
AI can convert selected text into structured to-do items.
- Highlight text, then right-click Organize Delegated Tasks.
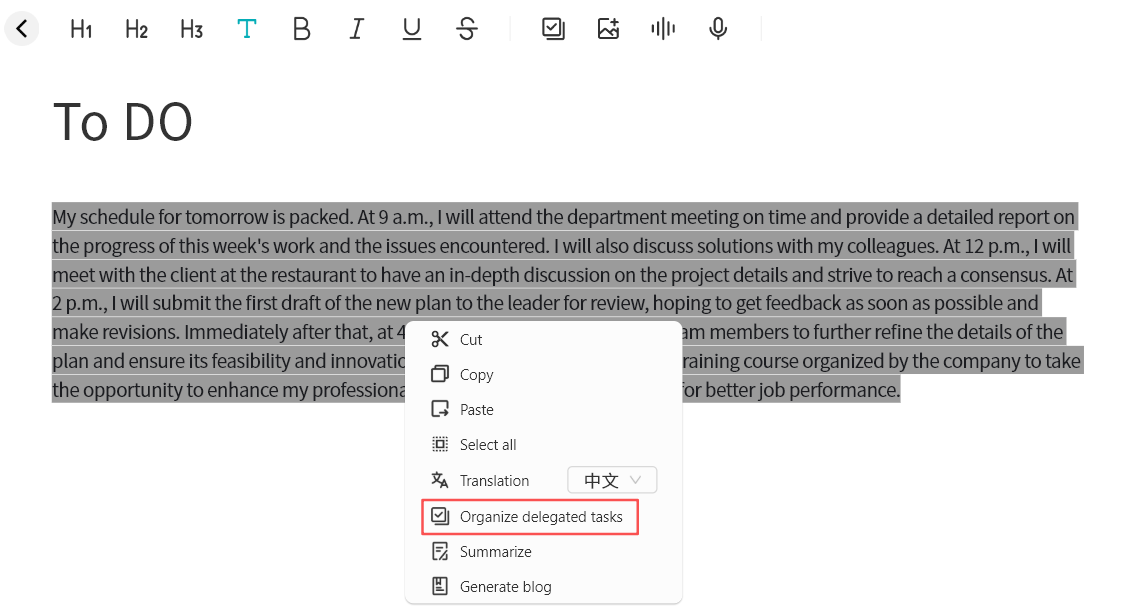
-
The AI Agent processes the text and generates a list of tasks.
-
Once generated, you may:
-
Save as Note.
-
Insert Text into the current note.
-
Re-run for a new result.
-
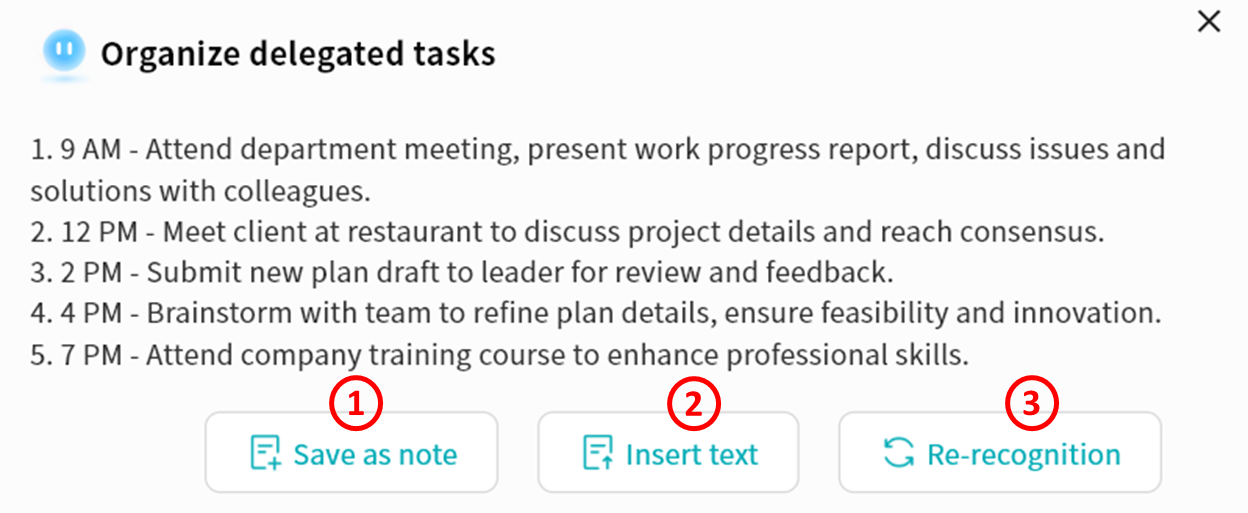
Summarization
AI can summarize selected text into concise content.
- Highlight text, then right-click Summarize.
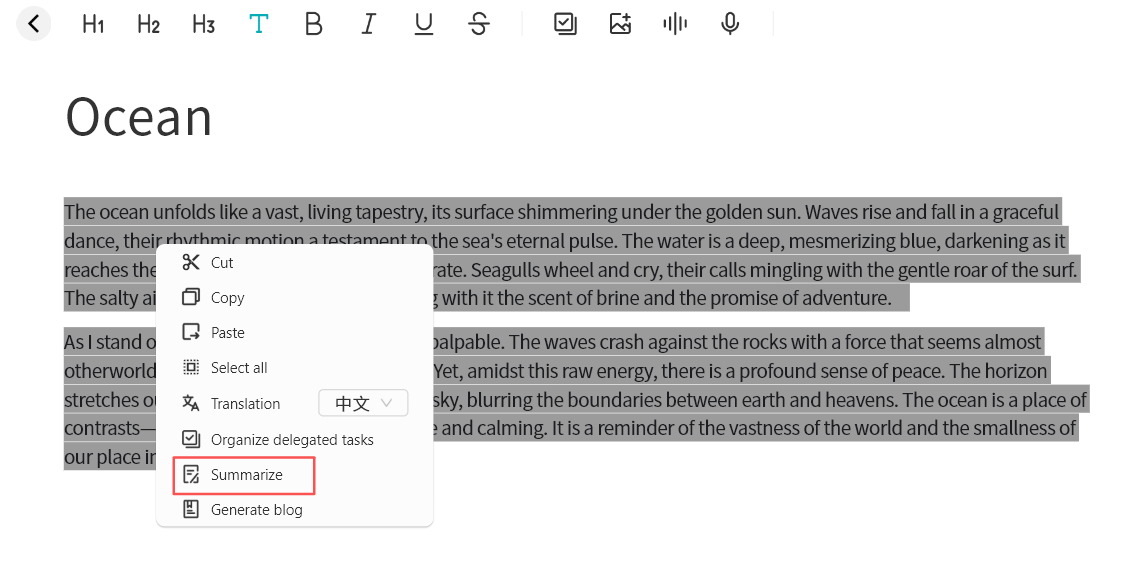
-
The AI Agent processes the text and generates a summary.
-
Once complete, you may:
-
Save as Note.
-
Insert Text into the current note.
-
Re-run for a new result.
-
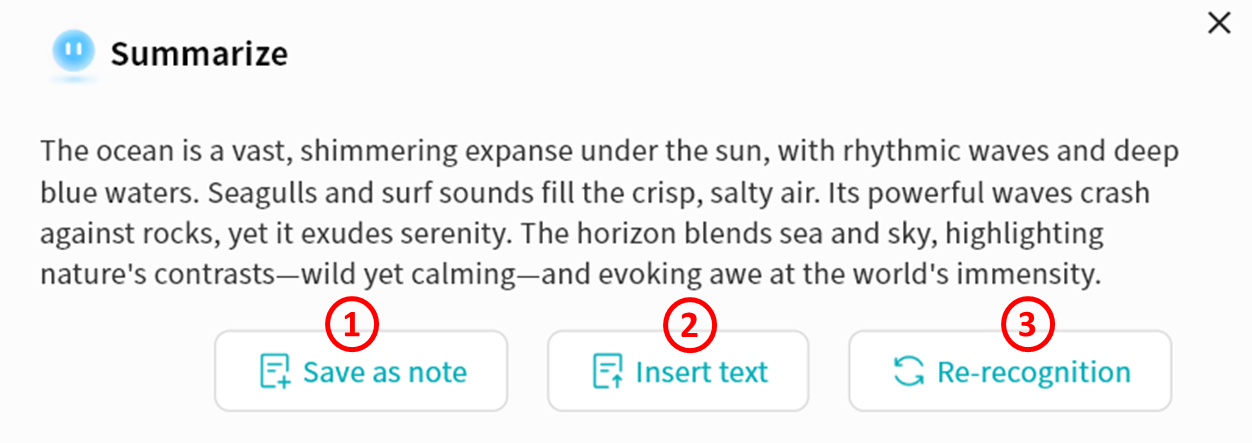
Blog Generation
AI can transform selected text into short blog-ready content for social media.
- Highlight text, then right-click Generate Blog.
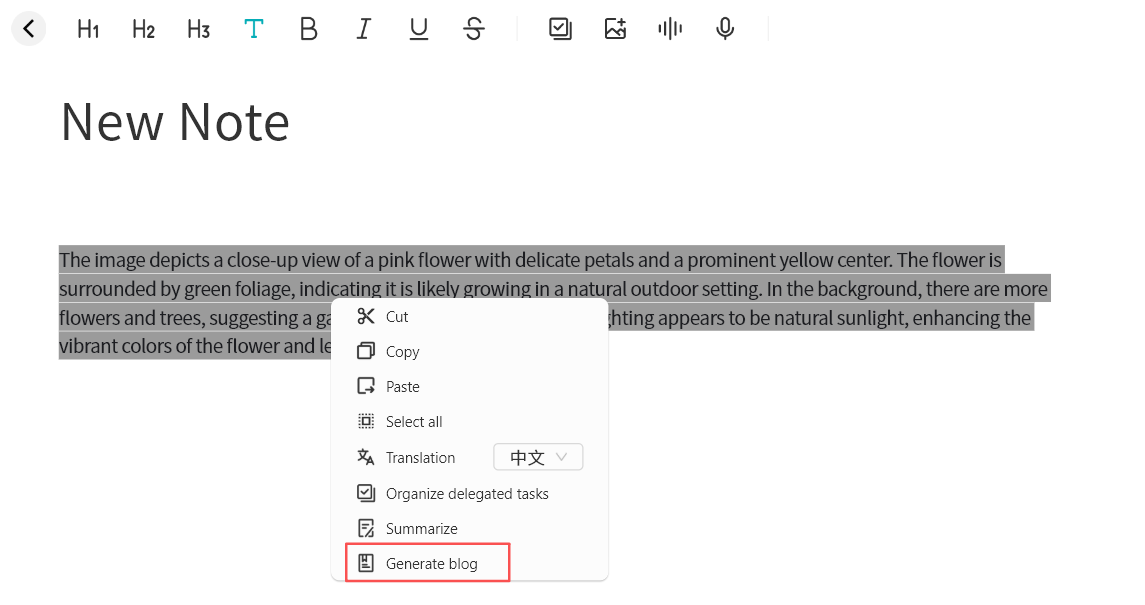
-
The AI Agent processes the text and creates a draft blog.
-
Once complete, you may:
-
Save as Note.
-
Insert Text into the current note.
-
Re-run for a new result.
-

Speech Recognition
You can convert audio files inserted into notes into text using Speech Recognition.
This function supports speaker identification based on different voice tones. Accuracy may vary depending on audio quality.
- Click To Text on the audio file.
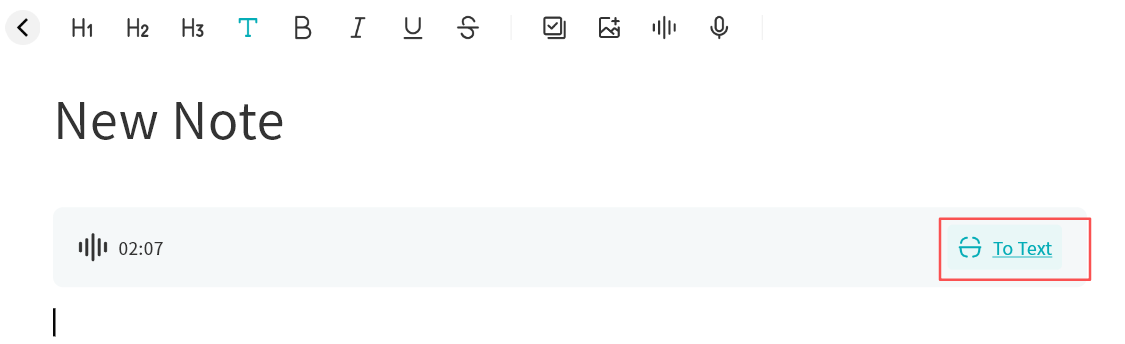
-
The AI Agent will identify speakers and transcribe the audio.
-
Once complete, you may:
-
Save as Note.
-
Insert Text into the current note.
-
Re-run for a new transcription.
-
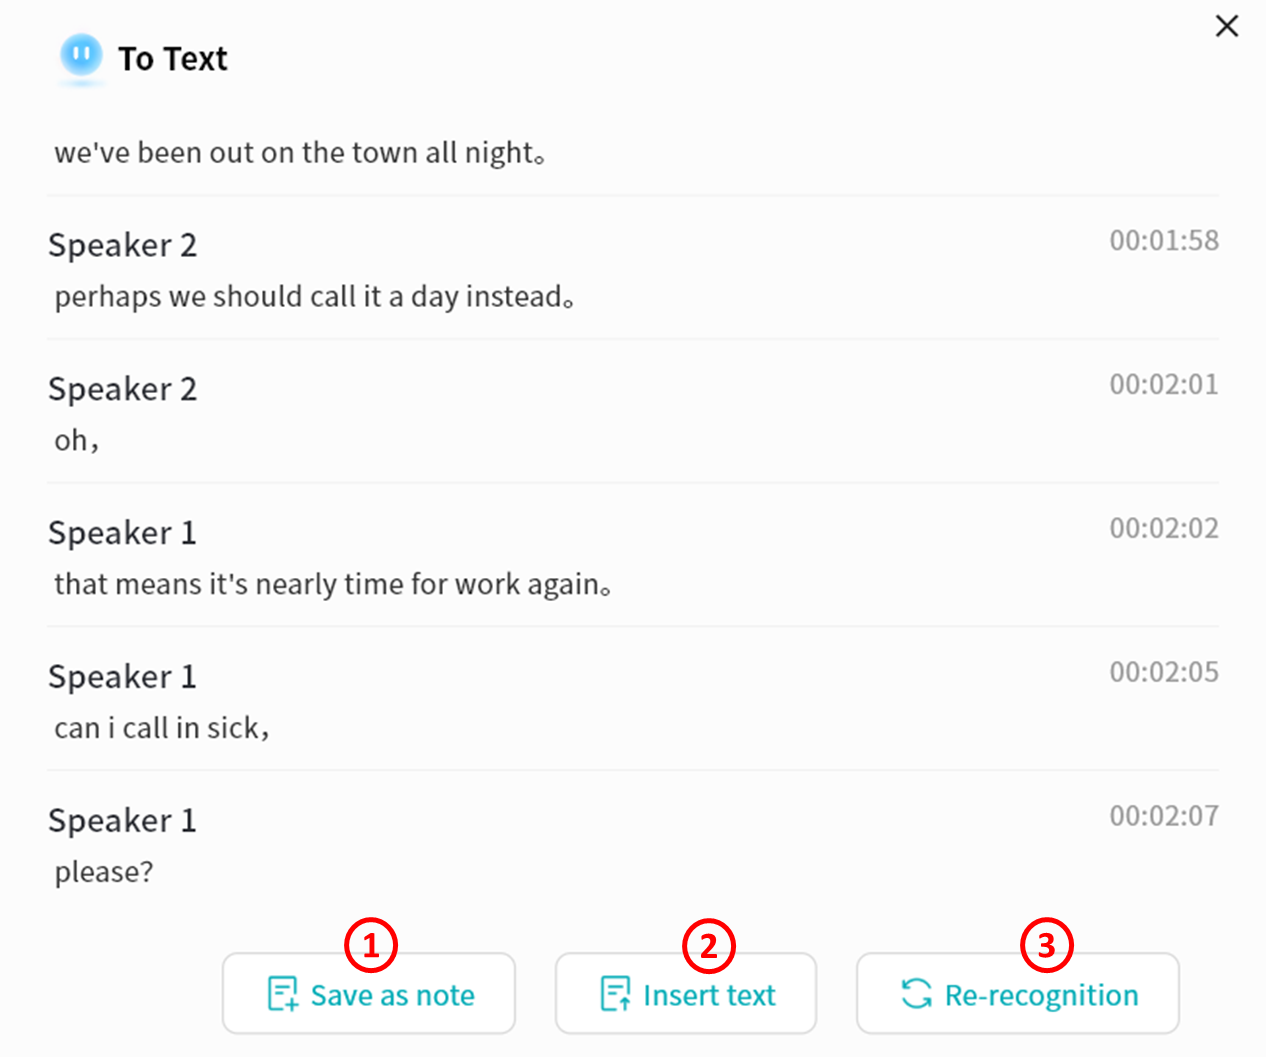
Example Use Case: Meeting Minutes
By combining multiple AI Agent functions, you can create structured meeting summaries. Example workflow:
-
Insert the meeting recording file into a note.
-
Select Speech Recognition to transcribe the audio.
- Insert the transcription into the note.
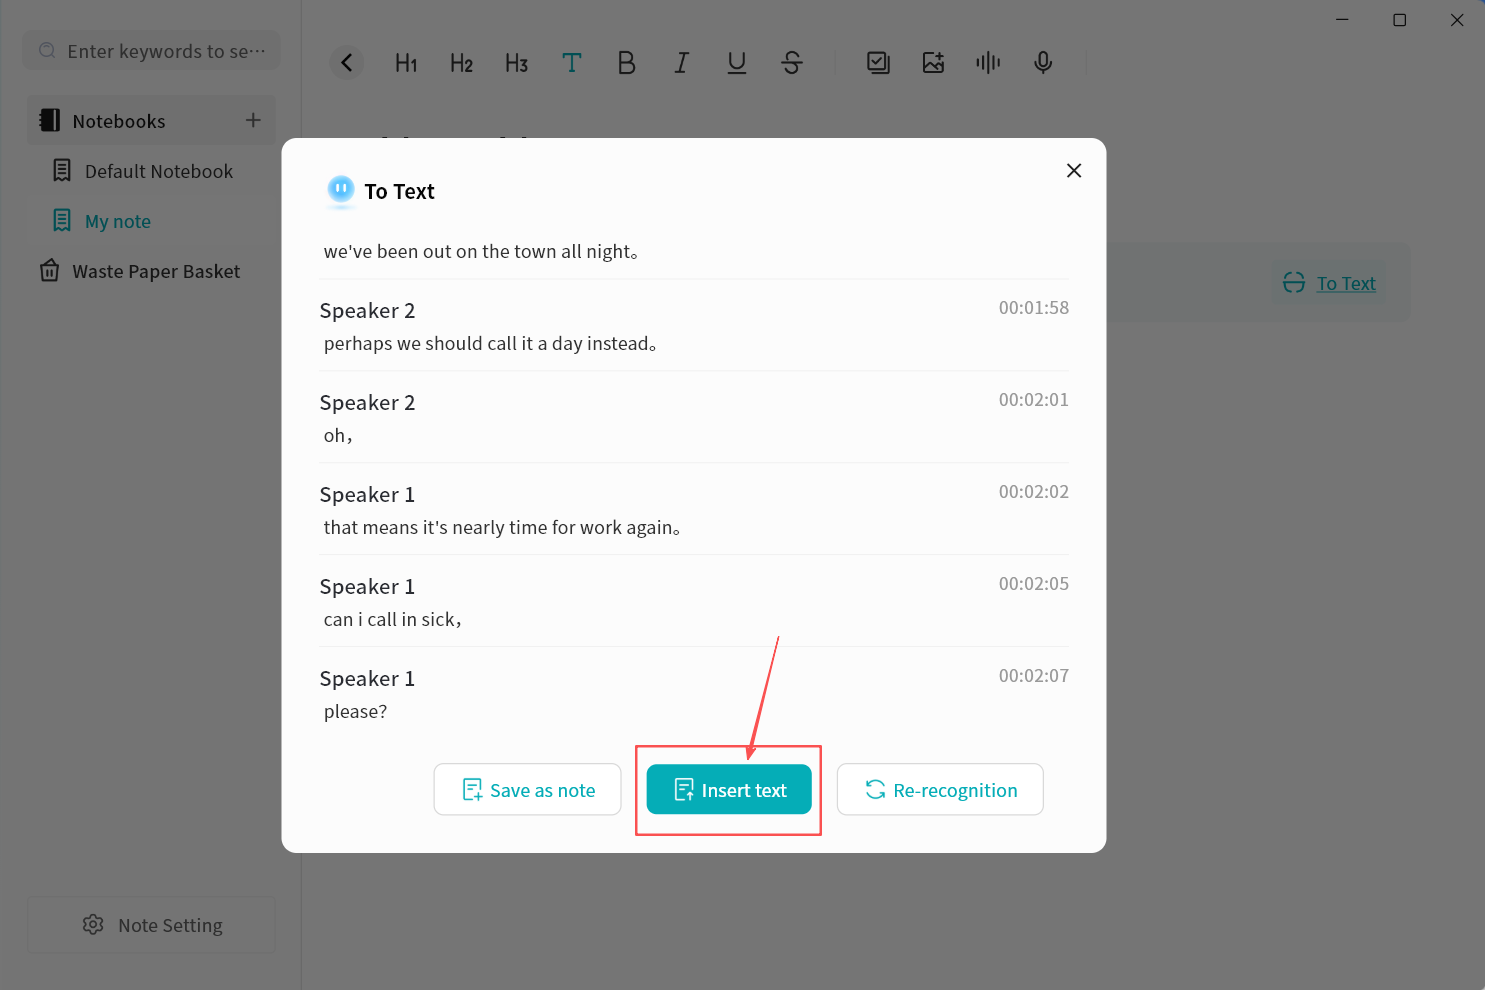
- Highlight the transcription text, then select Summarize.
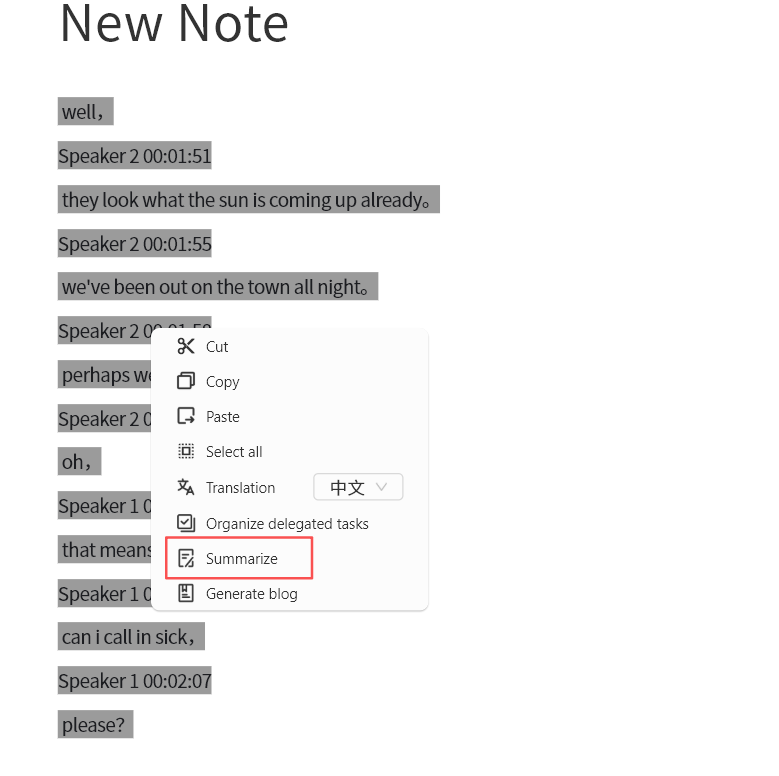
- Save or re-run the AI Agent to produce the final meeting summary.
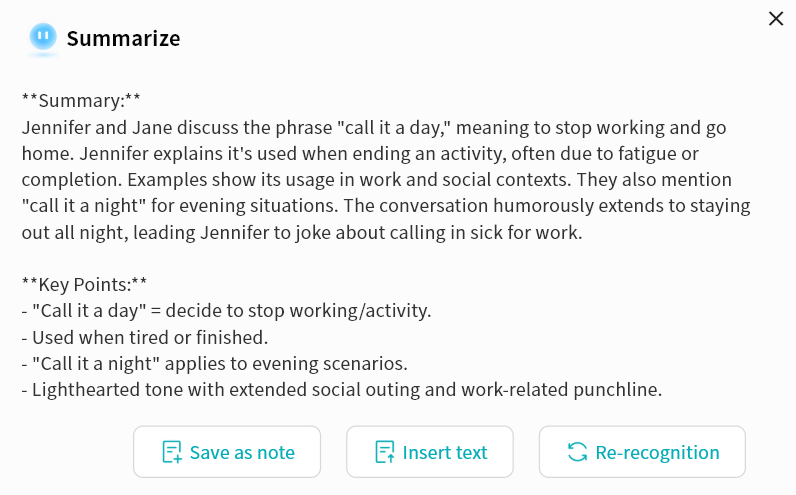
Waste Paper Basket
All deleted notes are stored in the Waste Paper Basket:
-
Restore: Recover notes back to their original notebook.
-
Delete: Permanently remove notes.
Multiple notes can be selected for batch restore or batch deletion.
Notes Settings (Configure Synchronization)
When synchronization is enabled, all your notes will remain consistent across your computer and the DASSET device.
-
Sync Target: Select the DASSET device where you want to synchronize your notes.
-
Conflict Handling Policy: Define how to handle conflicts when note data differs between your computer and the DASSET device.
-
Local overrides NAS: Notes on the computer will be uploaded and overwrite notes on the DASSET device. The local notes are treated as the only reliable source of data.
-
NAS device overrides Local: Notes on the DASSET device will be downloaded and overwrite notes on the computer. The NAS-stored notes are treated as the only reliable source of data.
-
If you are the sole user of your DASSET account and you do not edit the same notes on multiple devices simultaneously, it is suggested to select Local Overwrites NAS.
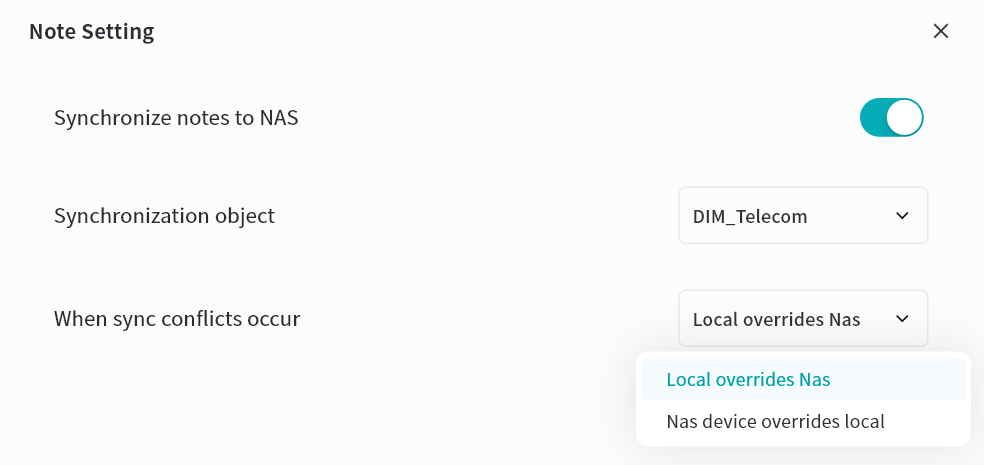
Instant Messaging (IM)
DASSET IM is a private chat tool running directly on the DASSET device. It provides fully private instant messaging, with all chat data stored on the DASSET device. Communications are transmitted using encryption to ensure privacy and security.
The DASSET IM feature supports the following operations:
-
Quote: Reply to a specific message by quoting it.
-
Copy: Copy the content of a message.
-
Delete: The sender can delete a message. Once deleted, it is also removed from the recipient's chat history.
-
Preview media: View pc-images, play videos, and listen to audio files shared in the chat.
-
Document preview and editing: Open and edit documents directly from the chat.
-
Save files: Save received chat files to your local device.
-
Send files: Share files stored on the DASSET device into the chat.
-
Message status: Check whether a sent message is marked as Read or Delivered.
-
AI Agent support: Use AI-powered features such as translation, summarization, reply suggestions, and speech-to-text recognition.
Selecting a Chat Server
When using DASSET IM for the first time, you must select a DASSET device to act as your chat server. Once selected, you can freely chat with all users connected to that device, and all chat history will be stored on the same server.
Each chat server runs on a single DASSET device. All users bound to that device can communicate with each other through the server.
-
Note 1: To protect user privacy, DASSET does not automatically create chat server accounts for all users bound to a device. If users on the same device want to chat with each other, they must first select the same chat server.
-
Note 2: Each chat server is independent. Think of it as having a WeChat server hosted in your home or office. Only users connected to the same server can communicate. DASSET users on different servers cannot chat with each other.
-
Note 3: Cross-server instant messaging is not supported. Accounts connected to different chat servers cannot communicate across devices.
When you first enter the chat interface, DASSET displays all the DASSET devices bound to your account and prompts you to select one as your chat server.
If a device does not support the chat application, you will see a red message stating This device does not support chat services. This usually occurs because the device firmware has not been updated to the latest version or the hardware is not capable of running chat services.
A single account can bind to multiple chat servers, but you can only be connected to one chat server at a time. Chatting is limited to users on that active server.
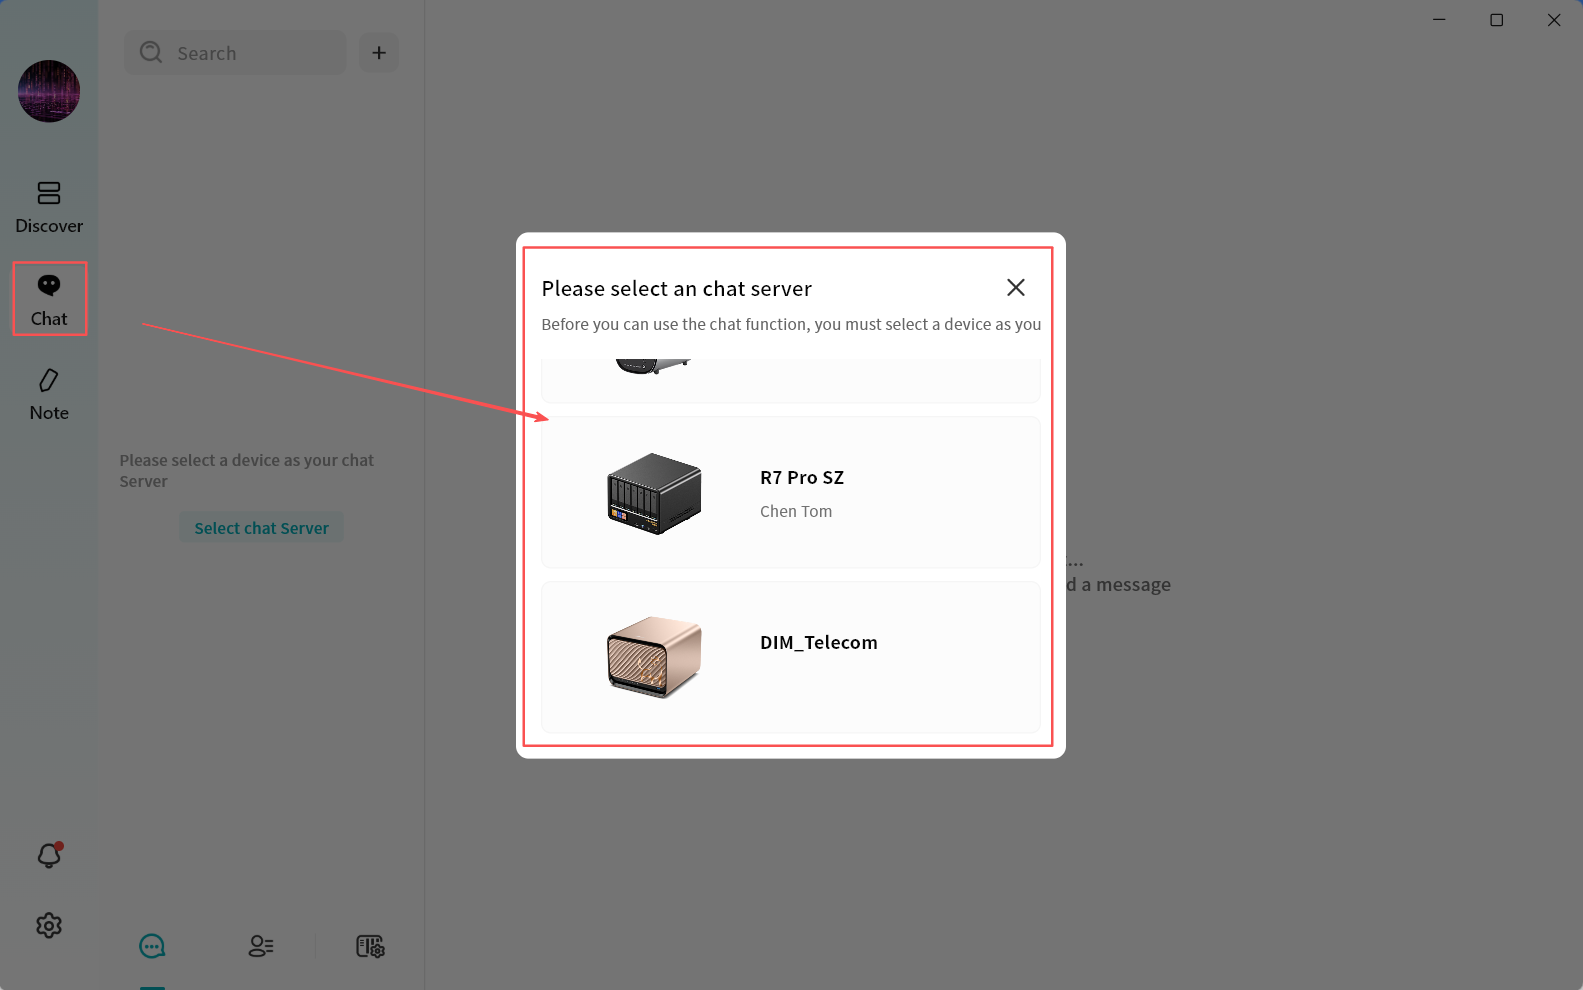
You may switch servers at any time to view messages from users on other chat servers.
Chat Interface Overview
After selecting a chat server, you will enter the DASSET chat interface:
-
Search: Search for contacts with whom you already have active conversations.
-
Add (+): Select users connected to the current chat server to start a first-time conversation, or invite new users to join the server (available only to the device Owner).
-
New Conversation: Start a first-time chat with users connected to the current chat server.
-
Conversation List: Switch to view the list of chat conversations.
-
Contacts: View all users currently on the selected chat server.
-
Switch Chat Server: Switch between multiple chat servers at any time to communicate with users on different servers.
-
Chat Window: Displays chat messages and conversation history.
Viewing the Contact List
When you open the contact list, you can see all user accounts currently connected to the selected chat server:
-
Contact List: Displays the names of all contacts.
-
Remarks: Add or edit notes for contacts to make them easier to remember.
-
Phone Number: View the contact's registered phone number.
-
Email Address: View the contact's registered email address.
-
Send Message: Start a conversation with the selected contact.
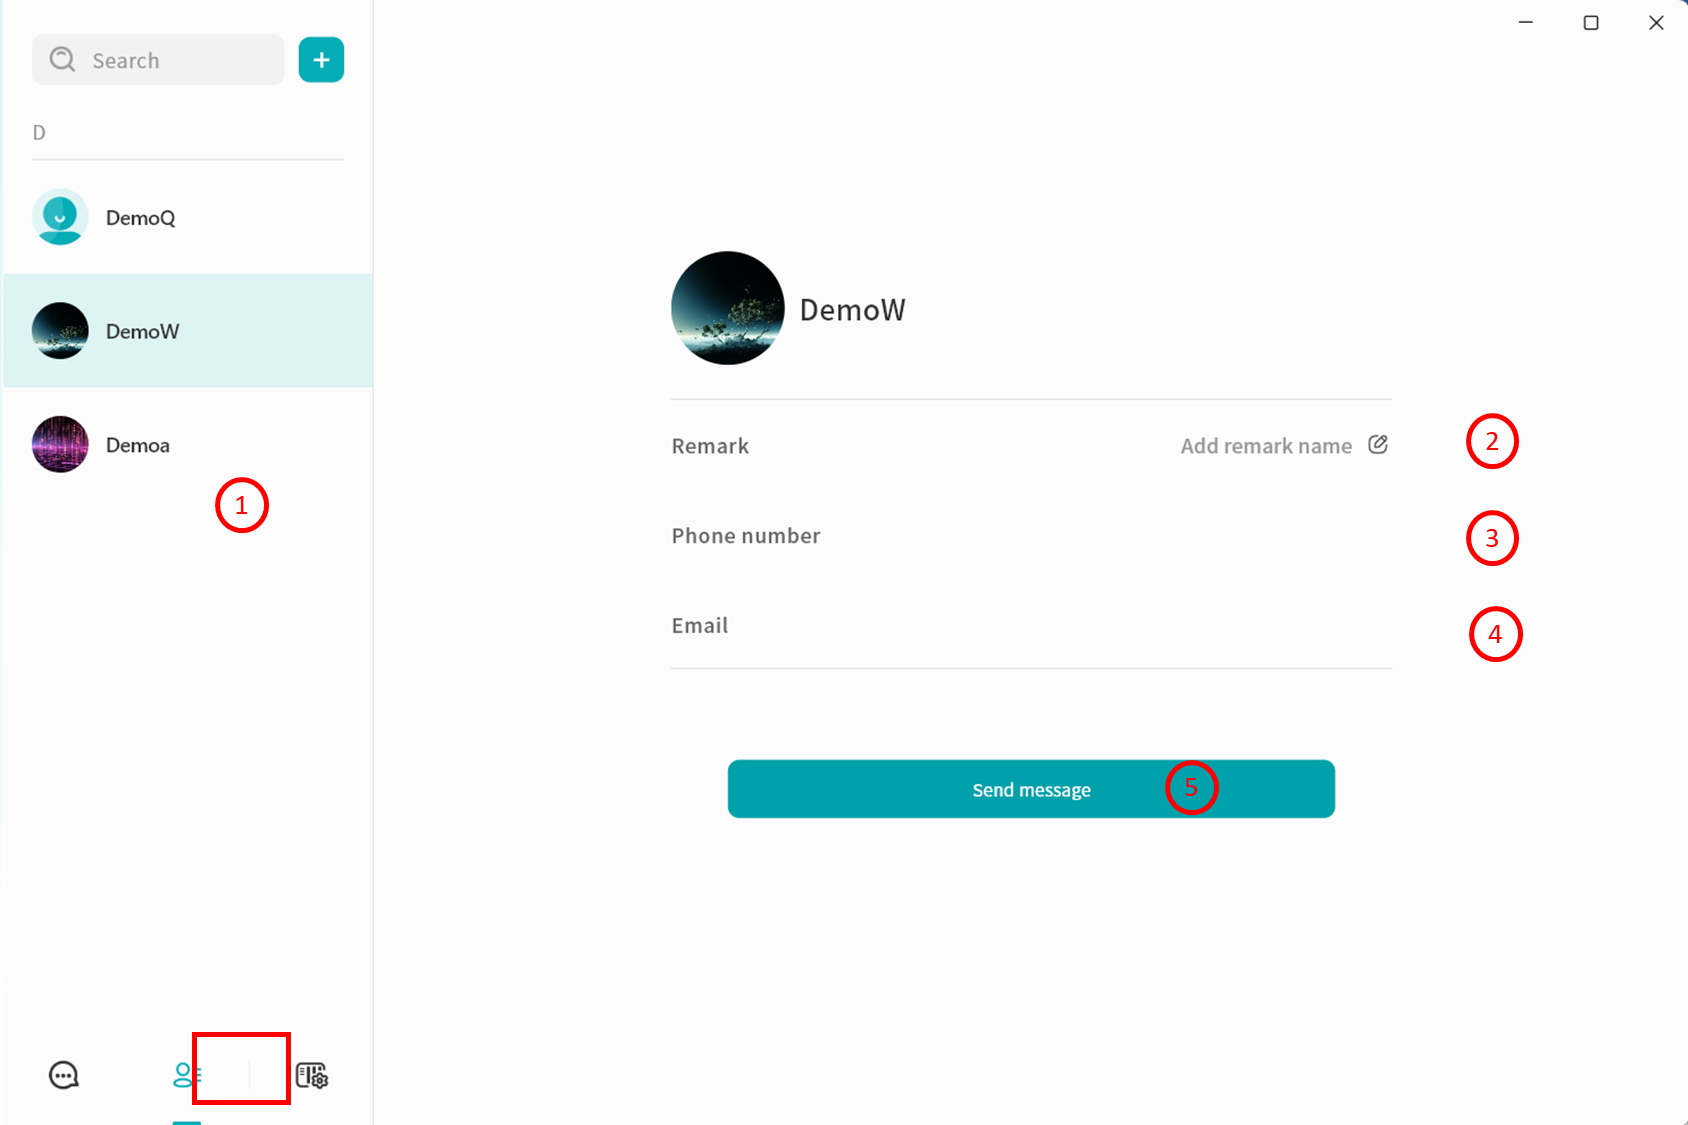
Switching Chat Servers
Click Switch Server to log in to another chat server and communicate with contacts connected to it.
-
At any given time, you can only be connected to one chat server, and you may chat only with users on that server.
-
The server list will only display your bound DASSET devices that support chat services.
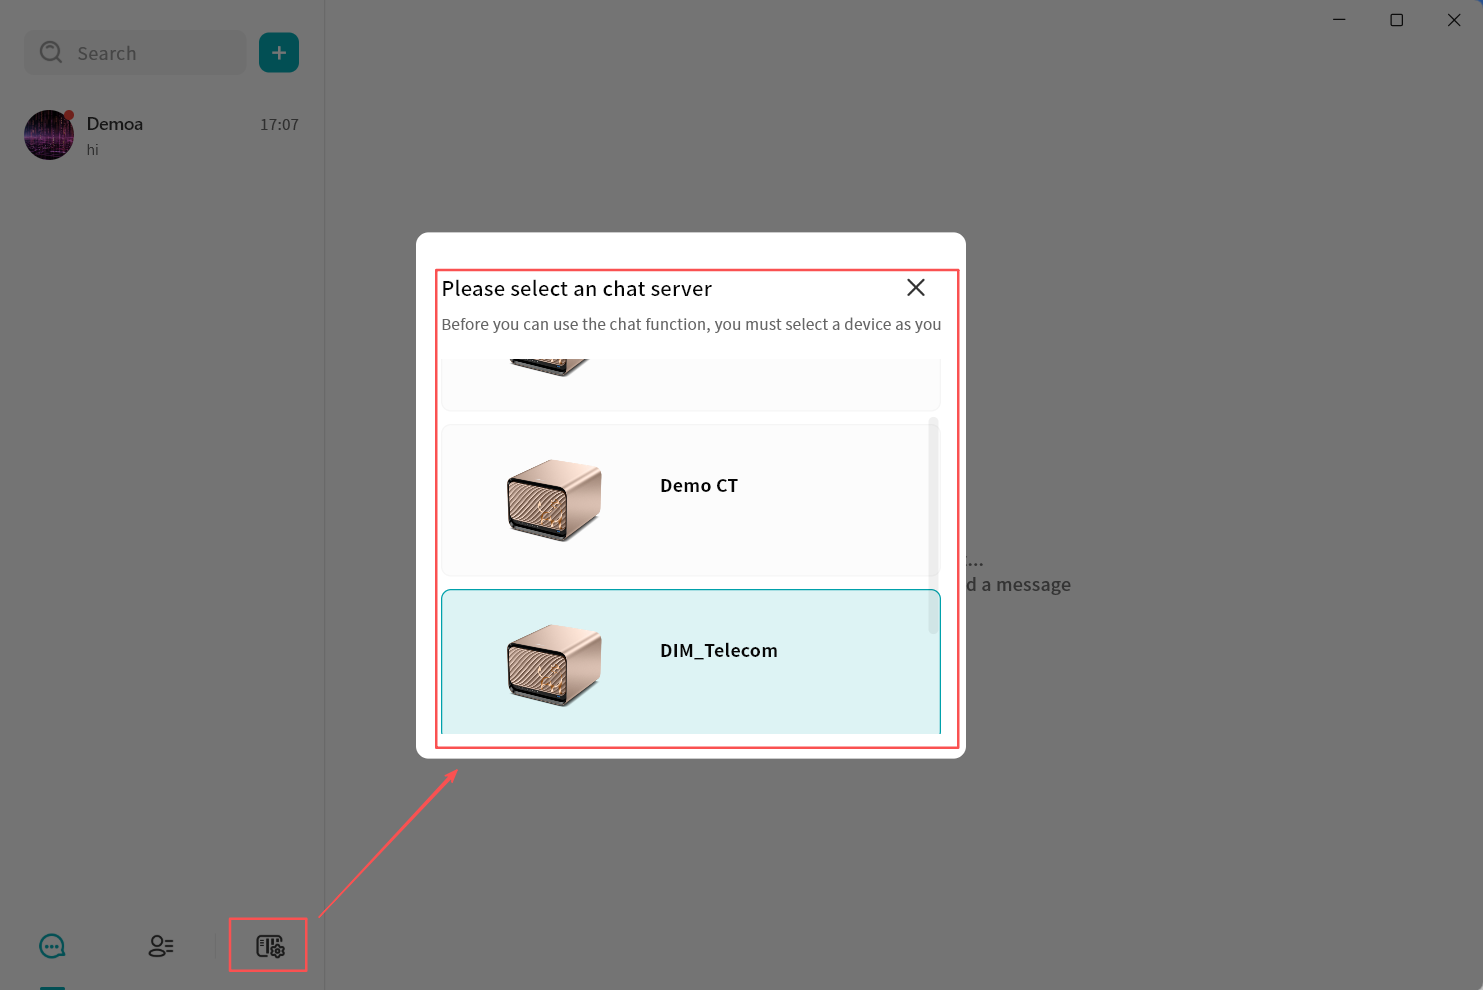
New Message Notifications
When a new message arrives, the DASSET client notifies you in two ways:
-
A red dot appears on the chat icon in the client.
-
A red dot appears on the contact's avatar in the chat interface.
Instant Chat Window
In DASSET IM, you can chat one-on-one or create group chats with users connected to the same chat server. The chat interface is designed to be familiar and intuitive, similar to other mainstream IM tools.
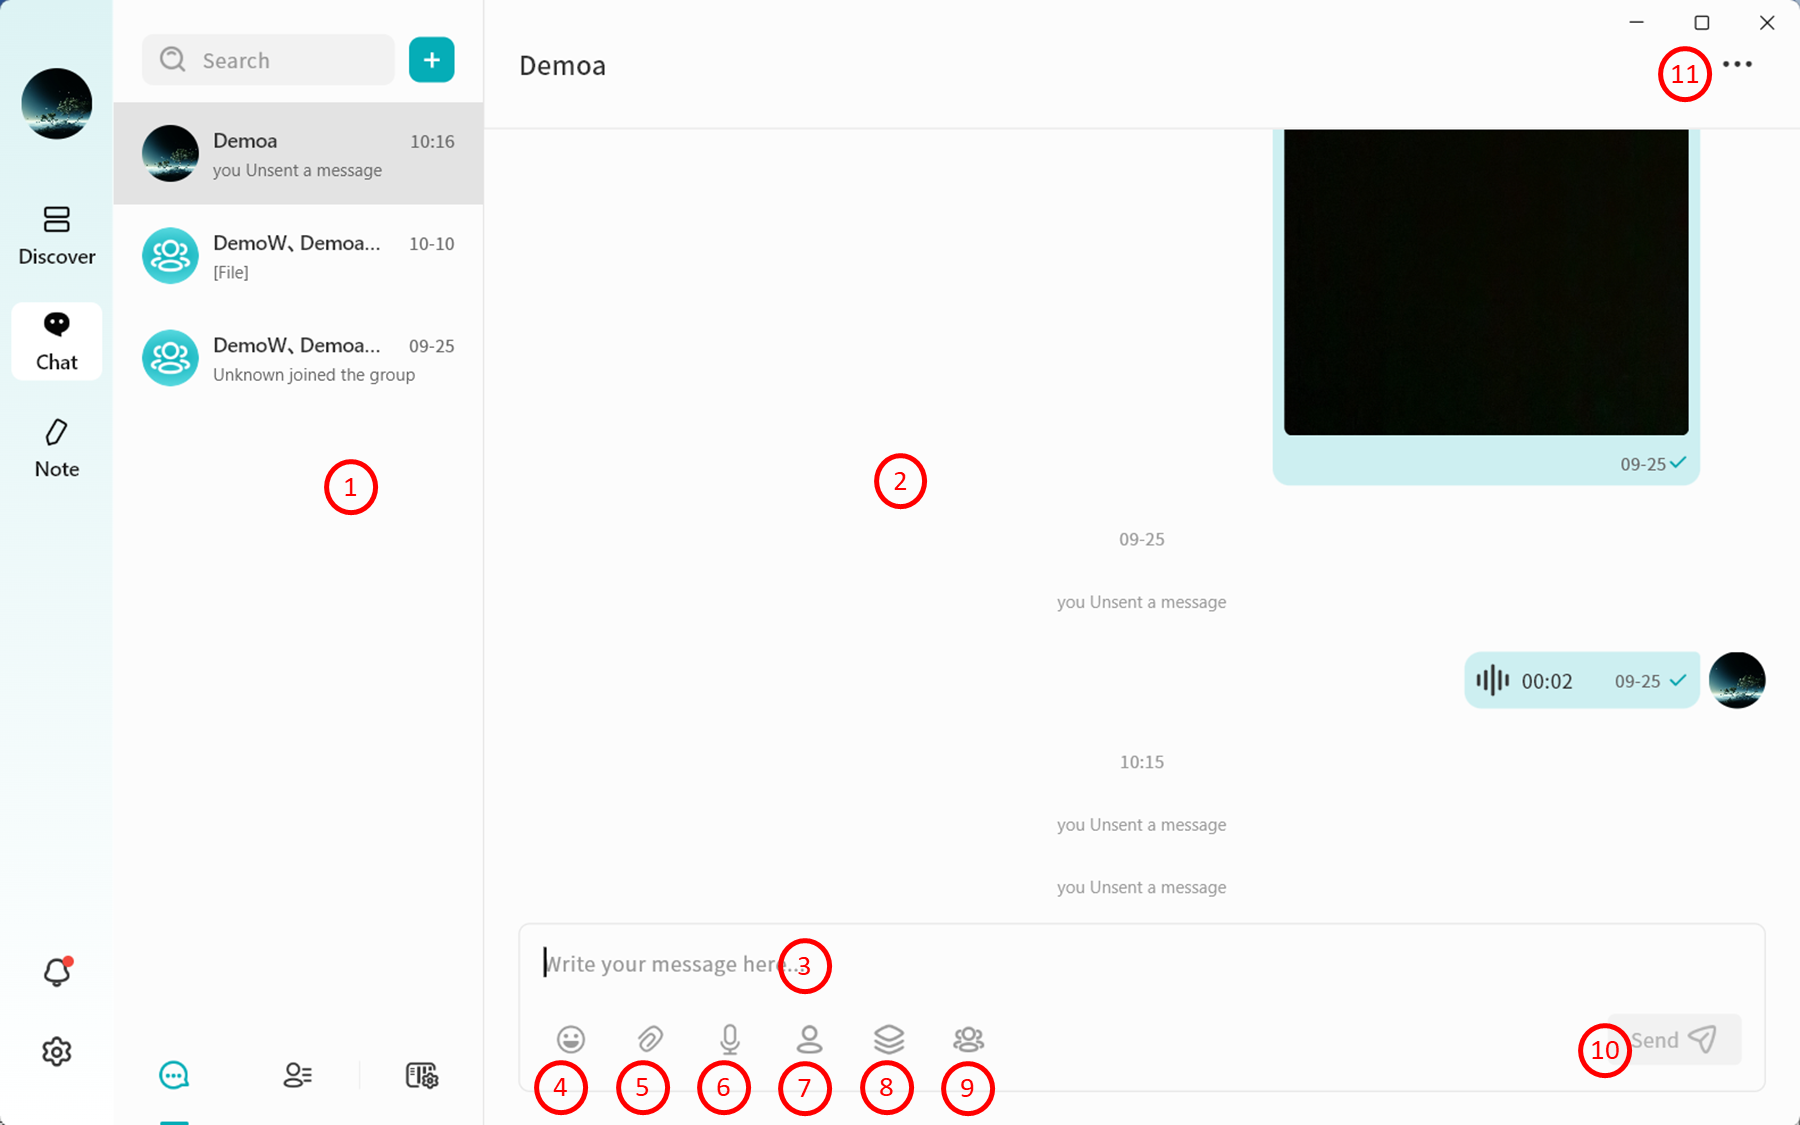
-
Conversation Tabs: Switch between different chat conversations. Right-click on any chat record to:
-
Pin the conversation
-
Mute Notifications
-
Delete the conversation
-
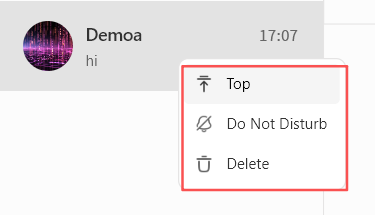
-
Chat Window: Displays the conversation history.
-
Input Box: Supports text input and pasting pc-images. Also supports sending long text and Markdown-formatted content. Messages exceeding 5000 characters will be automatically converted into a file for sending.
-
Emojis: Insert emojis into your messages.
-
Local Attachments: Send files stored on your computer.
-
Voice Messages: Record and send voice messages.
-
Send files from the "My Space" on the DASSET device that hosts the current IM chat server.
-
Send files from the "Public Space" on the DASSET device that hosts the current IM chat server.
-
Send files from the "Group Space" on the DASSET device that hosts the current IM chat server.
-
Send Message: Deliver the composed chat message.
-
Chat Information Panel: View and manage details of the chat partner or group:
-
View avatar
-
View nickname
-
Edit remarks
-
Pin the conversation
-
Mute the conversation
-
Delete Conversation: Permanently remove the chat from your view. Deleting a conversation removes all records from your side. Even if you start a new chat, previous messages will not be visible. However, the recipient's chat history will still remain intact.
-
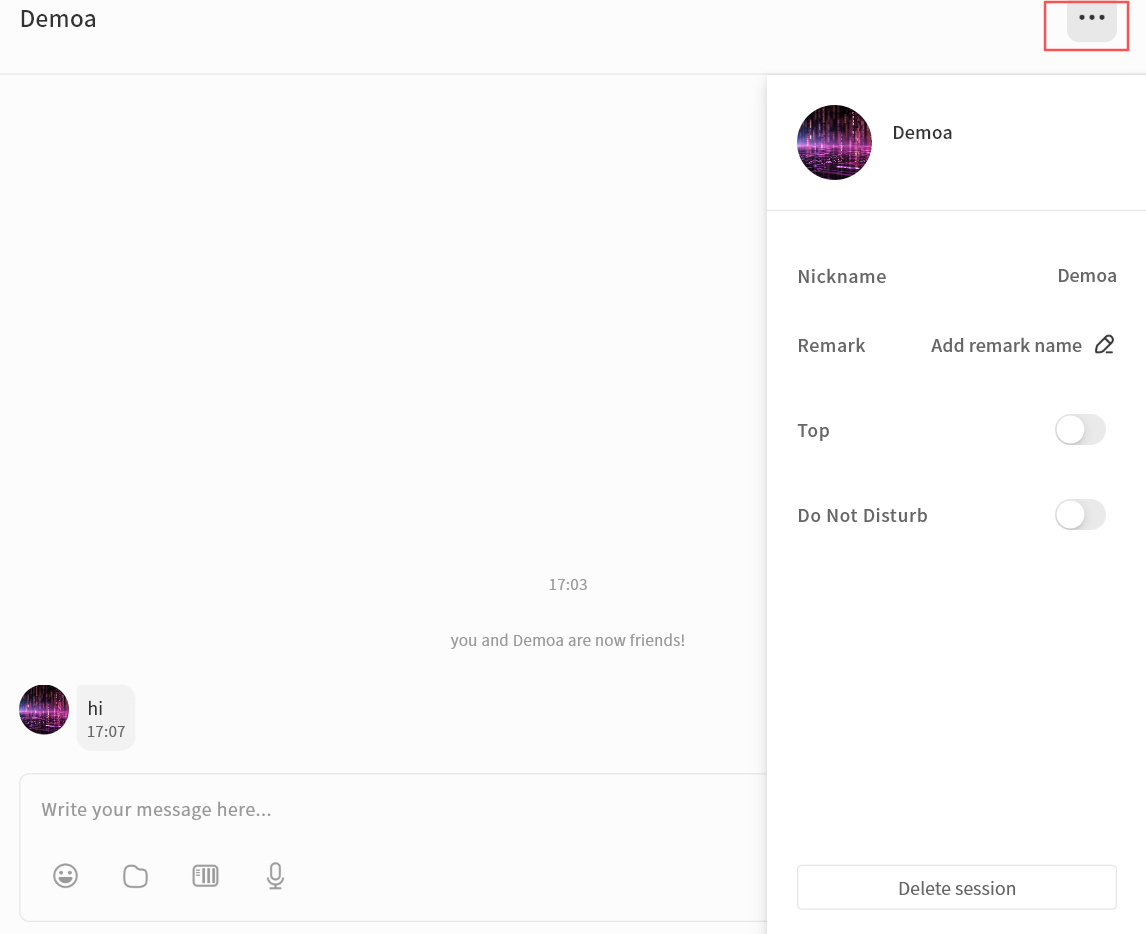
Chat Message Interactions
In the chat window, you can right-click on historical chat records to perform the following actions:
-
Quote: Reply to a specific message by quoting it.
-
Copy: Copy the content of the selected message.
-
Forward: Forward the message to another user.
-
Multi-Select: Select multiple messages for combined forwarding or deletion.
-
Save to NAS: Save attachments from the chat directly to your DASSET device.
-
Download: Download attachments to your local computer.
-
Emoji: Respond to a message with an emoji.
-
Recall: Withdraw a message you sent.
-
Delete: Delete selected messages.
warningDeletion only removes the message from the current terminal. If you log in from another terminal, the deleted message will still be visible. To ensure the message is removed from all terminals and the recipient, use Recall instead.
-
Open: Preview attachments directly if supported.
-
URL Links: If a chat message contains a URL, clicking it will open the link in your browser.
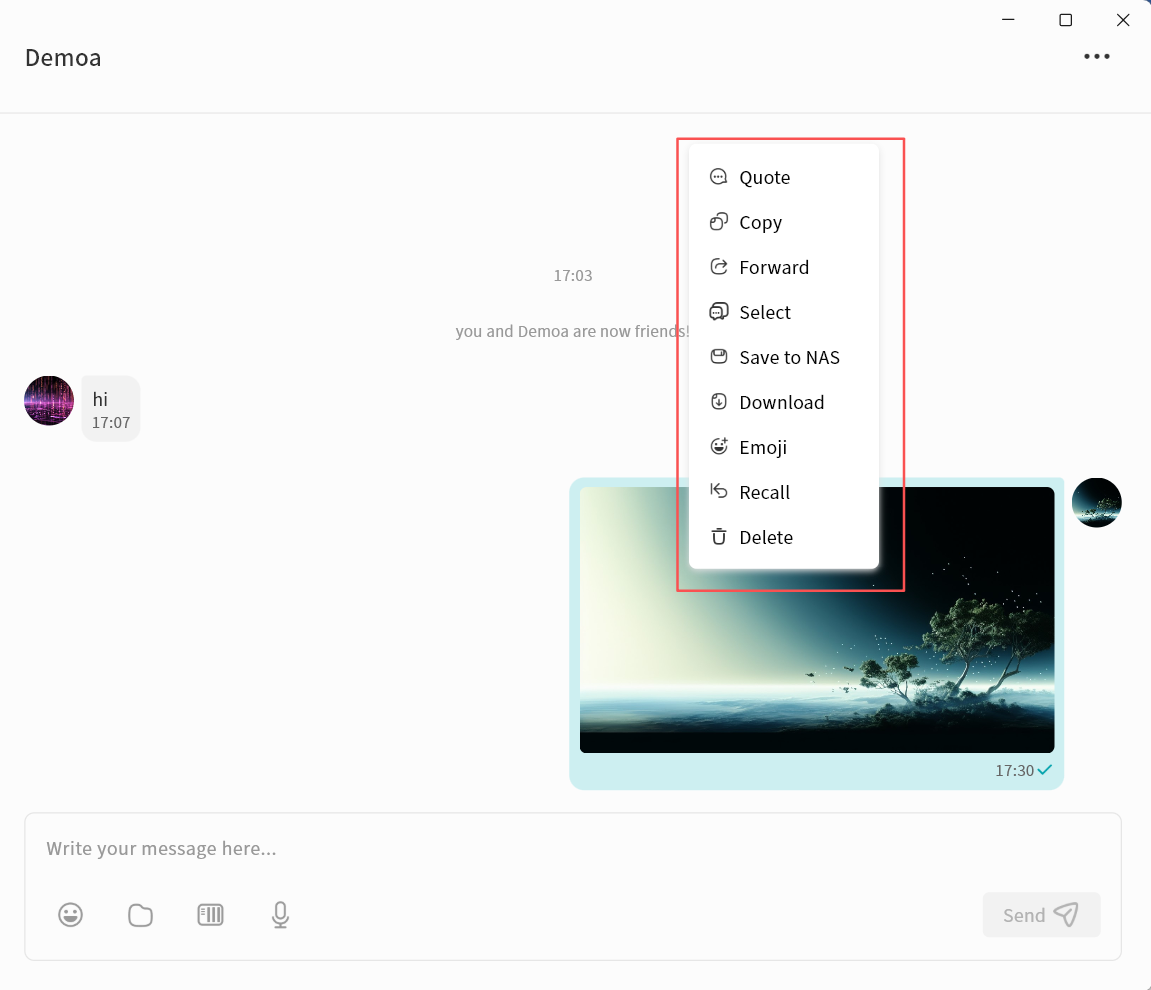
One-on-One Chat
Creating a Chat
- Click + New Conversation, or use the New Conversation button.
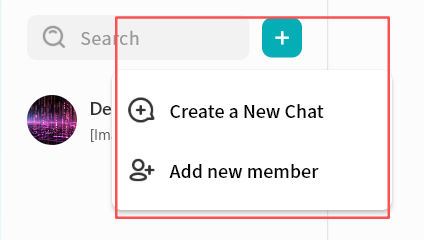
-
In the contact selection window, choose one or more users to start the conversation.
- If you select multiple contacts, the conversation will automatically switch to group chat mode.
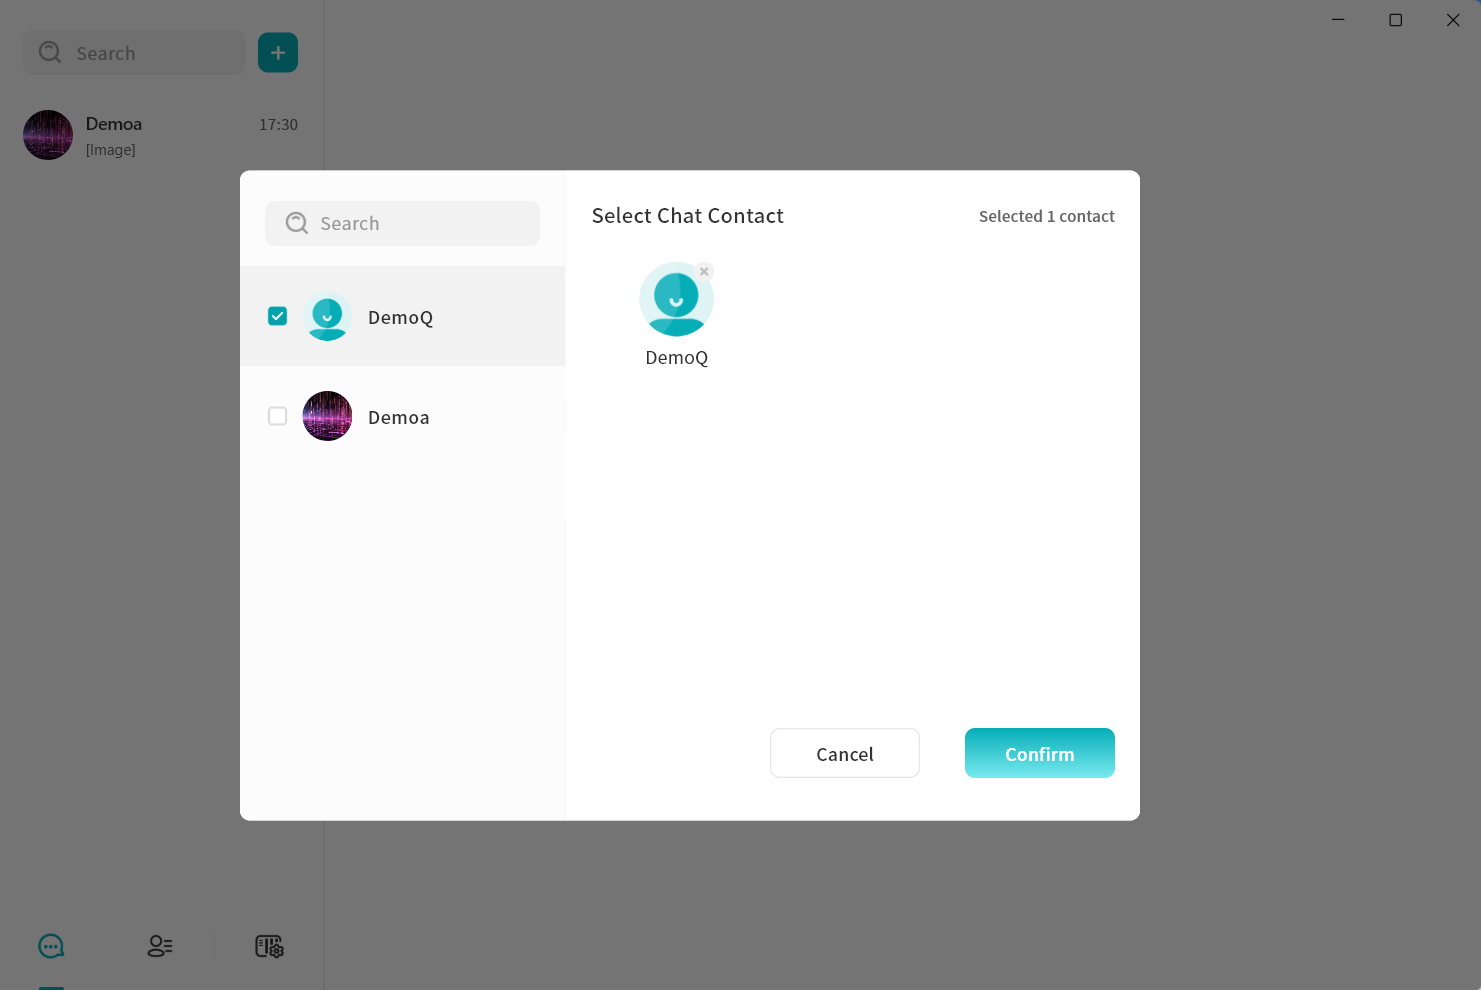
- Click Confirm to create the conversation.
Deleting a Conversation
You can delete an existing conversation with a contact as follows:
- In the chat window, click the ... menu in the top-right corner and select Delete Conversation.
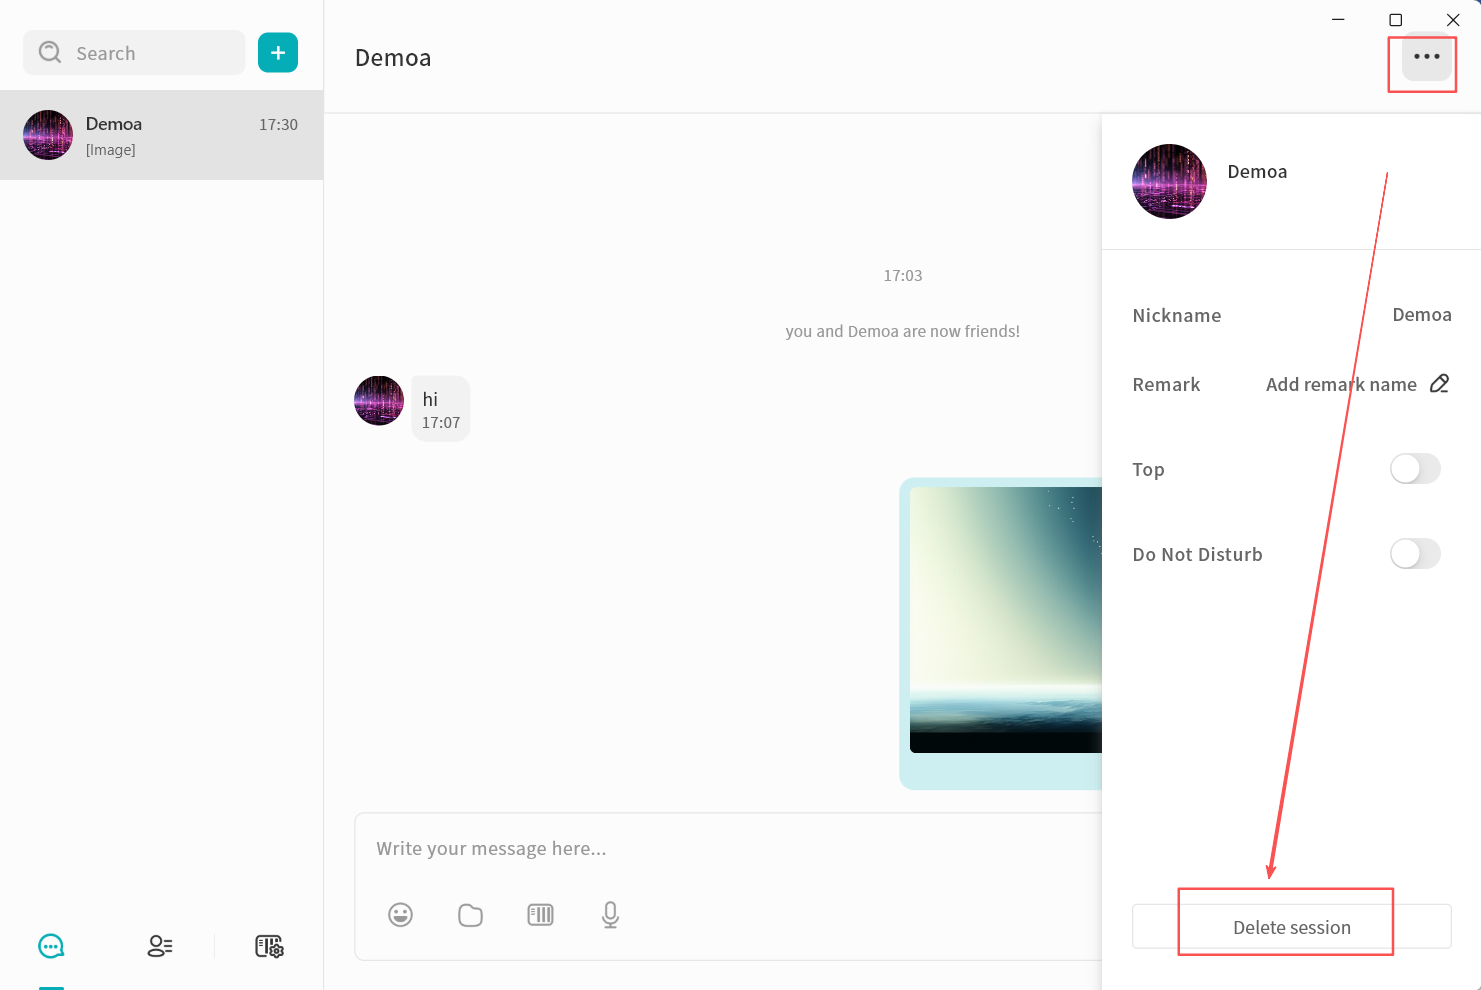
- In the confirmation window, click Confirm to delete the conversation.
Deleting a conversation will remove all chat records with that user from your view. Even if you start a new conversation later, previous messages will not reappear. However, the recipient will still retain the full chat history.
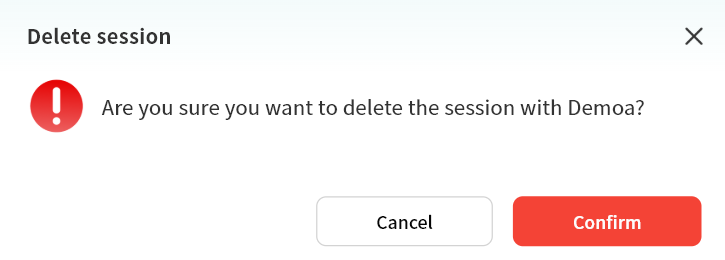
Pinning Chats and Muting Notifications
In the chat settings window, you can:
-
Top: Keep the conversation at the top of the chat list.
-
Do Not Disturb: Disable new message alerts for the conversation.
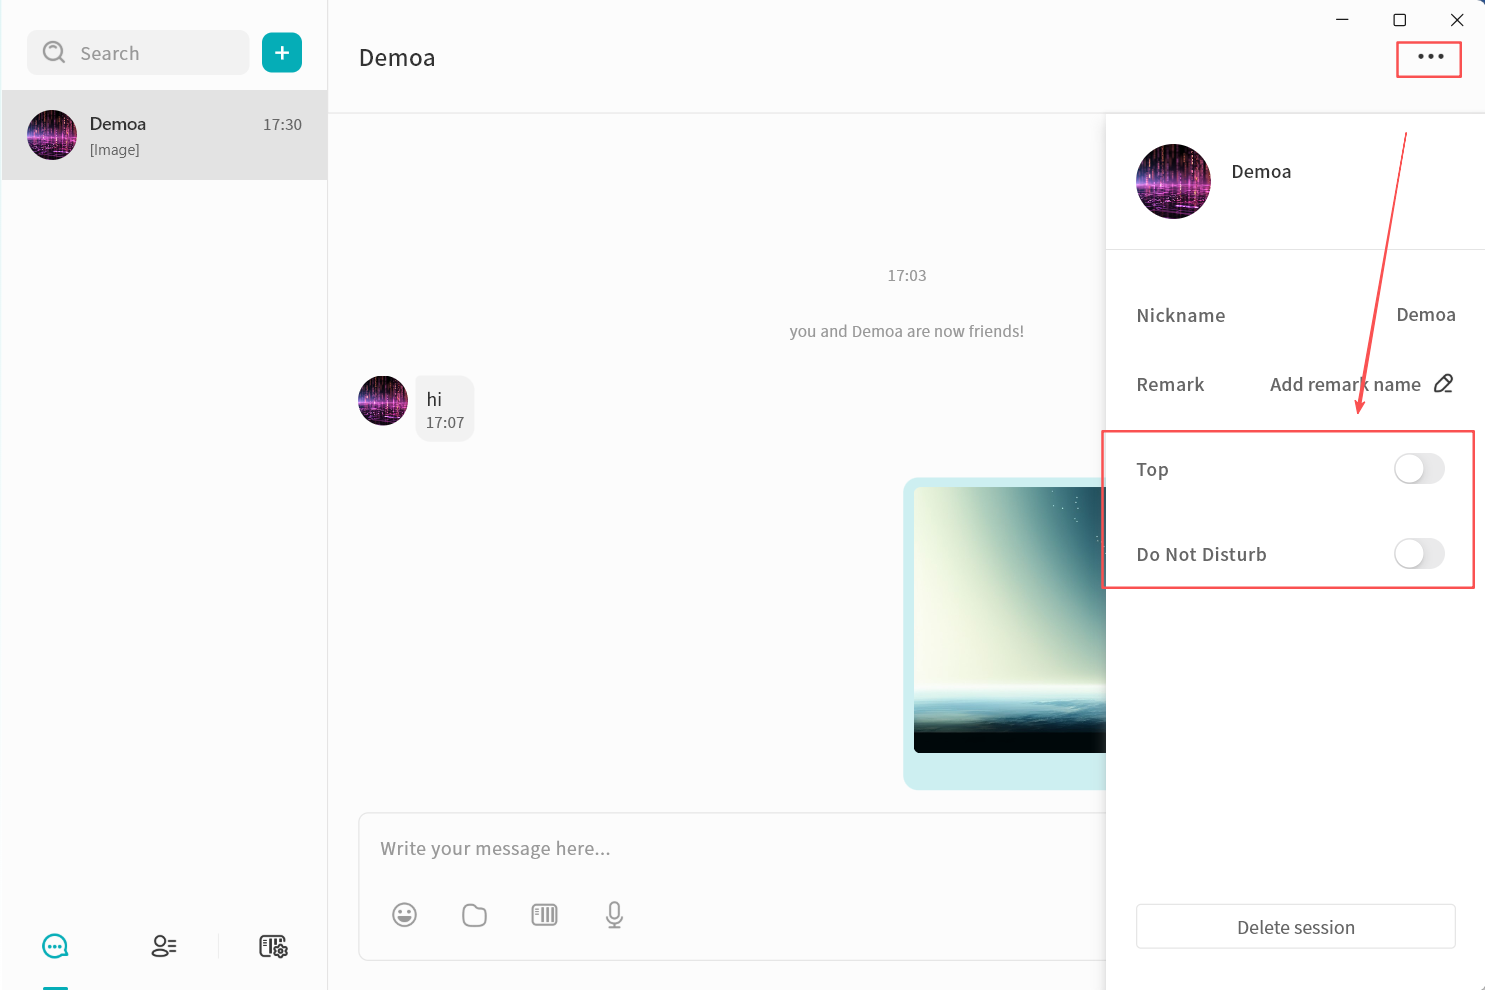
Group Chat
DASSET IM supports creating group chats with multiple contacts, making it convenient for small teams to communicate and share information.
Create a Group Chat
- Click + New Conversation, or use the New Conversation button.
- In the contact selection window, select multiple contacts.
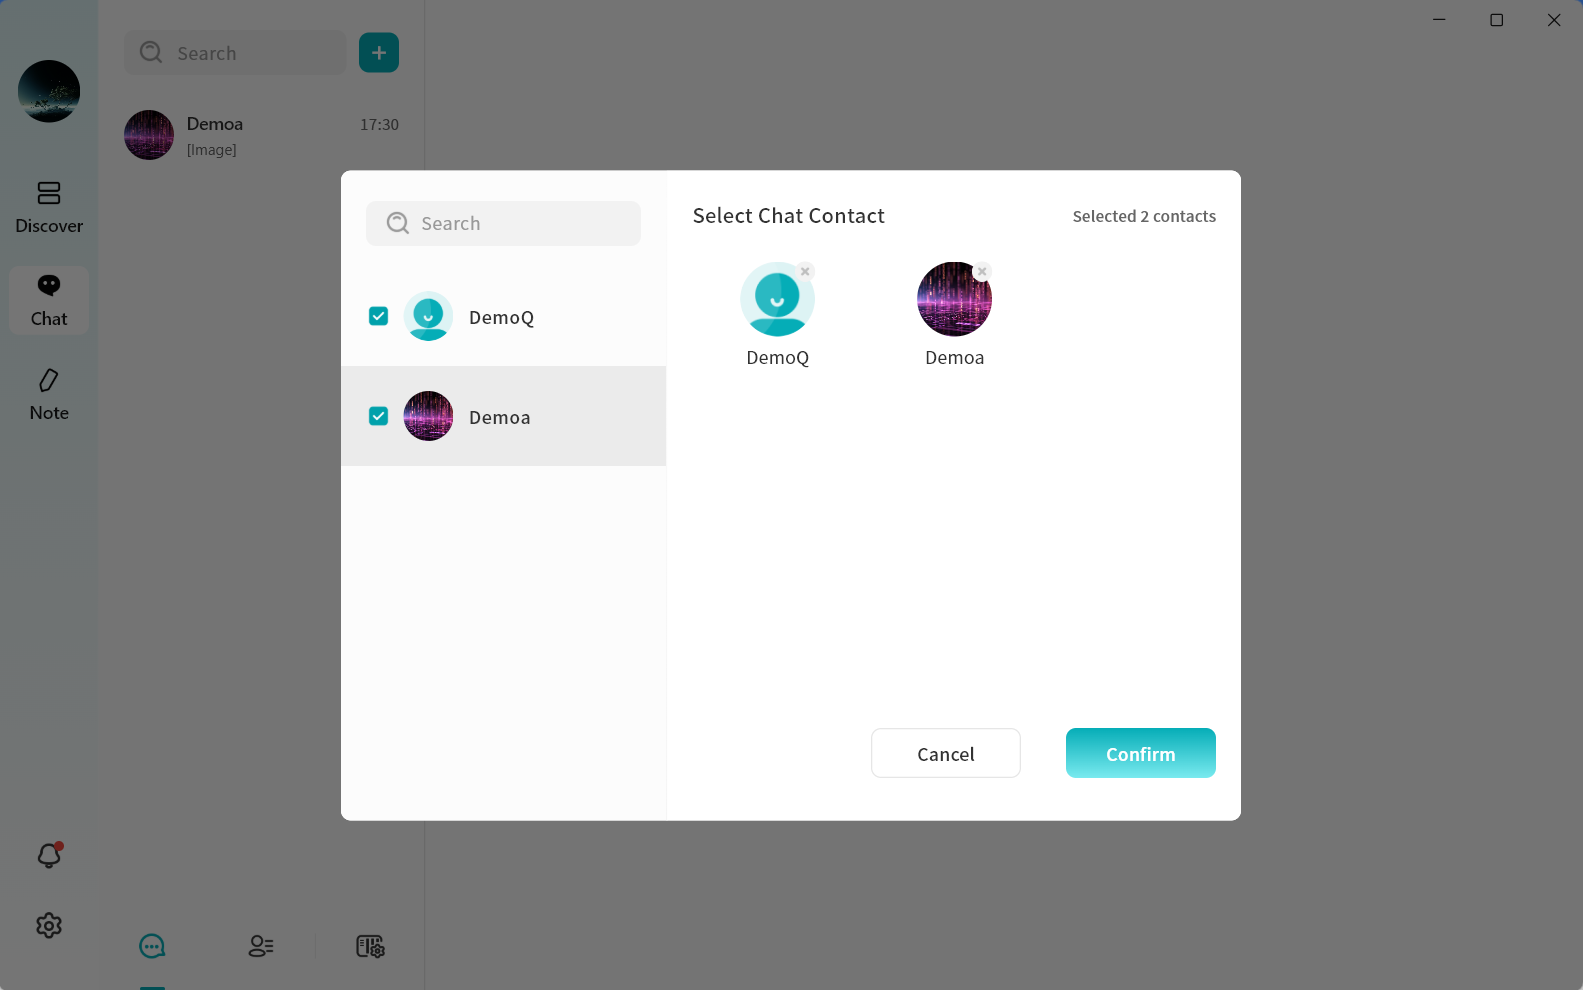
- Click Confirm to create the group chat.
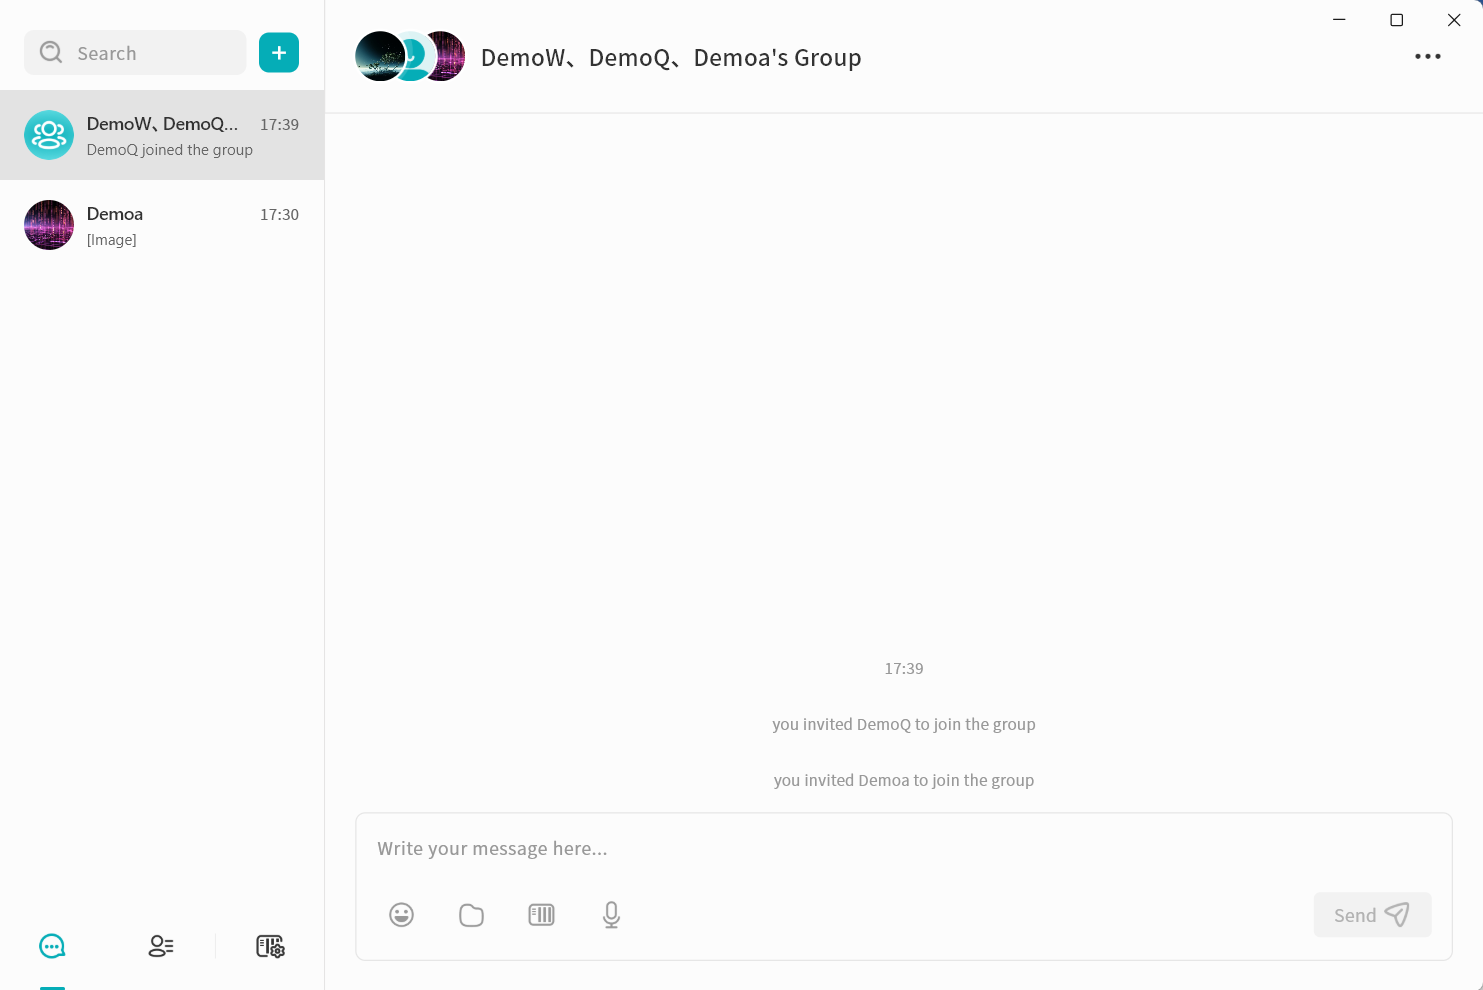
Manage Group Members
You can manage group members at any time, including viewing, adding, or removing participants.
- In the group chat window, click the ... menu in the top-right corner.
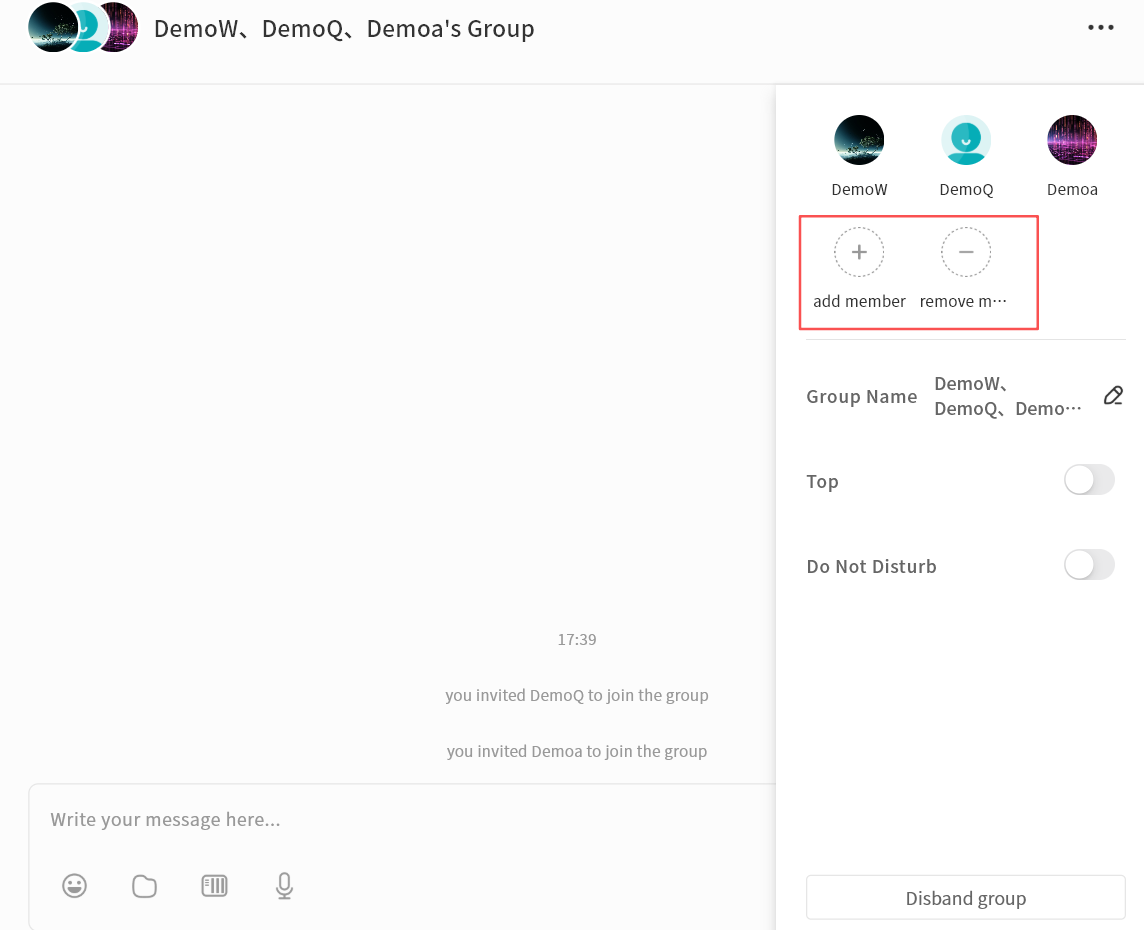
- Select Add Member to invite additional contacts connected to the same chat server.
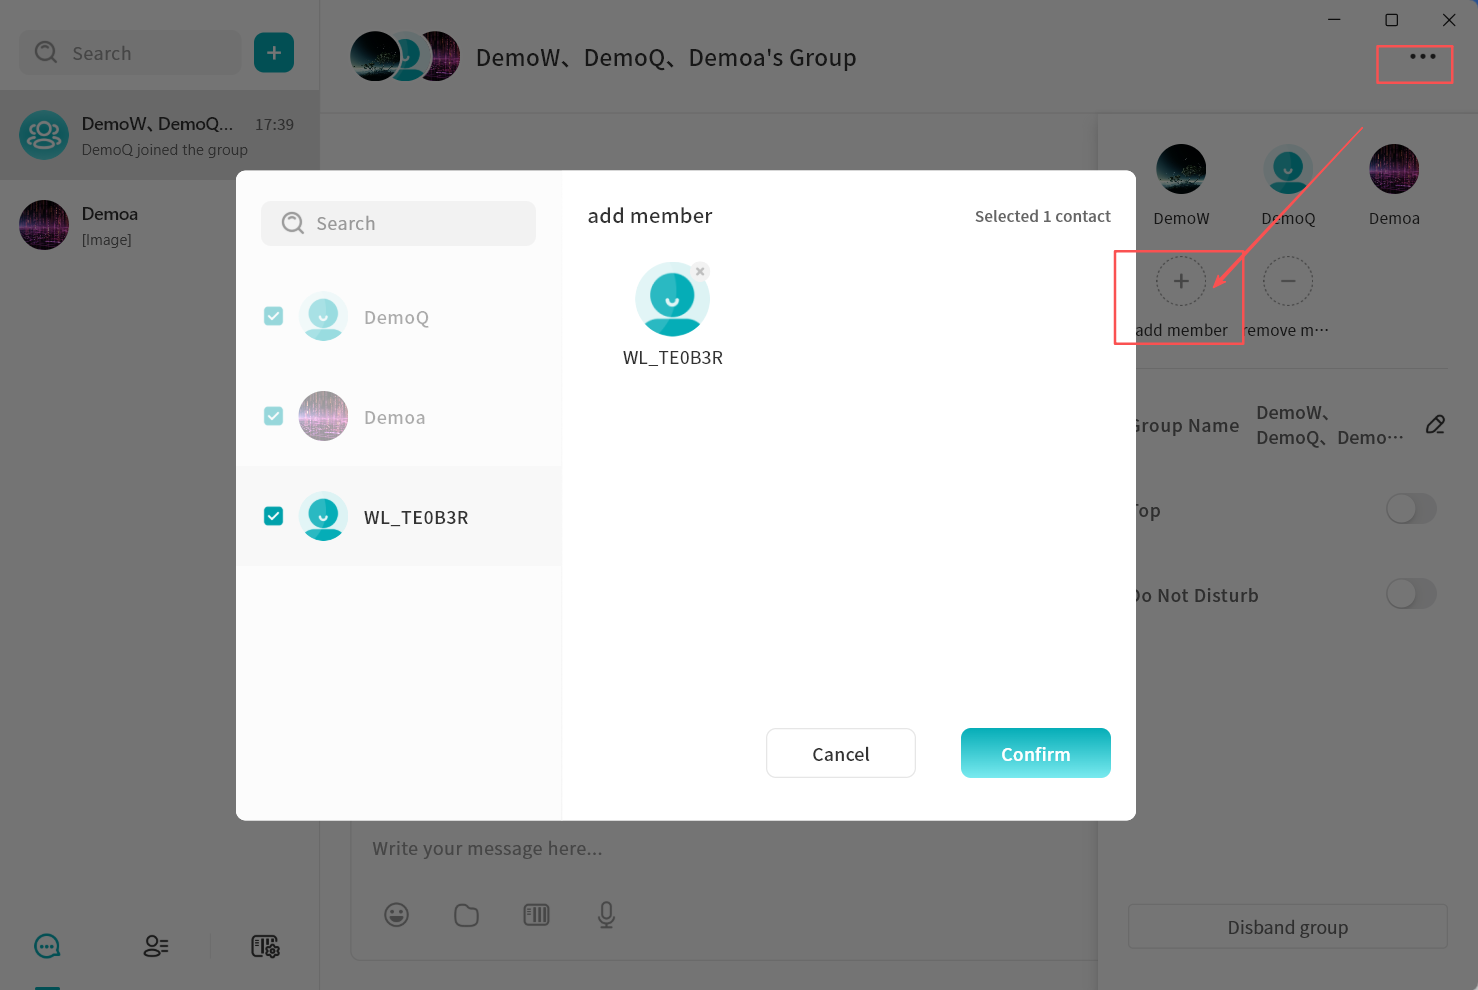
-
Select Remove Member to remove a participant from the group.
Only the group creator can remove members.
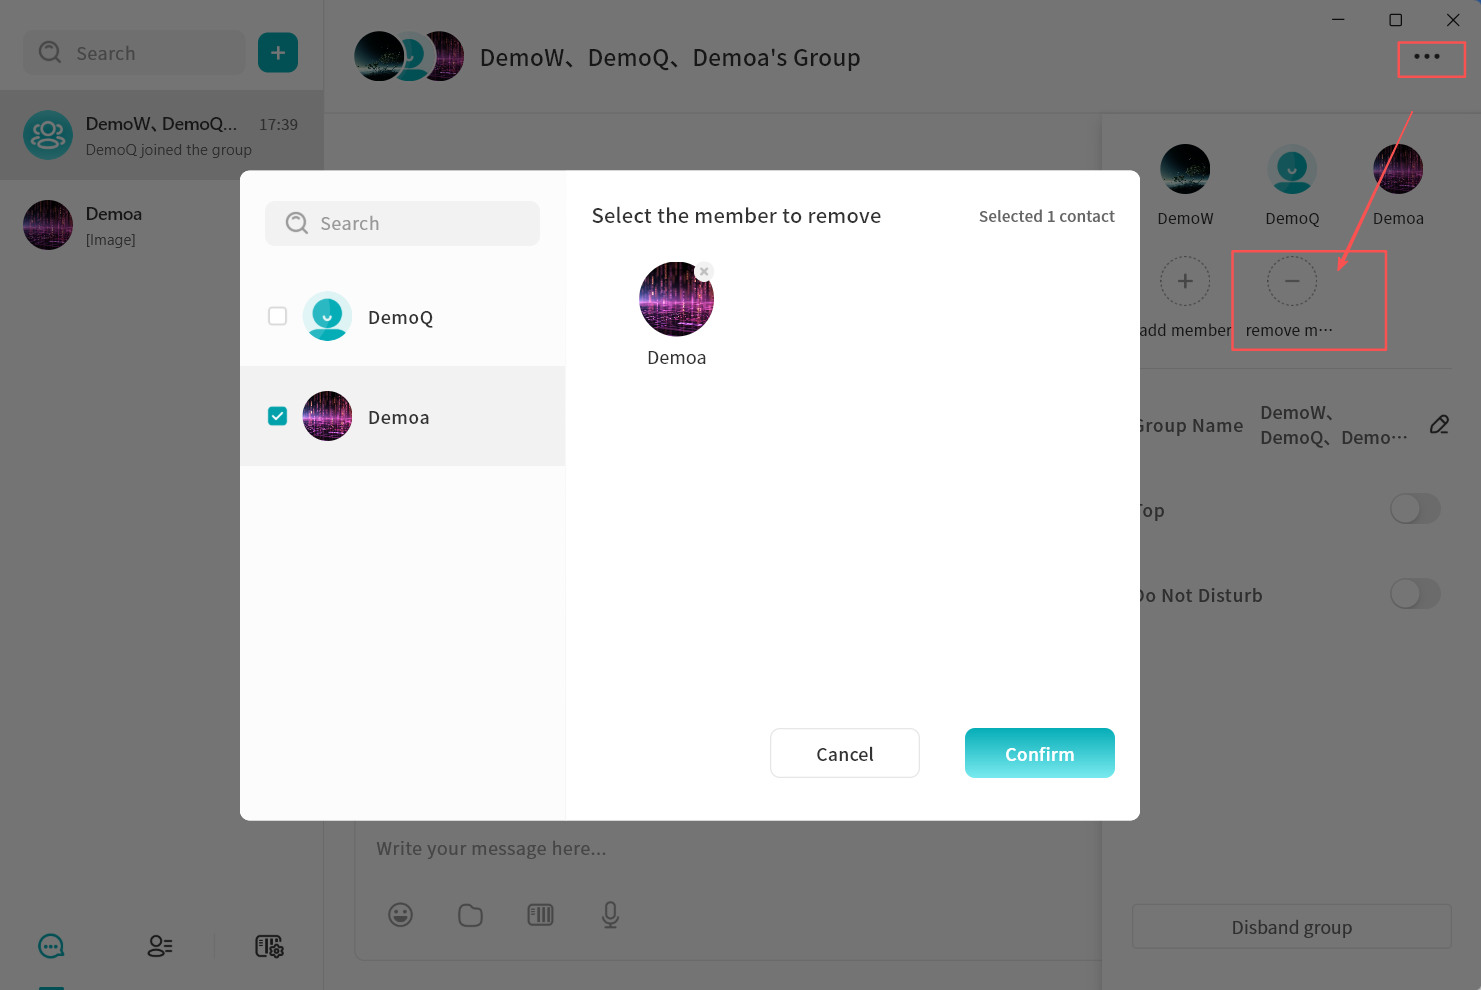
Change Group Name
The group creator can rename the group for easier identification. Click the edit icon next to the group name to enter a new name.
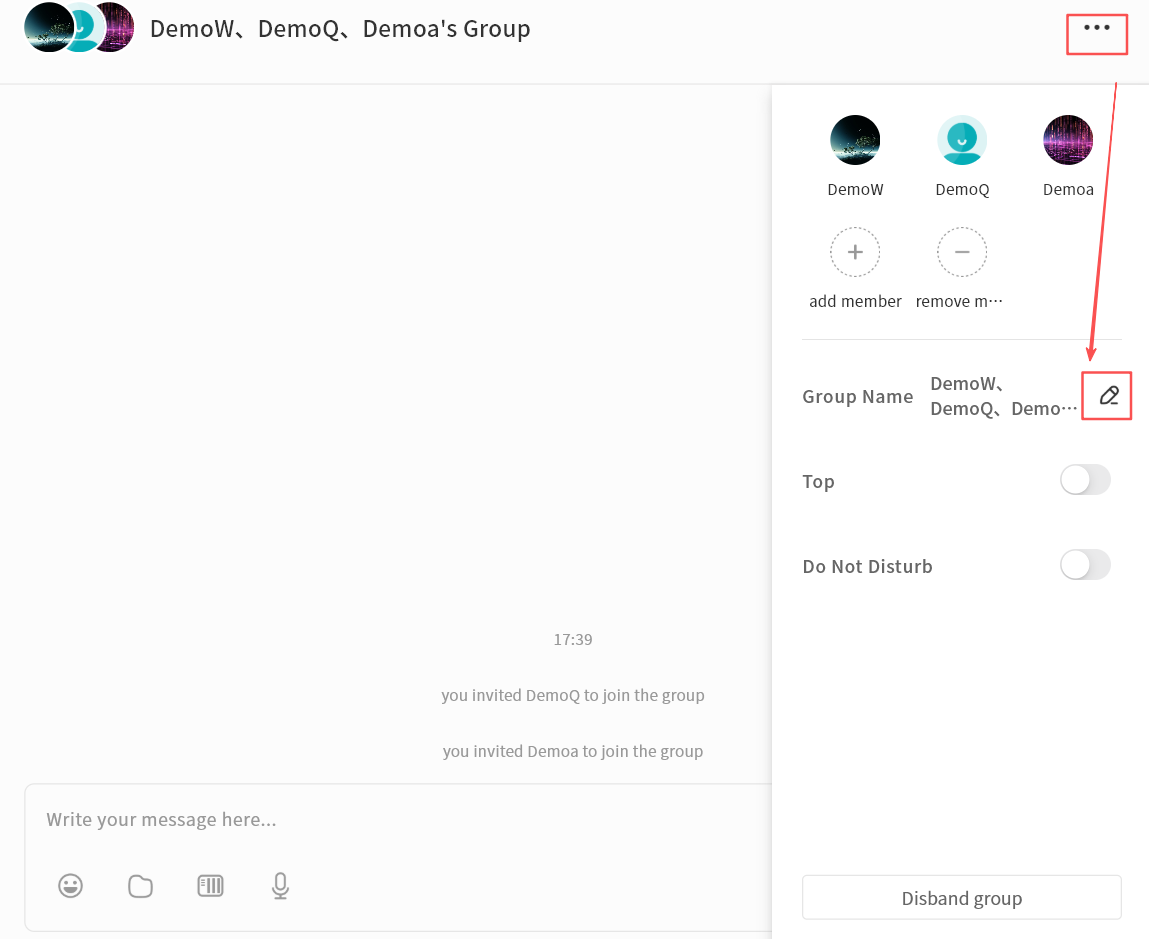
Pin Group Chat
Enable Top to keep the group chat at the top of the chat list.
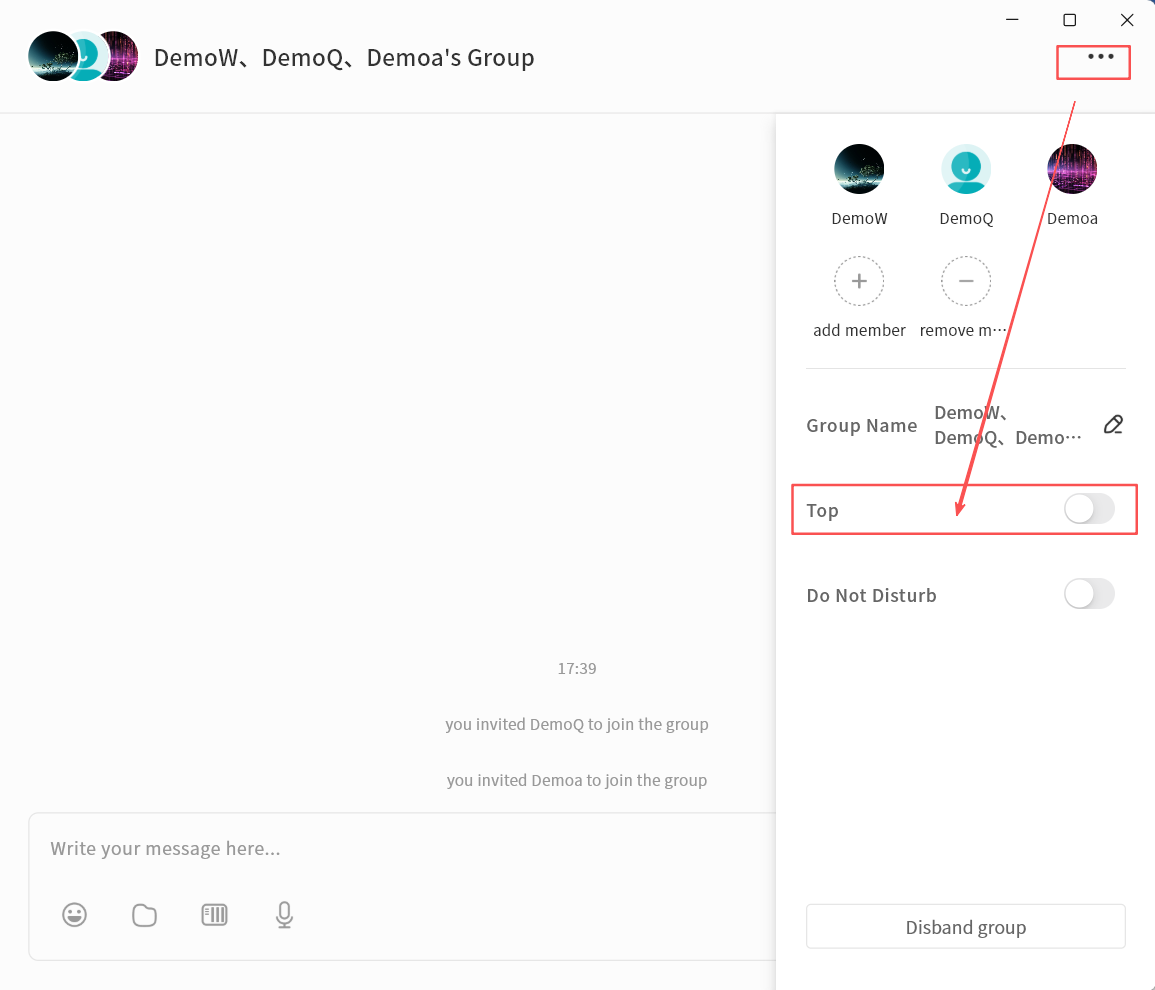
Mute Notifications
Enable Do not Disturb to stop receiving alerts for new messages in the group.
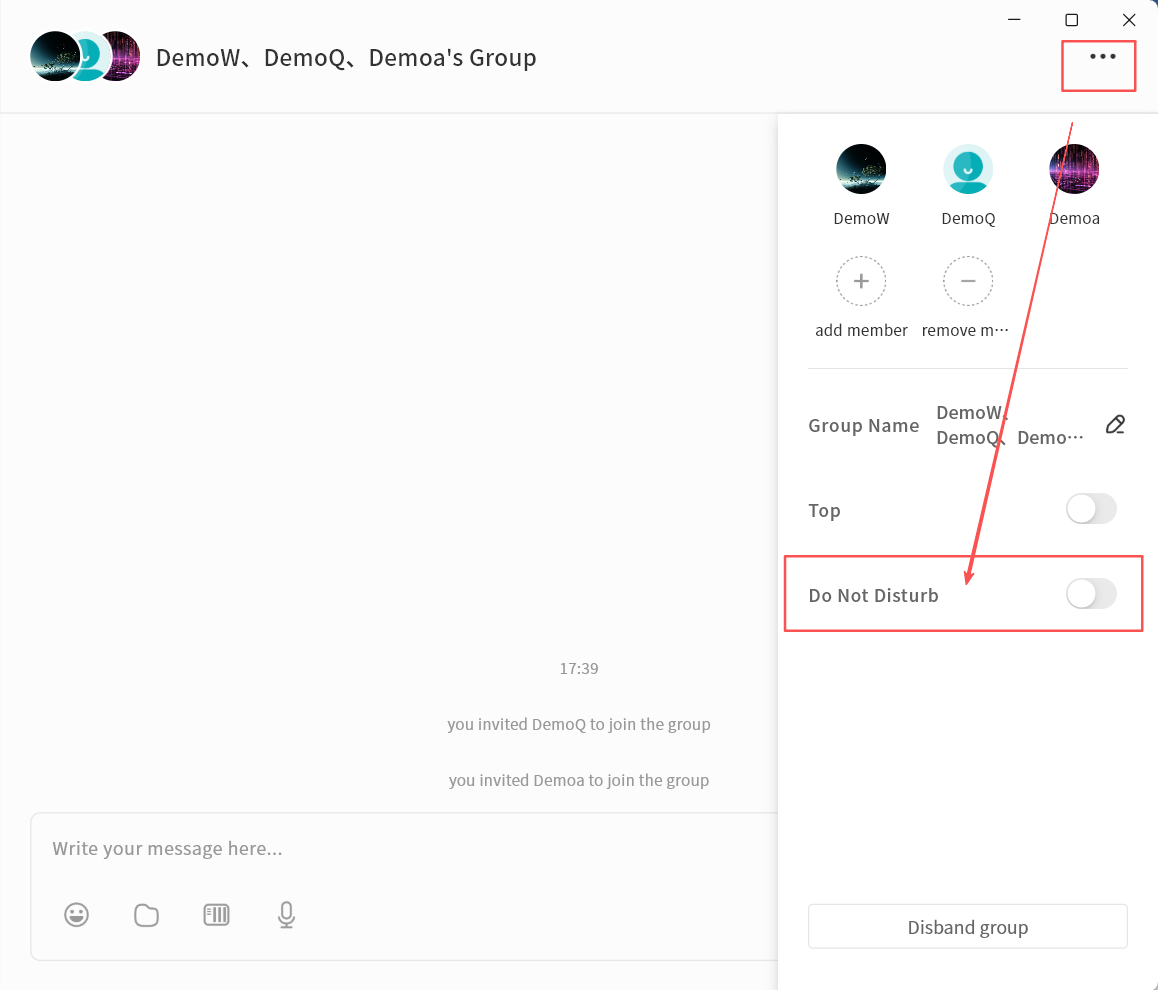
Disband Group
The group creator can disband the group:
-
In the group chat window, click the ... menu Disband Group.
-
Click Confirm to delete the group.
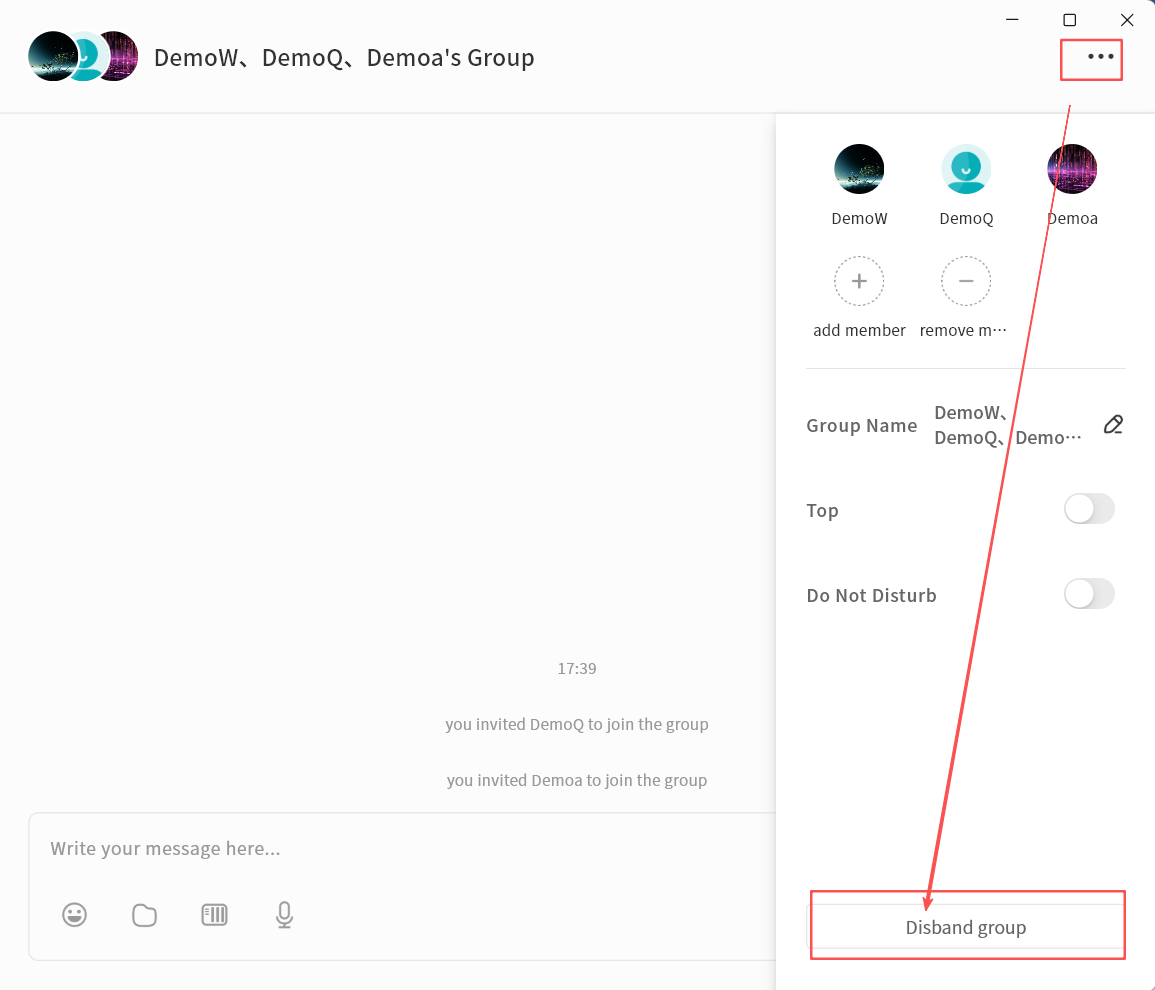
Leave Group
Any group member can exit the group at any time:
-
In the group chat window, click the ... menu Exit the Group.
-
After leaving, you will no longer receive messages from that group.

Group Files
Files shared in a group chat can be centrally managed through the Group Files feature.
Click ... Group Files to view all files sent within the group chat.
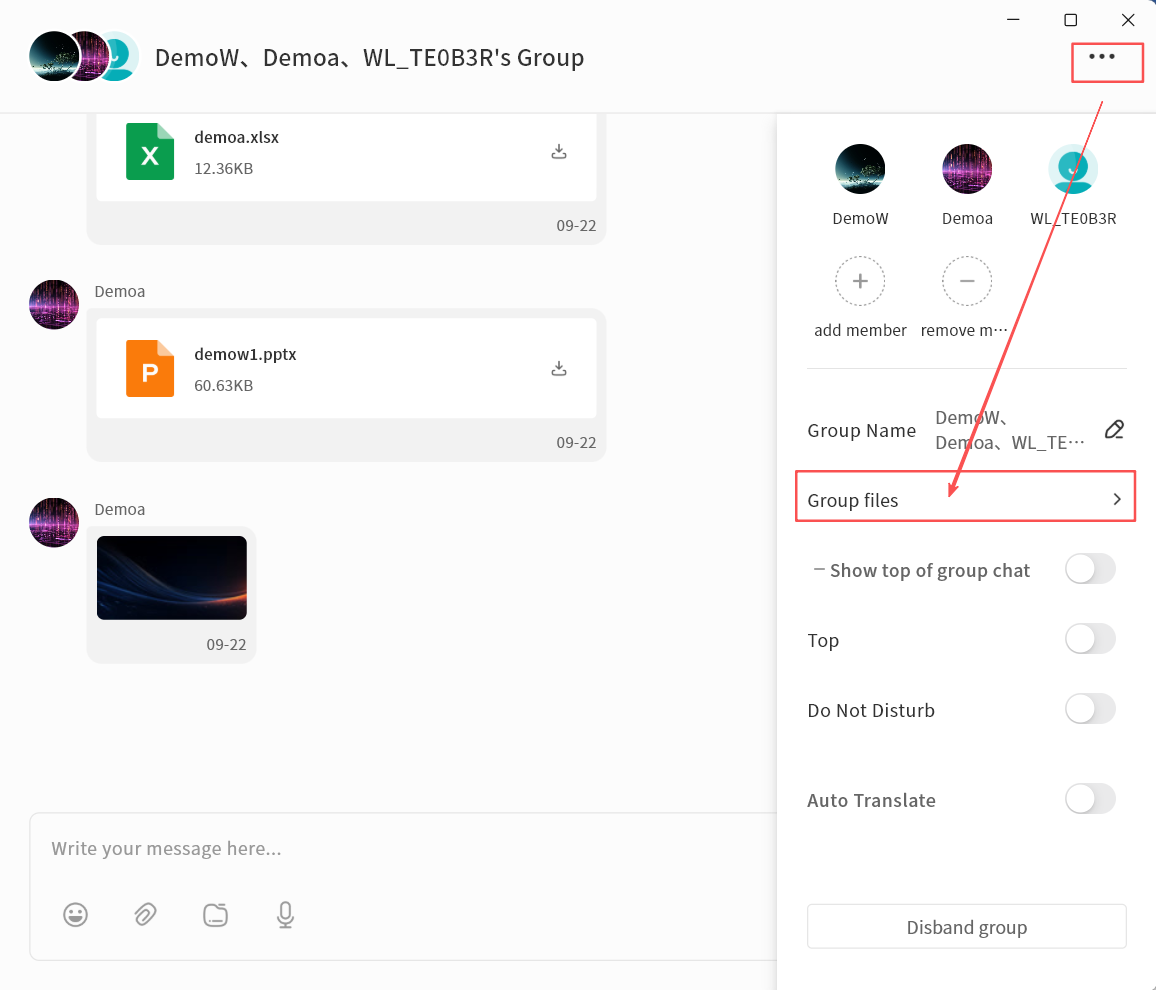
In Group Files, you can:
-
View File List: Includes file name, size, upload date, uploader, and available actions.
-
File Operations:
-
Download (all members): Save the file to the local device.
-
Forward (all members): Forward the file to another chat session.
-
Delete (group Owner and uploader only): Only the group creator or the original uploader can delete files from Group Files.
-
Save To (all members): Save the file to your personal NAS space associated with IM.
-
Rename (group Owner only): Change the file name.
-
-
Upload Local File: Select files from your local device to upload into Group Files. Note: After uploading, a file message will automatically be sent to the group chat.
-
Upload NAS File: Select files from your NAS to upload into Group Files. Note: After uploading, a file message will automatically be sent to the group chat.
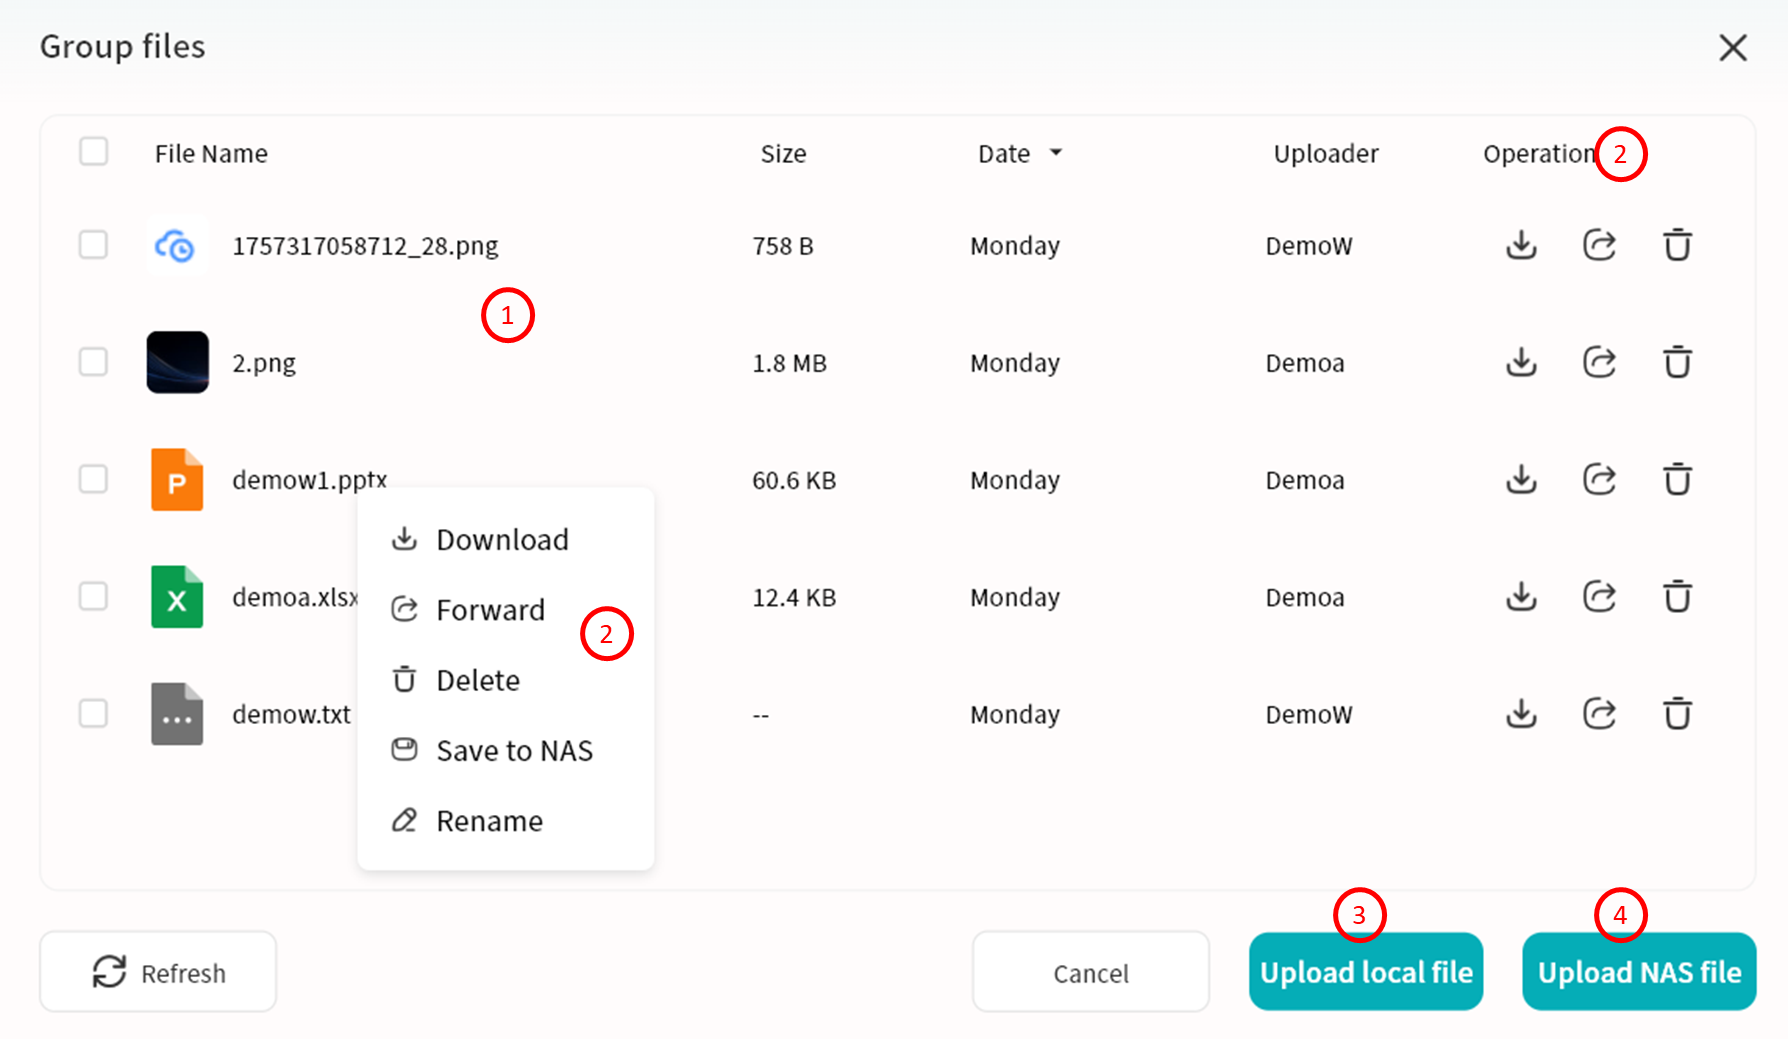
IM AI Agent
The IM feature includes multiple AI Agent capabilities that can be invoked anytime to improve communication efficiency.
Translation
You can translate a selected chat message into other languages (Chinese, English, or Japanese).
- Select a chat message, then right-click Translation Target Language.
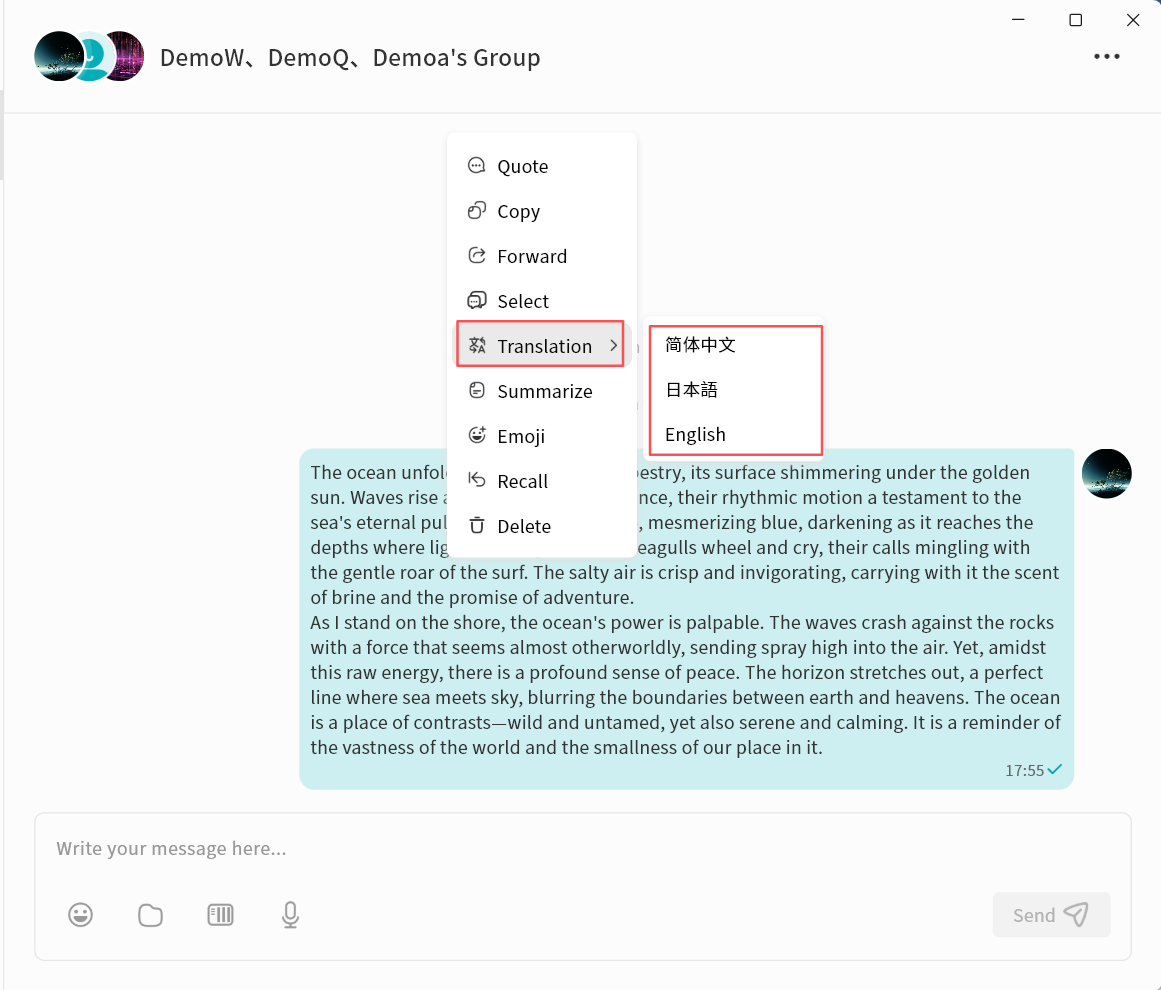
- Wait while the AI Agent processes the translation.
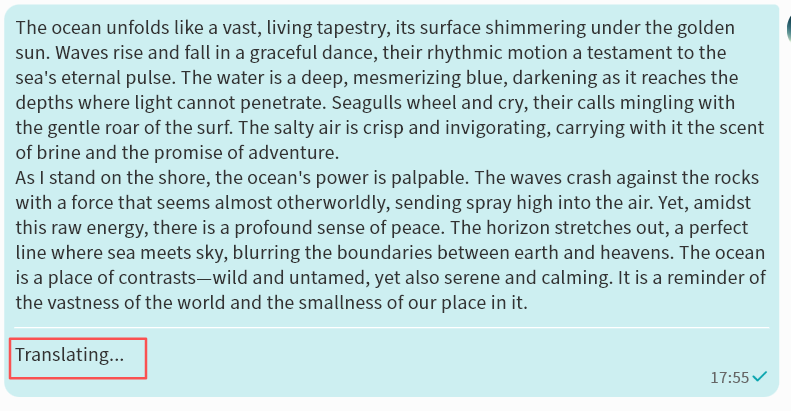
- Once complete, the translated text will be displayed.
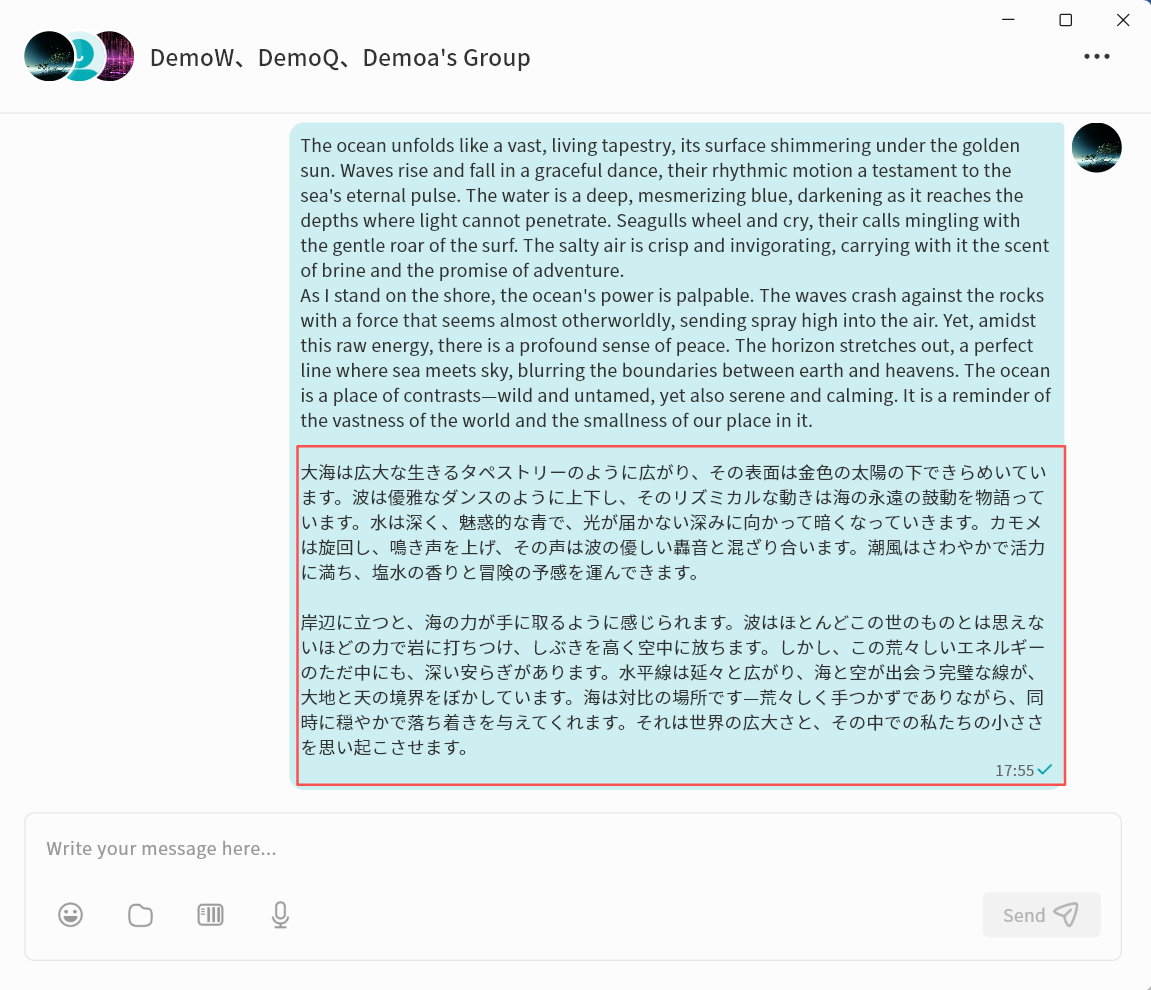
Smart Reply
AI Agent can generate multiple reply suggestions based on a selected message.
- Select a chat message, then right-click Smart Reply.
-
Wait while the AI Agent generates suggested replies.
-
Once complete, several reply options will be displayed. You can click any suggestion to send it directly, or select Change to another group to request a new set of suggestions.
Summarization
AI Agent can summarize the content of a selected chat message.
- Select a chat message, then right-click Summarize.
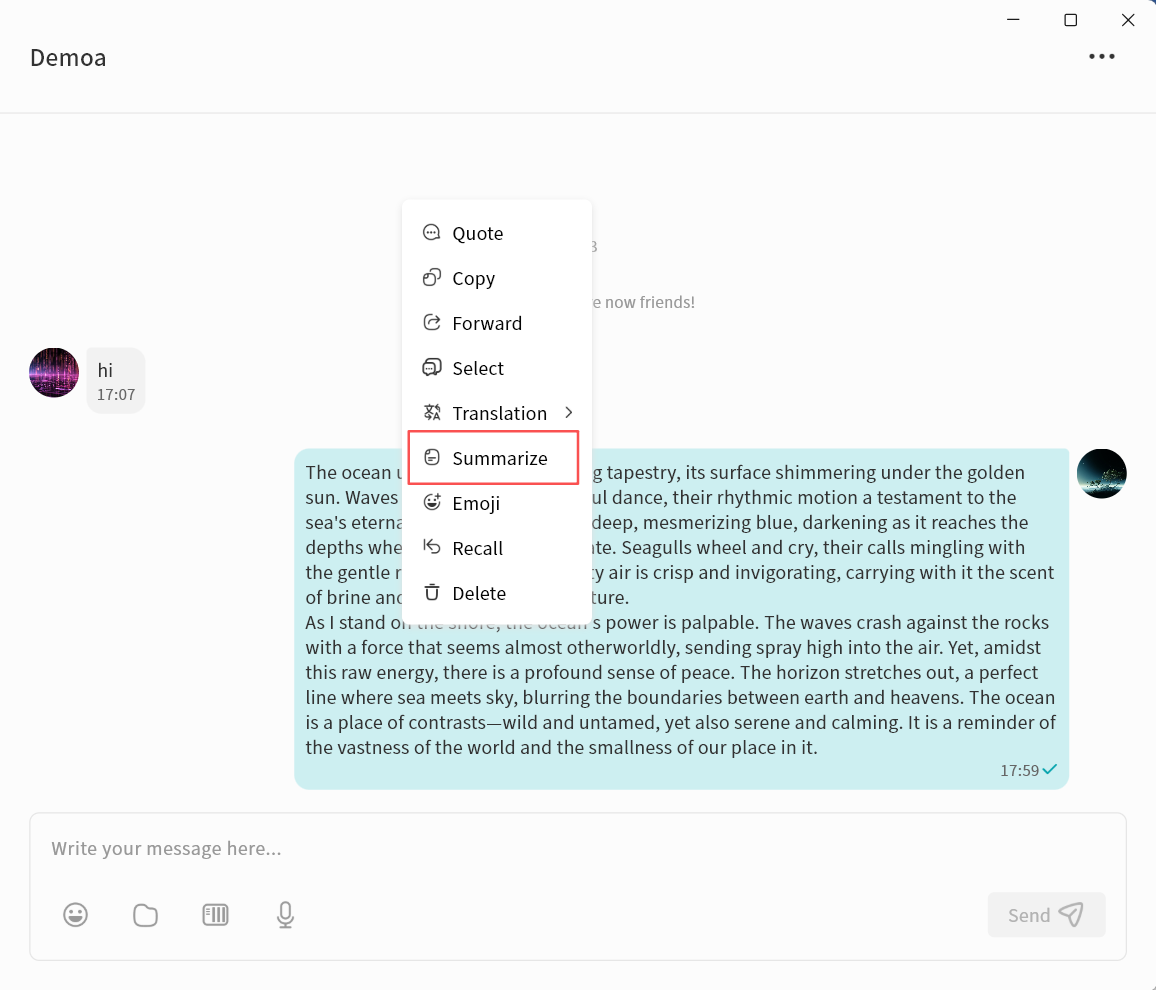
-
Wait while the AI Agent generates the summary.
-
Once complete, the summarized text will be displayed.

Speech Recognition
AI Agent can transcribe voice messages into text.
- Select a voice message, then right-click To Text.
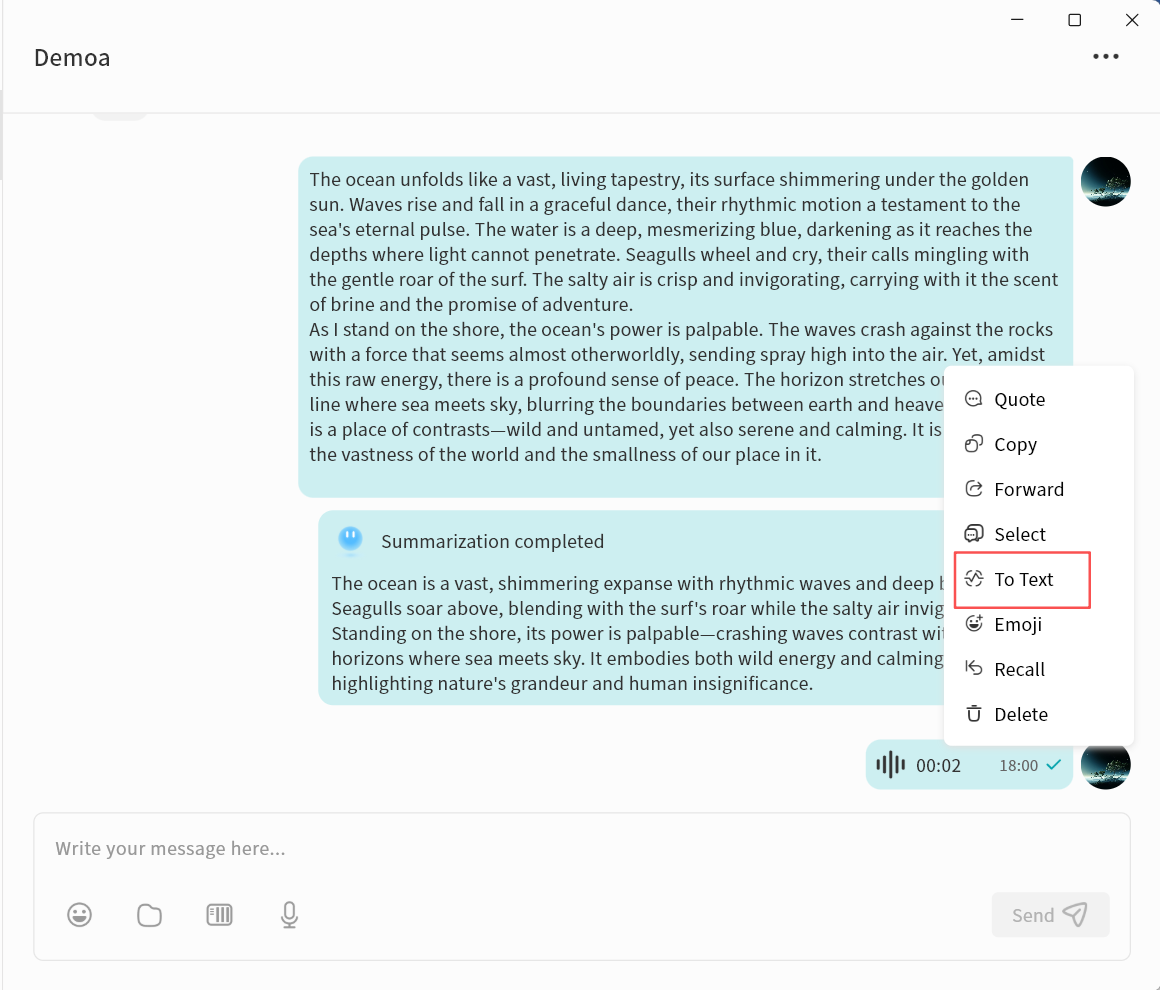
-
Wait while the AI Agent processes the audio.
-
Once complete, the transcribed text will be displayed.
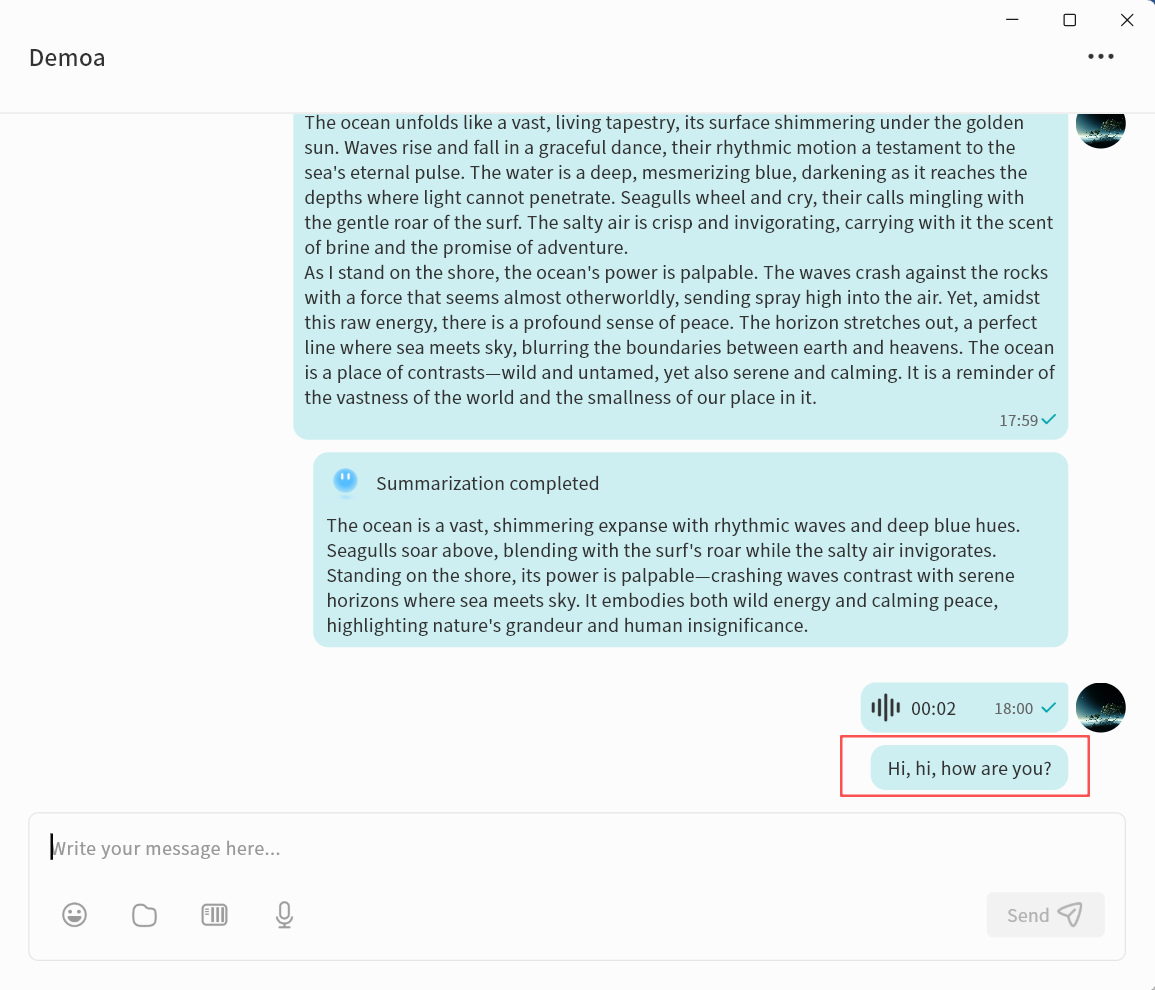
Auto Translation
In a chat conversation, you can enable the Auto Translation feature. The AI Agent will automatically translate all chat messages into your specified language.
- In the chat window, click the ... menu in the top-right corner Auto Translation.
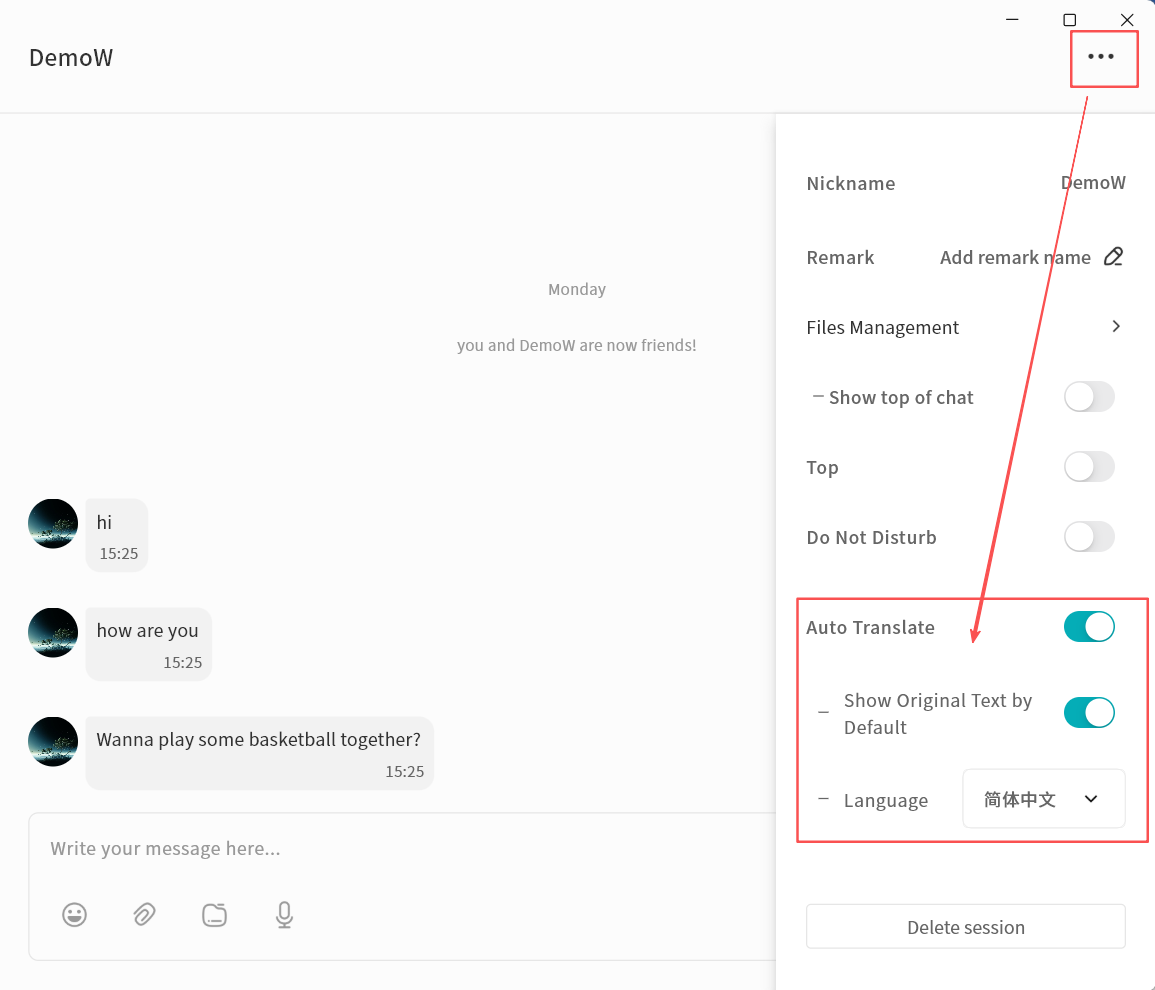
-
Enable Auto Translation and configure options:
-
Show Original Text: When enabled, both the original and translated messages will be displayed.
-
Target Language: Select the language into which messages should be translated.
-
-
The AI Agent will automatically translate incoming messages based on your settings.

- After activation, all chat records will display both the original text and the translation.
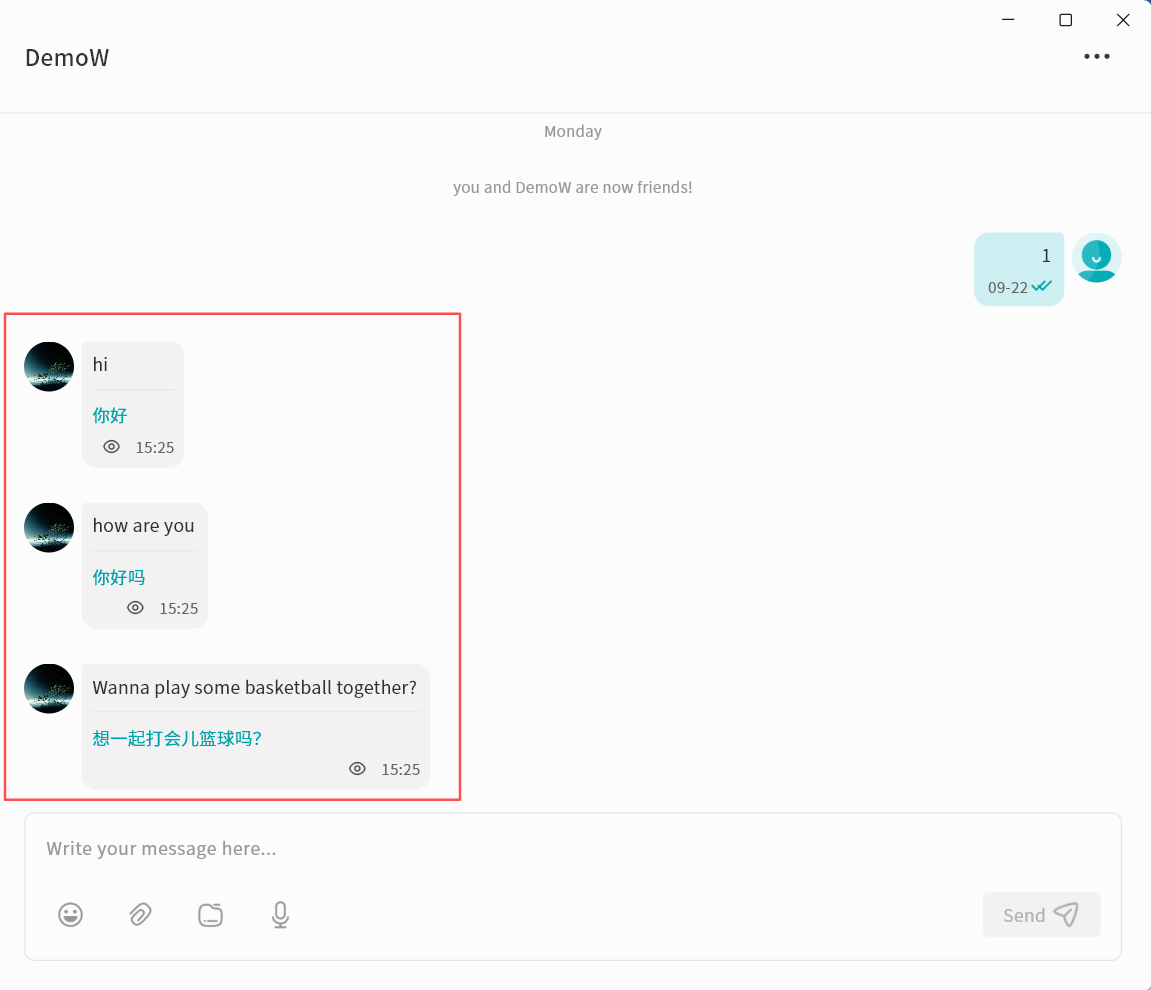
Image Recognition
You can turn on the "Image Recognition" feature within any chat. Once enabled, the AI Agent will automatically analyze the selected image and generate a detailed description.
- In the chat window, , right-click the image and choose Recognize Image.
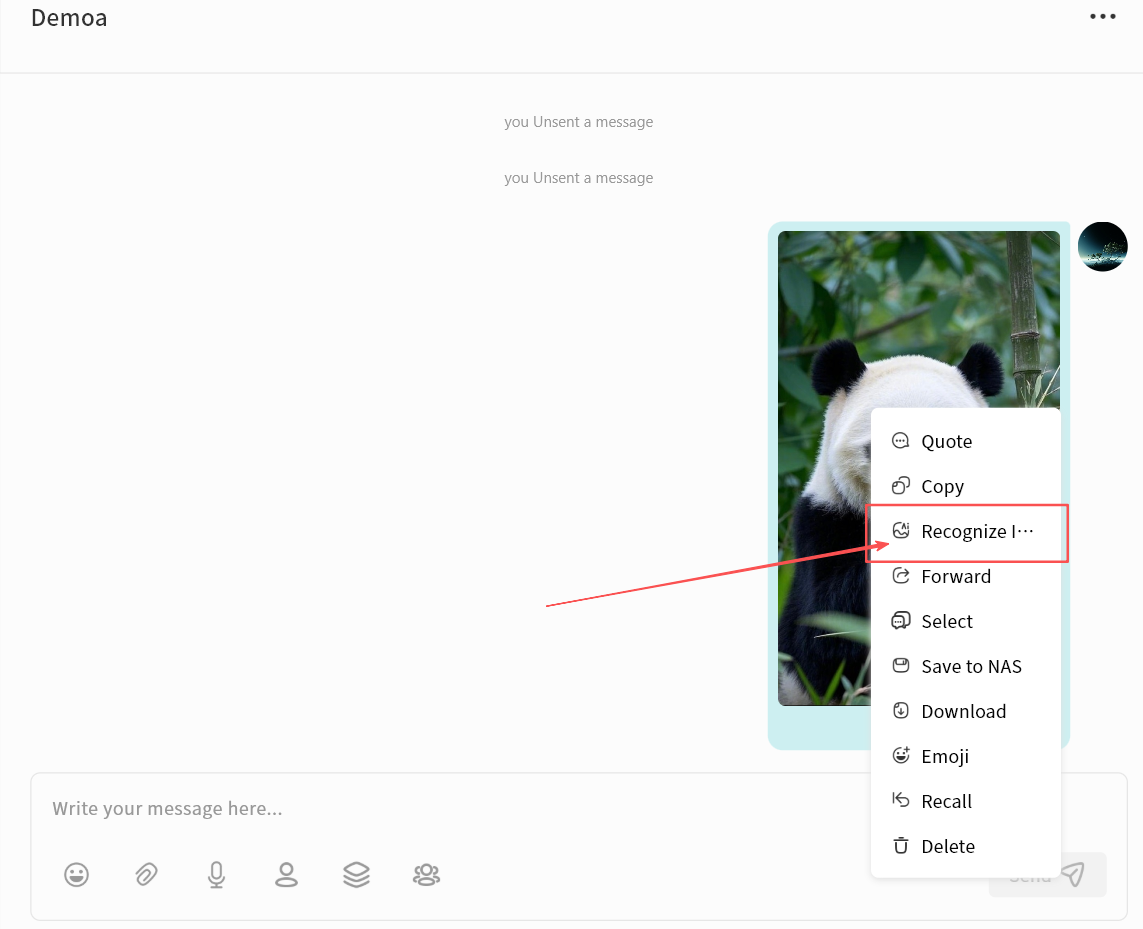
- Wait while the AI Agent processes the translation.

- When finished, you'll see the AI-generated description of the image.
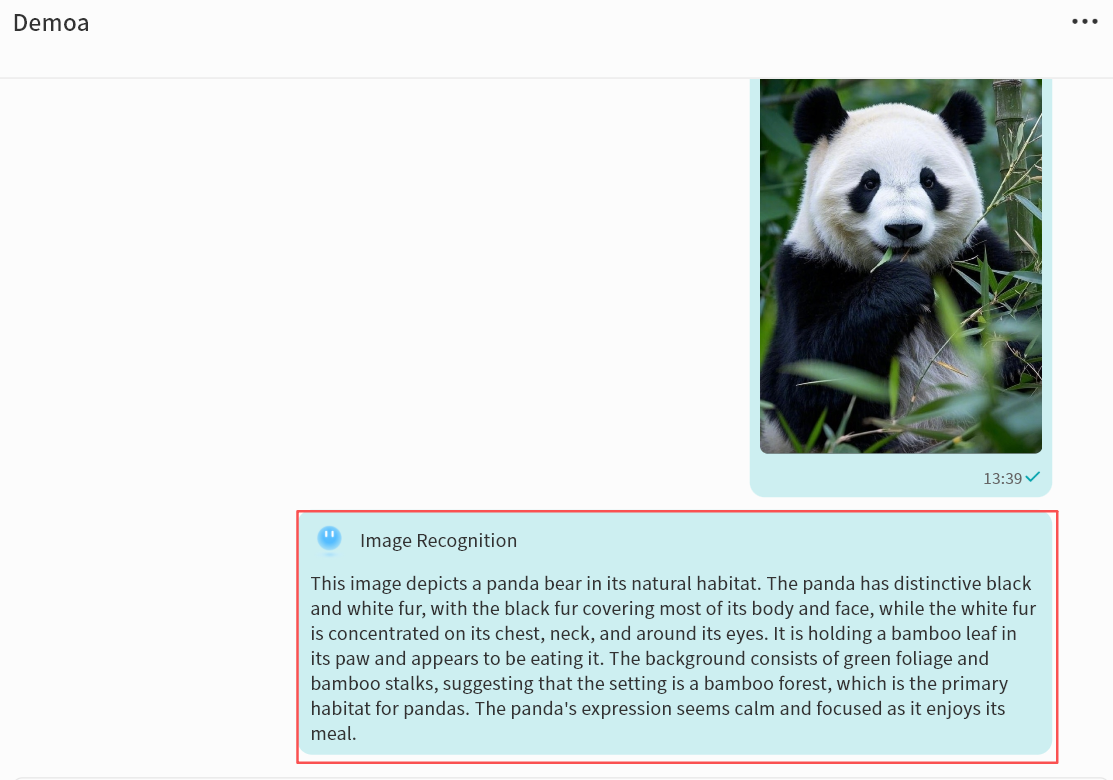
Supported Media File Formats in IM
The IM feature supports previewing media attachments. The supported formats are as follows:
| Media Type | Supported Formats |
|---|---|
| Images | JPEG, JPG, PNG, GIF, BMP, SVG, HEIC, RAW |
| Videos | MP4, WebM, AVI, MOV, MKV |
| Audio | MP3, AAC, OGG, WAV |
Lite NAS
Lite NAS is a unique feature of DASSET that allows your Windows or macOS computer to instantly act as a lightweight NAS. It enables seamless file interaction between the DASSET client and your computer. The key functions of Lite NAS include:
-
Instantly turn your computer into a personal cloud drive
-
Designate directories on your computer for remote access
-
Access your computer files securely, quickly, and from anywhere
Starting Lite NAS
When DASSET is running on your computer, you will see your current device listed on the Discovery page. From there, enter Manage and follow a few simple steps to initialize Lite NAS.
- On the Discovery page, click Management on your computer device icon.\
If your operating system prompts for service permissions, click Allow to ensure proper Lite NAS functionality.

- Click Confirm to enter the Lite NAS settings page.
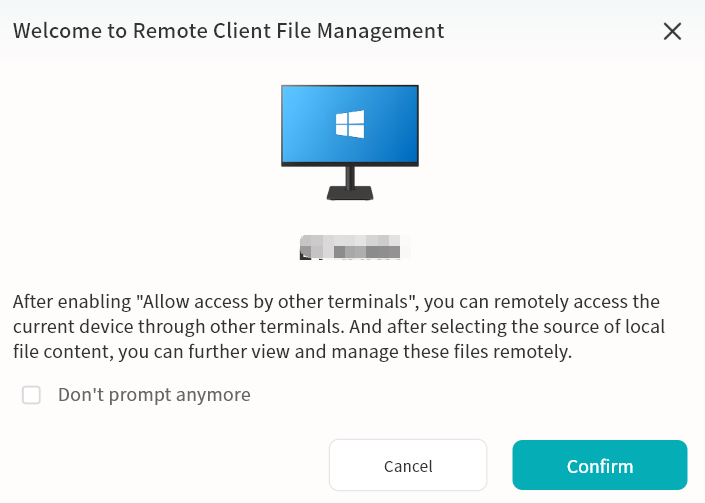
- For first-time use, complete the necessary Lite NAS configuration by clicking Go to Settings.
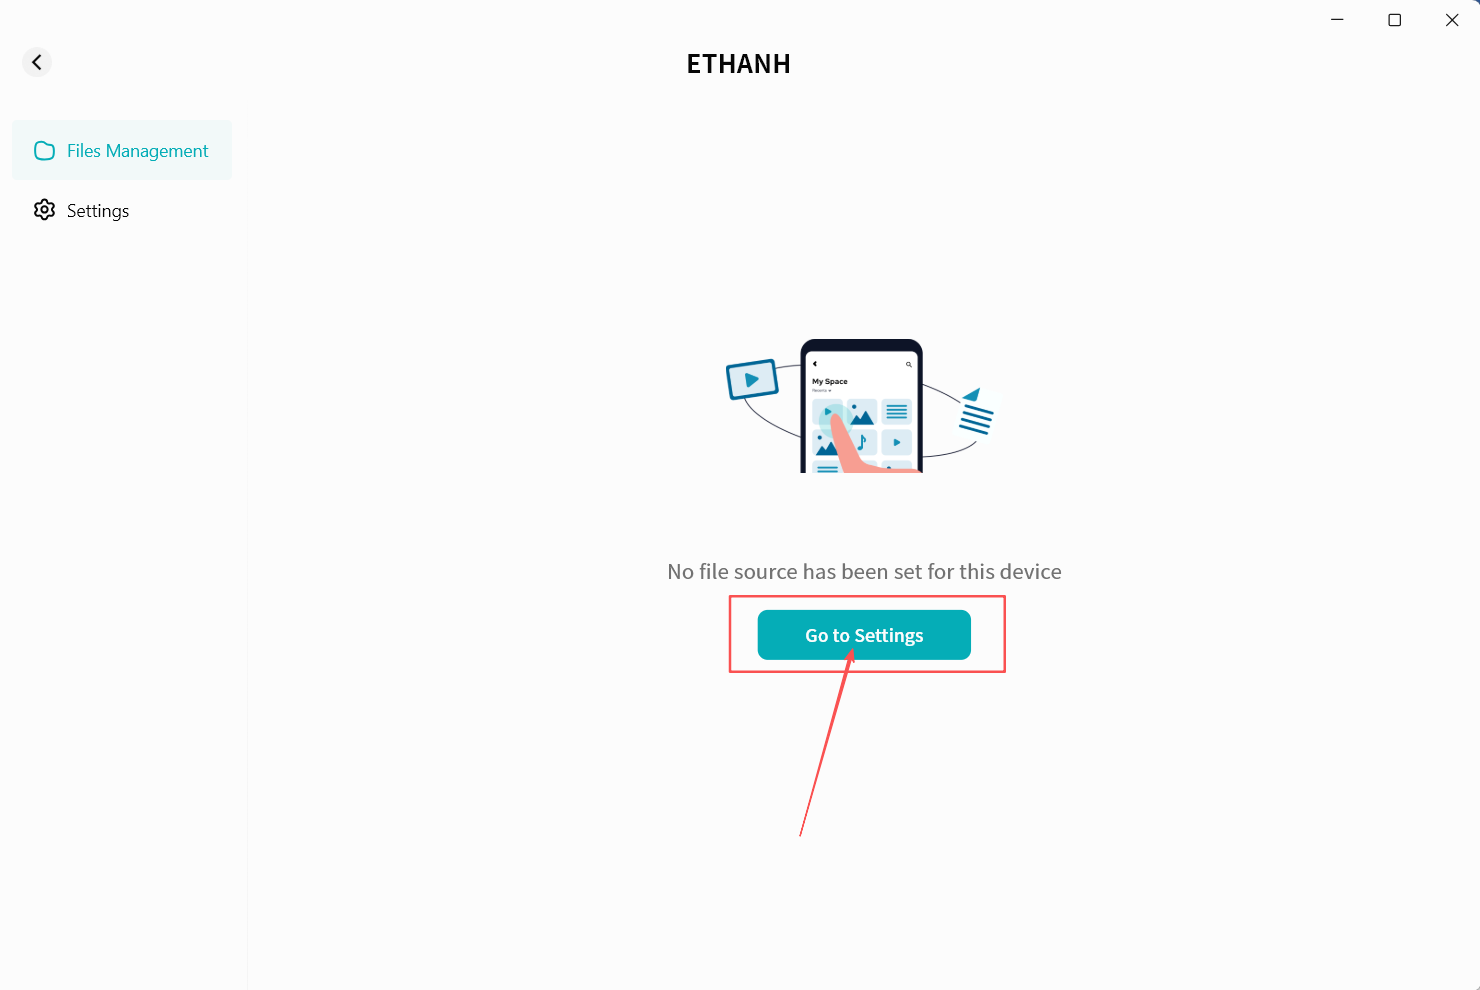
Lite NAS Settings
On the settings page, you can configure directories for remote access and choose whether to allow access to these directories from the DASSET app on other devices.
-
Directory Display Area: Shows all computer directories currently enabled for Lite NAS.
-
Add/Remove Directories: Use the + and -- buttons to add new directories for Lite NAS or remove existing ones.
Avoid adding entire drives to Lite NAS to prevent excessive indexing that may impact performance.
- Allow Access from Other Terminals: Allow your account to access these directories from other terminals running the DASSET app.
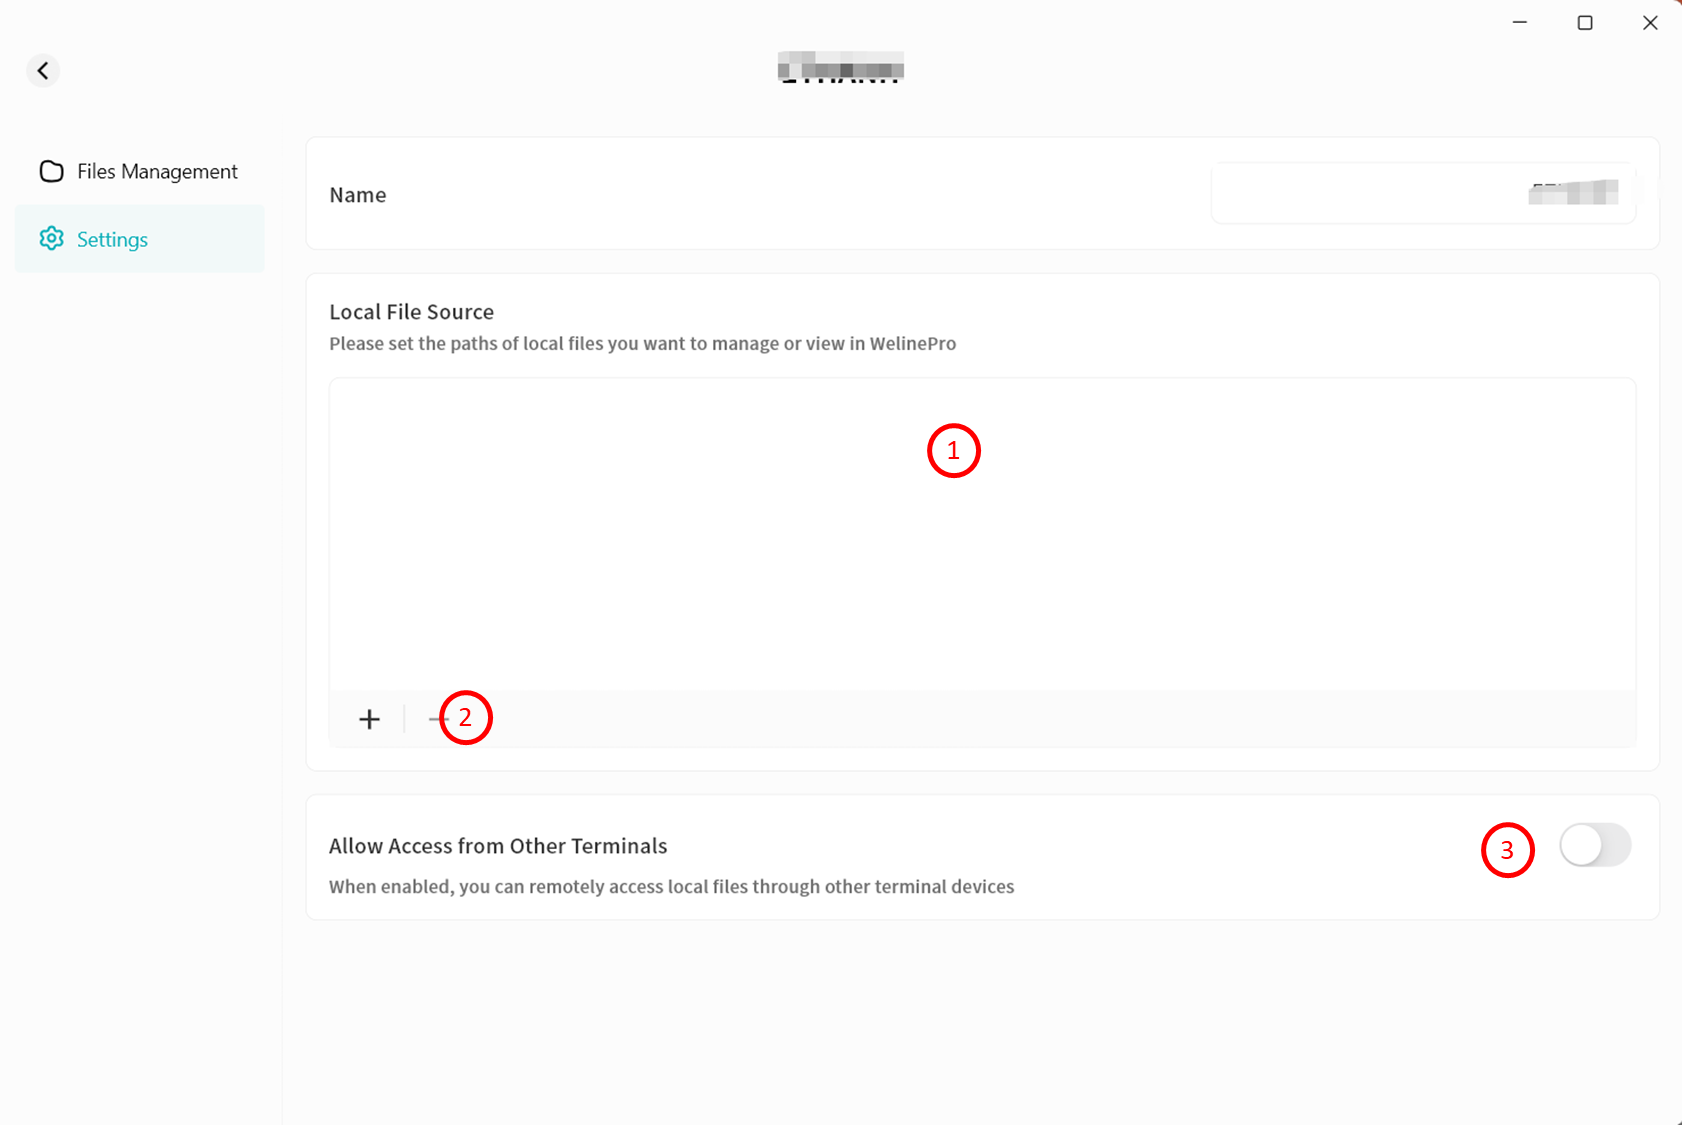
Lite NAS File Management
In the File Management interface, you will see the directories you configured in Settings.

Available operations include:
-
Navigate forward/backward within directories
-
Refresh file list
-
View file path
-
Search files by keyword
-
Create folder
-
Remove files or folders
-
Rename files or folders
-
View file details
-
Categorize files (pc-images, videos, audio, documents, compressed packages)
-
Sort files by name, size, or modification time
-
Switch between list view and grid view
-
Browse the file list
-
Right-click menu for delete, rename, or details
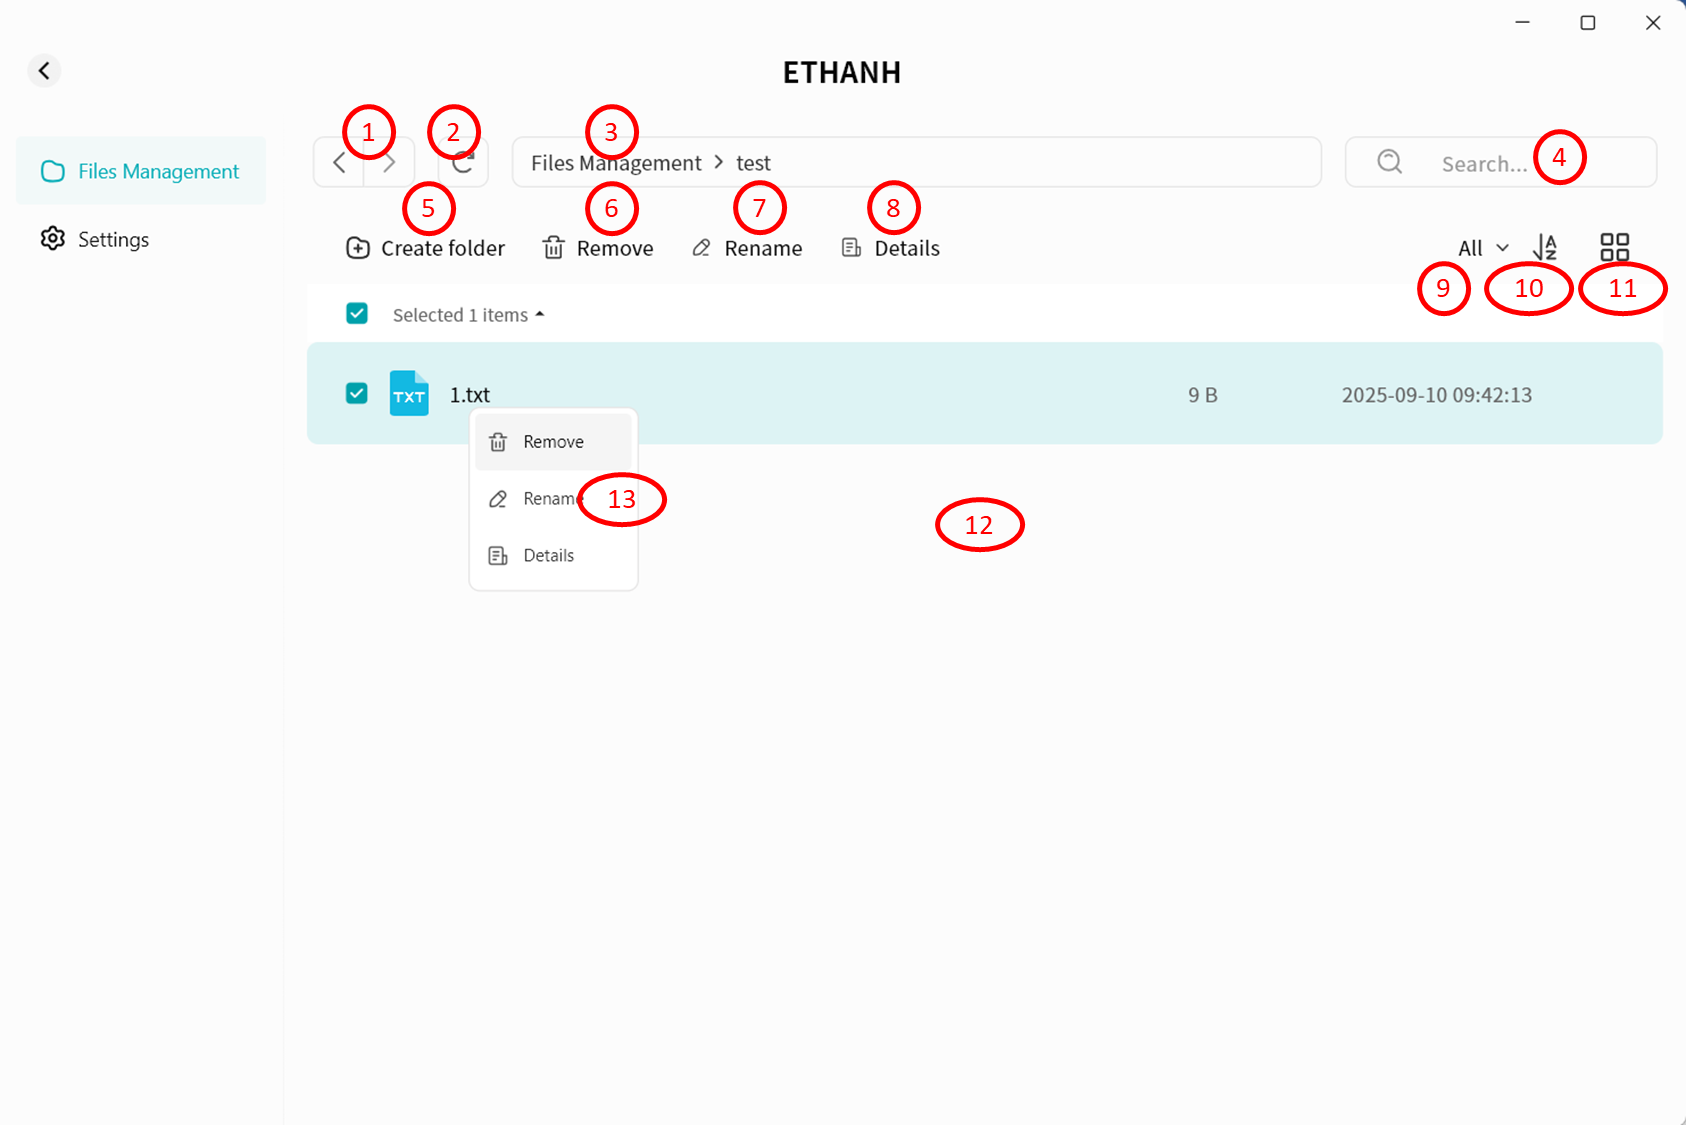
Accessing Lite NAS from Other Terminals
From DASSET Desktop Client
Remote Connection
- On the Discovery page, click Connect on the Lite NAS icon.
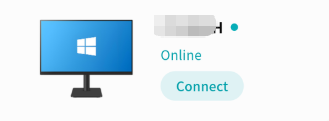
-
Enter the Lite NAS interface:
-
File Management: Access configured Lite NAS directories
-
Device Information: View terminal details running Lite NAS
-
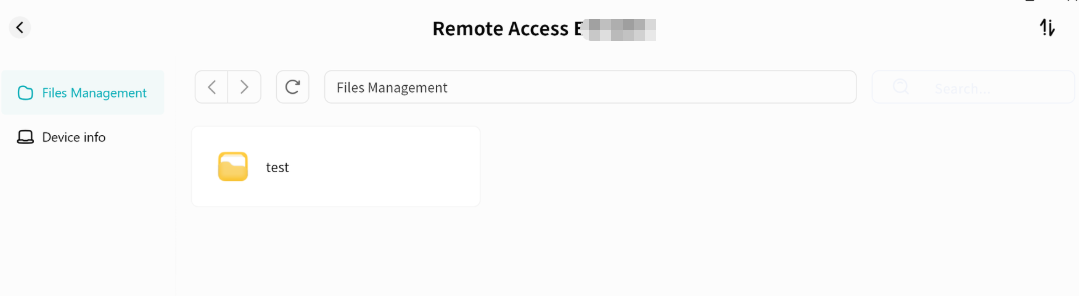
Viewing Device Information
Displays device name, Owner account, virtual domain name, virtual network IP, and LAN IP.
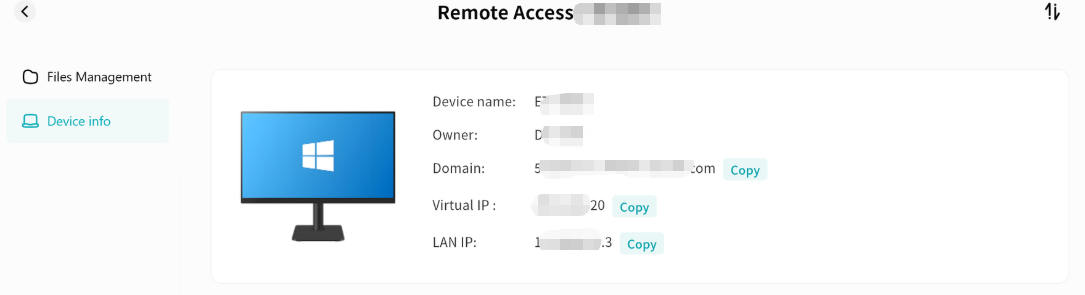
Remote File Access
Within the Lite NAS file manager, you can:
-
Navigate directories
-
Refresh file lists
-
View file paths
-
Search by keyword
-
Upload files and folders
-
Create folders
-
Download
-
Remove files and folders
-
Rename items
-
View file details
-
Categorize files (pc-images, videos, audio, documents, compressed packages)
-
Sort files by name, size, or modification date
-
Switch between list and grid views
-
Browse the file list
-
Use right-click menu for download, delete, rename, or details
-
Open Task Center to track upload and download progress
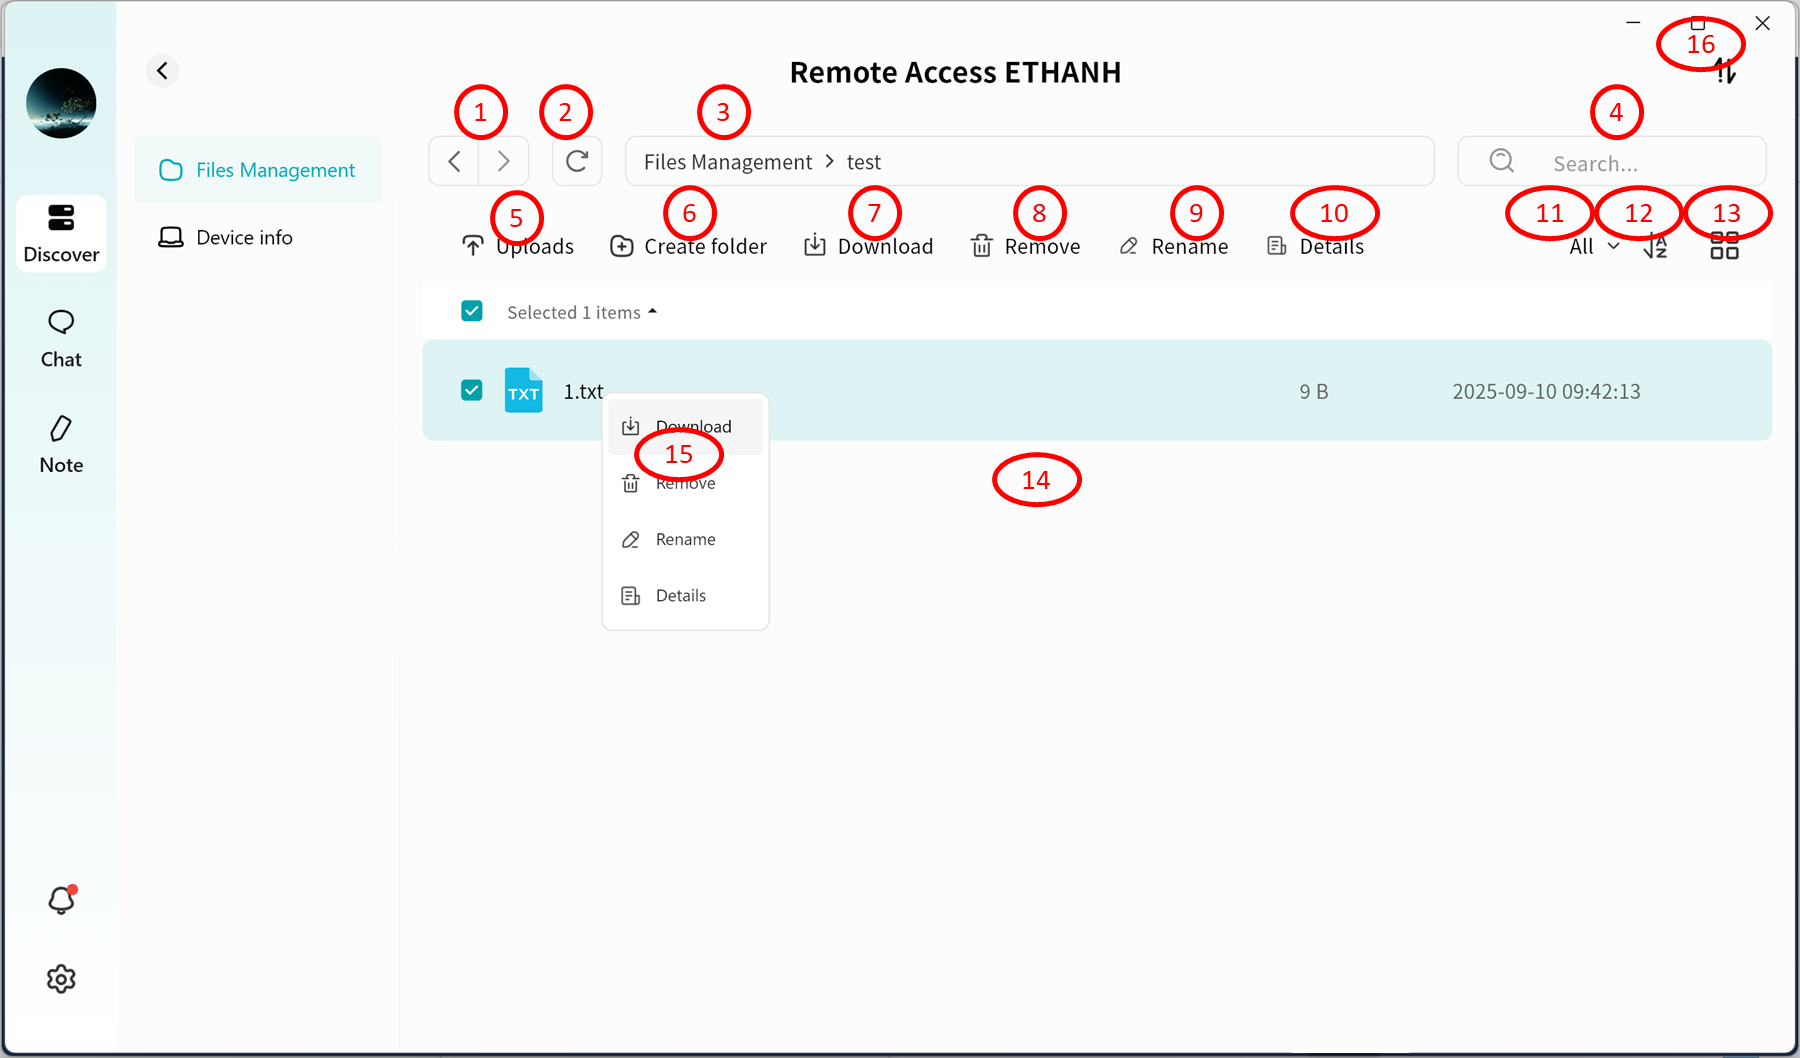
From DASSET Mobile App
Remote Connection
- On the Discovery page, tap Connect on the Lite NAS icon.
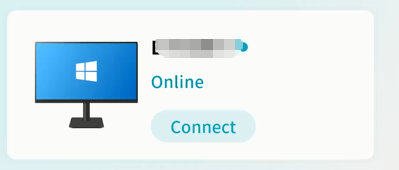
-
Enter the Lite NAS interface:
-
View configured directory list
-
Access Task Center for upload/download progress
-
Enter settings
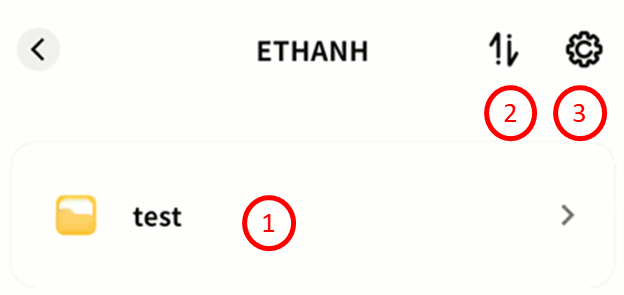
Viewing Device Information
Tap the gear icon Set up to see device name, Owner account, virtual domain name, virtual IP, and LAN IP.
Remote File Access
On the Lite NAS file manager, you can:
-
Sort files by name, date, or size
-
Access Task Center to monitor transfers
-
Search files by keyword
-
Enter settings
-
Categorize files (pc-images, videos, audio, documents, compressed packages)
-
Switch between list and grid views
-
Enable multi-select mode
-
Browse the file list
-
Open file menu for download, delete, rename, or details
-
Use the + button to upload files, upload photos/videos, or create new folders
Notifications
All operations related to DASSET device binding, as well as other system notifications to be added in the future, are displayed in the Notifications menu.
Most notifications do not require action. You can also click the checkmark in the upper-right corner to mark notifications as Read.
When receiving a binding request notification, please decide whether to allow or reject based on the situation.
Once you allow an account to bind to your DASSET device, that account will be able to read all data in your Public Space and access your subnet or devices if enabled. Please confirm carefully before clicking Accept.
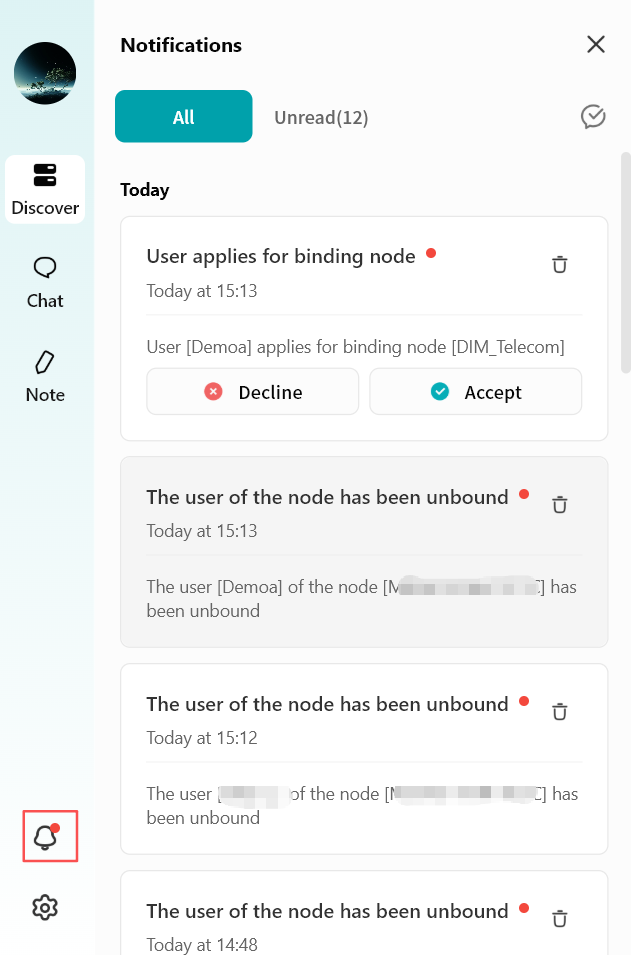
Settings
Use the Settings menu to configure DASSET Desktop Client.
Account
In the Account menu, you can:
-
Change Avatar: Select an image from your computer as your DASSET account avatar. This avatar will also be visible to your contacts.
-
Nickname: Set a display name that is easy for your friends to recognize.
-
Bind Email: Link an email address to your account or update the existing one.
-
Bind Phone: Link a phone number to your account or update the existing one.
-
Login Password: Change your login password.
Note: Whenever you add or update your email, phone number, or password, your account will be logged out automatically. Please log in again after the change.
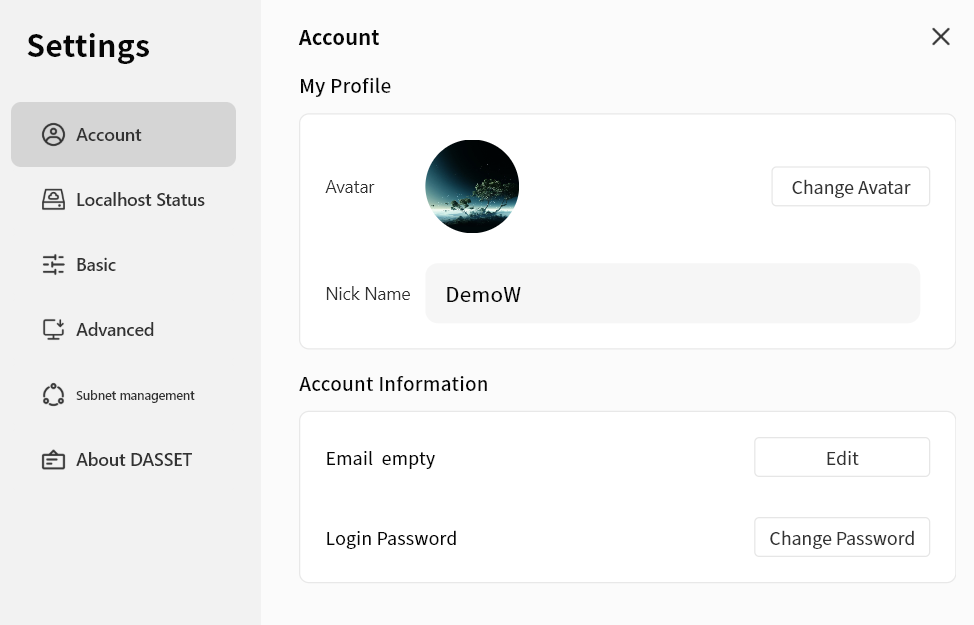
Localhost Status
The Localhost Status page displays information about your current DASSET Desktop Client session:
-
Current Network: The name of the virtual network you are connected to.
-
Selected Node: The relay node currently used for internet access.
-
Virtual Network IP: The virtual IP address of your computer, used to communicate with DASSET devices in the SDVN virtual network.
-
LAN IP: The local IP address configured on your computer.
-
Domain Name: The unique virtual domain name of your computer in the virtual network.
-
Online Duration: How long the current session has been active.
-
Latency: The network latency of your virtual connection.
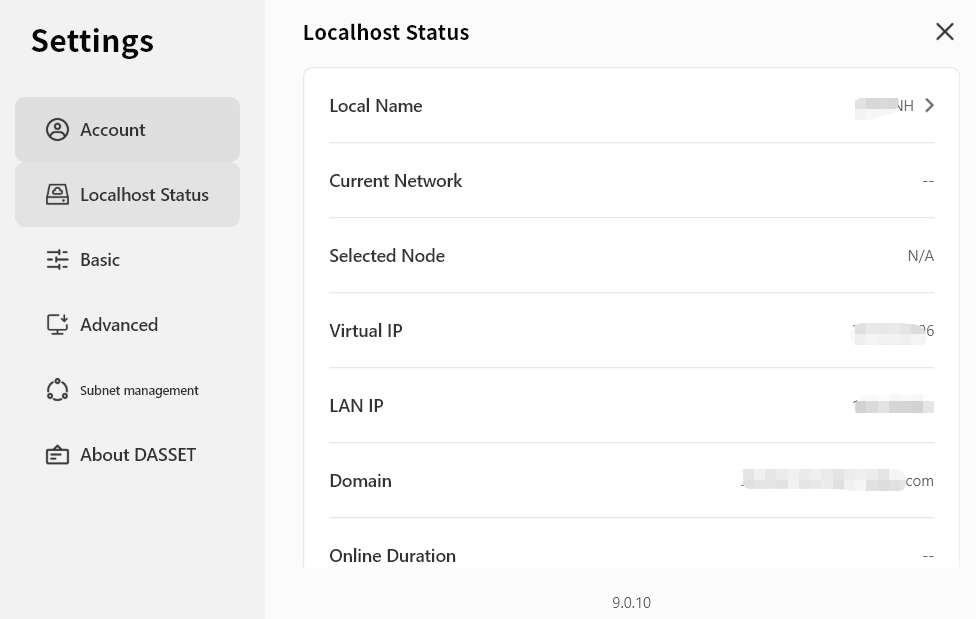
Basic Settings
In the Basic Settings page, you can configure:
-
Auto-start: Allow DASSET client to launch automatically when your computer starts.
-
Exit Options: Define the behavior when closing the software.
-
Language: Select the display language of the client. If set to Follow System, the client interface will adapt to your operating system's language.
Note: Additional languages are continuously being added. You can also select the display language on the login screen. -
Clear Cache: Delete cached files of the client.
-
Default Download Location: Choose the directory where downloaded files from DASSET will be stored. You can change this at any time.
-
Open Client Logs: Access client log files. (The DASSET support team may request these logs when troubleshooting issues.)
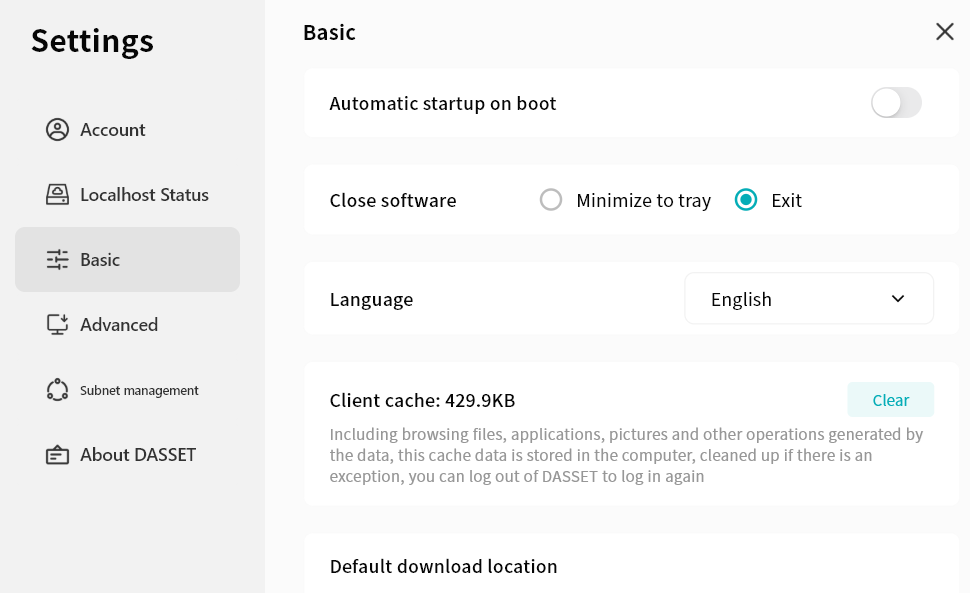
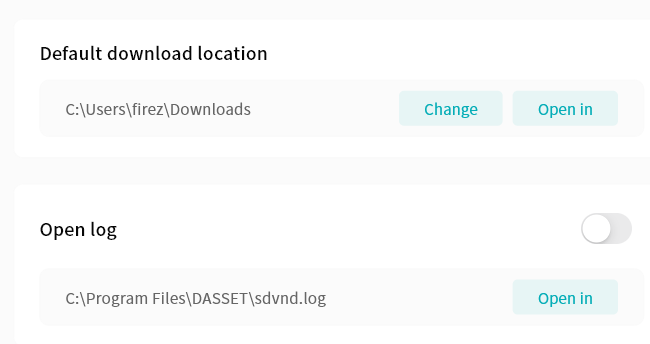
Advanced Settings
In the Advanced Settings page, you can configure:
-
Block LAN Access:
-
When enabled, communication between the DASSET client and devices is routed through the SDVN virtual network. This is more secure but may be slower.
-
When disabled, if the client detects that the DASSET device is on the same LAN, communication will occur in plaintext over the LAN. This is faster but less secure.
-
-
DLT:
-
When enabled, the client will attempt to use direct connection channels whenever possible.
-
When disabled, communication defaults to relay transmission.
-
-
Security Options: Choose the encryption algorithm for communication between the client and device.
-
RC4: Faster but less secure.
-
SHA256: Slower but more secure.
-
No Encryption: Not recommended.
-
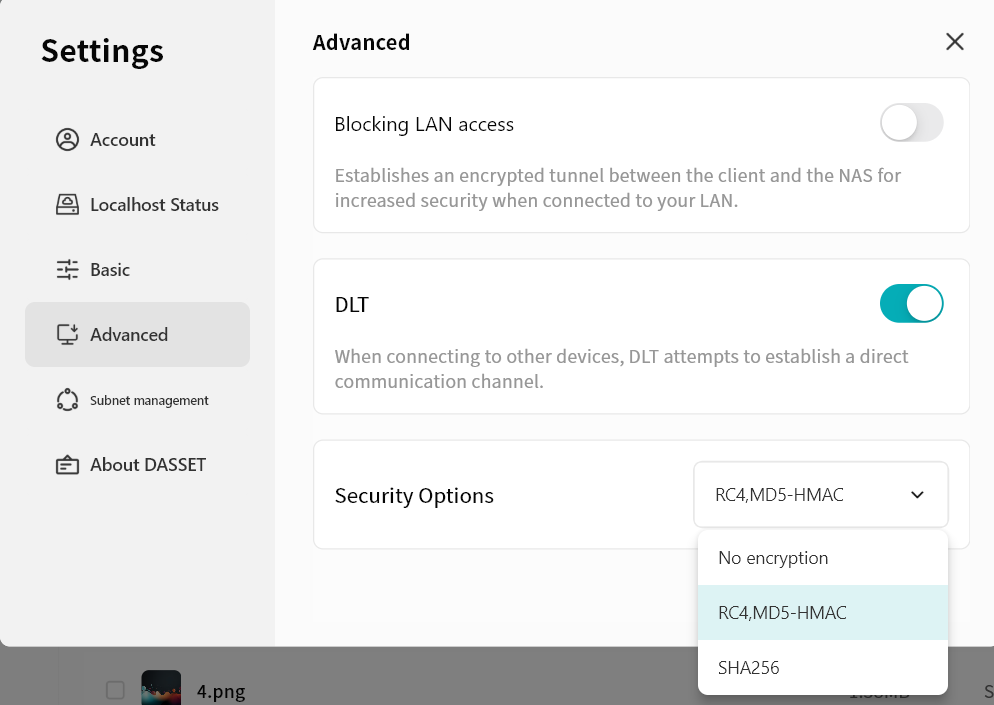
Subnet Management
In Subnet Management, you can enable subnets shared by specific DASSET devices, allowing you to remotely connect to subnet addresses while logged into the DASSET client.
Do not enable duplicate IP addresses or addresses identical to your LAN IP. Doing so may cause conflicts and disrupt network connectivity.
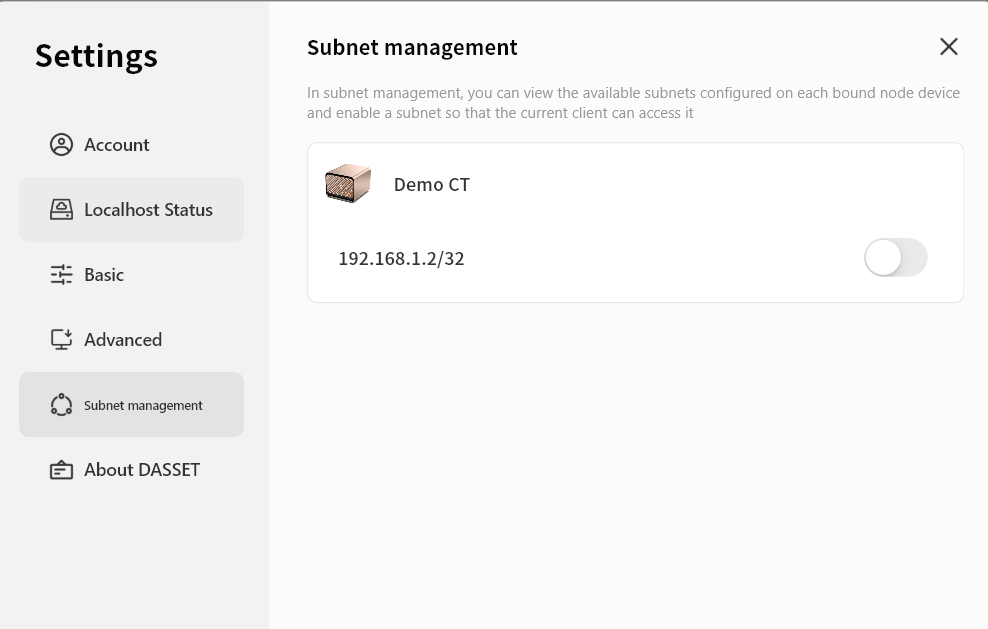
About
In the About page, you can view:
-
The client version number
-
Check for updates
-
Official website address
-
Privacy policy and other related information
DASSET provides information that is believed to be accurate and reliable; however, DASSET assumes no responsibility for the use of this information, or for any infringement of third-party patents or other rights that may result from such use. No license is granted by implication or otherwise under any DASSET patents or patent rights. DASSET reserves the right to modify this statement at any time without prior notice.
Apple, Mac, macOS, iOS, OS X, and Time Machine are trademarks of Apple Inc. App Store is a service mark of Apple Inc. Baidu Netdisk is a trademark of Baidu. Aliyun is a trademark of Alibaba. Dropbox is a trademark of Dropbox. OneDrive is a trademark of Microsoft. Wi-Fi is a registered trademark of Wi-Fi Alliance®. Android and Google Play are trademarks of Google Inc. All other trademarks are the property of their respective Owners.