Instant Messaging (IM)
DASSET IM is a private chat tool running directly on the DASSET device. It provides fully private instant messaging, with all chat data stored on the DASSET device. Communications are transmitted using encryption to ensure privacy and security.
The DASSET IM feature supports the following operations:
- Quote: Reply to a specific message by quoting it.
- Copy: Copy the content of a message.
- Delete: The sender can delete a message. Once deleted, it is also removed from the recipient's chat history.
- Preview media: View pc-images, play videos, and listen to audio files shared in the chat.
- Document preview and editing: Open and edit documents directly from the chat.
- Save files: Save received chat files to your local device.
- Send files: Share files stored on the DASSET device into the chat.
- Message status: Check whether a sent message is marked as Read or Delivered.
- AI Agent support: Use AI-powered features such as translation, summarization, reply suggestions, and speech-to-text recognition.
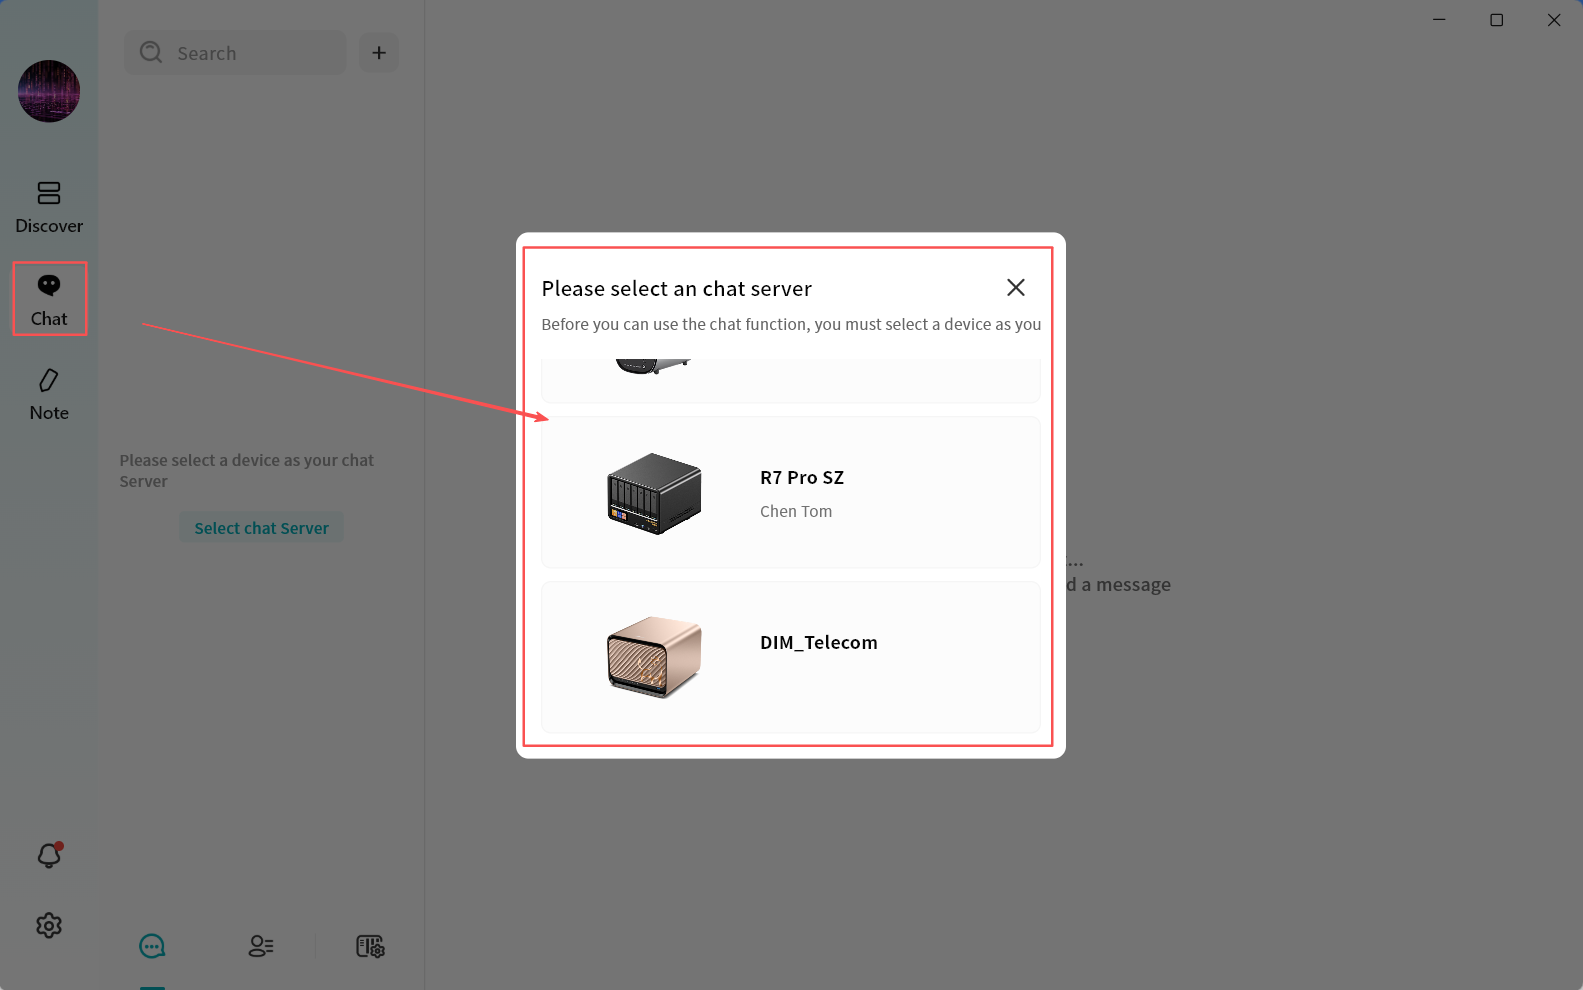
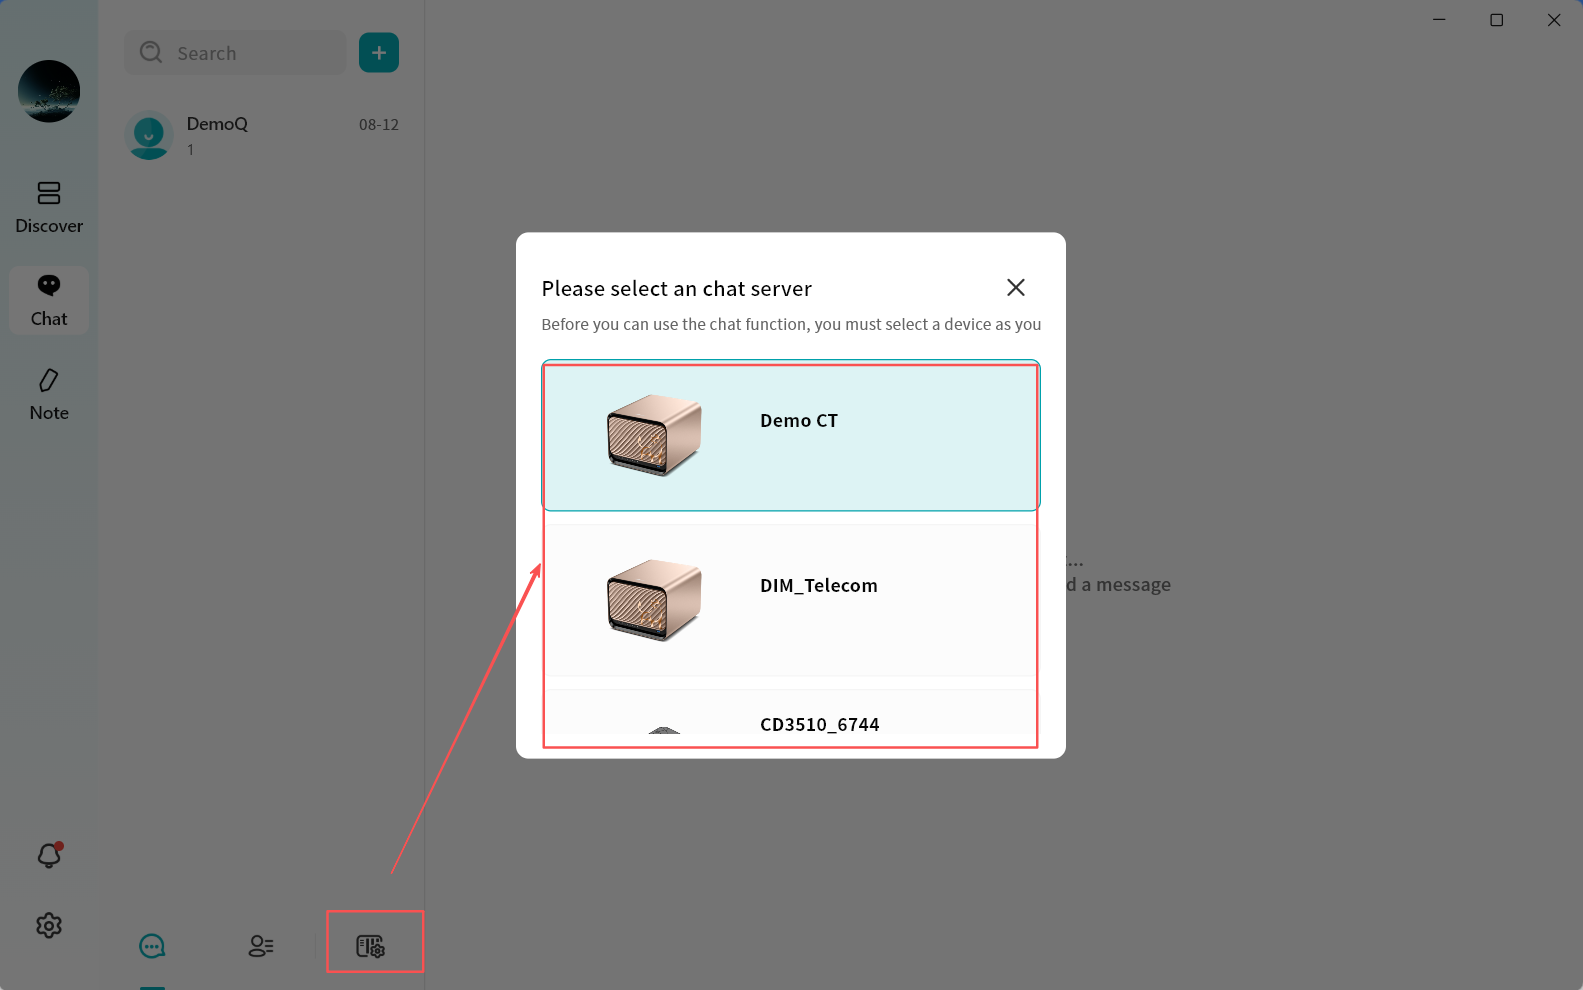
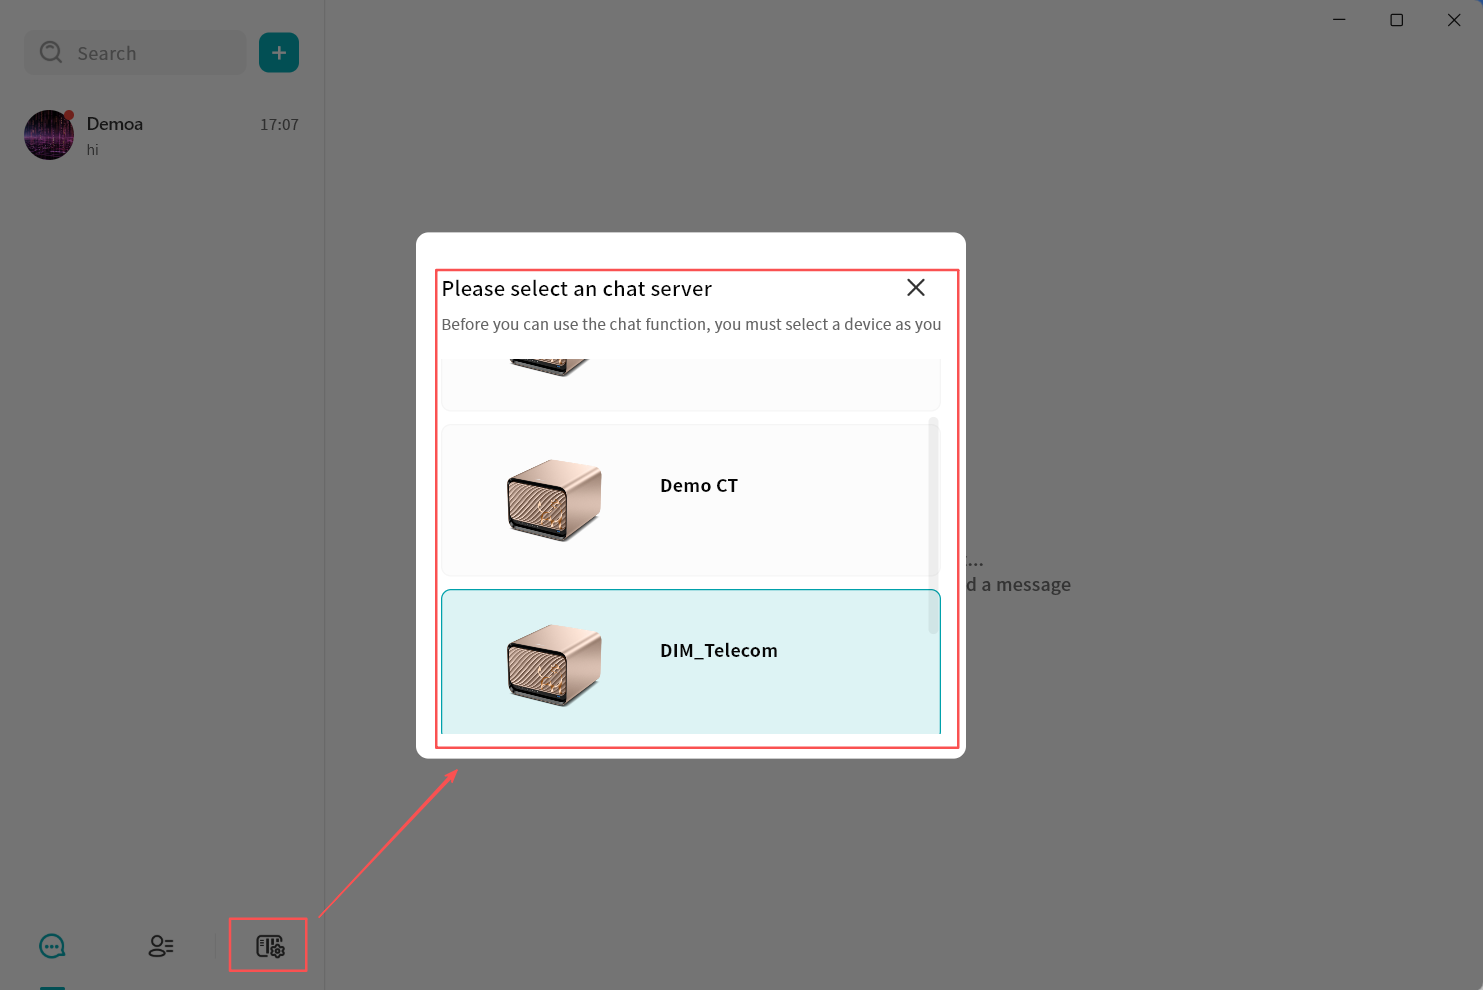
Selecting a Chat Server
When using DASSET IM for the first time, you must select a DASSET device to act as your chat server. Once selected, you can freely chat with all users connected to that device, and all chat history will be stored on the same server. Each chat server runs on a single DASSET device. All users bound to that device can communicate with each other through the server.
- Note 1: To protect user privacy, DASSET does not automatically create chat server accounts for all users bound to a device. If users on the same device want to chat with each other, they must first select the same chat server.
- Note 2: Each chat server is independent. Think of it as having a WeChat server hosted in your home or office. Only users connected to the same server can communicate. DASSET users on different servers cannot chat with each other.
- Note 3: Cross-server instant messaging is not supported. Accounts connected to different chat servers cannot communicate across devices.
When you first enter the chat interface, DASSET displays all the DASSET devices bound to your account and prompts you to select one as your chat server. If a device does not support the chat application, you will see a red message stating This device does not support chat services. This usually occurs because the device firmware has not been updated to the latest version or the hardware is not capable of running chat services. A single account can bind to multiple chat servers, but you can only be connected to one chat server at a time. Chatting is limited to users on that active server.
You may switch servers at any time to view messages from users on other chat servers.
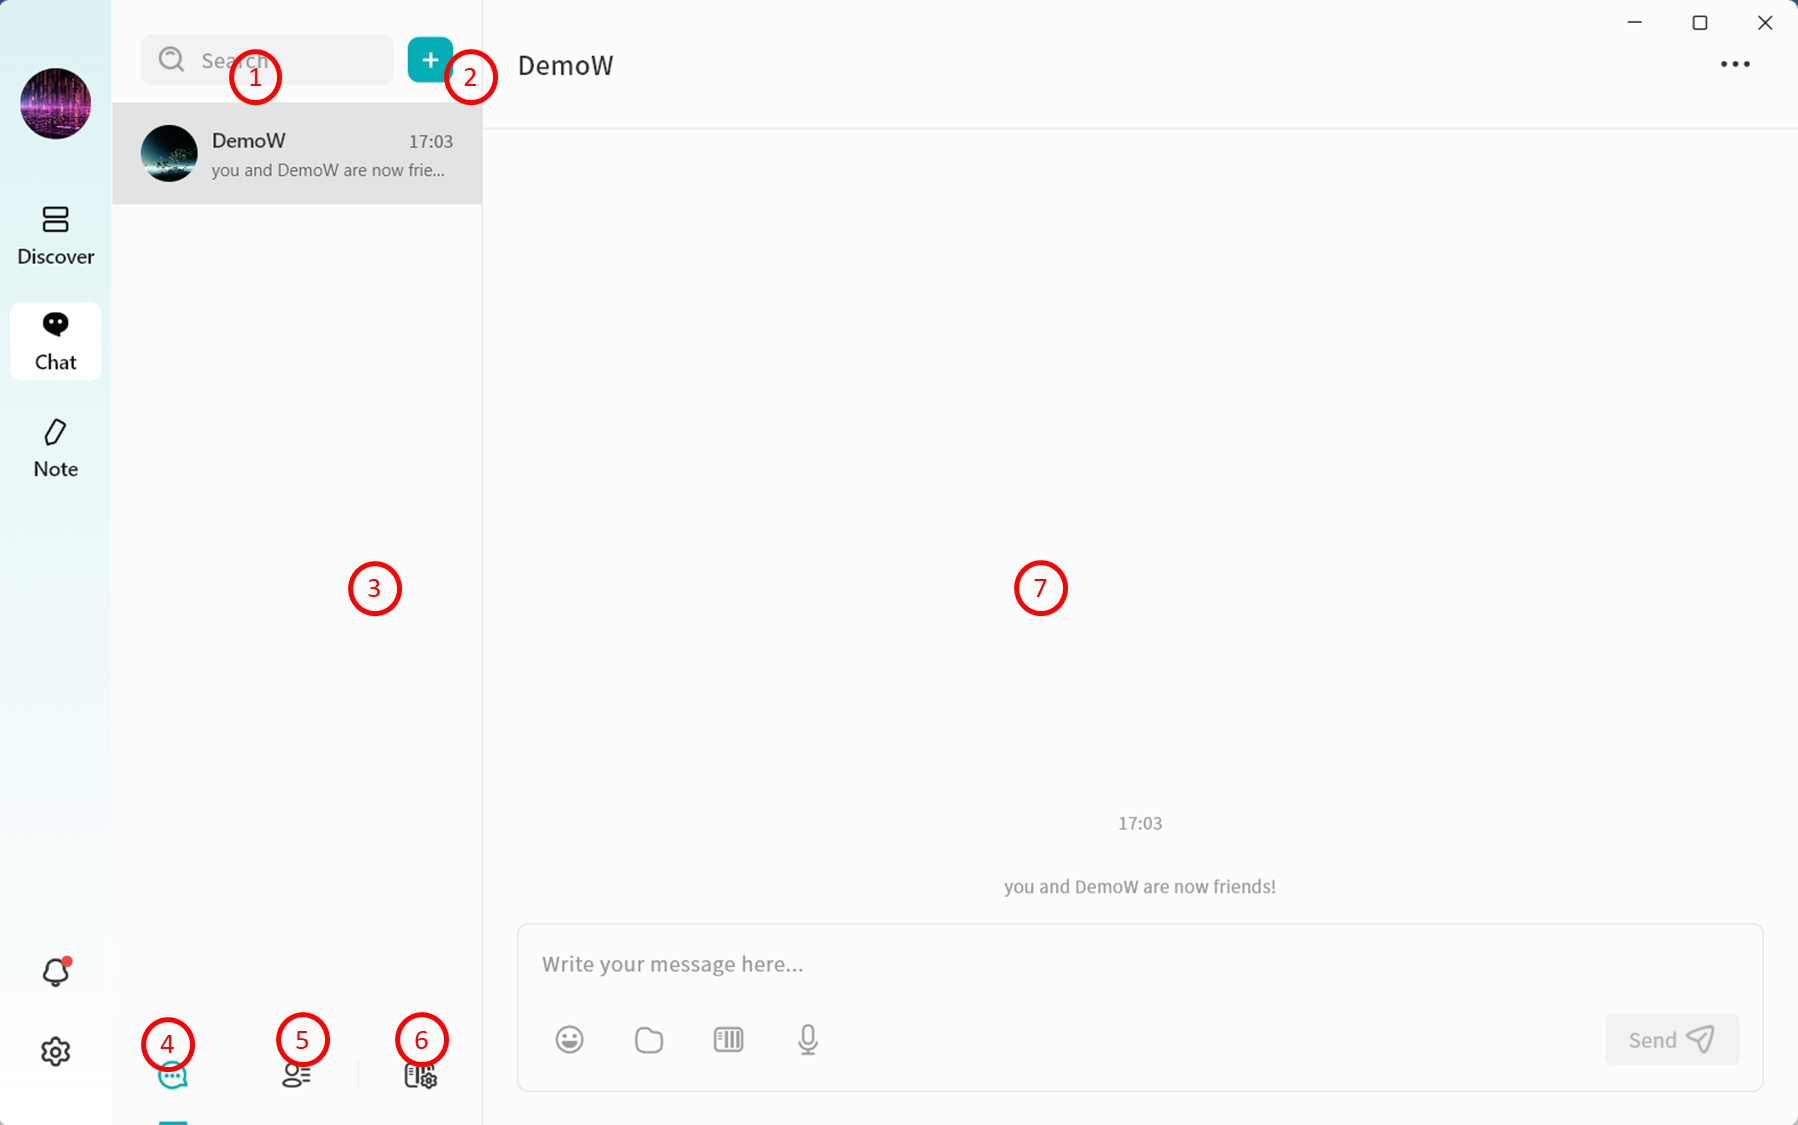
Chat Interface Overview
After selecting a chat server, you will enter the DASSET chat interface:
- Search: Search for contacts with whom you already have active conversations.
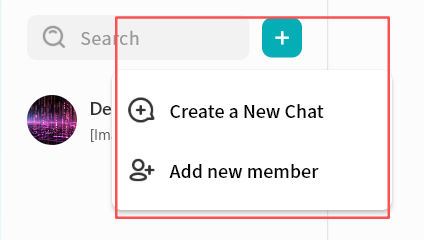
- Add (+): Select users connected to the current chat server to start a first-time conversation, or invite new users to join the server (available only to the device Owner).
- New Conversation: Start a first-time chat with users connected to the current chat server.
- Conversation List: Switch to view the list of chat conversations.
- Contacts: View all users currently on the selected chat server.
- Switch Chat Server: Switch between multiple chat servers at any time to communicate with users on different servers.
- Chat Window: Displays chat messages and conversation history.
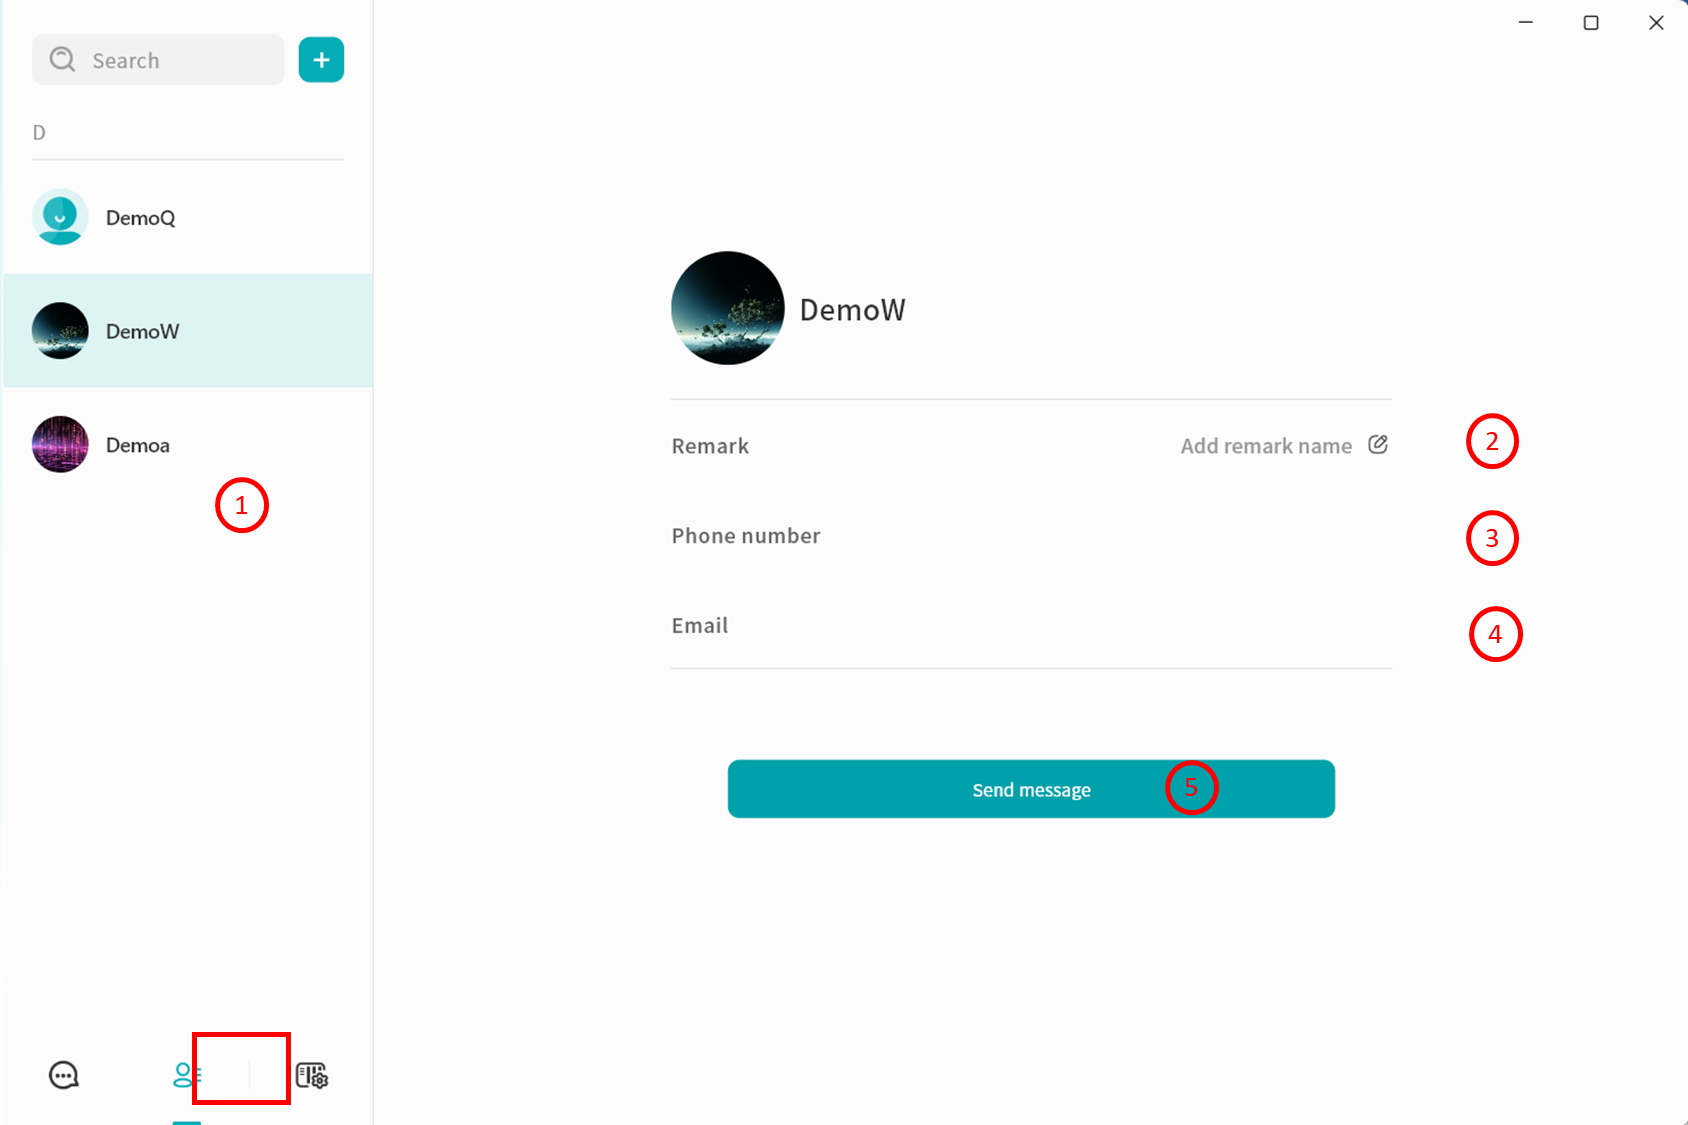
Viewing the Contact List
When you open the contact list, you can see all user accounts currently connected to the selected chat server:
- Contact List: Displays the names of all contacts.
- Remarks: Add or edit notes for contacts to make them easier to remember.
- Phone Number: View the contact's registered phone number.
- Email Address: View the contact's registered email address.
- Send Message: Start a conversation with the selected contact.
Switching Chat Servers
Click Switch Server to log in to another chat server and communicate with contacts connected to it.
- At any given time, you can only be connected to one chat server, and you may chat only with users on that server.
- The server list will only display your bound DASSET devices that support chat services.
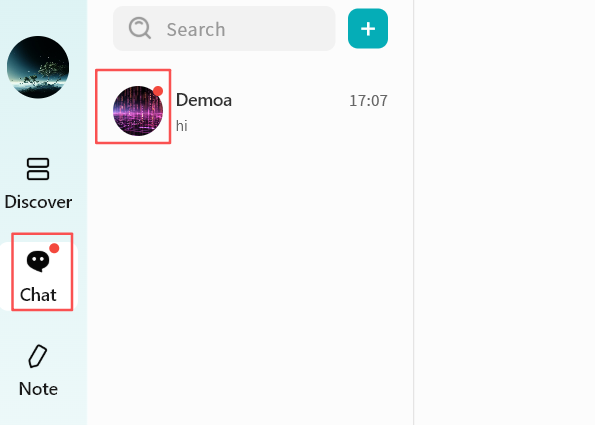
New Message Notifications
When a new message arrives, the DASSET client notifies you in two ways:
- A red dot appears on the chat icon in the client.
- A red dot appears on the contact's avatar in the chat interface.
Instant Chat Window
In DASSET IM, you can chat one-on-one or create group chats with users connected to the same chat server. The chat interface is designed to be familiar and intuitive, similar to other mainstream IM tools.
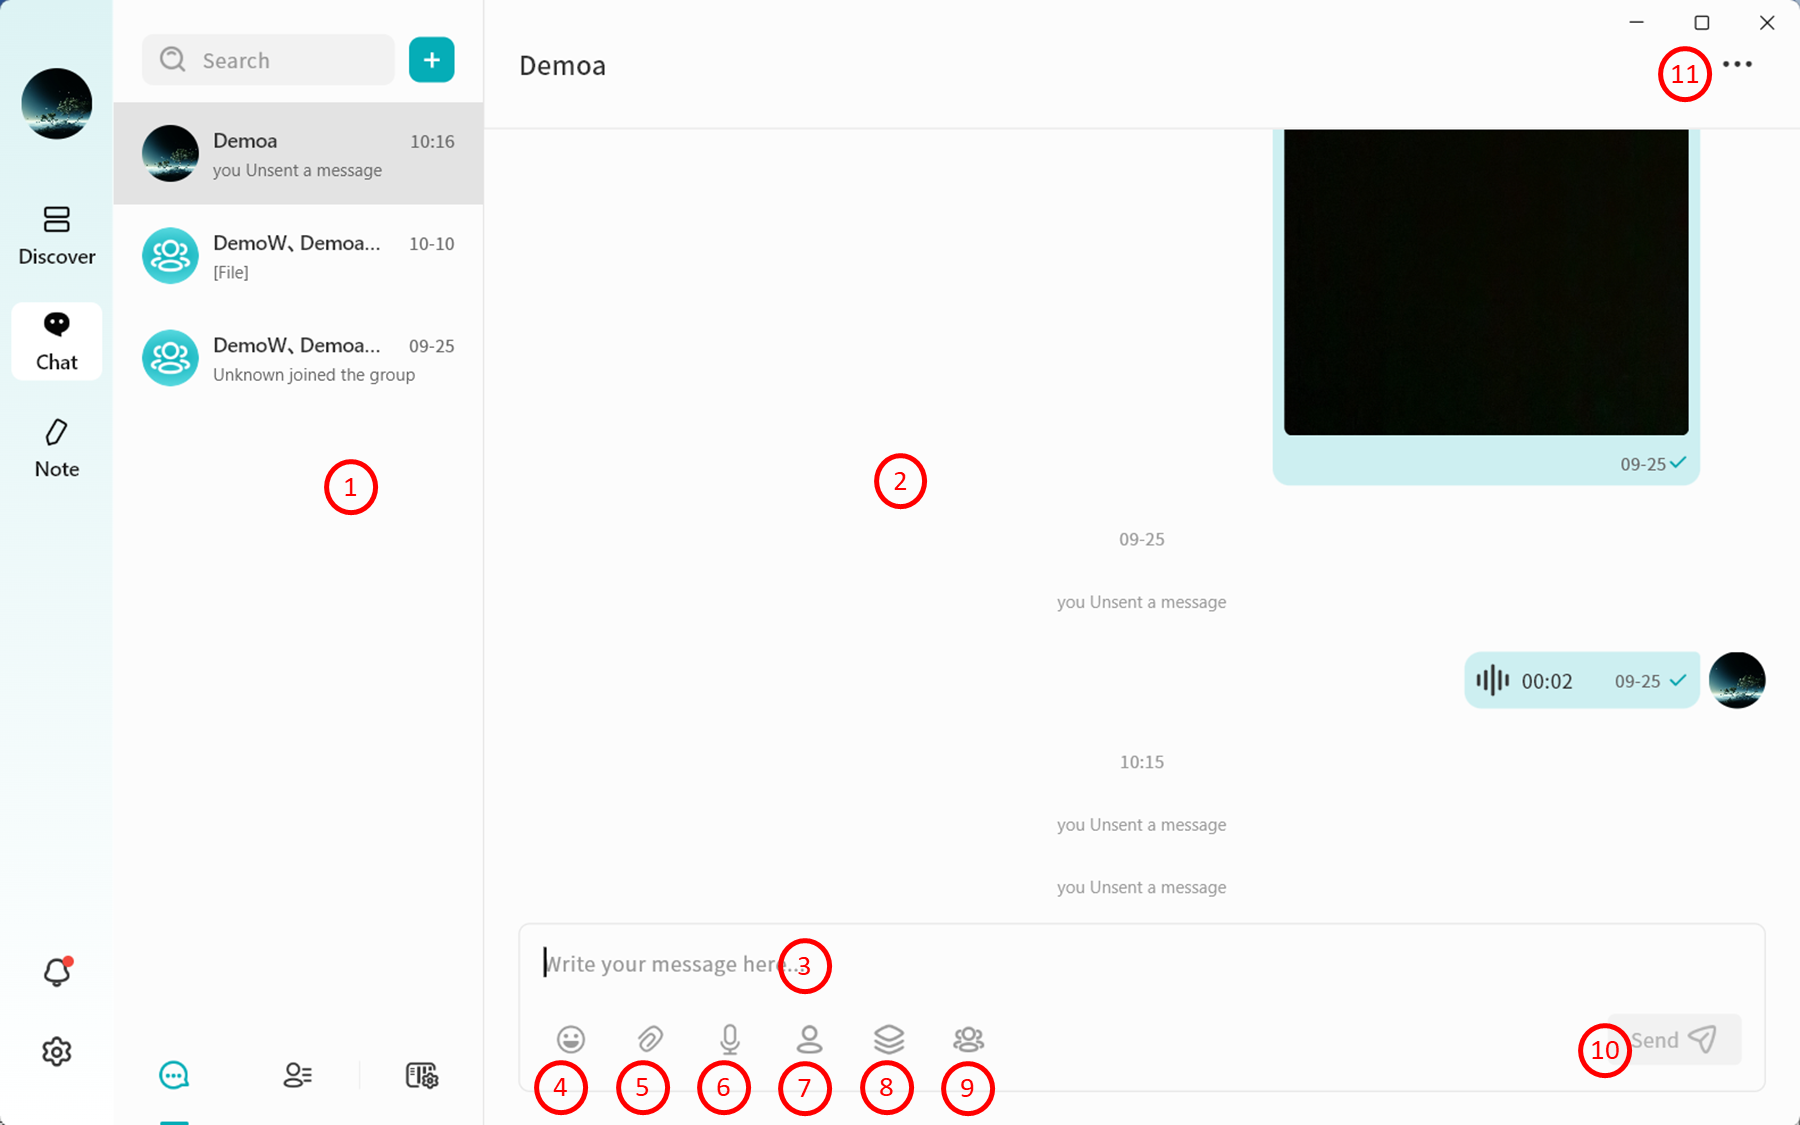
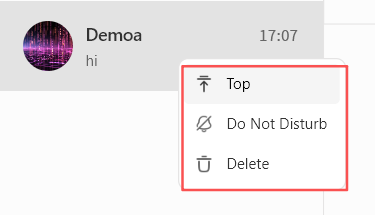
- Conversation Tabs: Switch between different chat conversations. Right-click on any chat record to:
- Pin the conversation
- Mute Notifications
- Delete the conversation
- Chat Window: Displays the conversation history.
- Input Box: Supports text input and pasting pc-images. Also supports sending long text and Markdown-formatted content. Messages exceeding 5000 characters will be automatically converted into a file for sending.
- Emojis: Insert emojis into your messages.
- Local Attachments: Send files stored on your computer.
- Voice Messages: Record and send voice messages.
- Send files from the "My Space" on the DASSET device that hosts the current IM chat server.
- Send files from the "Public Space" on the DASSET device that hosts the current IM chat server.
- Send files from the "Group Space" on the DASSET device that hosts the current IM chat server.
- Send Message: Deliver the composed chat message.
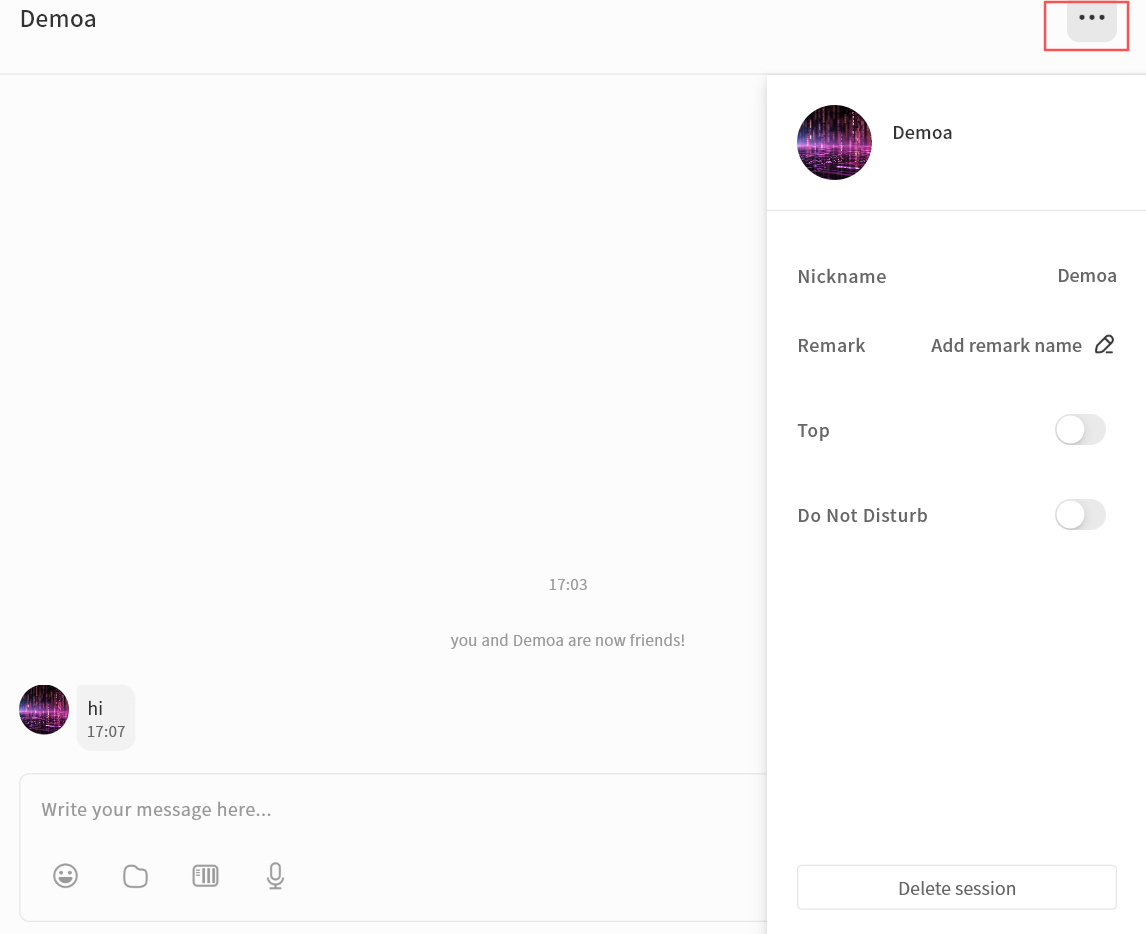
- Chat Information Panel: View and manage details of the chat partner or group:
- View avatar
- View nickname
- Edit remarks
- Pin the conversation
- Mute the conversation
- Delete Conversation: Permanently remove the chat from your view. Deleting a conversation removes all records from your side. Even if you start a new chat, previous messages will not be visible. However, the recipient's chat history will still remain intact.
Chat Message Interactions
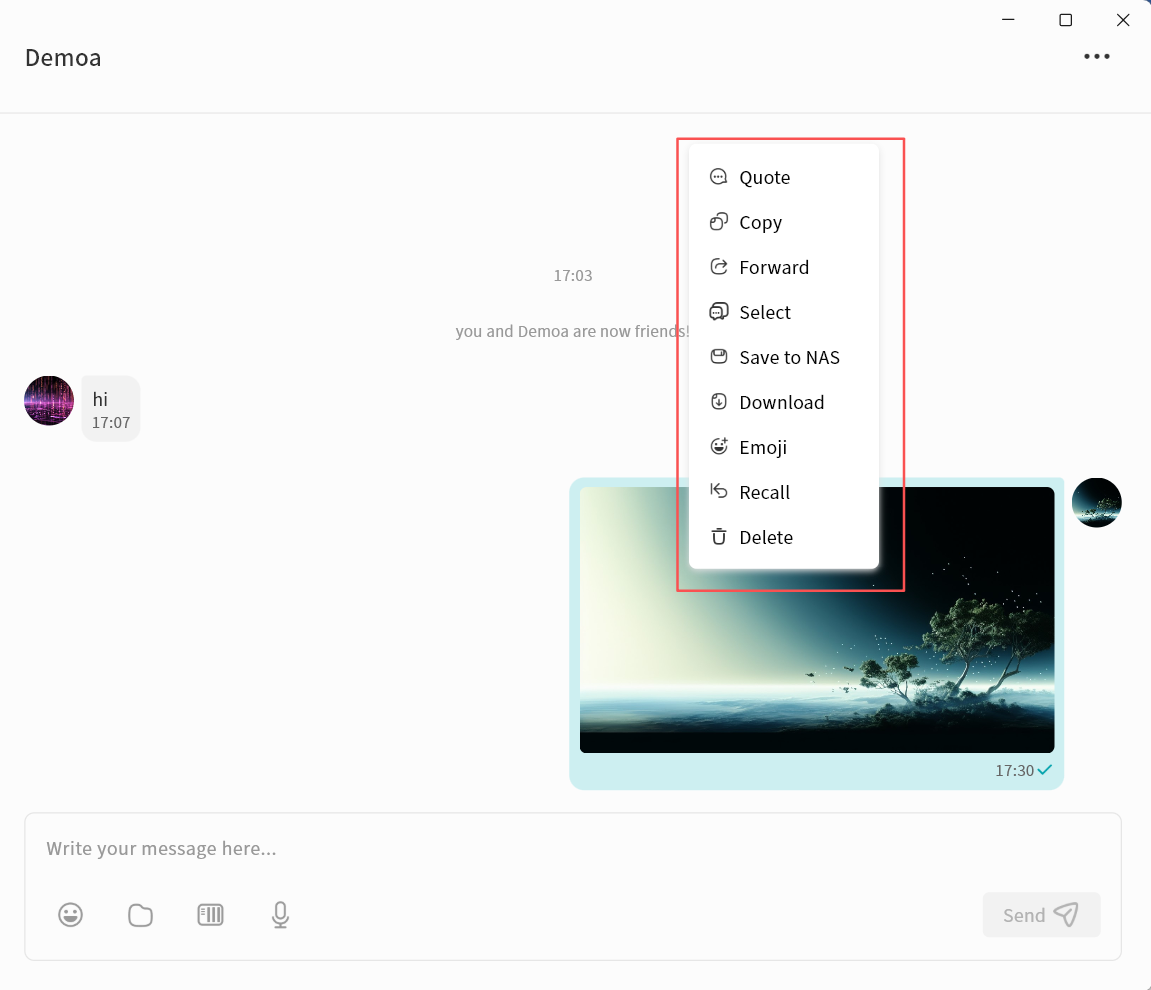
In the chat window, you can right-click on historical chat records to perform the following actions:
- Quote: Reply to a specific message by quoting it.
- Copy: Copy the content of the selected message.
- Forward: Forward the message to another user.
- Multi-Select: Select multiple messages for combined forwarding or deletion.
- Save to NAS: Save attachments from the chat directly to your DASSET device.
- Download: Download attachments to your local computer.
- Emoji: Respond to a message with an emoji.
- Recall: Withdraw a message you sent.
- Delete: Delete selected messages.
warning
Deletion only removes the message from the current terminal. If you log in from another terminal, the deleted message will still be visible. To ensure the message is removed from all terminals and the recipient, use Recall instead.
- Open: Preview attachments directly if supported.
- URL Links: If a chat message contains a URL, clicking it will open the link in your browser.
One-on-One Chat
Creating a Chat
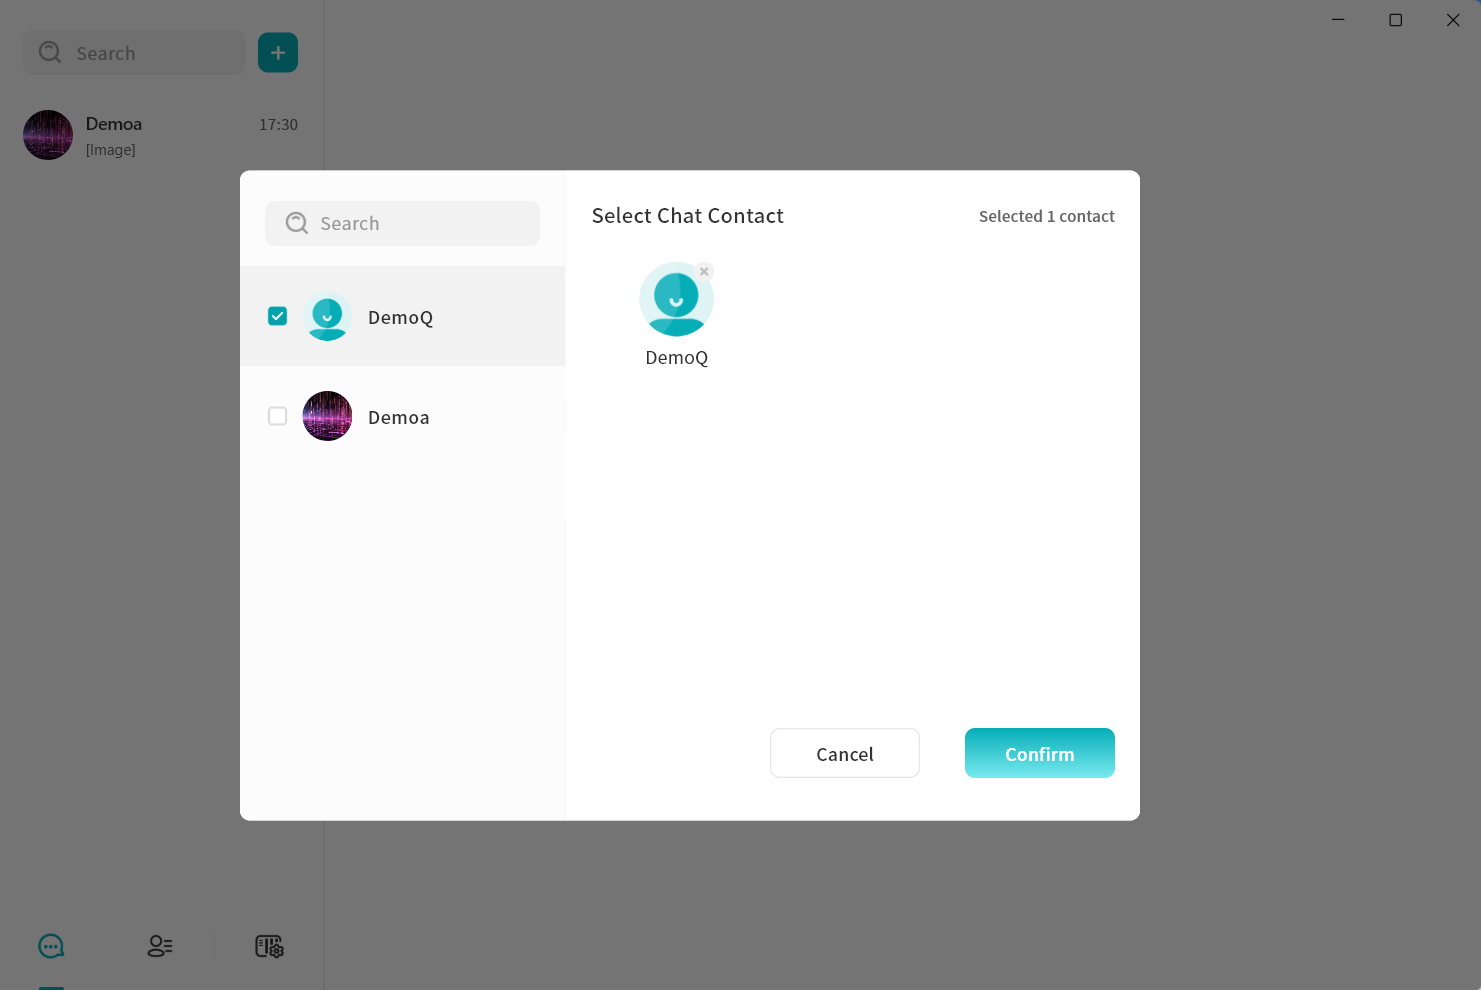
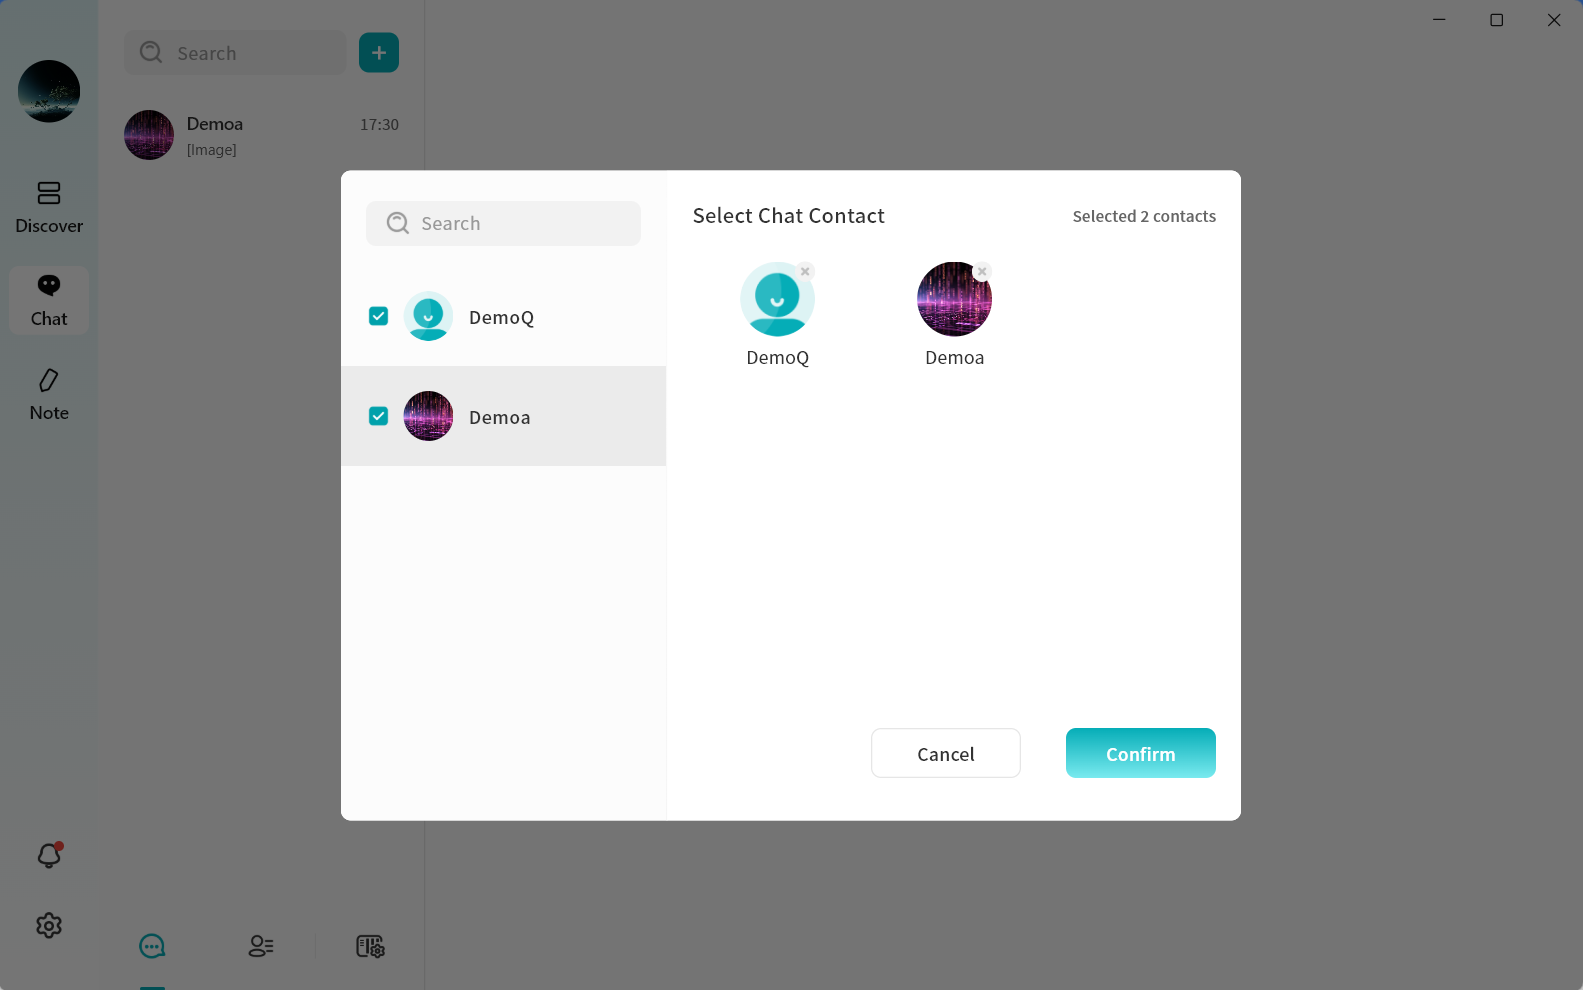
- Click + New Conversation, or use the New Conversation button.
- In the contact selection window, choose one or more users to start the conversation.
- If you select multiple contacts, the conversation will automatically switch to group chat mode.
- If you select multiple contacts, the conversation will automatically switch to group chat mode.
- Click Confirm to create the conversation.
Deleting a Conversation
You can delete an existing conversation with a contact as follows:
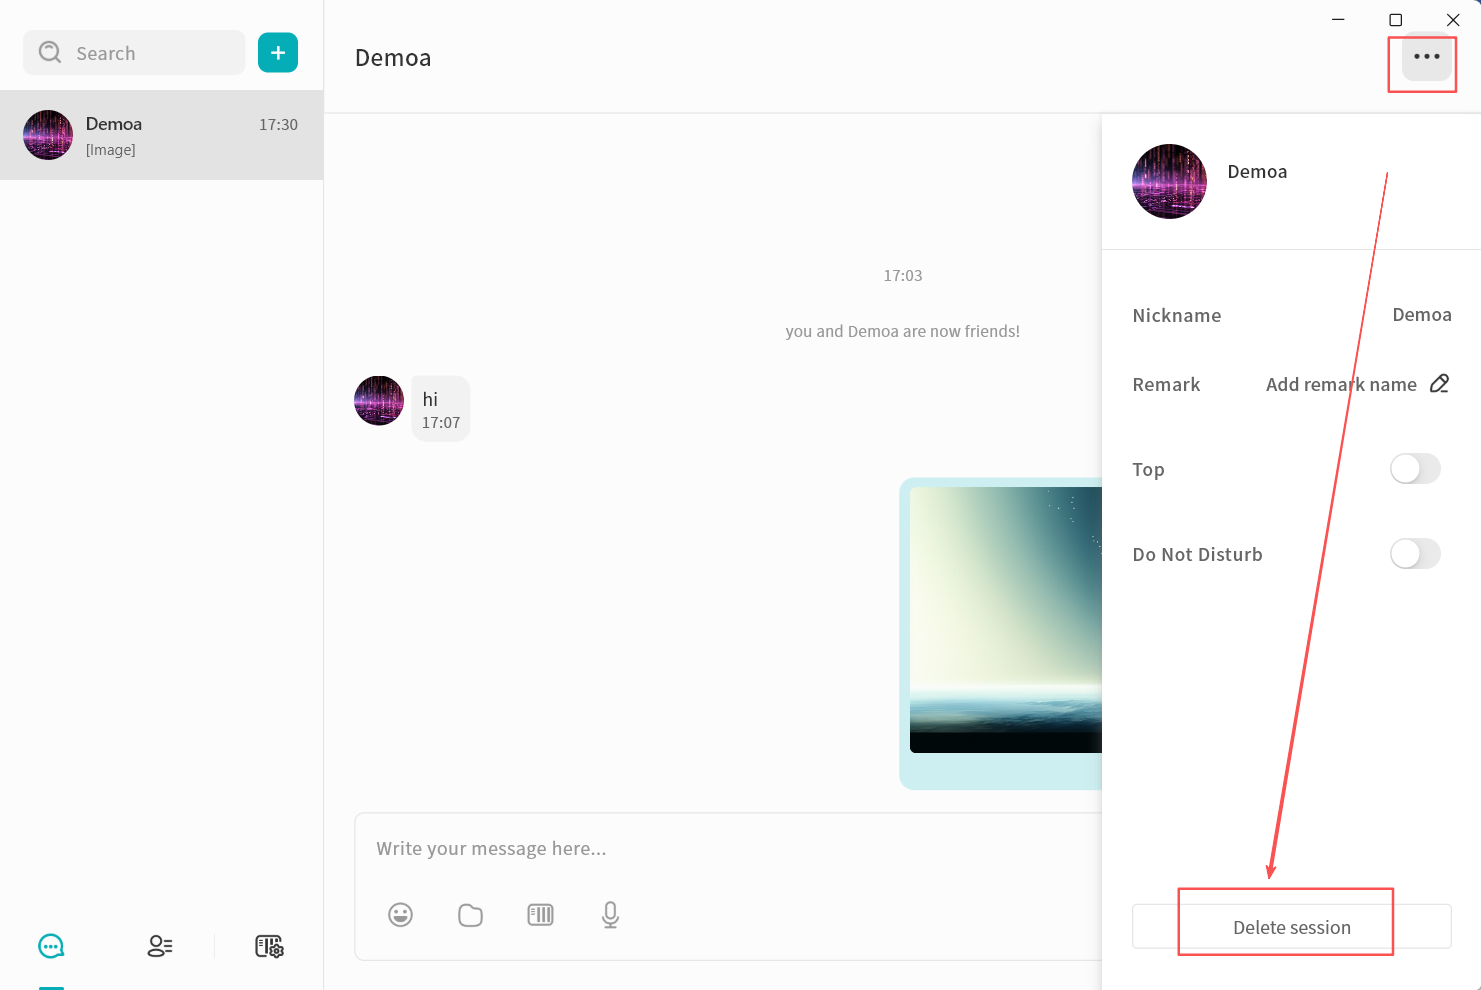
- In the chat window, click the ... menu in the top-right corner and select Delete Conversation.
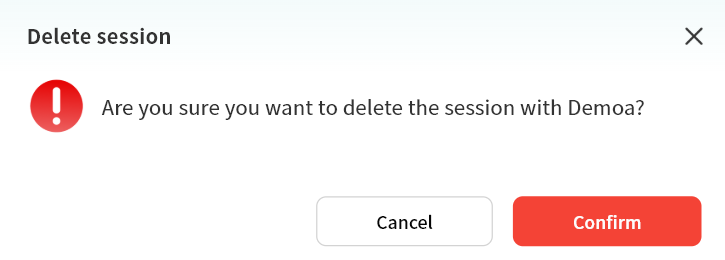
- In the confirmation window, click Confirm to delete the conversation.
Deleting a conversation will remove all chat records with that user from your view. Even if you start a new conversation later, previous messages will not reappear. However, the recipient will still retain the full chat history.
Pinning Chats and Muting Notifications
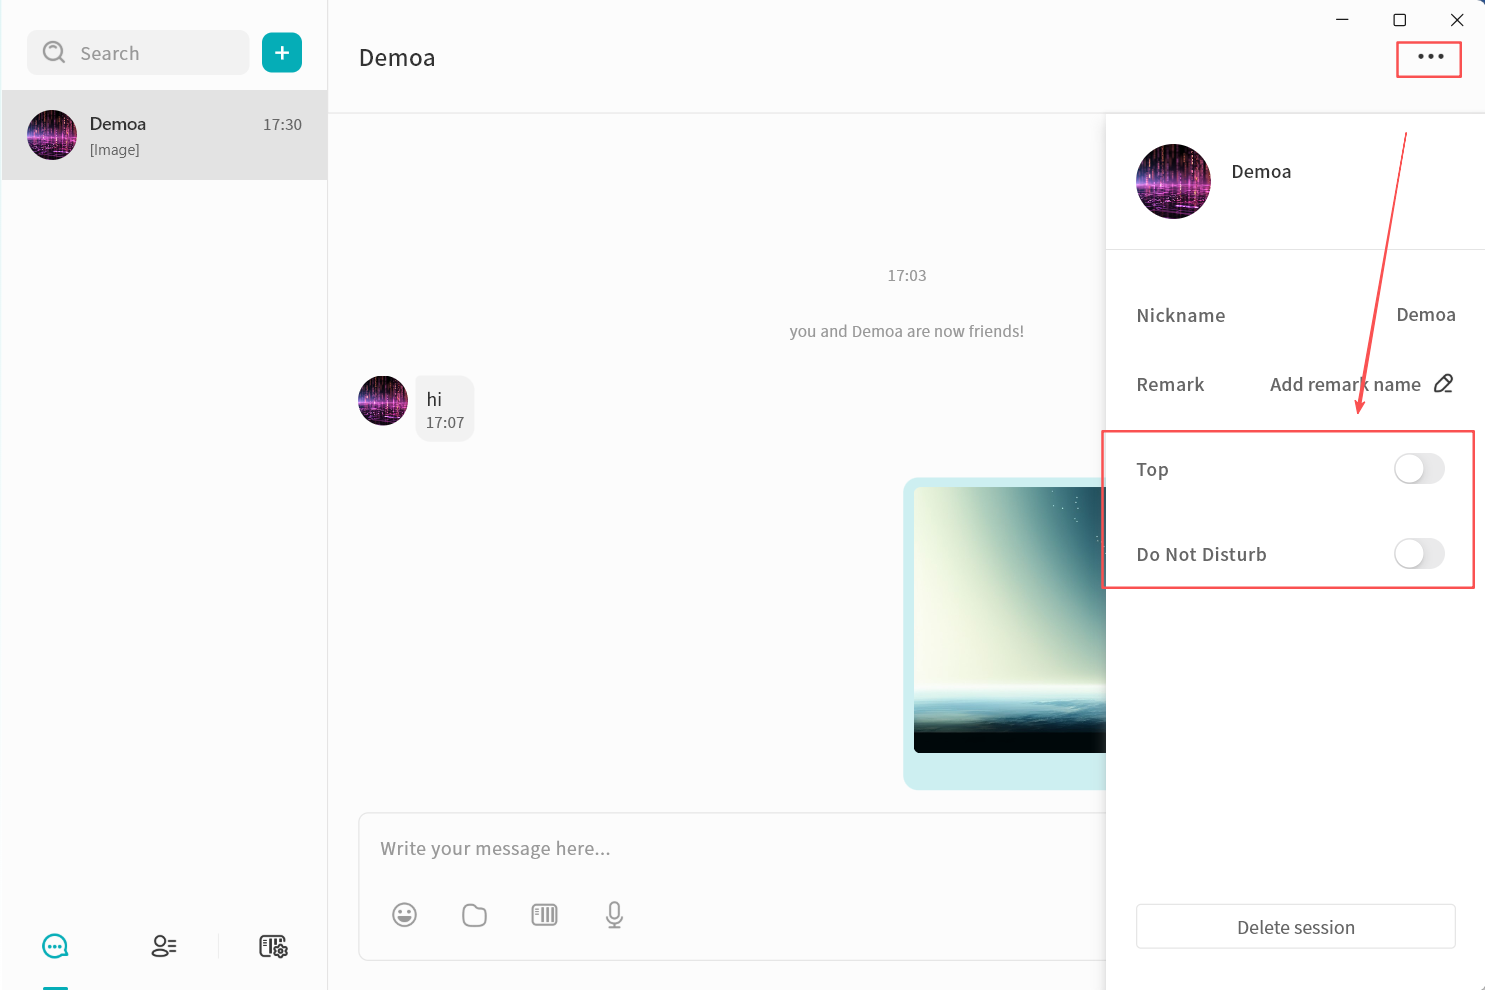
In the chat settings window, you can:
- Top: Keep the conversation at the top of the chat list.
- Do Not Disturb: Disable new message alerts for the conversation.
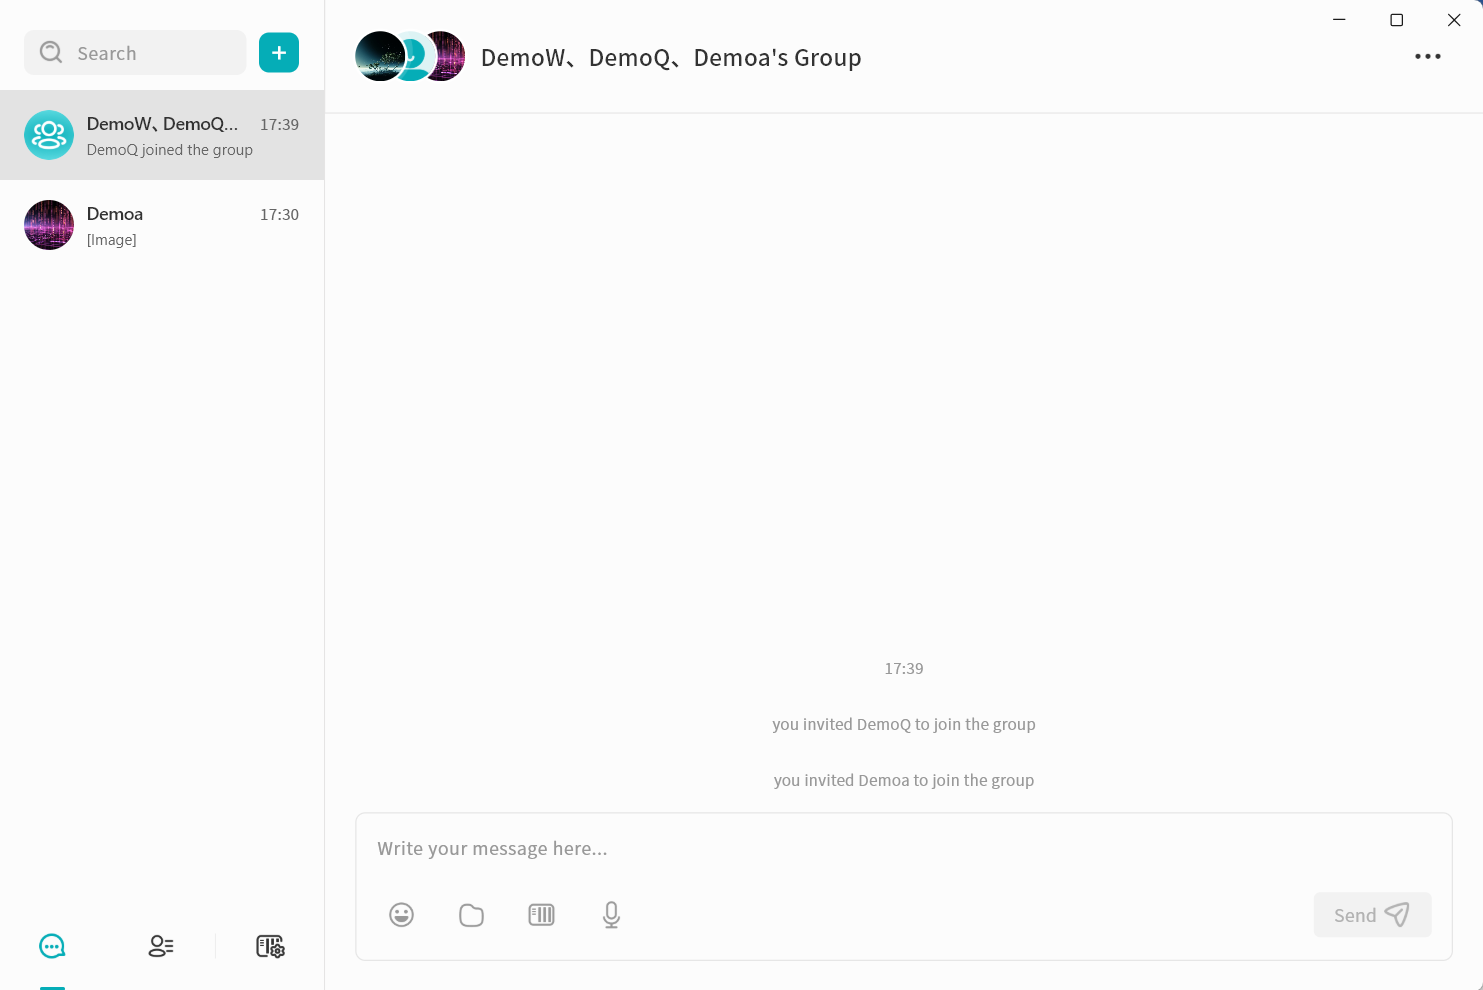
Group Chat
DASSET IM supports creating group chats with multiple contacts, making it convenient for small teams to communicate and share information.
Create a Group Chat
- Click + New Conversation, or use the New Conversation button.
- In the contact selection window, select multiple contacts.
- Click Confirm to create the group chat.
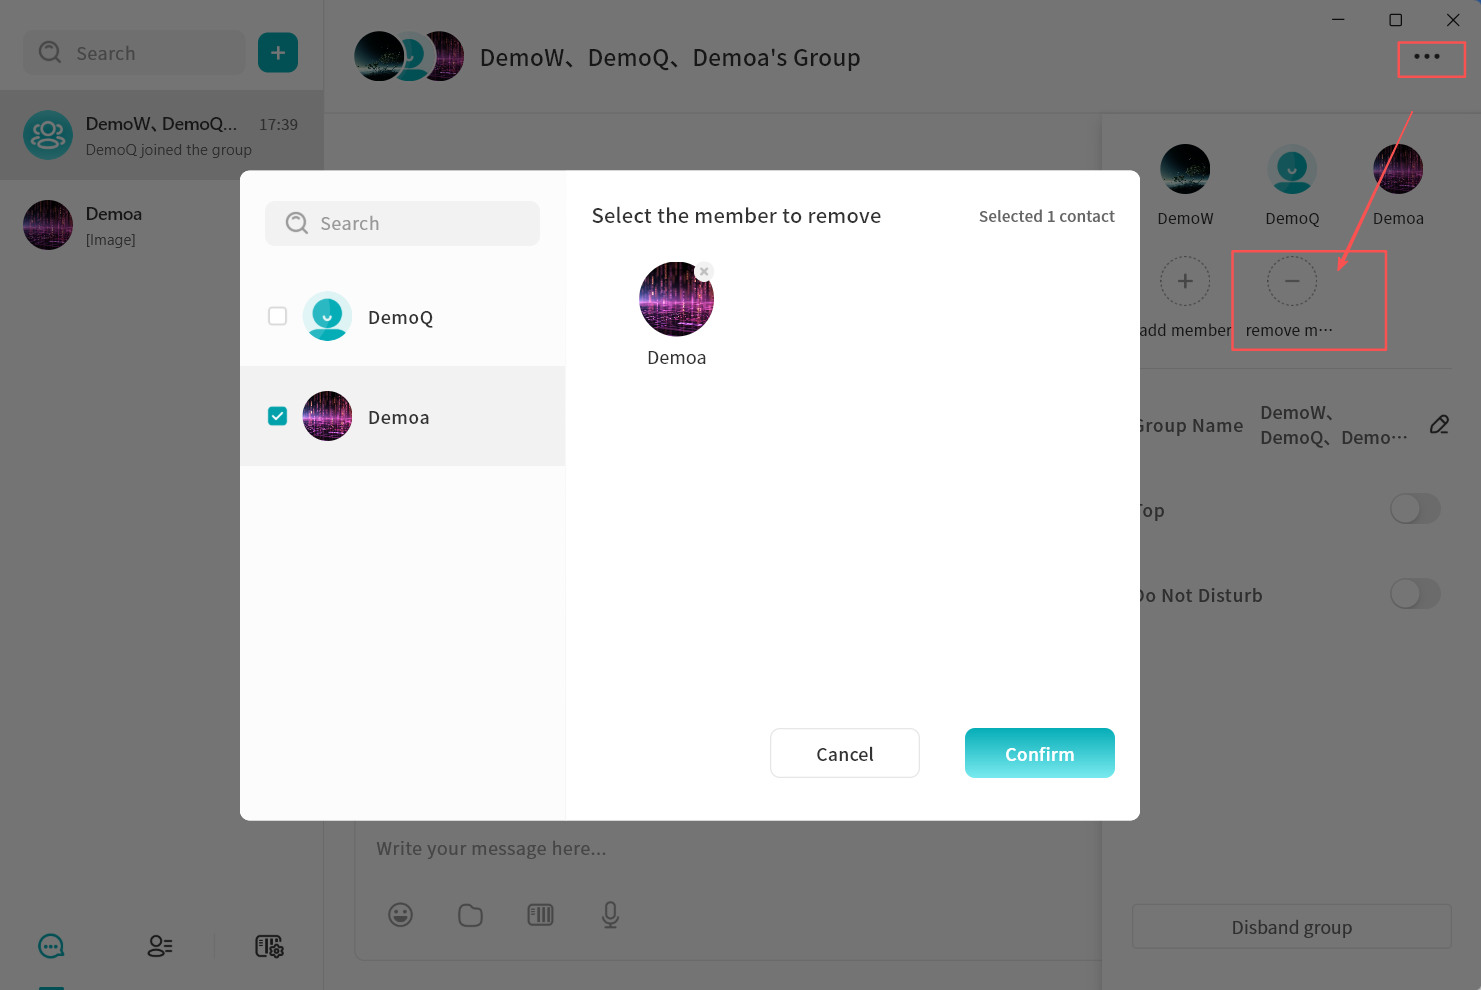
Manage Group Members
You can manage group members at any time, including viewing, adding, or removing participants.
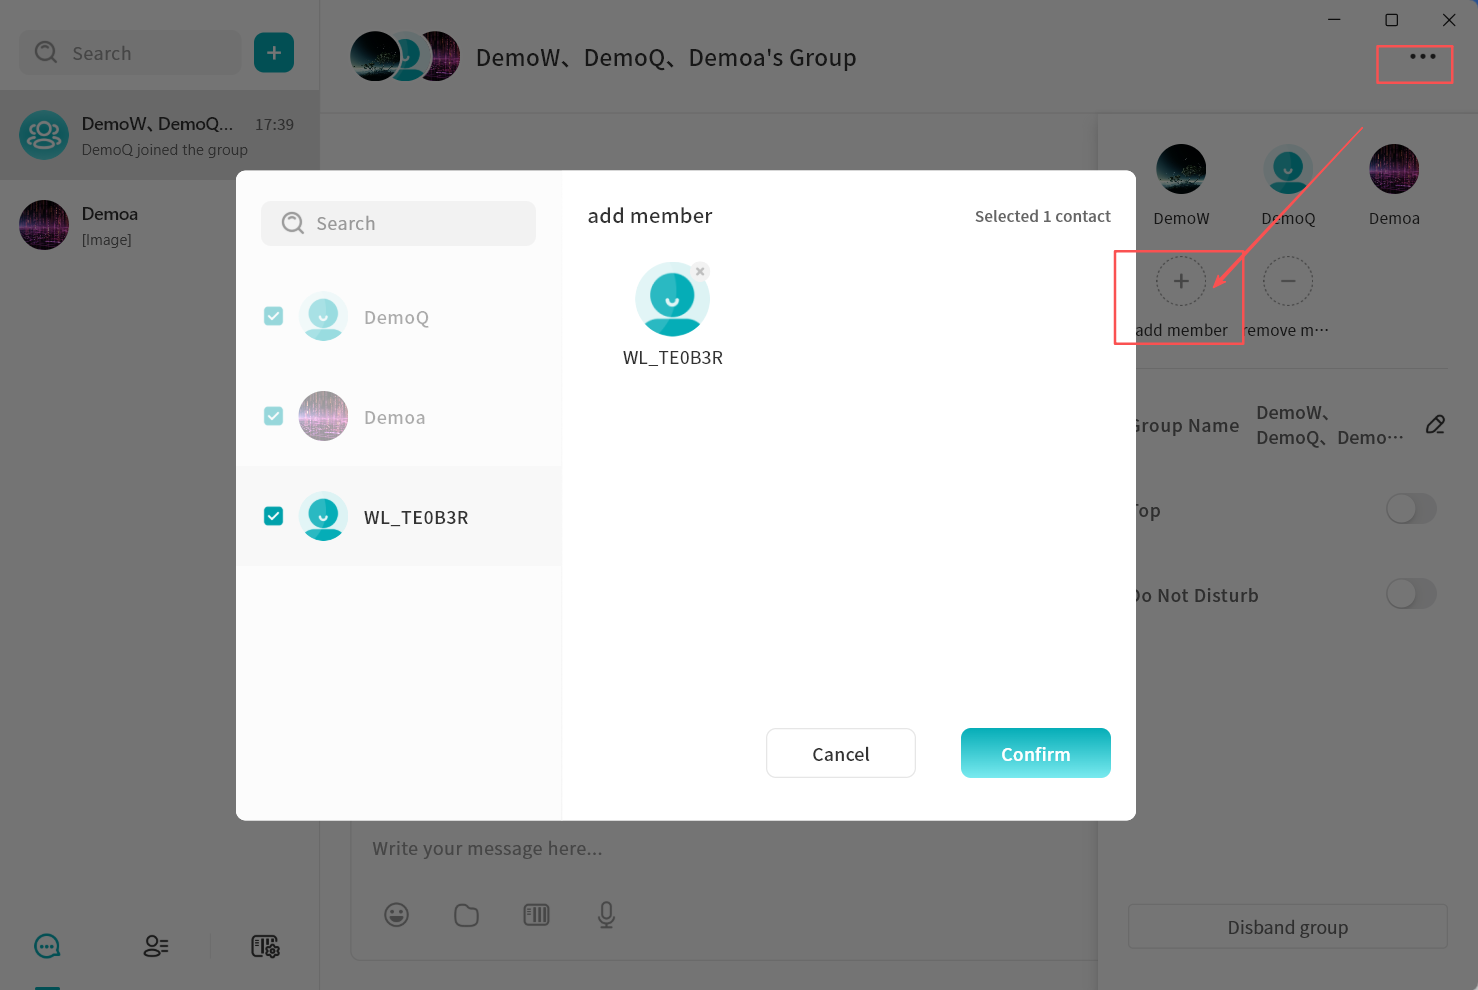
- In the group chat window, click the ... menu in the top-right corner.
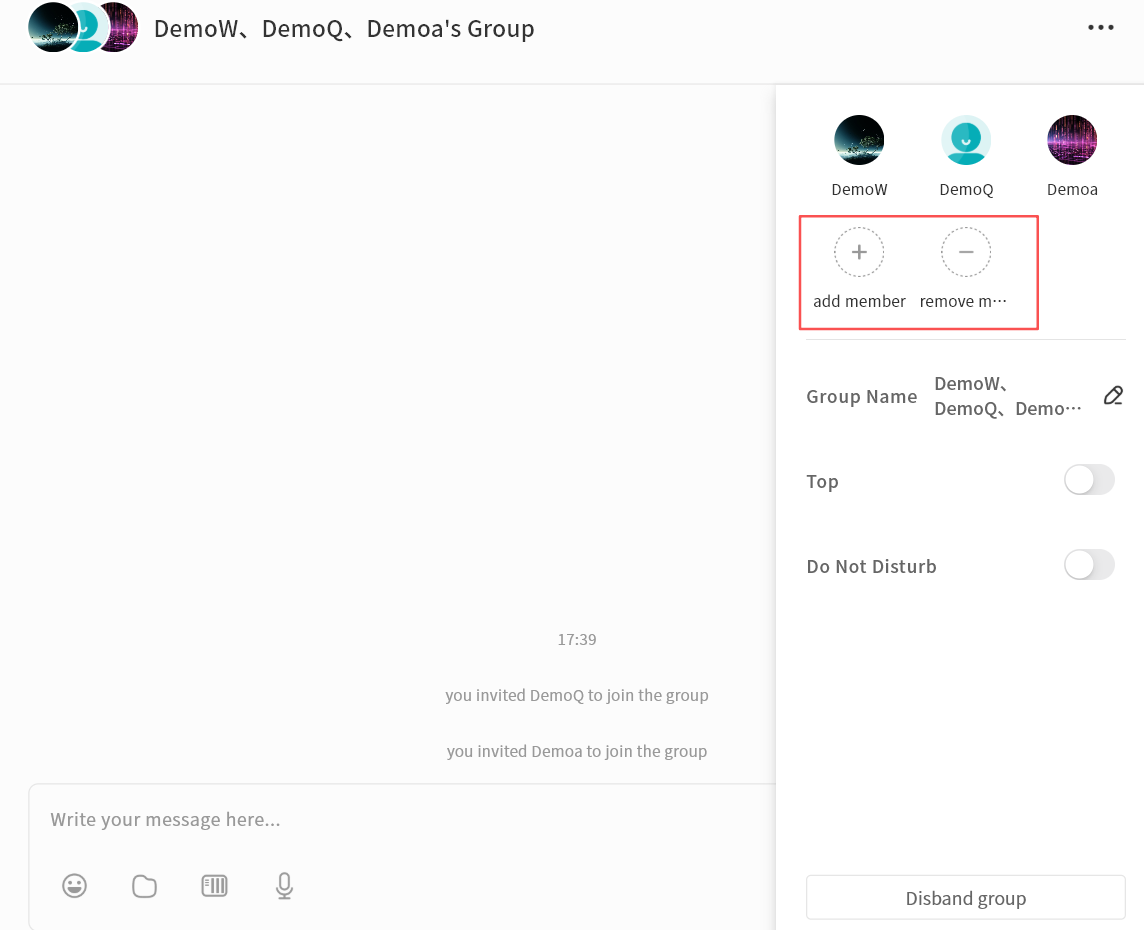
- Select Add Member to invite additional contacts connected to the same chat server.
- Select Remove Member to remove a participant from the group. Only the group creator can remove members.
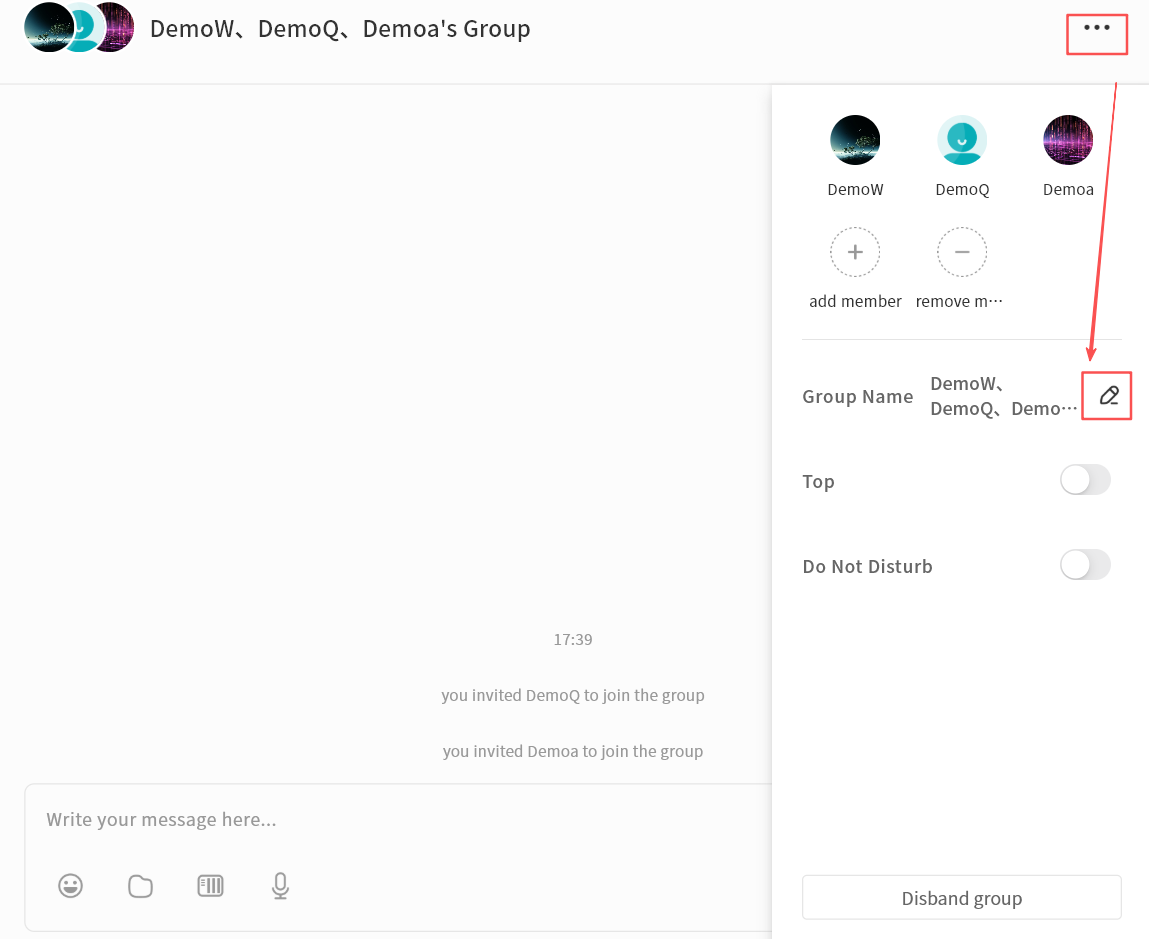
Change Group Name
The group creator can rename the group for easier identification. Click the edit icon next to the group name to enter a new name.
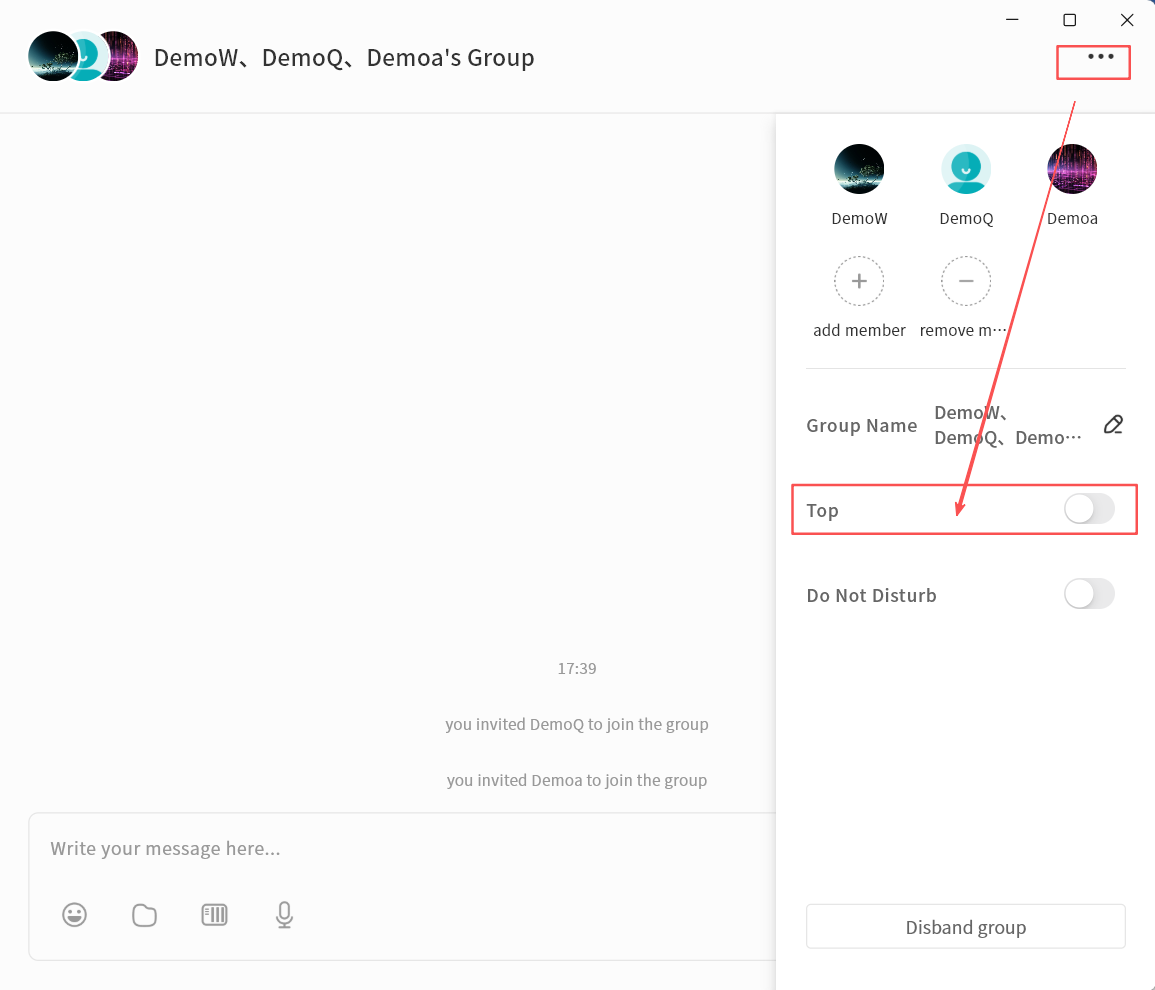
Pin Group Chat
Enable Top to keep the group chat at the top of the chat list.
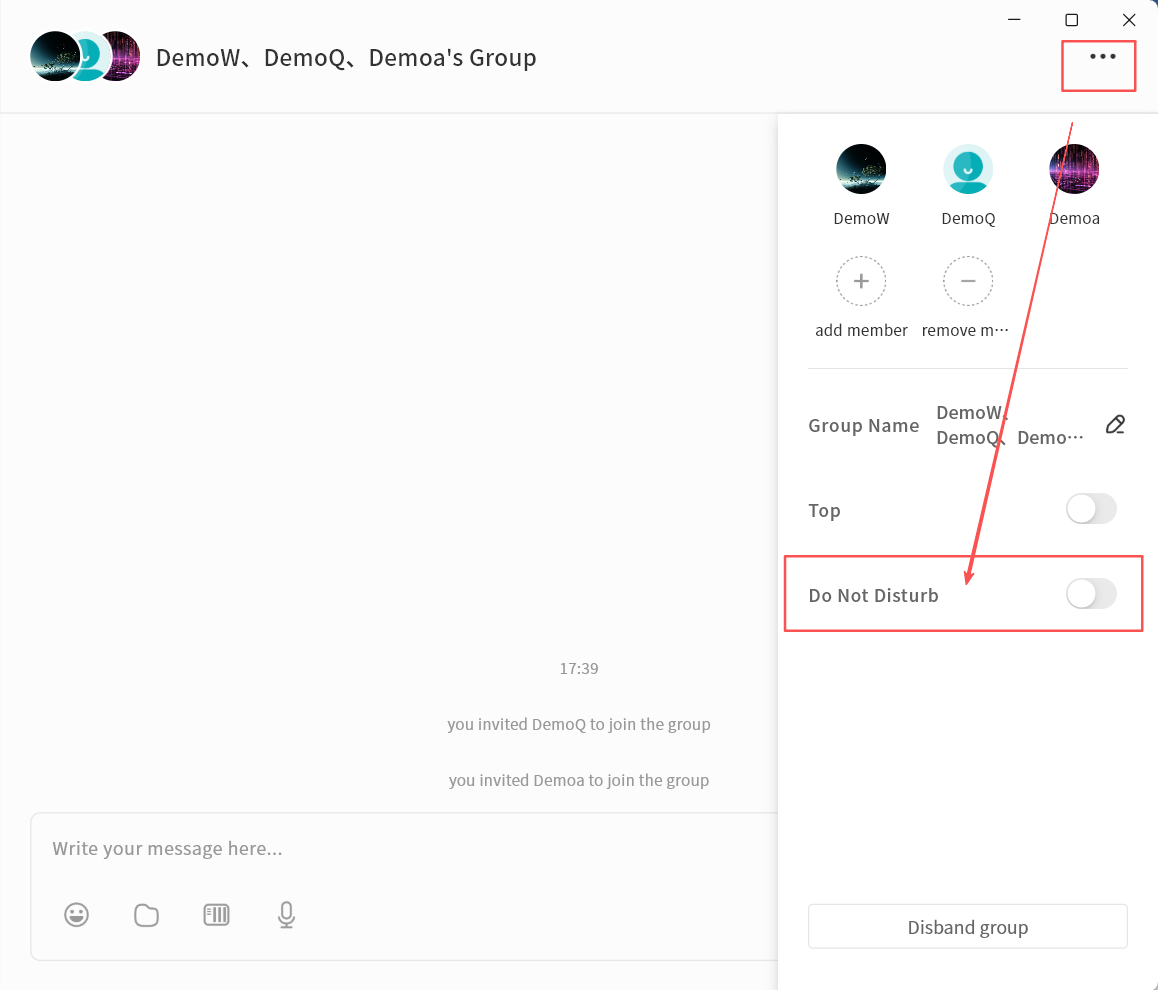
Mute Notifications
Enable Do not Disturb to stop receiving alerts for new messages in the group.
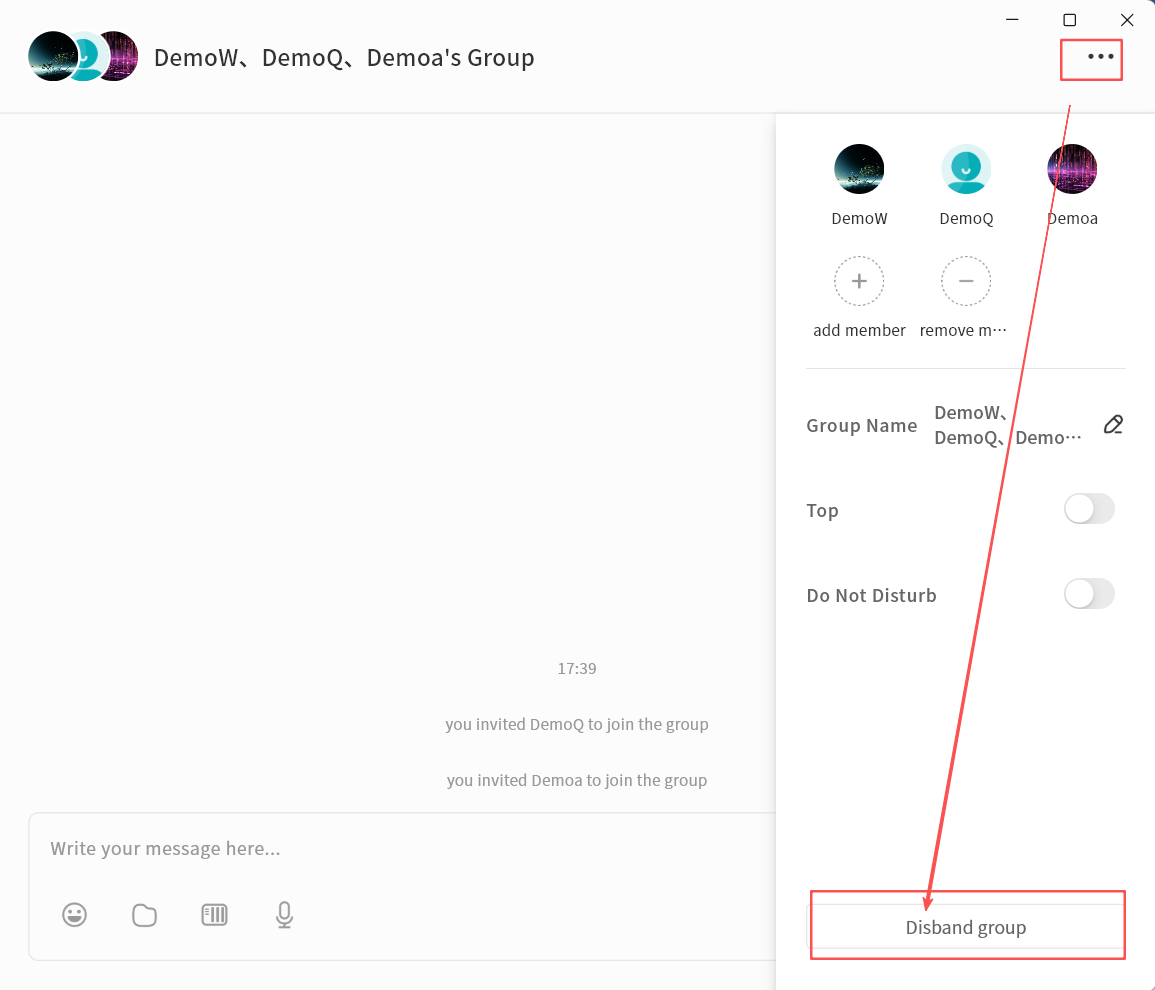
Disband Group
The group creator can disband the group:
- In the group chat window, click the ... menu Disband Group.
- Click Confirm to delete the group.
Leave Group
Any group member can exit the group at any time:
- In the group chat window, click the ... menu Exit the Group.
- After leaving, you will no longer receive messages from that group.

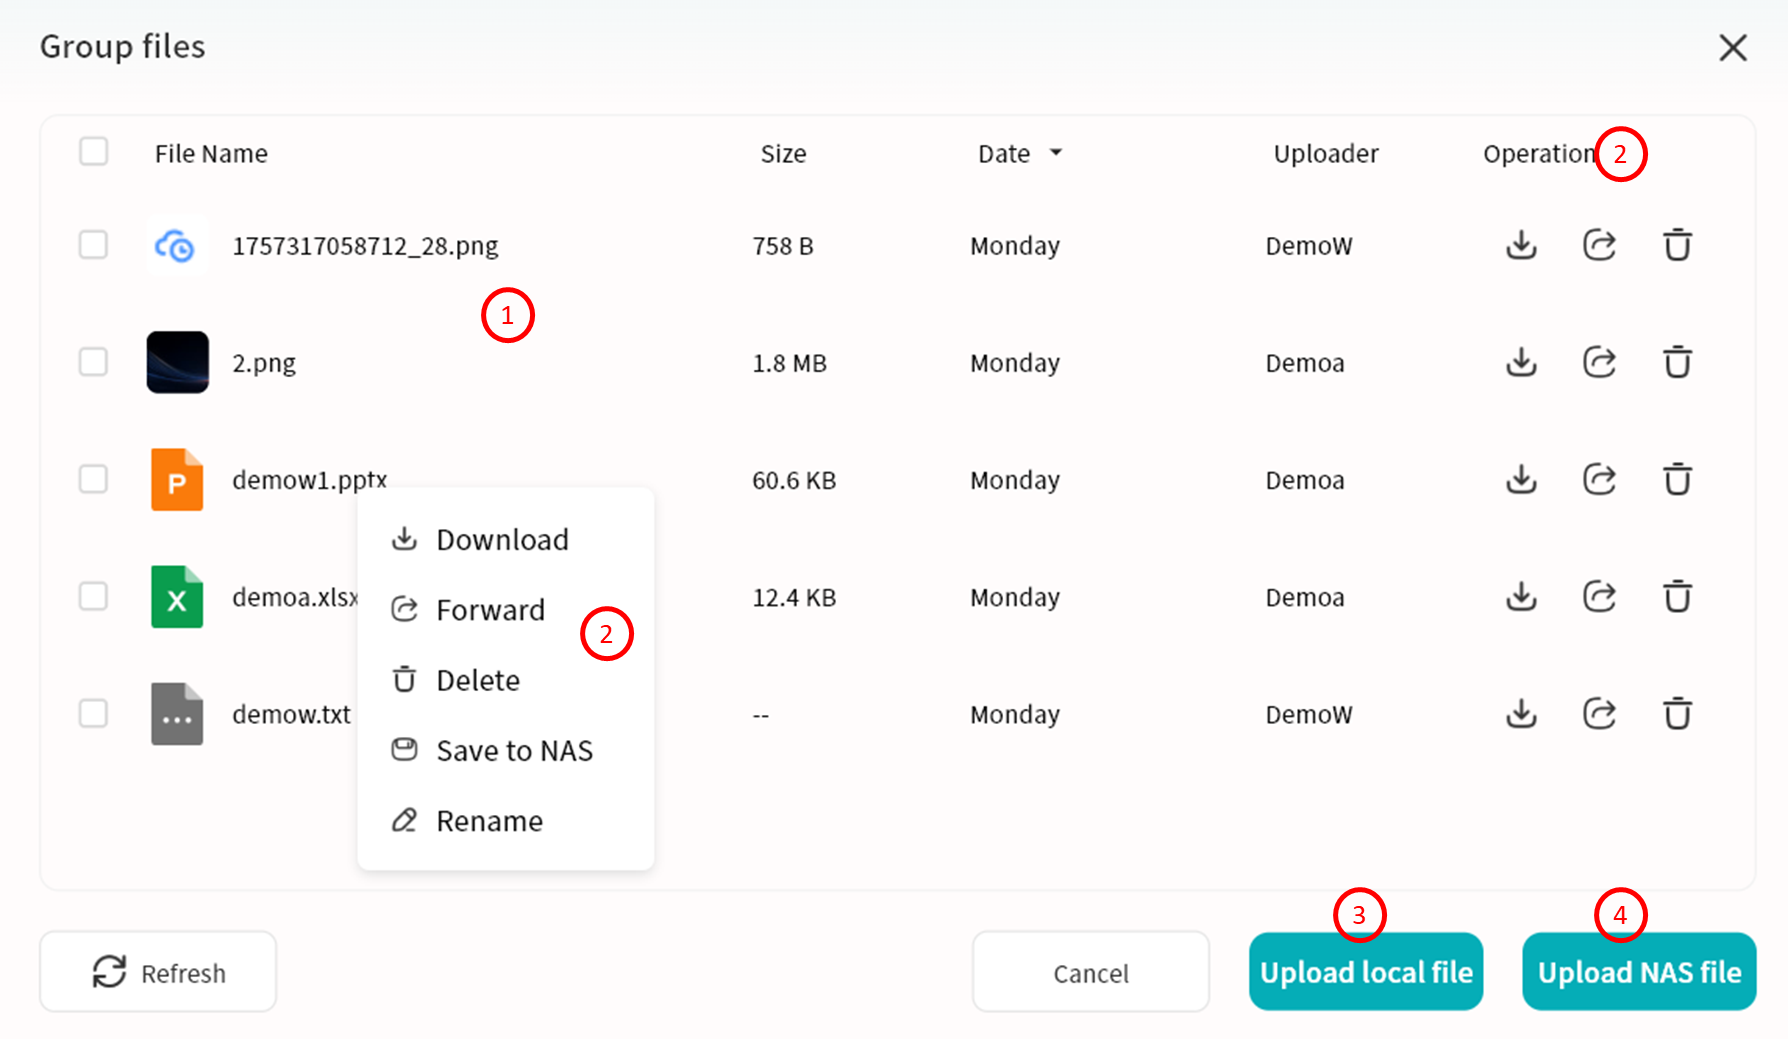
Group Files
Files shared in a group chat can be centrally managed through the Group Files feature. Click ... Group Files to view all files sent within the group chat.
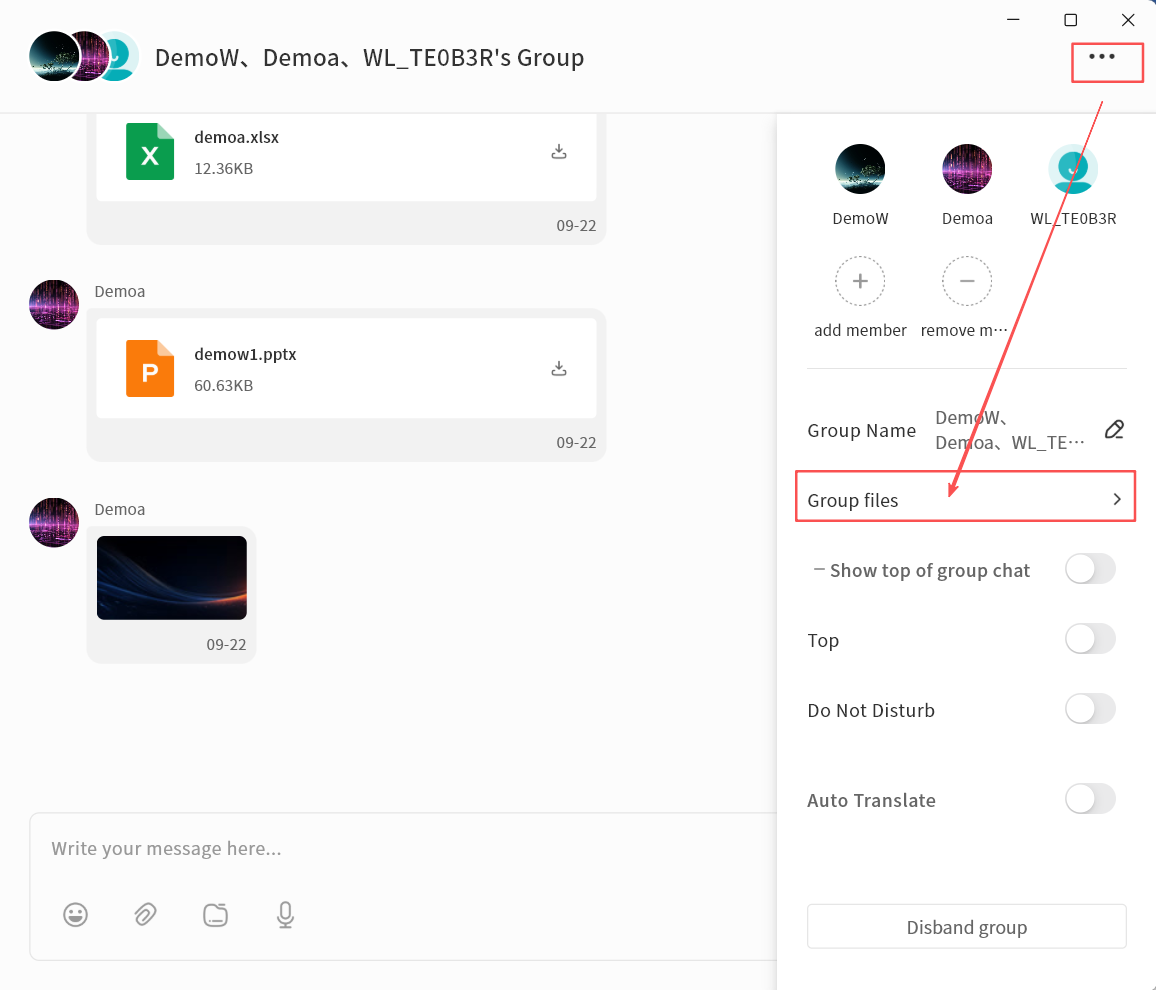 In Group Files, you can:
- View File List: Includes file name, size, upload date, uploader, and available actions.
- File Operations:
- Download (all members): Save the file to the local device.
- Forward (all members): Forward the file to another chat session.
- Delete (group Owner and uploader only): Only the group creator or the original uploader can delete files from Group Files.
- Save To (all members): Save the file to your personal NAS space associated with IM.
- Rename (group Owner only): Change the file name.
- Upload Local File: Select files from your local device to upload into Group Files. Note: After uploading, a file message will automatically be sent to the group chat.
- Upload NAS File: Select files from your NAS to upload into Group Files. Note: After uploading, a file message will automatically be sent to the group chat.
IM AI Agent
The IM feature includes multiple AI Agent capabilities that can be invoked anytime to improve communication efficiency.
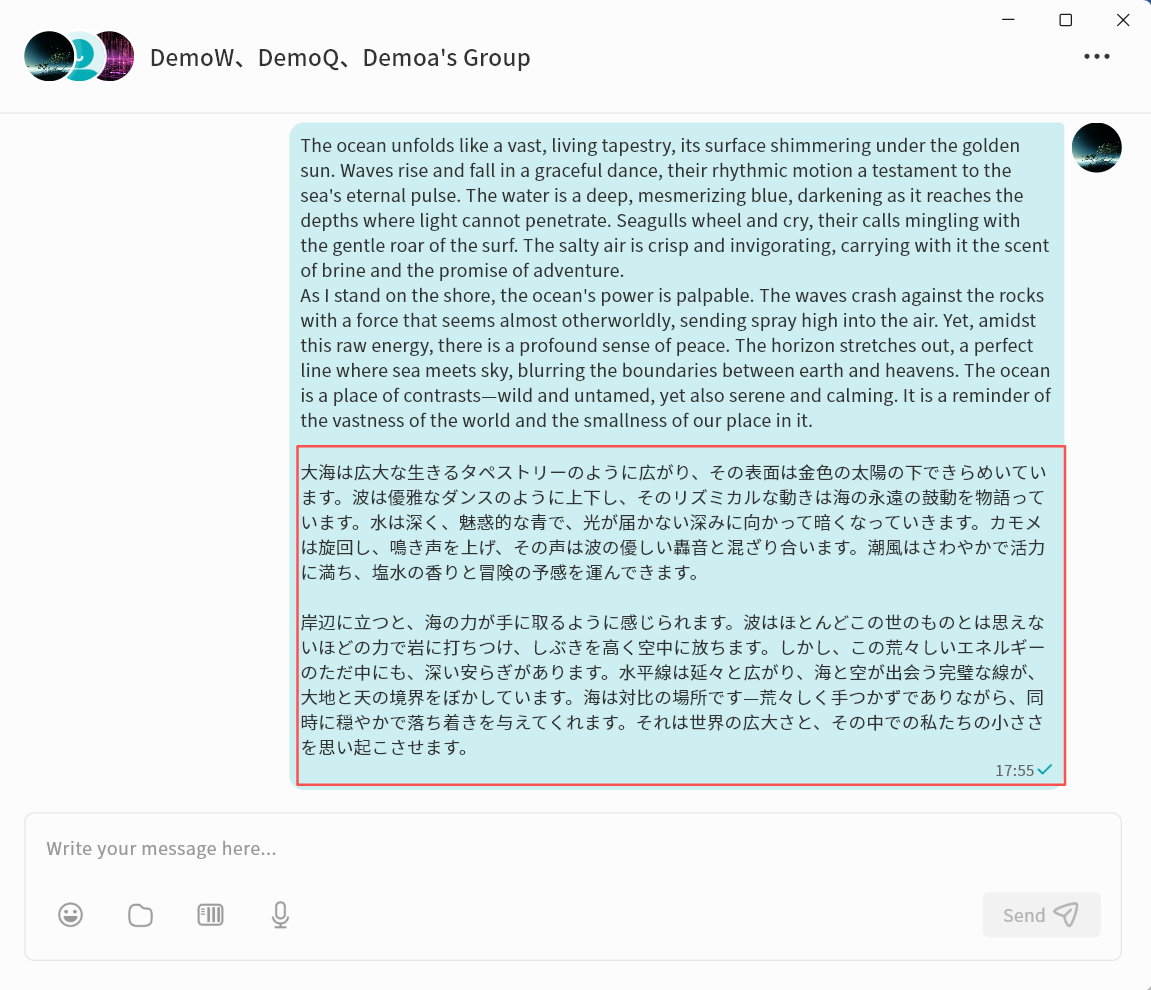
Translation
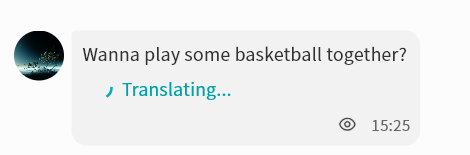
You can translate a selected chat message into other languages (Chinese, English, or Japanese).
- Select a chat message, then right-click Translation Target Language.
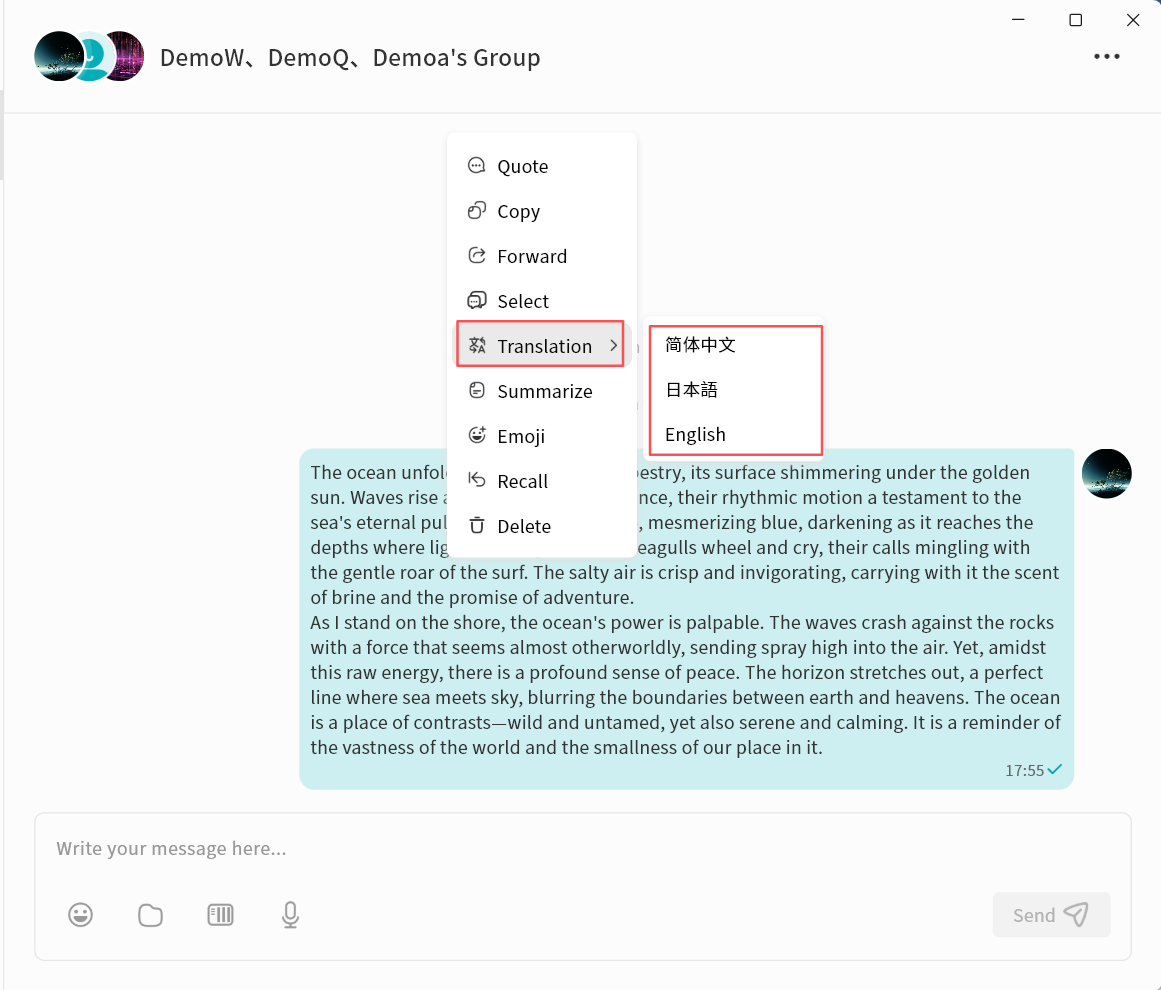
- Wait while the AI Agent processes the translation.
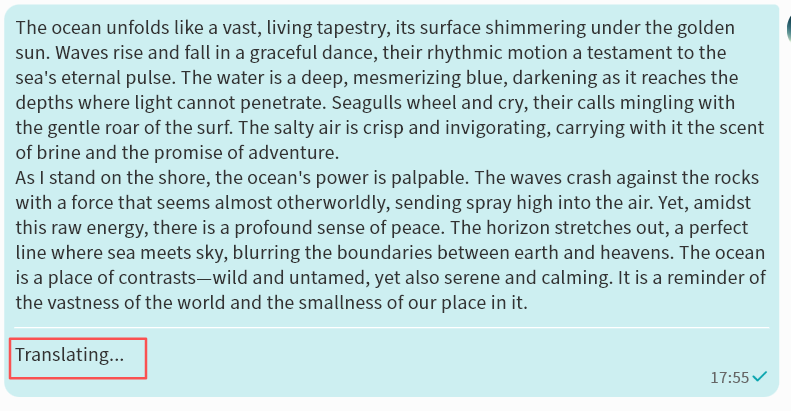
- Once complete, the translated text will be displayed.
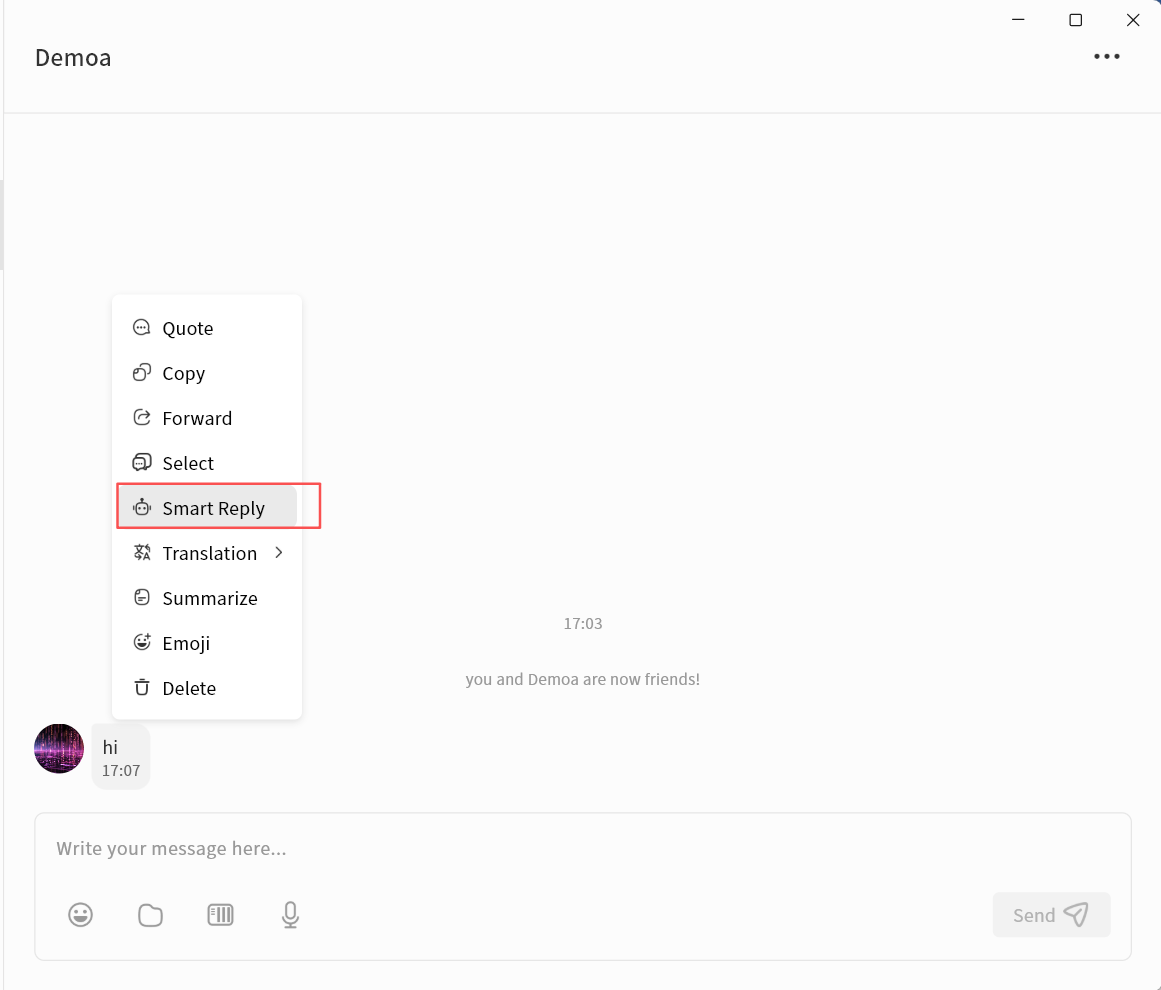
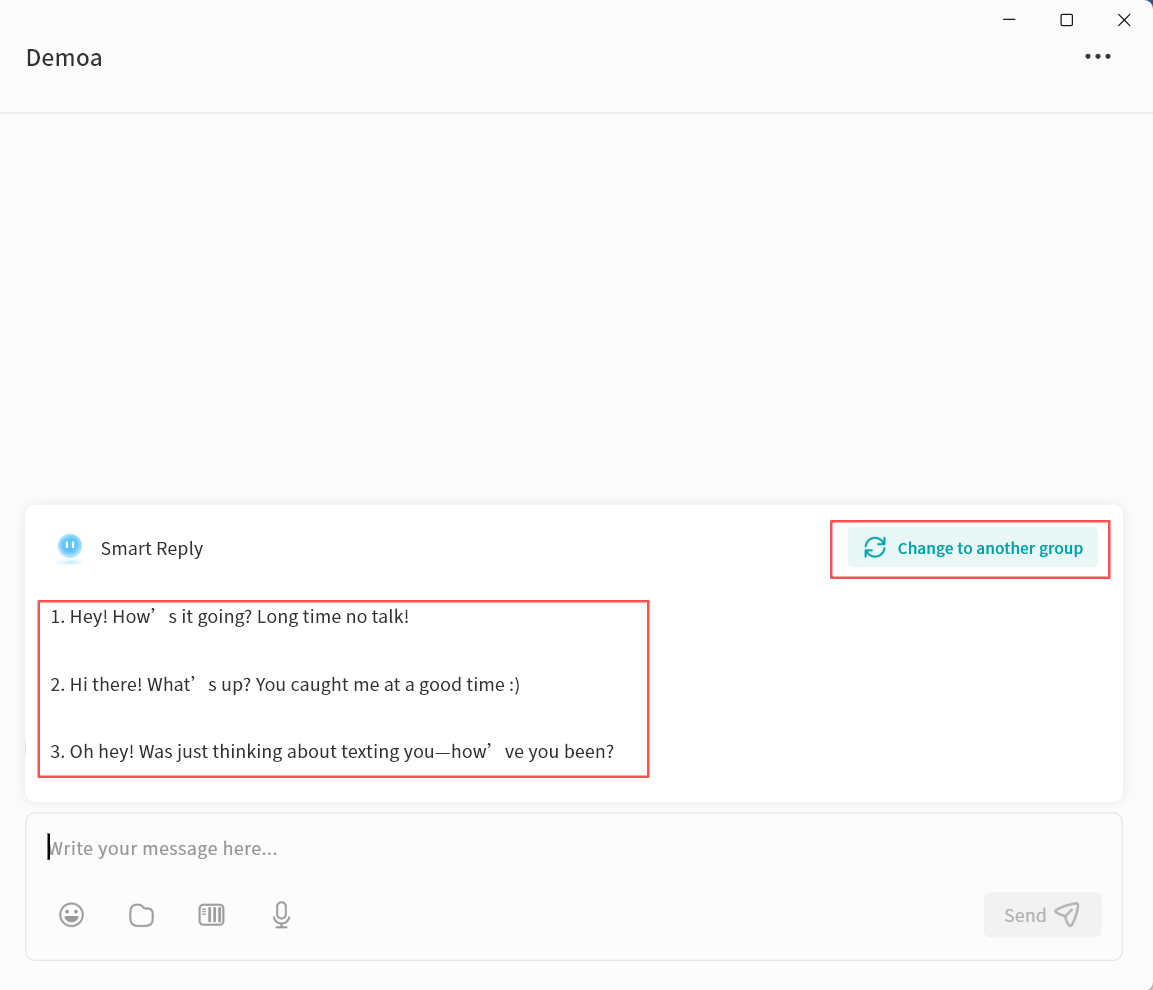
Smart Reply
AI Agent can generate multiple reply suggestions based on a selected message.
- Select a chat message, then right-click Smart Reply.
- Wait while the AI Agent generates suggested replies.
- Once complete, several reply options will be displayed. You can click any suggestion to send it directly, or select Change to another group to request a new set of suggestions.
Summarization
AI Agent can summarize the content of a selected chat message.
- Select a chat message, then right-click Summarize.
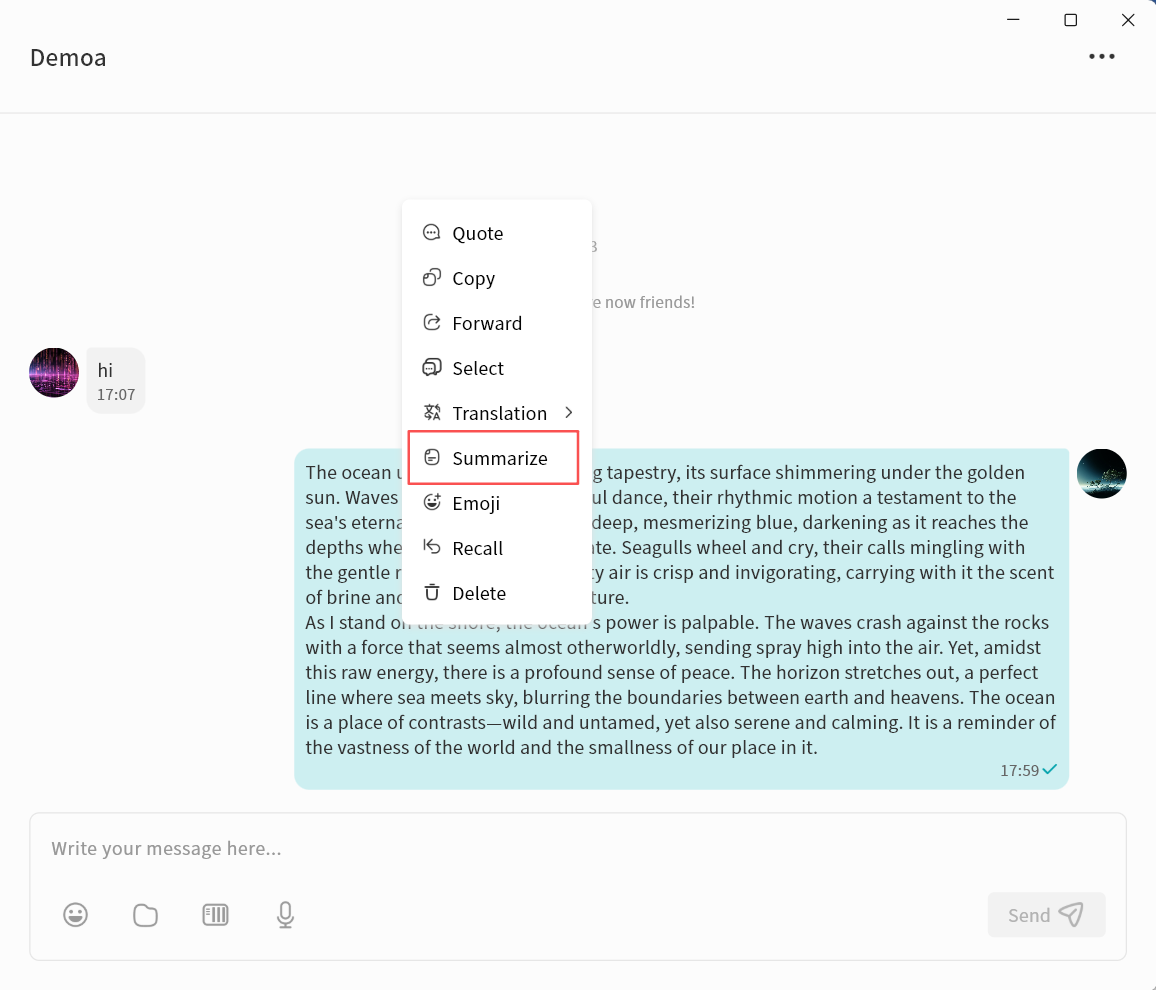
- Wait while the AI Agent generates the summary.
- Once complete, the summarized text will be displayed.

Speech Recognition
AI Agent can transcribe voice messages into text.
- Select a voice message, then right-click To Text.
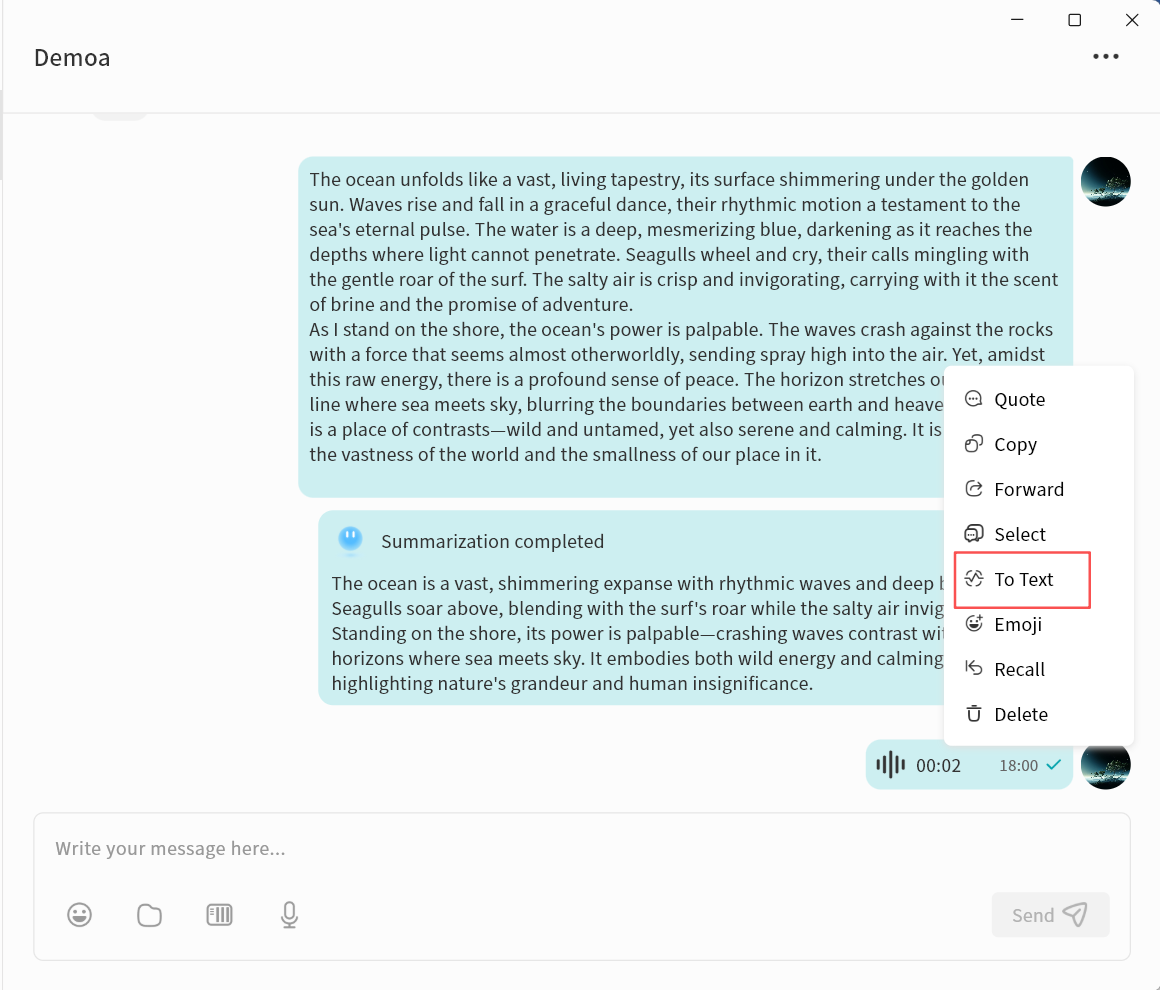
- Wait while the AI Agent processes the audio.
- Once complete, the transcribed text will be displayed.
Auto Translation
In a chat conversation, you can enable the Auto Translation feature. The AI Agent will automatically translate all chat messages into your specified language.
- In the chat window, click the ... menu in the top-right corner Auto Translation.
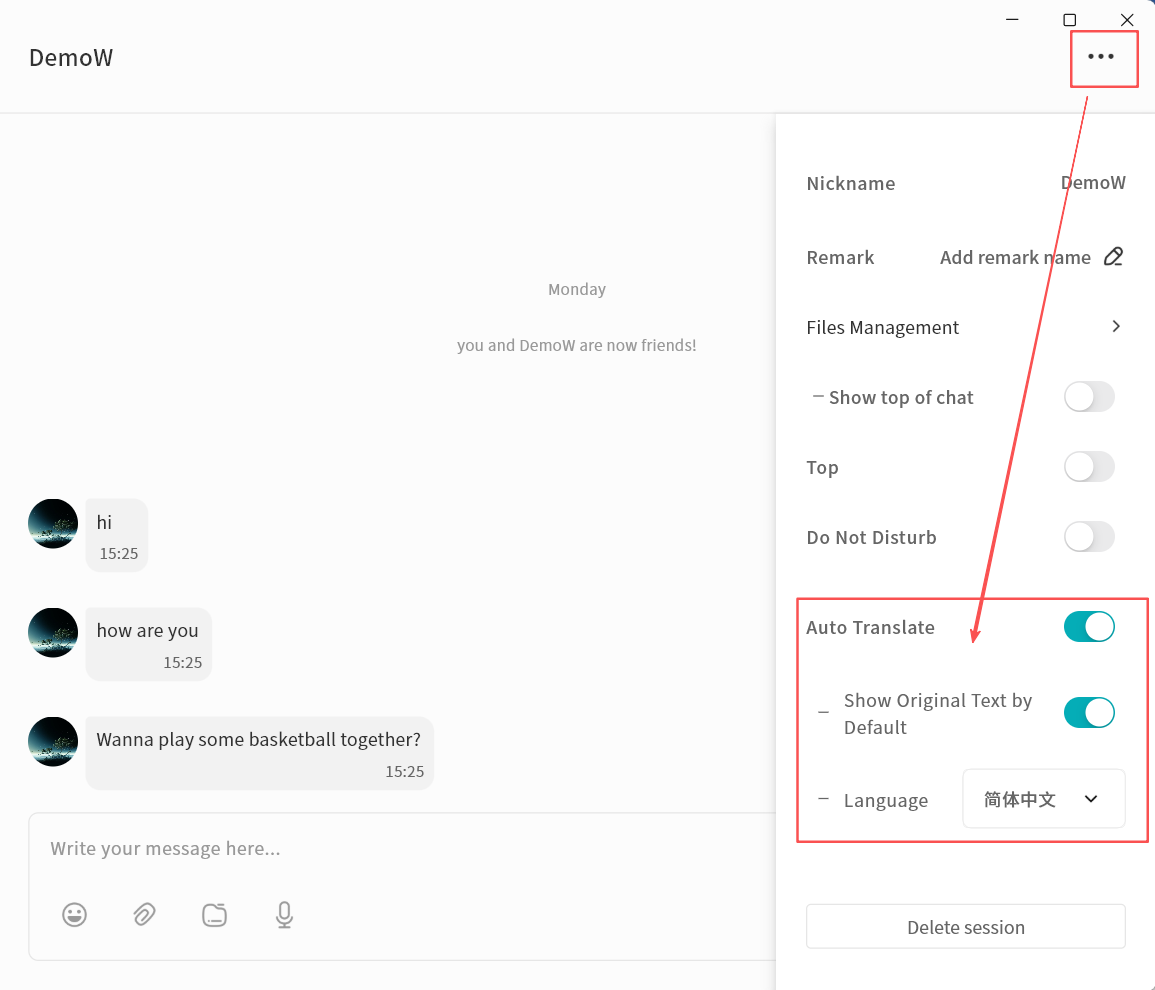
- Enable Auto Translation and configure options:
- Show Original Text: When enabled, both the original and translated messages will be displayed.
- Target Language: Select the language into which messages should be translated.
- The AI Agent will automatically translate incoming messages based on your settings.
- After activation, all chat records will display both the original text and the translation.
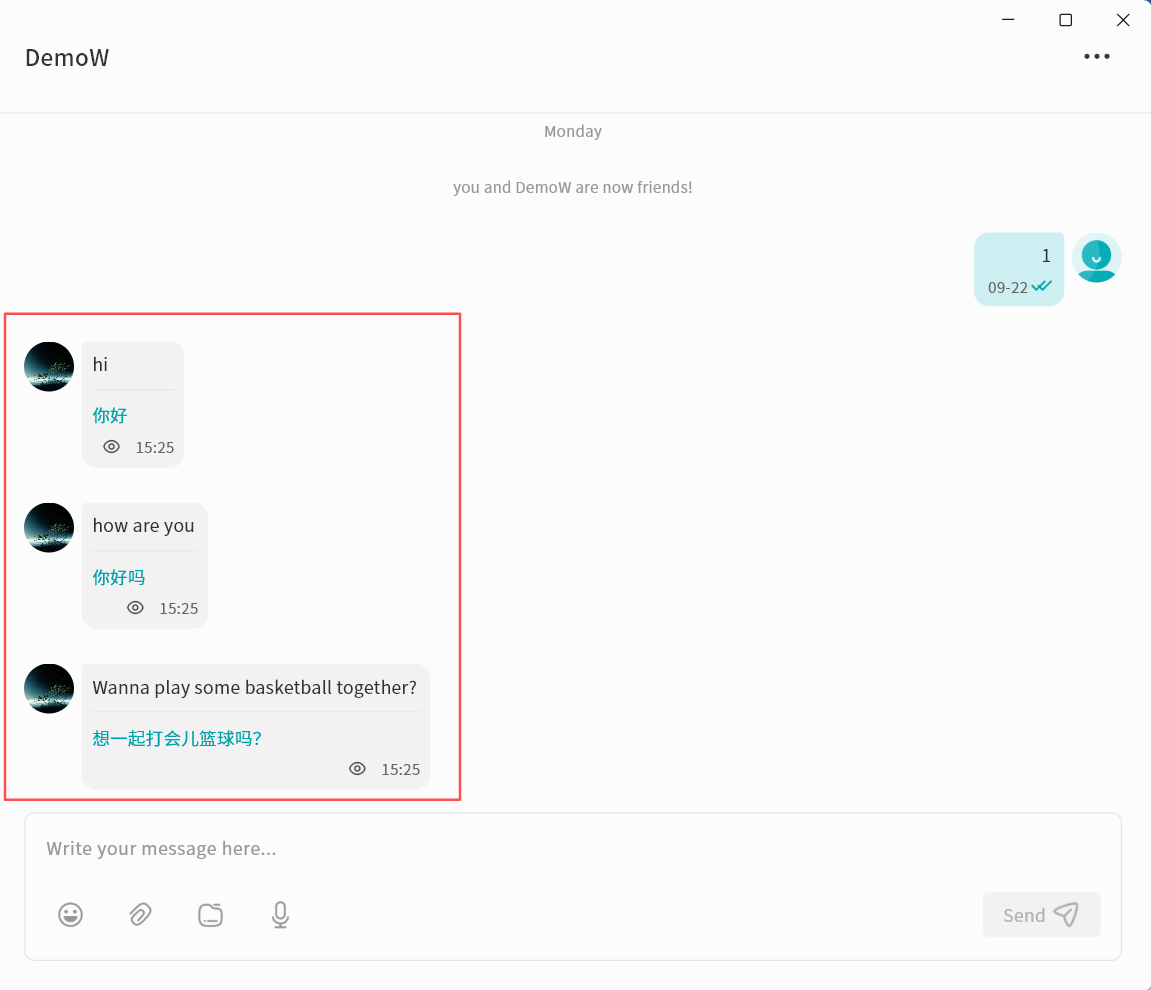
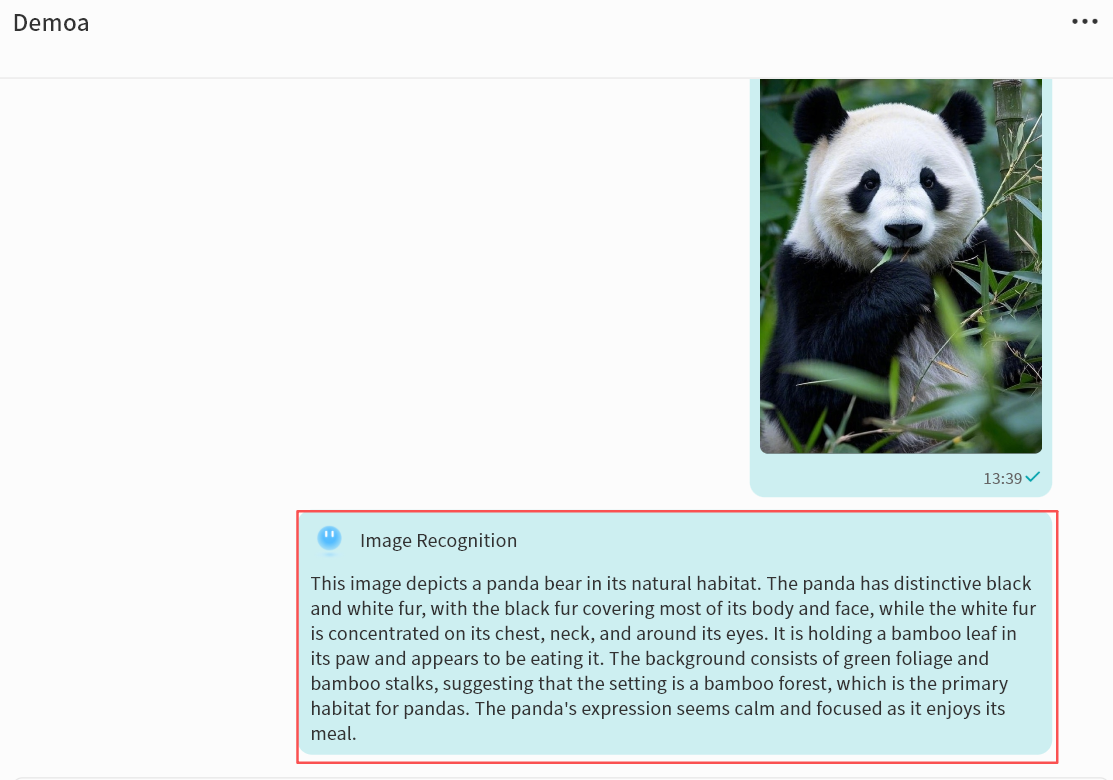
Image Recognition
You can turn on the "Image Recognition" feature within any chat. Once enabled, the AI Agent will automatically analyze the selected image and generate a detailed description.
- In the chat window, , right-click the image and choose Recognize Image.
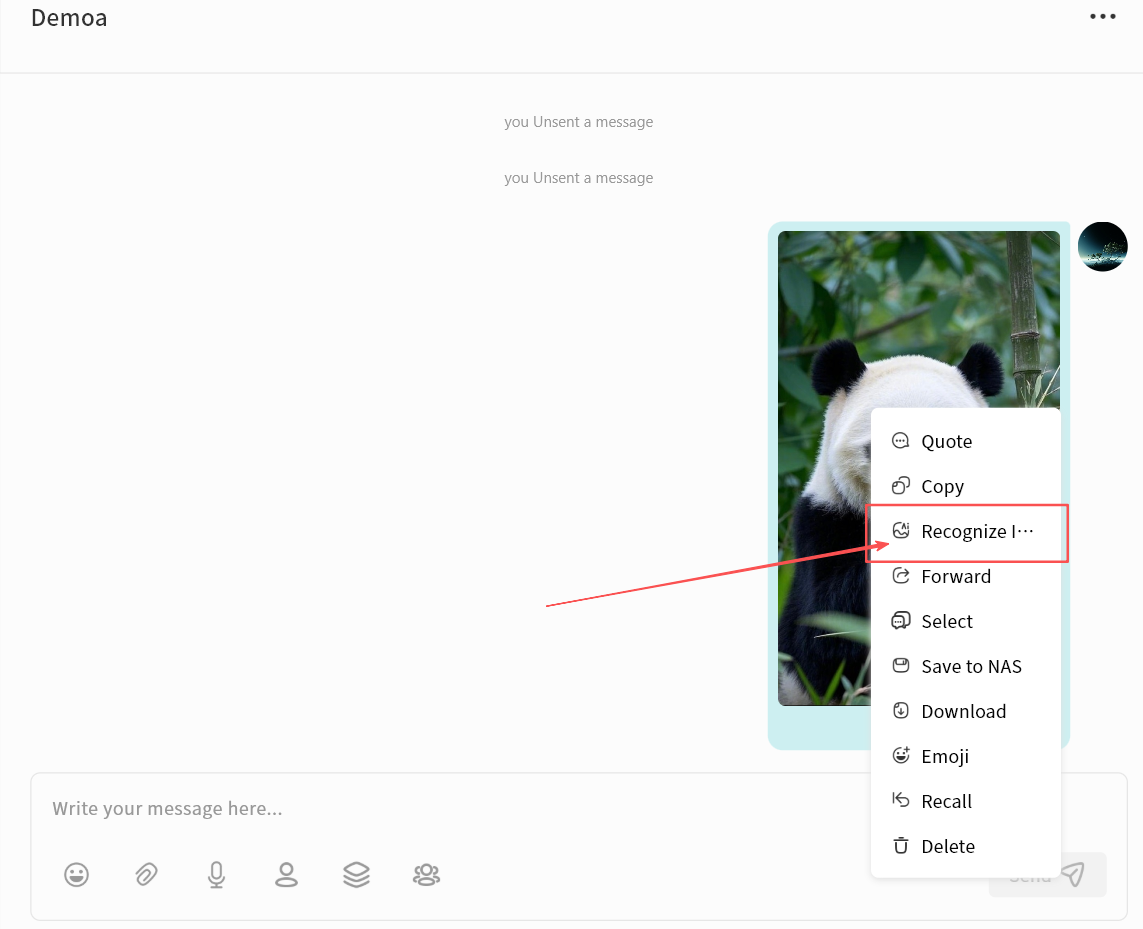
- Wait while the AI Agent processes the translation.

- When finished, you'll see the AI-generated description of the image.